A library for your API that provides:
- Automated Integration Testing
- Automated Live Documentation
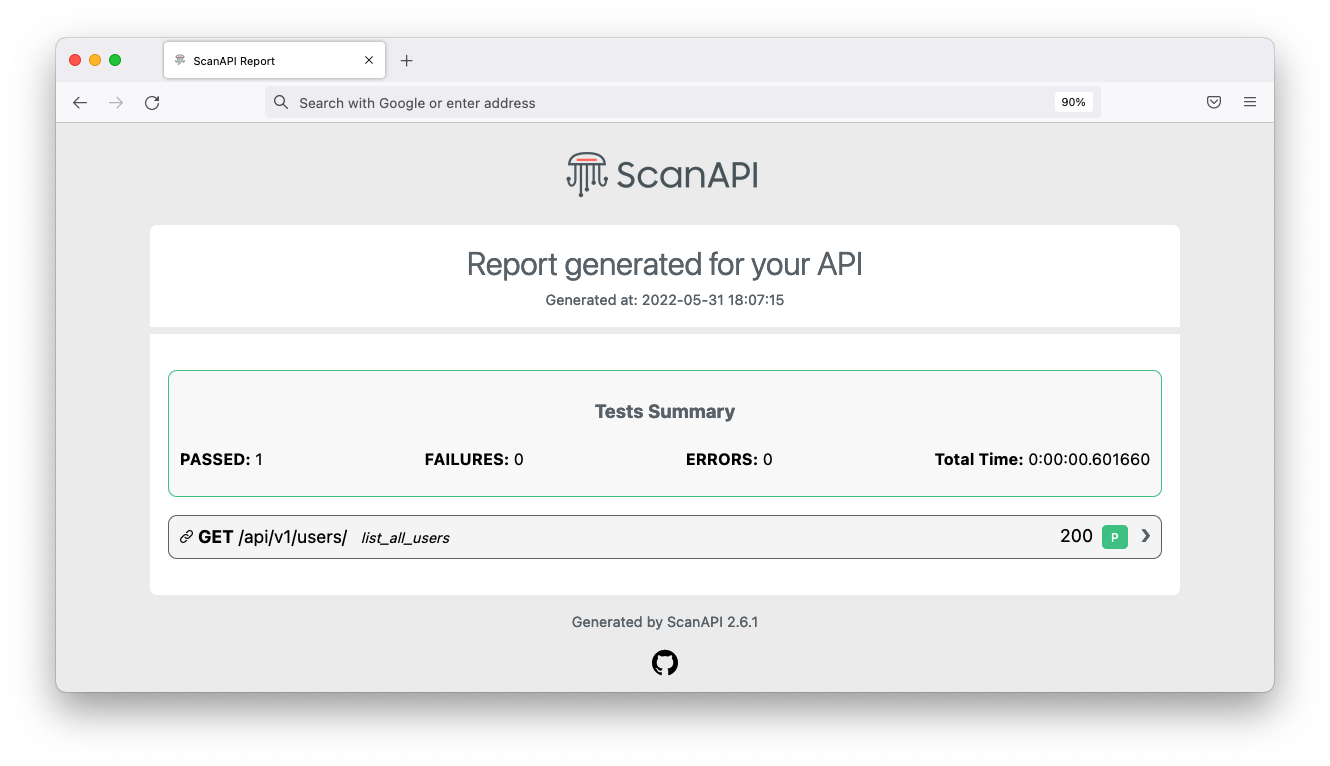
Given an API specification, written in YAML/JSON format, ScanAPI hits the specified endpoints, runs the test cases, and generates a detailed report of this execution - which can also be used as the API documentation itself.
With almost no Python knowledge, the user can define endpoints to be hit, the expected behavior for each response and will receive a full real-time diagnostic report of the API!
$ pip install scanapiYou will need to write the API's specification and save it as a YAML or JSON file. For example:
api:
  endpoints:
    - name: scanapi-demo # The API's name of your API
      path: http://demo.scanapi.dev/api/ # The API's base url
      requests:
        - name: list_all_devs # The name of the first request
          path: devs/ # The path of the first request
          method: get # The HTTP method of the first request
          tests:
            - name: status_code_is_200 # The name of the first test for this request
              assert: ${{ response.status_code == 200 }} # The assertion
And run the scanapi command
$ scanapi <file_path>Then, the lib will hit the specified endpoints and generate a scanapi-report.html file with the
report results.
You can find complete examples at scanapi/examples!
$ scanapi --help
Usage: scanapi [OPTIONS] [SPEC_PATH]

  Automated Testing and Documentation for your REST API. SPEC_PATH argument
  is the API specification file path.

Options:
  -o, --output-path PATH          Report output path.
  -c, --config-path PATH          Configuration file path.
  -t, --template PATH             Custom report template path.
  -ll, --log-level [DEBUG|INFO|WARNING|ERROR|CRITICAL]
                                  Set the debug logging level for the program.
  -h, --help                      Show this message and exit.
| KEY | Description | Type | Scopes |
|---|---|---|---|
| api | It is a reserved word that marks the root of the specification and must not appear in any other place | dict | root |
| assert | The test assertion | dict | tests |
| body | The HTTP body of the request | dict | request |
| endpoints | Represents a list of API endpoints | list | endpoint |
| headers | The HTTP headers | dict | endpoint, request |
| method | The HTTP method of the request (GET, POST, PUT, PATCH or DELETE). If not set, GET will be used | string | request |
| name | An identifier | string | endpoint, request, test |
| params | The HTTP query parameters | dict | endpoint, request |
| path | A part of the URL path that will be concatenated with possible other paths | string | endpoint, request |
| requests | Represents a list of HTTP requests | list | endpoint |
| tests | Represents a list of tests to run against a HTTP response of a request | list | request |
| vars | Key used to define your custom variables to be used along the specification | dict | endpoint, request |
| ${custom var} | Syntax to get the value of the custom variables defined at key vars |
string | request - after vars definition |
| ${ENV_VAR} | Syntax to get the value of an environment variable | string | endpoint, request |
| ${{python_code}} | Syntax to get the value of a Python code expression | string | request |
You can use environment variables in your API spec file with the syntax
${MY_ENV_VAR}For example:
$ export BASE_URL="http://demo.scanapi.dev/api/"api:
endpoints:
- name: scanapi-demo
path: ${BASE_URL}
requests:
- name: health
method: get
path: /health/ScanAPI would call the following http://demo.scanapi.dev/api/health/ then.
Heads up: the variable name must be in upper case.
You can create custom variables using the syntax:
requests:
  - name: my_request
    ...
    vars:
      my_variable_name: my_variable_value
And in the next requests you can access them using the syntax:
${my_variable_name}You can add Python code to the API specification by using the syntax:
${{my_python_code}}For example
body:
  uuid: 5c5af4f2-2265-4e6c-94b4-d681c1648c38
  name: Tarik
  yearsOfExperience: ${{2 + 5}}
  languages:
    - ruby
      go
  newOpportunities: false
What I can use inside the ${{}} syntax?
Any python code that can run inside an eval python command.
A short list of modules will be already available for you. They are all the imports of
this file.
Inside the request scope, you can save the results of the response to use in the next requests. For example:
requests:
  - name: list_all
    method: get
    vars:
      dev_id: ${{response.json()[2]["uuid"]}}
The dev_id variable will receive the uuid value of the 3rd result from the devs_list_all request
If the response is
[
    {
        "uuid": "68af402f-1084-40a4-b9b2-6bb5c2d11559",
        "name": "Anna",
        "yearsOfExperience": 5,
        "languages": [
            "python",
            "c"
        ],
        "newOpportunities": true
    },
    {
        "uuid": "0d1bd106-c585-4d6b-b3a4-d72dedf7190e",
        "name": "Louis",
        "yearsOfExperience": 3,
        "languages": [
            "java"
        ],
        "newOpportunities": true
    },
    {
        "uuid": "129e8cb2-d19c-41ad-9921-cea329bed7f0",
        "name": "Marcus",
        "yearsOfExperience": 4,
        "languages": [
            "c"
        ],
        "newOpportunities": false
    }
]
The dev_id variable will receive the value 129e8cb2-d19c-41ad-9921-cea329bed7f0
With !include, it is possible to build your API specification in multiple files.
For example, these two files
# api.yaml
api:
  endpoints:
    - name: scanapi-demo
      path: ${BASE_URL}
      requests: !include include.yaml
# include.yaml
- name: health
path: /health/would generate:
api:
  endpoints:
    - name: scanapi-demo
      path: ${BASE_URL}
      requests:
        - name: health
path: /health/If you want to configure the ScanAPI with a file, you can create a .scanapi.yaml file in the root
of your project
project_name: DemoAPI # This will be rendered in the Report Title.
spec_path: my_path/api.yaml # API specification file path
output_path: my_path/my-report.html # Report output path.
template: my_template.jinja # Custom report template path.If you want to omit sensitive information in the report, you can configure it in the .scanapi.yaml
file.
report:
  hide-request:
    headers:
      - Authorization
The following configuration will print all the headers values for the Authorization key for all
the request as SENSITIVE_INFORMATION in the report.
In the same way you can omit sensitive information from response.
report:
  hide-response:
    headers:
      - Authorization
Available attributes to hide: headers, body and url.
Collaboration is super welcome! We prepared the CONTRIBUTING.md file to help you in the first steps. Every little bit of help counts! Feel free to create new GitHub issues and interact here.
Let's build it together 🚀


