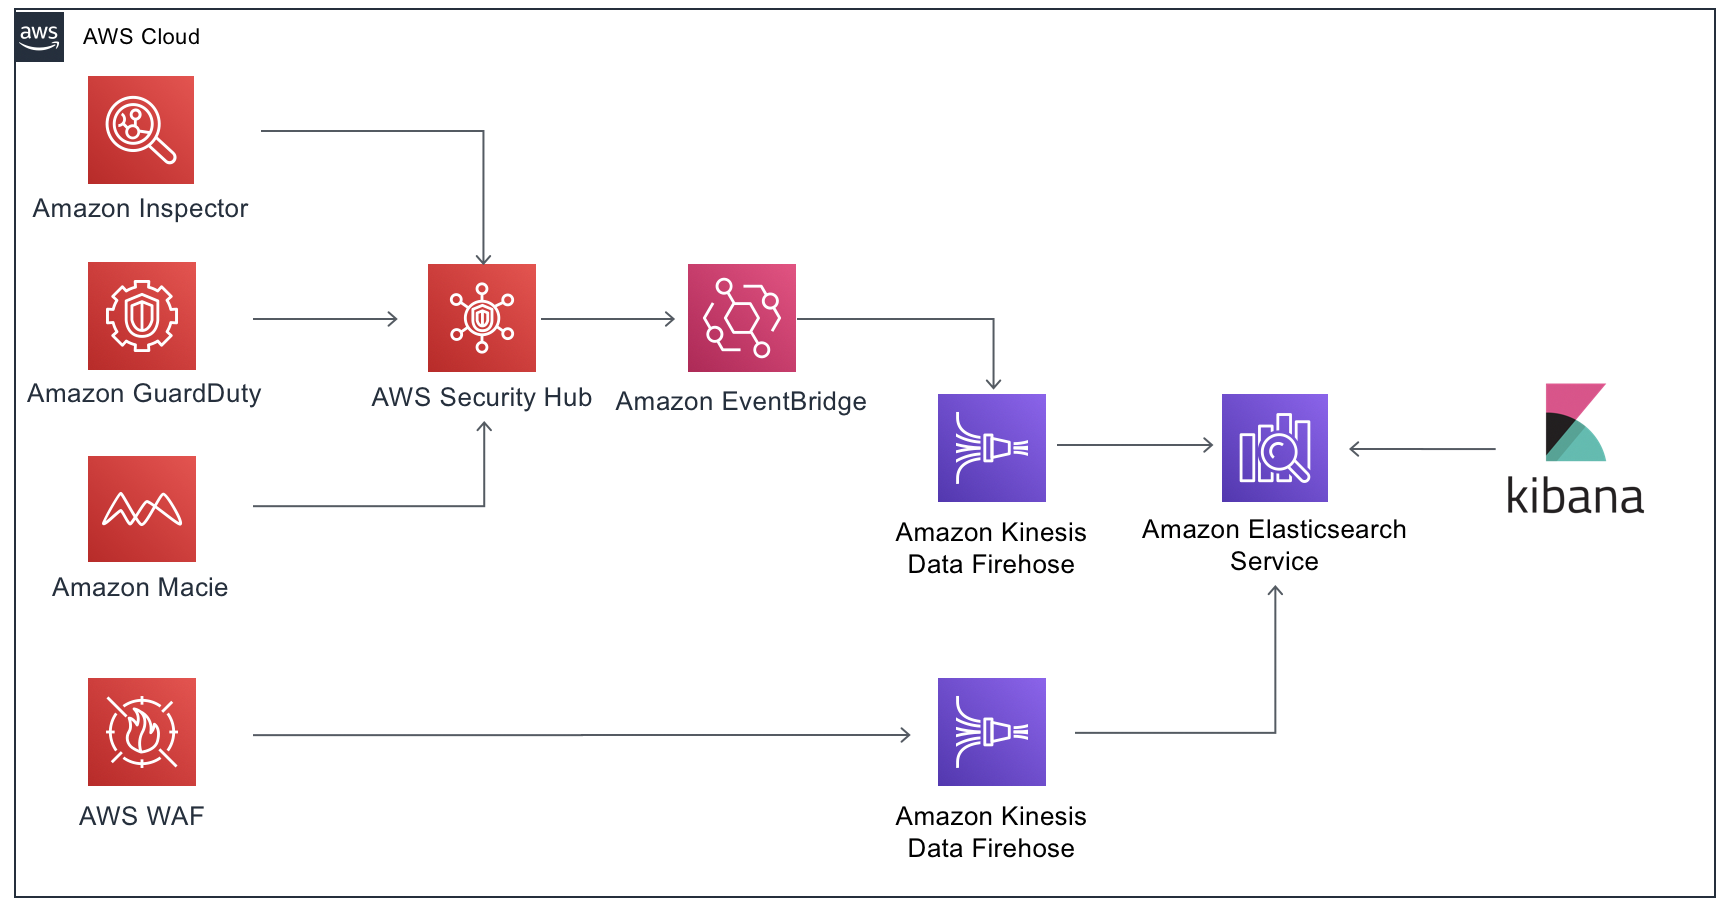
To get started you will need an IAM user with the following access:
- AWS CloudFormation
- Amazon S3
- Amazon ElasticSearch Service
- Amazon Kinesis Data Firehose
- Amazon EventBridge
Note: Tested in the N. Virginia region (us-east-1). But you can test in every region that has support for this services
- Download the deploy/template.yaml file in your computer
- Open the Cloudformation.
- On the Welcome page, click on Create stack button.
- On the Step 1 - Specify template: Choose Upload a template file, click on Choose file button and select the template.yaml.
- On the Step 2 - Specify stack parameters: Enter the DataNodeEBSVolumeSize, ElasticSearchDomainName, MasterUser for the ElasticSearch Opendistro access, MasterUserPass, NodeNumber and NodeType.
- On the Step 3 - Configure stack options: Just click on Next button.
- On the Step 4 - Review: Enable the checkbox I acknowledge that AWS CloudFormation might create IAM resources with custom names., and click on Create Stack button.
- Wait for the stack get into status CREATE_COMPLETE.
- Open ElasticSearch Console.
- In My Domains, click in the domain created (e.g. soc-dashboard).
- Click in Overview tab and click on endpoint on Kibana field.
- In the new browser tab, in Username put the MasterUser parameter defined by you on Cloudformation deployment.
- In Password, put the MasterPass parameter defined by you on Cloudformation deployment.
- In the Kibana front end, go to Security.
- Click in Role Mappings.
- Click in Edit button on all_access.
- In Backend roles, click on Add Backend Role button and insert two roles, on in each line:
- arn:aws:iam::<ACCOUNT_ID>:role/admin
- arn:aws:iam::<ACCOUNT_ID:role/<FIREHOSE_STREAM_IAMROLE> (this is the role used by Kinesis Firehose can deliver to ES Domain)
For Security Hub, you don't need to configure to send the findins to the ES domain, because this is configured with EventBridge Rule created by Cloudformation template. For AWS WAF Logs, you need to enable logging details on AWS Console.
- Open WAF Console.
- In AWS WAF, click in Web ACLs.
- Click in your WAF ACL.
- Click in Logging and metrics tab.
- In Logging, click in Enable logging.
- In Logging details, click in Select a delivery stream.
- Select aws-waf-logs-sec-dashboards and click in Enable logging button.
Now that you have findings coming to your ElasticSearch Domain, you need to create an Index Patterns for each Firehose stream. In this case, you need to create index patterns for sechub_index and waf_index.
- After you are logged into Kibana, go to Stack Management.
- Click in Index Patterns.
- Click in Create index pattern.
- In the Index pattern box, type sechub_index* and click in Next step.
- In the Time Filter field name drop-down, select detail.findings.UpdatedAt and click in Create index pattern.
Repeat this steps for waf_index
- Open the Cloudformation.
- Select the Stack and click on Delete button.
https://docs.aws.amazon.com/securityhub/latest/userguide/securityhub-settingup.html
https://docs.aws.amazon.com/macie/latest/userguide/macie-setting-up.html
https://docs.aws.amazon.com/guardduty/latest/ug/guardduty_settingup.html
https://aws.amazon.com/pt/premiumsupport/knowledge-center/set-up-amazon-inspector/
https://aws.amazon.com/pt/solutions/implementations/aws-waf-security-automations/
This sample code is made available under the MIT-0 license. See the LICENSE file.
