该文档来源于 zhanymkanov/fastapi-best-practices (github.com) 开源项目,这里对作者表示感谢!
以下为使用 ChatGPT 对原文档进行的英汉译,如有错误请指出!
我们在创业公司使用的一些具有主观性的最佳实践和约定列表。
- FastAPI 最佳实践
- 1. 项目结构,一致且可预测
- 2. 大量使用 Pydantic 进行数据验证
- 3. 使用依赖项进行数据验证 vs 数据库
- 4. 链式依赖项
- 5. 解耦和重用依赖项,依赖调用被缓存
- 6. 遵循 REST
- 7. 如果你只有阻塞式 I/O 操作,请不要使你的路由异步
- 8. 从第 0 天开始定制基础模型
- 9. 文档
- 10. 使用 Pydantic 的 BaseSettings 进行配置
- 11. SQLAlchemy: 设置数据库键命名约定
- 12. 迁移 Alembic
- 13. 设置数据库命名约定
- 14. 从第 0 天开始设置异步测试客户端
- 15. BackgroundTasks > asyncio.create_task
- 16. 类型标注很重要
- 17. 分块保存文件
- 18. 小心动态 Pydantic 字段(Pydantic v1)
- 19. SQL-first, Pydantic-second
- 20. 如果用户可以发送公开可用的 URL,请验证主机
- 21. 在自定义 pydantic 验证器中抛出 ValueError,如果 schema 直接面向客户端
- 22. FastAPI 将 Pydantic 对象转换为 dict,再转换为 Pydantic 对象,然后转换为 JSON
- 23. 如果你必须使用同步 SDK,请在线程池中运行它
- 24. 使用 linters (black, ruff)
- 额外部分
在过去的 1.5 年的生产中,我们做出了一些好的和不好的决策,这些决策极大地影响了我们的开发者体验,其中一些是值得分享的。
有很多种方法来组织项目,但最好的结构是一致的、直接的,没有惊喜的结构。
- 如果看项目结构没有给你一个关于项目是关于什么的想法,那么结构可能不清晰。
- 如果你必须打开包来理解哪些模块位于其中,那么你的结构是不清晰的。
- 如果文件的频率和位置感觉随机,那么你的项目结构是糟糕的。
- 如果看模块的位置和它的名字没有给你一个关于里面内容的想法,那么你的结构非常糟糕。
尽管由@tiangolo提出的项目结构,我们通过类型(例如 api, crud, models, schemas)来分隔文件对于微服务或范围较小的项目是好的,但我们无法将其适用于我们的包含很多领域和模块的单体应用。我发现更具可扩展性和可演化性的结构是受到 Netflix 的 Dispatch 启发的,并做了一些小的修改。
fastapi-project
├── alembic/
├── src
│   ├── auth
│   │   ├── router.py
│   │   ├── schemas.py  # pydantic models
│   │   ├── models.py  # db models
│   │   ├── dependencies.py
│   │   ├── config.py  # local configs
│   │   ├── constants.py
│   │   ├── exceptions.py
│   │   ├── service.py
│   │   └── utils.py
│   ├── aws
│   │   ├── client.py  # client model for external service communication
│   │   ├── schemas.py
│   │   ├── config.py
│   │   ├── constants.py
│   │   ├── exceptions.py
│   │   └── utils.py
│   └── posts
│   │   ├── router.py
│   │   ├── schemas.py
│   │   ├── models.py
│   │   ├── dependencies.py
│   │   ├── constants.py
│   │   ├── exceptions.py
│   │   ├── service.py
│   │   └── utils.py
│   ├── config.py  # global configs
│   ├── models.py  # global models
│   ├── exceptions.py  # global exceptions
│   ├── pagination.py  # global module e.g. pagination
│   ├── database.py  # db connection related stuff
│   └── main.py
├── tests/
│   ├── auth
│   ├── aws
│   └── posts
├── templates/
│   └── index.html
├── requirements
│   ├── base.txt
│   ├── dev.txt
│   └── prod.txt
├── .env
├── .gitignore
├── logging.ini
└── alembic.ini
- 将所有域目录存储在 src 文件夹内
src/- 应用的最高级别,包含通用模型、配置和常量等。src/main.py- 项目的根,初始化 FastAPI 应用
- 每个包有自己的路由器、模式、模型等。
router.py- 每个模块的核心,包含所有端点schemas.py- 用于 pydantic 模型models.py- 用于数据库模型service.py- 模块特定的业务逻辑dependencies.py- 路由依赖项constants.py- 模块特定的常量和错误代码config.py- 例如环境变量utils.py- 非业务逻辑函数,例如响应规范化、数据丰富等。exceptions.py- 模块特定的异常,例如PostNotFound,InvalidUserData
- 当包需要来自其他包的服务或依赖项或常量时 - 使用明确的模块名导入它们
from src.auth import constants as auth_constants
from src.notifications import service as notification_service
from src.posts.constants import ErrorCode as PostsErrorCode # in case we have Standard ErrorCode in constants module of each packagePydantic 拥有丰富的功能集,用于验证和转换数据。
除了常规功能,如必填与非必填字段、默认值外,Pydantic 还内置了全面的数据处理工具,如正则表达式、枚举限制选项、长度验证、电子邮件验证等。
from enum import Enum
from pydantic import AnyUrl, BaseModel, EmailStr, Field, constr

class MusicBand(str, Enum):
   AEROSMITH = "AEROSMITH"
   QUEEN = "QUEEN"
   ACDC = "AC/DC"


class UserBase(BaseModel):
    first_name: str = Field(min_length=1, max_length=128)
    username: constr(regex="^[A-Za-z0-9-_]+$", to_lower=True, strip_whitespace=True)
    email: EmailStr
    age: int = Field(ge=18, default=None)  # must be greater or equal to 18
    favorite_band: MusicBand = None  # only "AEROSMITH", "QUEEN", "AC/DC" values are allowed to be inputted
website: AnyUrl = NonePydantic 只能验证来自客户端输入的值。
使用依赖项来验证数据是否符合数据库约束,如电子邮件已存在、用户未找到等。
# dependencies.py
async def valid_post_id(post_id: UUID4) -> Mapping:
    post = await service.get_by_id(post_id)
    if not post:
        raise PostNotFound()

    return post


# router.py
@router.get("/posts/{post_id}", response_model=PostResponse)
async def get_post_by_id(post: Mapping = Depends(valid_post_id)):
    return post


@router.put("/posts/{post_id}", response_model=PostResponse)
async def update_post(
    update_data: PostUpdate,
    post: Mapping = Depends(valid_post_id),
):
    updated_post: Mapping = await service.update(id=post["id"], data=update_data)
    return updated_post


@router.get("/posts/{post_id}/reviews", response_model=list[ReviewsResponse])
async def get_post_reviews(post: Mapping = Depends(valid_post_id)):
    post_reviews: list[Mapping] = await reviews_service.get_by_post_id(post["id"])
    return post_reviews
如果我们没有将数据验证放入依赖项中,我们将不得不为每个端点添加 post_id 验证,并为它们编写相同的测试。
依赖项可以使用其他依赖项,避免对类似逻辑的代码重复。
# dependencies.py
from fastapi.security import OAuth2PasswordBearer
from jose import JWTError, jwt

async def valid_post_id(post_id: UUID4) -> Mapping:
    post = await service.get_by_id(post_id)
    if not post:
        raise PostNotFound()

    return post


async def parse_jwt_data(
    token: str = Depends(OAuth2PasswordBearer(tokenUrl="/auth/token"))
) -> dict:
    try:
        payload = jwt.decode(token, "JWT_SECRET", algorithms=["HS256"])
    except JWTError:
        raise InvalidCredentials()

    return {"user_id": payload["id"]}


async def valid_owned_post(
    post: Mapping = Depends(valid_post_id),
    token_data: dict = Depends(parse_jwt_data),
) -> Mapping:
    if post["creator_id"] != token_data["user_id"]:
        raise UserNotOwner()

    return post

# router.py
@router.get("/users/{user_id}/posts/{post_id}", response_model=PostResponse)
async def get_user_post(post: Mapping = Depends(valid_owned_post)):
return post依赖项可以被多次重用,它们不会被重新计算 - FastAPI 默认在请求的范围内缓存依赖项的结果,即如果我们有一个调用服务 get_post_by_id 的依赖项,我们不会每次调用这个依赖项时都访问数据库 - 只有第一次函数调用。
知道这一点,我们可以轻松地将依赖项解耦为多个较小的函数,这些函数在更小的领域上操作,并且在其他路由中更容易重用。例如,在下面的代码中,我们使用了 parse_jwt_data 三次:
valid_owned_postvalid_active_creatorget_user_post
但 parse_jwt_data 只在第一次调用时被调用。
# dependencies.py
from fastapi import BackgroundTasks
from fastapi.security import OAuth2PasswordBearer
from jose import JWTError, jwt

async def valid_post_id(post_id: UUID4) -> Mapping:
    post = await service.get_by_id(post_id)
    if not post:
        raise PostNotFound()

    return post


async def parse_jwt_data(
    token: str = Depends(OAuth2PasswordBearer(tokenUrl="/auth/token"))
) -> dict:
    try:
        payload = jwt.decode(token, "JWT_SECRET", algorithms=["HS256"])
    except JWTError:
        raise InvalidCredentials()

    return {"user_id": payload["id"]}


async def valid_owned_post(
    post: Mapping = Depends(valid_post_id),
    token_data: dict = Depends(parse_jwt_data),
) -> Mapping:
    if post["creator_id"] != token_data["user_id"]:
        raise UserNotOwner()

    return post


async def valid_active_creator(
    token_data: dict = Depends(parse_jwt_data),
):
    user = await users_service.get_by_id(token_data["user_id"])
    if not user["is_active"]:
        raise UserIsBanned()

    if not user["is_creator"]:
       raise UserNotCreator()

    return user


# router.py
@router.get("/users/{user_id}/posts/{post_id}", response_model=PostResponse)
async def get_user_post(
    worker: BackgroundTasks,
    post: Mapping = Depends(valid_owned_post),
    user: Mapping = Depends(valid_active_creator),
):
    """Get post that belong the active user."""
    worker.add_task(notifications_service.send_email, user["id"])
return post开发符合 RESTful API 标准的 API 使得在类似这样的路由中重用依赖项变得更加容易:
GET /courses/:course_idGET /courses/:course_id/chapters/:chapter_id/lessonsGET /chapters/:chapter_id
唯一的注意点是在路径中使用相同的变量名:
- 如果你有两个端点
GET /profiles/:profile_id和GET /creators/:creator_id都验证给定的profile_id是否存在,但GET /creators/:creator_id还检查了 profile 是否为 creator,那么最好将creator_id路径变量重命名为profile_id并链式这两个依赖项。
# src.profiles.dependencies
async def valid_profile_id(profile_id: UUID4) -> Mapping:
    profile = await service.get_by_id(profile_id)
    if not profile:
        raise ProfileNotFound()

    return profile

# src.creators.dependencies
async def valid_creator_id(profile: Mapping = Depends(valid_profile_id)) -> Mapping:
    if not profile["is_creator"]:
       raise ProfileNotCreator()

    return profile

# src.profiles.router.py
@router.get("/profiles/{profile_id}", response_model=ProfileResponse)
async def get_user_profile_by_id(profile: Mapping = Depends(valid_profile_id)):
    """Get profile by id."""
    return profile

# src.creators.router.py
@router.get("/creators/{profile_id}", response_model=ProfileResponse)
async def get_user_profile_by_id(
     creator_profile: Mapping = Depends(valid_creator_id)
):
    """Get creator's profile by id."""
    return creator_profile
使用 /me 端点来获取用户资源(例如 GET /profiles/me, GET /users/me/posts)
- 不需要验证用户 id 是否存在 - 它已经通过认证方法检查过了
- 不需要检查用户 id 是否属于请求者
FastAPI 能够有效处理异步和同步 I/O 操作。
- FastAPI 在 线程池 中运行
sync路由,阻塞式 I/O 操作不会阻止 事件循环 执行任务。 - 否则,如果路由定义为
async,则会通过await常规调用,FastAPI 信任你仅执行非阻塞 I/O 操作。
如果你违背了这种信任,在异步路由中执行阻塞操作,事件循环将无法运行下一个任务,直到阻塞操作完成。
import asyncio
import time

@router.get("/terrible-ping")
async def terrible_catastrophic_ping():
    time.sleep(10) # I/O blocking operation for 10 seconds
    pong = service.get_pong()  # I/O blocking operation to get pong from DB

    return {"pong": pong}

@router.get("/good-ping")
def good_ping():
    time.sleep(10) # I/O blocking operation for 10 seconds, but in another thread
    pong = service.get_pong()  # I/O blocking operation to get pong from DB, but in another thread

    return {"pong": pong}

@router.get("/perfect-ping")
async def perfect_ping():
    await asyncio.sleep(10) # non-blocking I/O operation
    pong = await service.async_get_pong()  # non-blocking I/O db call

    return {"pong": pong}
当我们调用时发生的情况:
GET /terrible-ping- FastAPI 服务器接收到请求并开始处理它
- 服务器的事件循环和队列中的所有任务都将等待直到
time.sleep()完成- 服务器认为
time.sleep()不是 I/O 任务,所以它等待直到它完成 - 服务器在等待期间不会接受任何新请求
- 服务器认为
- 然后,事件循环和队列中的所有任务都将等待直到
service.get_pong完成- 服务器认为
service.get_pong()不是 I/O 任务,所以它等待直到它完成 - 服务器在等待期间不会接受任何新请求
- 服务器认为
- 服务器返回响应。
- 响应后,服务器开始接受新请求
GET /good-ping- FastAPI 服务器接收到请求并开始处理它
- FastAPI 将整个路由
good_ping发送到线程池,其中一个工作线程将运行该函数 - 当
good_ping正在执行时,事件循环从队列中选择下一个任务并处理它们(例如接受新请求,调用数据库)- 独立于主线程(即我们的 FastAPI 应用),工作线程将等待
time.sleep完成,然后等待service.get_pong完成 - 同步操作仅阻塞侧线程,而不是主线程。
- 独立于主线程(即我们的 FastAPI 应用),工作线程将等待
- 当
good_ping完成其工作时,服务器将响应返回给客户端
GET /perfect-ping- FastAPI 服务器接收到请求并开始处理它
- FastAPI 等待
asyncio.sleep(10) - 事件循环从队列中选择下一个任务并处理它们(例如接受新请求,调用数据库)
- 当
asyncio.sleep(10)完成时,服务器执行下一行并等待service.async_get_pong - 事件循环从队列中选择下一个任务并处理它们(例如接受新请求,调用数据库)
- 当
service.async_get_pong完成时,服务器返回响应给客户端。
第二个注意点是,那些非阻塞的 awaitable 操作或发送到线程池的操作必须是 I/O 密集型任务(例如,打开文件、数据库调用、外部 API 调用)。
- 等待 CPU 密集型任务(例如,大量计算、数据处理、视频转码)是没有意义的,因为 CPU 必须工作以完成任务,而 I/O 操作是外部的,服务器在等待这些操作完成时无事可做,因此可以处理下一个任务。
- 在其他线程中运行 CPU 密集型任务也不是有效的,因为 GIL(全局解释器锁)。简而言之,GIL 只允许一次一个线程工作,这使得它对 CPU 任务来说是无用的。
- 如果你想优化 CPU 密集型任务,你应该将它们发送到另一个进程中的工作器。
相关的 StackOverflow 用户困惑问题
- https://stackoverflow.com/questions/62976648/architecture-flask-vs-fastapi/70309597#70309597
- 这里你也可以查看 my answer
- https://stackoverflow.com/questions/65342833/fastapi-uploadfile-is-slow-compared-to-flask
- https://stackoverflow.com/questions/71516140/fastapi-runs-api-calls-in-serial-instead-of-parallel-fashion
拥有一个可控的全局基础模型允许我们自定义应用中的所有模型。
例如,我们可以有一个标准的 datetime 格式或为基础模型的所有子类添加超级方法。
from datetime import datetime
from typing import Any
from zoneinfo import ZoneInfo

from fastapi.encoders import jsonable_encoder
from pydantic import BaseModel, ConfigDict, model_validator


def convert_datetime_to_gmt(dt: datetime) -> str:
    if not dt.tzinfo:
        dt = dt.replace(tzinfo=ZoneInfo("UTC"))

    return dt.strftime("%Y-%m-%dT%H:%M:%S%z")


class CustomModel(BaseModel):
    model_config = ConfigDict(
        json_encoders={datetime: convert_datetime_to_gmt},
        populate_by_name=True,
    )

    @model_validator(mode="before")
    @classmethod
    def set_null_microseconds(cls, data: dict[str, Any]) -> dict[str, Any]:
        datetime_fields = {
            k: v.replace(microsecond=0)
            for k, v in data.items()
            if isinstance(k, datetime)
        }

        return {**data, **datetime_fields}

    def serializable_dict(self, **kwargs):
        """Return a dict which contains only serializable fields."""
        default_dict = self.model_dump()

return jsonable_encoder(default_dict)- 在上面的示例中,我们决定创建一个全局基础模型:
- 将所有日期格式中的微秒数设为 0
- 将所有 datetime 字段序列化为带有明确时区的标准格式
- 除非你的 API 是公开的,默认情况下隐藏文档。仅在选定的环境中显式显示。
from fastapi import FastAPI
from starlette.config import Config

config = Config(".env")  # parse .env file for env variables

ENVIRONMENT = config("ENVIRONMENT")  # get current env name
SHOW_DOCS_ENVIRONMENT = ("local", "staging")  # explicit list of allowed envs

app_configs = {"title": "My Cool API"}
if ENVIRONMENT not in SHOW_DOCS_ENVIRONMENT:
   app_configs["openapi_url"] = None  # set url for docs as null

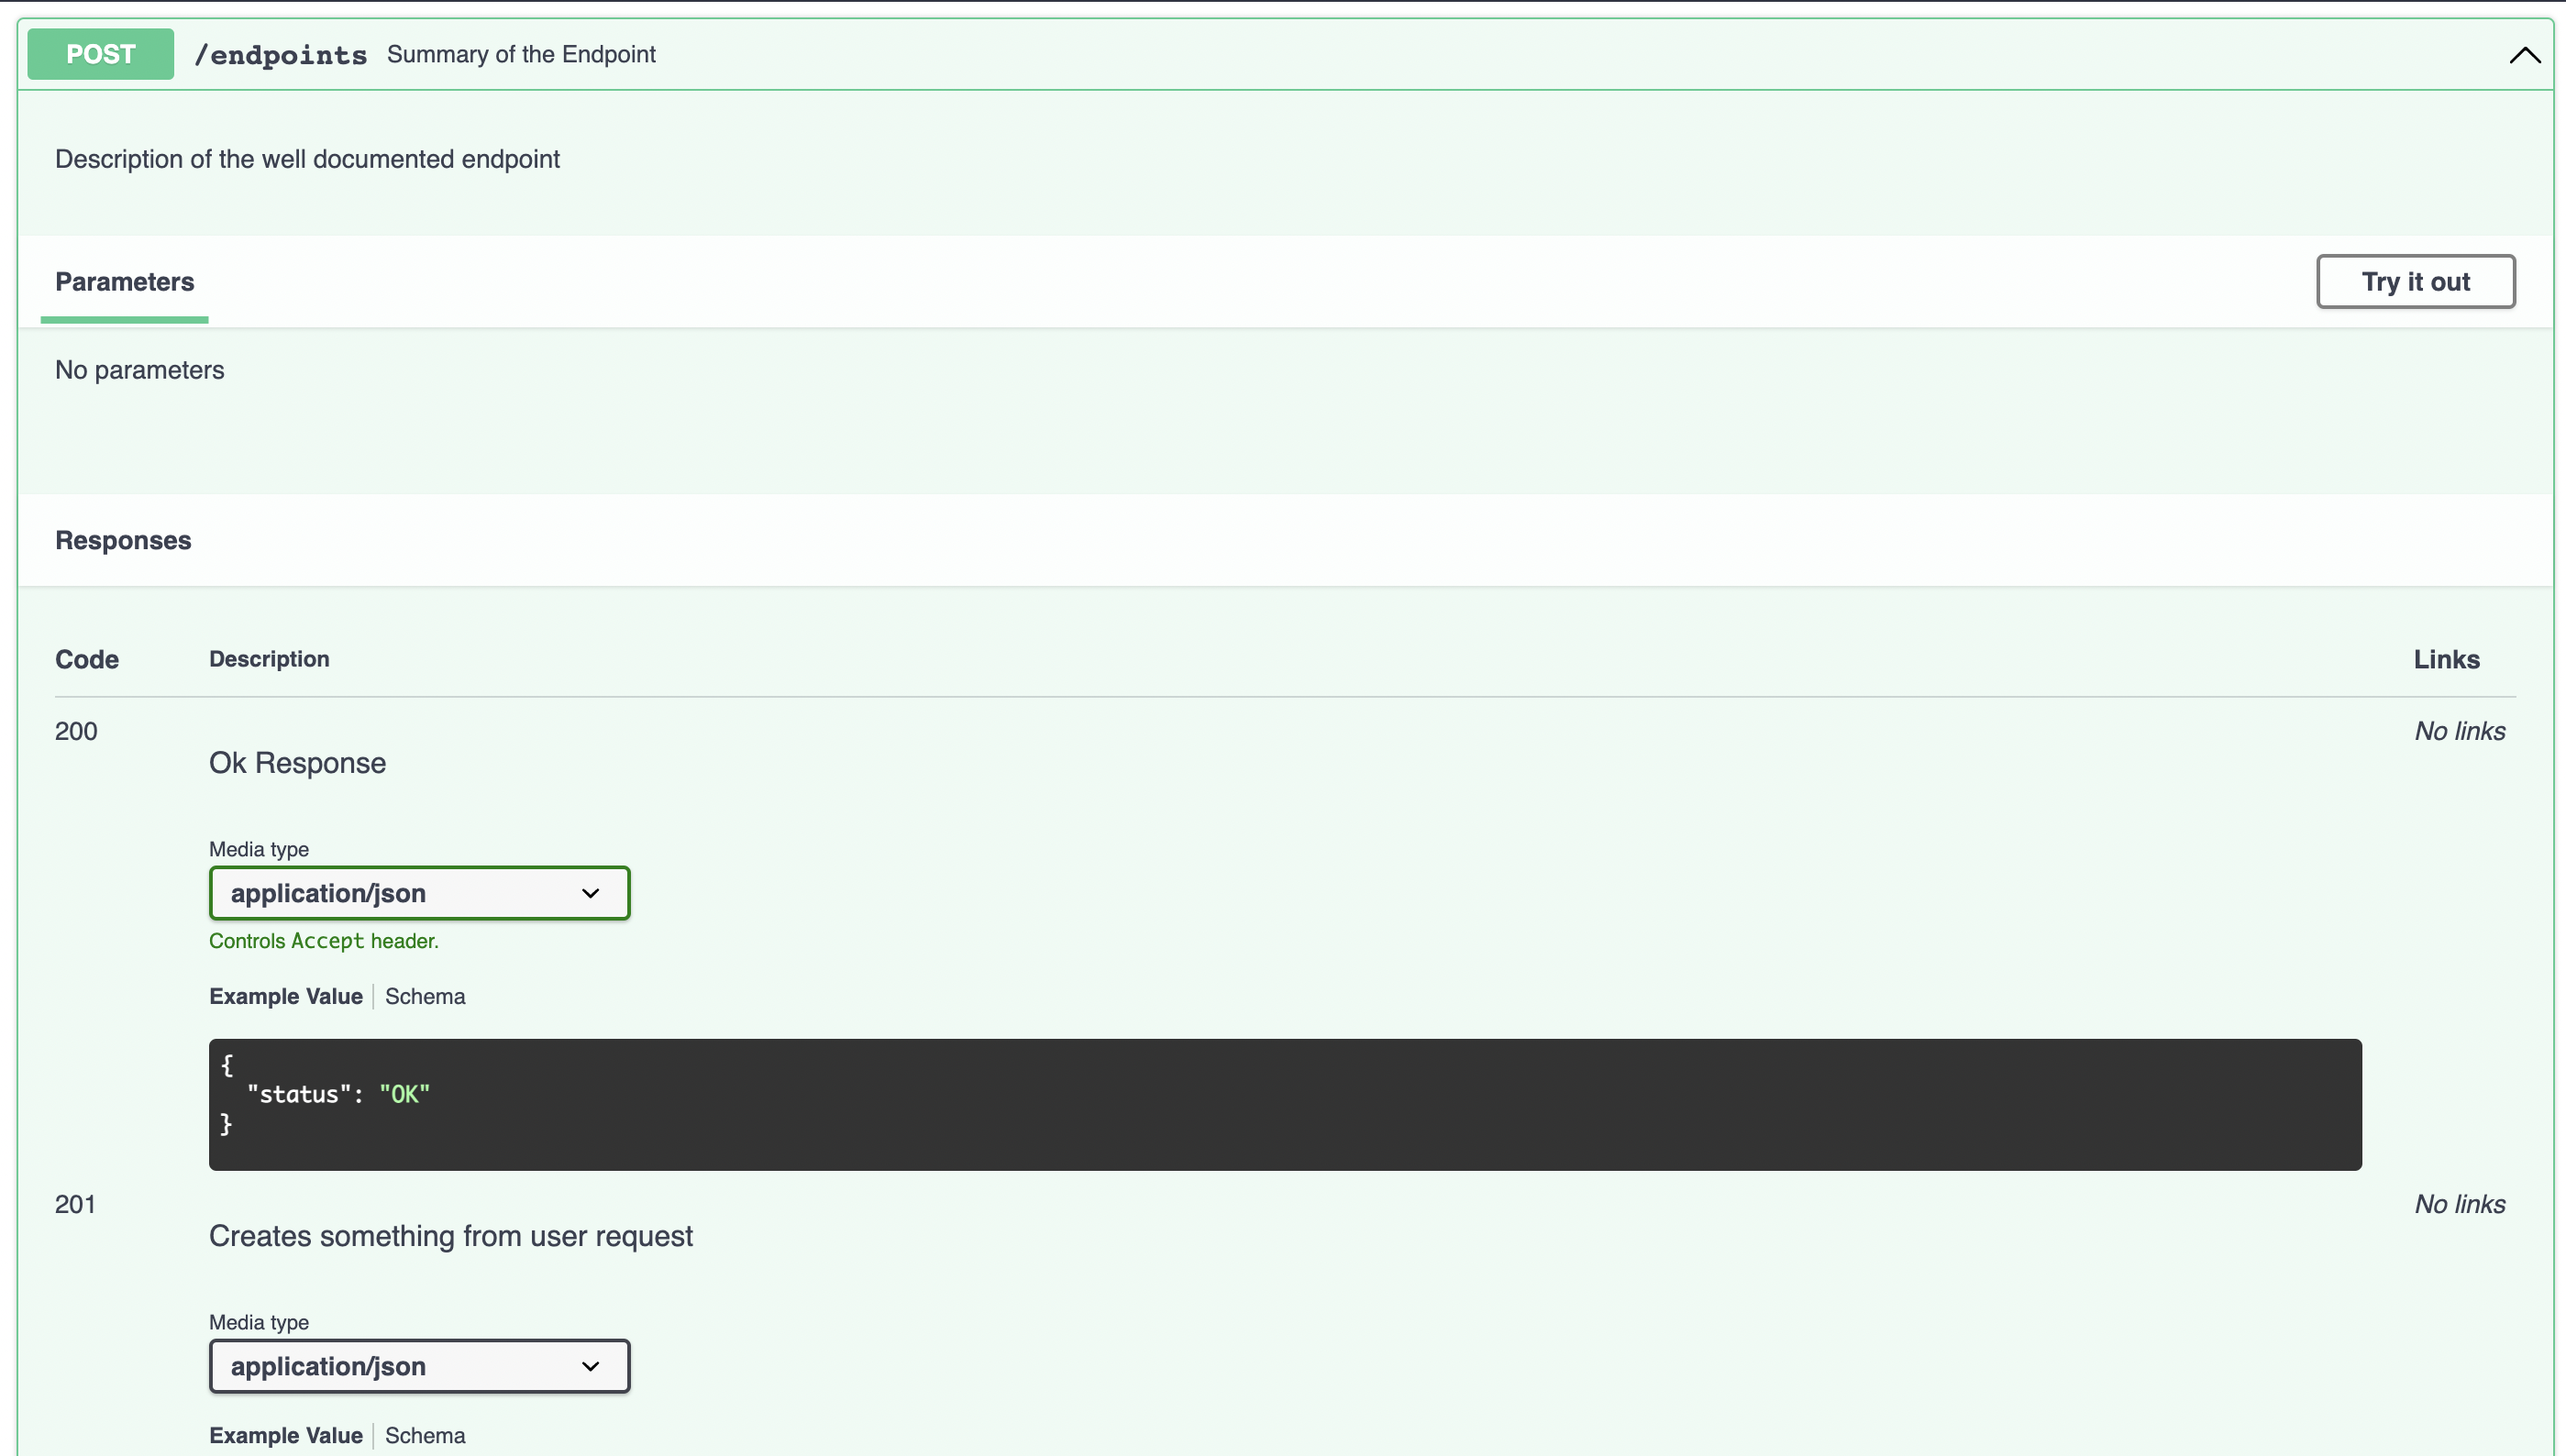
app = FastAPI(**app_configs)- 帮助 FastAPI 生成易于理解的文档
- 设置
response_model,status_code,description等 - 如果模型和状态不同,使用路由的
responses属性添加不同响应的文档
- 设置
from fastapi import APIRouter, status

router = APIRouter()

@router.post(
    "/endpoints",
    response_model=DefaultResponseModel,  # default response pydantic model
    status_code=status.HTTP_201_CREATED,  # default status code
    description="Description of the well documented endpoint",
    tags=["Endpoint Category"],
    summary="Summary of the Endpoint",
    responses={
        status.HTTP_200_OK: {
            "model": OkResponse, # custom pydantic model for 200 response
            "description": "Ok Response",
        },
        status.HTTP_201_CREATED: {
            "model": CreatedResponse,  # custom pydantic model for 201 response
            "description": "Creates something from user request ",
        },
        status.HTTP_202_ACCEPTED: {
            "model": AcceptedResponse,  # custom pydantic model for 202 response
            "description": "Accepts request and handles it later",
        },
    },
)
async def documented_route():
    pass
将会生成如此文档:
Pydantic 提供了一个强大的工具来解析环境变量,并使用其验证器处理它们。
from pydantic import AnyUrl, PostgresDsn
from pydantic_settings import BaseSettings  # pydantic v2

class AppSettings(BaseSettings):
    class Config:
        env_file = ".env"
        env_file_encoding = "utf-8"
        env_prefix = "app_"

    DATABASE_URL: PostgresDsn
    IS_GOOD_ENV: bool = True
ALLOWED_CORS_ORIGINS: set[AnyUrl]根据你的数据库的约定明确设置索引的命名比让 sqlalchemy 默认的命名更可取。
from sqlalchemy import MetaData

POSTGRES_INDEXES_NAMING_CONVENTION = {
    "ix": "%(column_0_label)s_idx",
    "uq": "%(table_name)s_%(column_0_name)s_key",
    "ck": "%(table_name)s_%(constraint_name)s_check",
    "fk": "%(table_name)s_%(column_0_name)s_fkey",
    "pk": "%(table_name)s_pkey",
}
metadata = MetaData(naming_convention=POSTGRES_INDEXES_NAMING_CONVENTION)- 迁移必须是静态的并且可逆的。
如果你的迁移依赖于动态生成的数据,请确保唯一动态的是数据本身,而不是其结构。
-
以描述性的名称和 slugs 生成迁移。Slug 是必需的,应该解释更改。
-
为新迁移设置人类可读的文件模板。我们使用
*date*_*slug*.py模式,例如2022-08-24_post_content_idx.py
# alembic.ini
file_template = %%(year)d-%%(month).2d-%%(day).2d_%%(slug)s
保持命名的一致性很重要。我们遵循的一些规则:
- lower_case_snake
- 单数形式(例如,
post,post_like,user_playlist) - 通过模块前缀对相似表进行分组,例如
payment_account,payment_bill,post,post_like - 在表之间保持一致性,但具体命名也是可以的,例如:
- 在所有表中使用
profile_id,但如果其中一些表仅需要是创建者的档案,则使用creator_id - 对于如
post_like,post_view这样的抽象表使用post_id,但在相关模块中使用具体命名,如在chapters.course_id中使用course_id
- 在所有表中使用
- 对于 datetime 使用
_at后缀 - 对于 date 使用
_date后缀
编写与数据库集成的集成测试最终可能会导致混乱的事件循环错误。 立即设置异步测试客户端,例如 async_asgi_testclient 或 httpx
import pytest
from async_asgi_testclient import TestClient

from src.main import app  # inited FastAPI app


@pytest.fixture
async def client():
    host, port = "127.0.0.1", "5555"
    scope = {"client": (host, port)}

    async with TestClient(
        app, scope=scope, headers={"X-User-Fingerprint": "Test"}
    ) as client:
        yield client


@pytest.mark.asyncio
async def test_create_post(client: TestClient):
    resp = await client.post("/posts")

    assert resp.status_code == 201
除非你有同步数据库连接(真的吗?)或不打算编写集成测试。
BackgroundTasks 能够有效运行阻塞和非阻塞 I/O 操作,就像 FastAPI 处理阻塞路由一样(sync 任务在线程池中运行,而 async 任务稍后被 await)。
- 不要向工作器撒谎,不要将阻塞 I/O 操作标记为
async - 不要将其用于重 CPU 密集型任务。
from fastapi import APIRouter, BackgroundTasks
from pydantic import UUID4

from src.notifications import service as notifications_service


router = APIRouter()


@router.post("/users/{user_id}/email")
async def send_user_email(worker: BackgroundTasks, user_id: UUID4):
    """Send email to user"""
    worker.add_task(notifications_service.send_email, user_id)  # send email after responding client
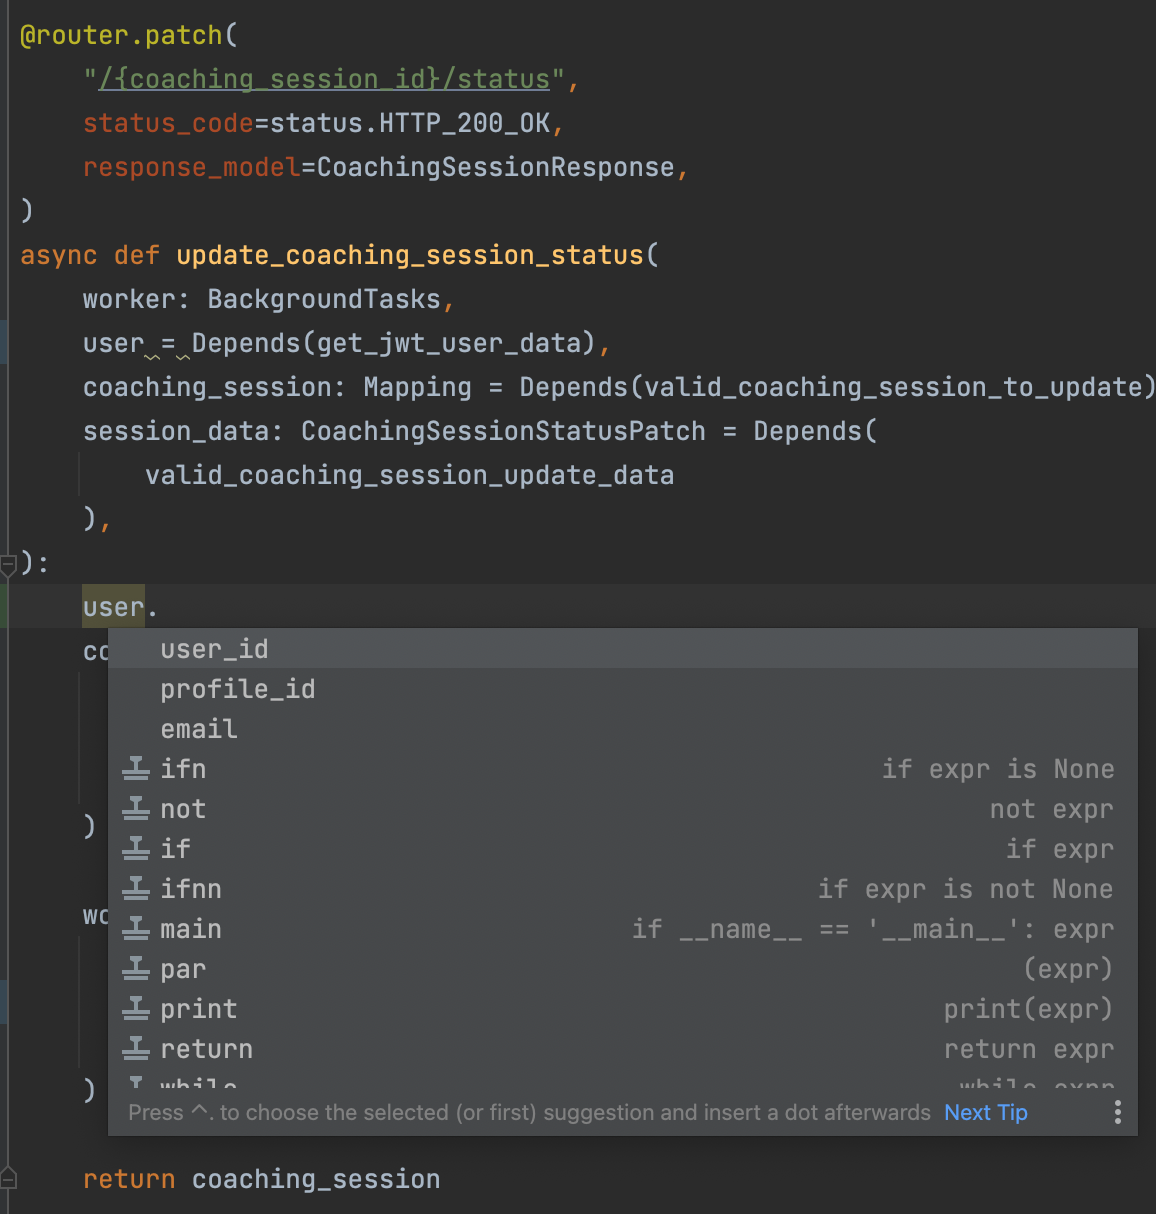
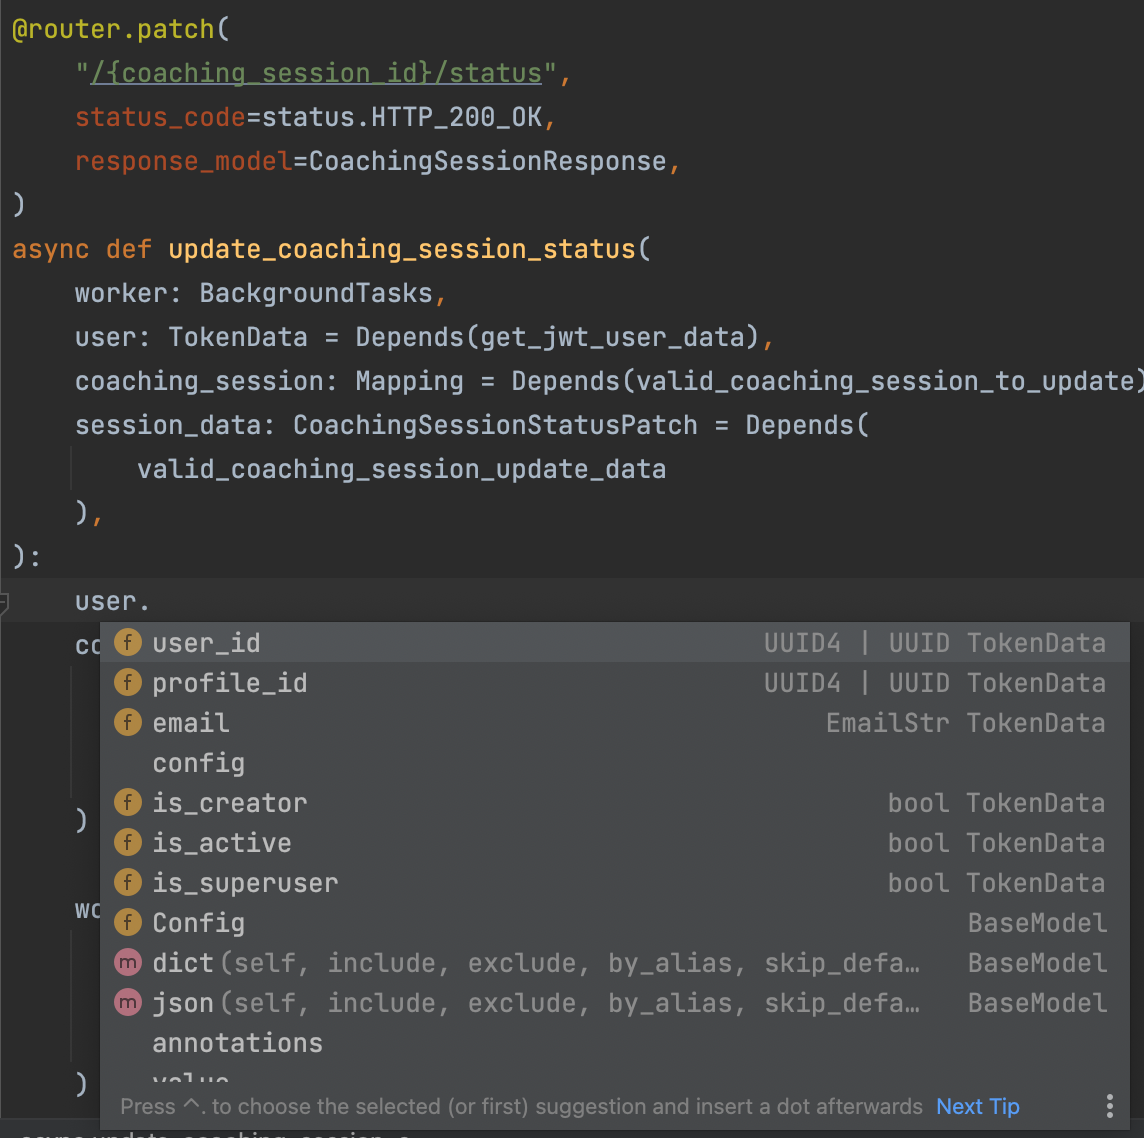
return {"status": "ok"}FastAPI、Pydantic 和现代 IDE 鼓励使用类型提示。
没有类型提示
有类型提示
不要指望你的客户端只发送小文件。
import aiofiles
from fastapi import UploadFile

DEFAULT_CHUNK_SIZE = 1024 * 1024 * 50  # 50 megabytes

async def save_video(video_file: UploadFile):
   async with aiofiles.open("/file/path/name.mp4", "wb") as f:
     while chunk := await video_file.read(DEFAULT_CHUNK_SIZE):
await f.write(chunk)如果你有一个可以接受多种类型的 Pydantic 字段,请确保验证器明确知道这些类型之间的区别。
from pydantic import BaseModel


class Article(BaseModel):
   text: str | None
   extra: str | None


class Video(BaseModel):
   video_id: int
   text: str | None
   extra: str | None


class Post(BaseModel):
   content: Article | Video


post = Post(content={"video_id": 1, "text": "text"})
print(type(post.content))
# 输出: Article
# Article 非常包容且所有字段都是可选的,允许任何 dict 成为有效
解决方案:
- 验证输入仅包含允许的有效字段,如果提供了未知字段则抛出错误
from pydantic import BaseModel, Extra

class Article(BaseModel):
   text: str | None
   extra: str | None

   class Config:
        extra = Extra.forbid


class Video(BaseModel):
   video_id: int
   text: str | None
   extra: str | None

   class Config:
        extra = Extra.forbid


class Post(BaseModel):
content: Article | Video- 如果字段简单,则使用 Pydantic 的 Smart Union (>v1.9, <2.0)
这是一个好的解决方案,如果字段简单如 int 或 bool,但它不适用于复杂字段如类。
没有 Smart Union
from pydantic import BaseModel


class Post(BaseModel):
   field_1: bool | int
   field_2: int | str
   content: Article | Video

p = Post(field_1=1, field_2="1", content={"video_id": 1})
print(p.field_1)
# OUTPUT: True
print(type(p.field_2))
# OUTPUT: int
print(type(p.content))
# OUTPUT: Article
有 Smart Union
class Post(BaseModel):
   field_1: bool | int
   field_2: int | str
   content: Article | Video

   class Config:
      smart_union = True


p = Post(field_1=1, field_2="1", content={"video_id": 1})
print(p.field_1)
# 输出: 1
print(type(p.field_2))
# 输出: str
print(type(p.content))
# 输出: Article, 因为 smart_union 不适用于像类这样的复杂字段- 快速解决方法
适当地排序字段类型:从最严格的到最宽松的。
class Post(BaseModel):
content: Video | Article- 通常情况下,数据库处理数据处理任务比 CPython 要快得多、更干净。
- 推荐使用 SQL 来完成所有复杂的联接和简单的数据操作。
- 推荐在数据库中聚合 JSON,以用于包含嵌套对象的响应。
# src.posts.service
from typing import Mapping

from pydantic import UUID4
from sqlalchemy import desc, func, select, text
from sqlalchemy.sql.functions import coalesce

from src.database import database, posts, profiles, post_review, products

async def get_posts(
    creator_id: UUID4, *, limit: int = 10, offset: int = 0
) -> list[Mapping]:
    select_query = (
        select(
            (
                posts.c.id,
                posts.c.type,
                posts.c.slug,
                posts.c.title,
                func.json_build_object(
                   text("'id', profiles.id"),
                   text("'first_name', profiles.first_name"),
                   text("'last_name', profiles.last_name"),
                   text("'username', profiles.username"),
                ).label("creator"),
            )
        )
        .select_from(posts.join(profiles, posts.c.owner_id == profiles.c.id))
        .where(posts.c.owner_id == creator_id)
        .limit(limit)
        .offset(offset)
        .group_by(
            posts.c.id,
            posts.c.type,
            posts.c.slug,
            posts.c.title,
            profiles.c.id,
            profiles.c.first_name,
            profiles.c.last_name,
            profiles.c.username,
            profiles.c.avatar,
        )
        .order_by(
            desc(coalesce(posts.c.updated_at, posts.c.published_at, posts.c.created_at))
        )
    )

    return await database.fetch_all(select_query)

# src.posts.schemas
import orjson
from enum import Enum

from pydantic import BaseModel, UUID4, validator


class PostType(str, Enum):
    ARTICLE = "ARTICLE"
    COURSE = "COURSE"


class Creator(BaseModel):
    id: UUID4
    first_name: str
    last_name: str
    username: str


class Post(BaseModel):
    id: UUID4
    type: PostType
    slug: str
    title: str
    creator: Creator

    @validator("creator", pre=True)  # before default validation
    def parse_json(cls, creator: str | dict | Creator) -> dict | Creator:
       if isinstance(creator, str):  # i.e. json
          return orjson.loads(creator)

       return creator

# src.posts.router
from fastapi import APIRouter, Depends

router = APIRouter()


@router.get("/creators/{creator_id}/posts", response_model=list[Post])
async def get_creator_posts(creator: Mapping = Depends(valid_creator_id)):
   posts = await service.get_posts(creator["id"])

   return posts
如果数据库中聚合的数据是简单的 JSON,则可以查看 Pydantic 的 Json 字段类型,它将首先加载原始 JSON。
from pydantic import BaseModel, Json

class A(BaseModel):
    numbers: Json[list[int]]
    dicts: Json[dict[str, int]]

valid_a = A(numbers="[1, 2, 3]", dicts='{"key": 1000}')  # becomes A(numbers=[1,2,3], dicts={"key": 1000})
invalid_a = A(numbers='["a", "b", "c"]', dicts='{"key": "str instead of int"}') # raises ValueError例如,我们有一个特定的端点:
- 接受用户的媒体文件,
- 为该文件生成唯一的 url,
- 将 url 返回给用户,
- 用户将在其他端点如
PUT /profiles/me,POST /posts中使用该 url - 这些端点仅接受来自白名单主机的文件
- 用户将在其他端点如
- 使用此名称和匹配的 URL 将文件上传到 AWS。
如果我们不对 URL 主机进行白名单处理,那么恶意用户将有机会上传危险链接。
from pydantic import AnyUrl, BaseModel

ALLOWED_MEDIA_URLS = {"mysite.com", "mysite.org"}

class CompanyMediaUrl(AnyUrl):
    @classmethod
    def validate_host(cls, parts: dict) -> tuple[str, str, str, bool]:  # pydantic v1
       """Extend pydantic's AnyUrl validation to whitelist URL hosts."""
        host, tld, host_type, rebuild = super().validate_host(parts)
        if host not in ALLOWED_MEDIA_URLS:
            raise ValueError(
                "Forbidden host url. Upload files only to internal services."
            )

        return host, tld, host_type, rebuild


class Profile(BaseModel):
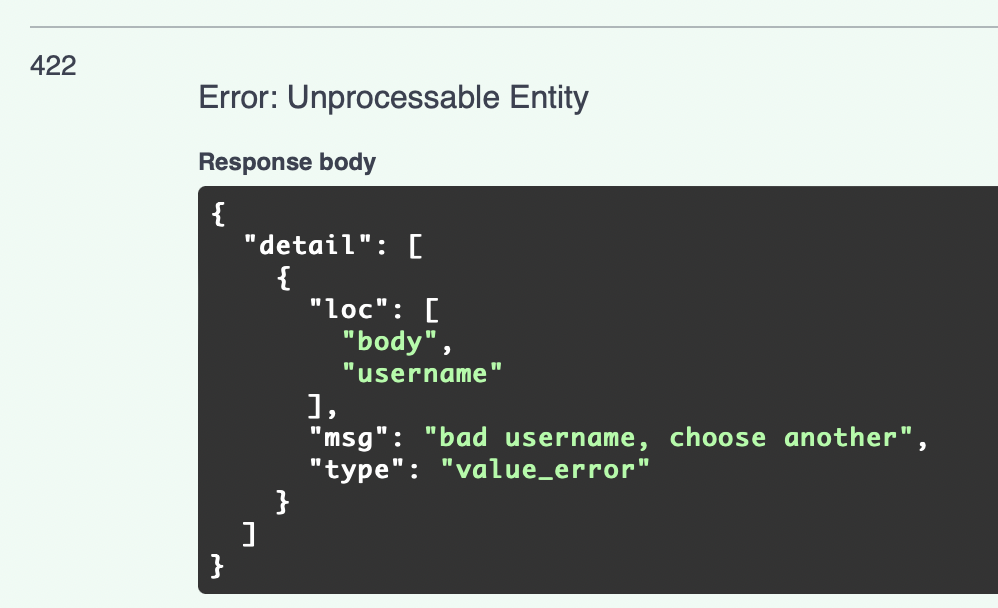
avatar_url: CompanyMediaUrl # only whitelisted urls for avatar这将返回给用户一个详细的响应。
# src.profiles.schemas
from pydantic import BaseModel, validator

class ProfileCreate(BaseModel):
    username: str

    @validator("username")  # pydantic v1
    def validate_bad_words(cls, username: str):
        if username  == "me":
            raise ValueError("bad username, choose another")

        return username


# src.profiles.routes
from fastapi import APIRouter

router = APIRouter()


@router.post("/profiles")
async def get_creator_posts(profile_data: ProfileCreate):
   pass
响应示例:
如果你认为可以返回与你的路由的 response_model 匹配的 Pydantic 对象来进行某些优化,那么这是错误的。
FastAPI 首先将那个 pydantic 对象使用其 jsonable_encoder 转换为 dict,然后使用你的 response_model 验证数据,最后才将你的对象序列化为 JSON。
from fastapi import FastAPI
from pydantic import BaseModel, root_validator

app = FastAPI()


class ProfileResponse(BaseModel):
    @root_validator
    def debug_usage(cls, data: dict):
        print("created pydantic model")

        return data

    def dict(self, *args, **kwargs):
        print("called dict")
        return super().dict(*args, **kwargs)


@app.get("/", response_model=ProfileResponse)
async def root():
    return ProfileResponse()
日志输出:
[INFO] [2022-08-28 12:00:00.000000] created pydantic model
[INFO] [2022-08-28 12:00:00.000010] called dict
[INFO] [2022-08-28 12:00:00.000020] created pydantic model
[INFO] [2022-08-28 12:00:00.000030] called dict
如果你必须使用一个库来与外部服务交互,并且它不是 async 的,那么请在外部工作线程中进行 HTTP 调用。
对于一个简单的例子,我们可以使用我们熟知的 run_in_threadpool 来自 starlette。
from fastapi import FastAPI
from fastapi.concurrency import run_in_threadpool
from my_sync_library import SyncAPIClient

app = FastAPI()


@app.get("/")
async def call_my_sync_library():
    my_data = await service.get_my_data()

    client = SyncAPIClient()
await run_in_threadpool(client.make_request, data=my_data)有了 linters,你可以忘记格式化代码,专注于编写业务逻辑。
Black 是一种不妥协的代码格式化器,它消除了开发过程中你必须做出的许多小决策。 Ruff 是一个“极速”的新 linter,取代了 autoflake 和 isort,并支持超过 600 条 lint 规则。
使用 pre-commit 钩子是一个流行的好做法,但对我们来说,只使用脚本就足够了。
#!/bin/sh -e
set -x

ruff --fix
black src tests一些非常好心的人分享了他们自己的经验和最佳实践,这绝对值得一读。在项目的 issues 部分查看他们。
例如,lowercase00 详细描述了他们在处理权限 & 认证、基于类的服务 & 视图、任务队列、自定义响应序列化器、使用 dynaconf 进行配置等方面的最佳实践。
如果你有关于使用 FastAPI 的经验,无论是好是坏,都非常欢迎在这里创建一个新的 issue。我们很乐意阅读它。
现在,包括额外部分在内的文件已经全部翻译完毕。如果你有任何进一步的问题或需要更多的帮助,请随时告诉我!


