Thanks to the original author for developing such a useful plugin that can synchronize Obsidian to Notion. However, the original repository can only sync Name and Tags information. For those like me who use NotionNext to set up their website, this presents some limitations. Every time I import, I need to make a lot of modifications.
Thus, based on the original author's work, I've added a feature to match the NotionNext template. This way, you can edit directly in Obsidian and publish with a single click after organizing.
- Removed the
convert tagoption. Now, you can directly add tags in the YAML front matter. If you don't want to add tags, you can delete the tags in the YAML front matter or leave the tags blank.
For now, this plugin is exclusively for NotionNext. If you're not using this template, you'll keep receiving error 400.
For those without a NotionNext requirement, please use the original Obsidian-to-notion.
Before installing the plugin, you must have set up the following:
- Your NotionNext database.
- According to the original author's readme.md, set up the Notion API, and it should already be associated with your NotionNext repository.
- NotionNext Database ID
- Your NotionNext database should have the following contents:
- type
- title
- slug
- category
- tags
- date
- status
- summary
- password
- icon
From version 0.0.6, I also add the following contents: - titleicon: the unique icon for each post, it can only support emoji currently. - cover url: the cover image for each post, it should be end with a type of image, such as .jpg, .png, .gif, etc.
If you've directly copied the NotionNext template, these contents should already exist. I've made changes to this plugin based on the original author's work. All you need to ensure is that your database has the above content, and every letter is in lowercase!!!
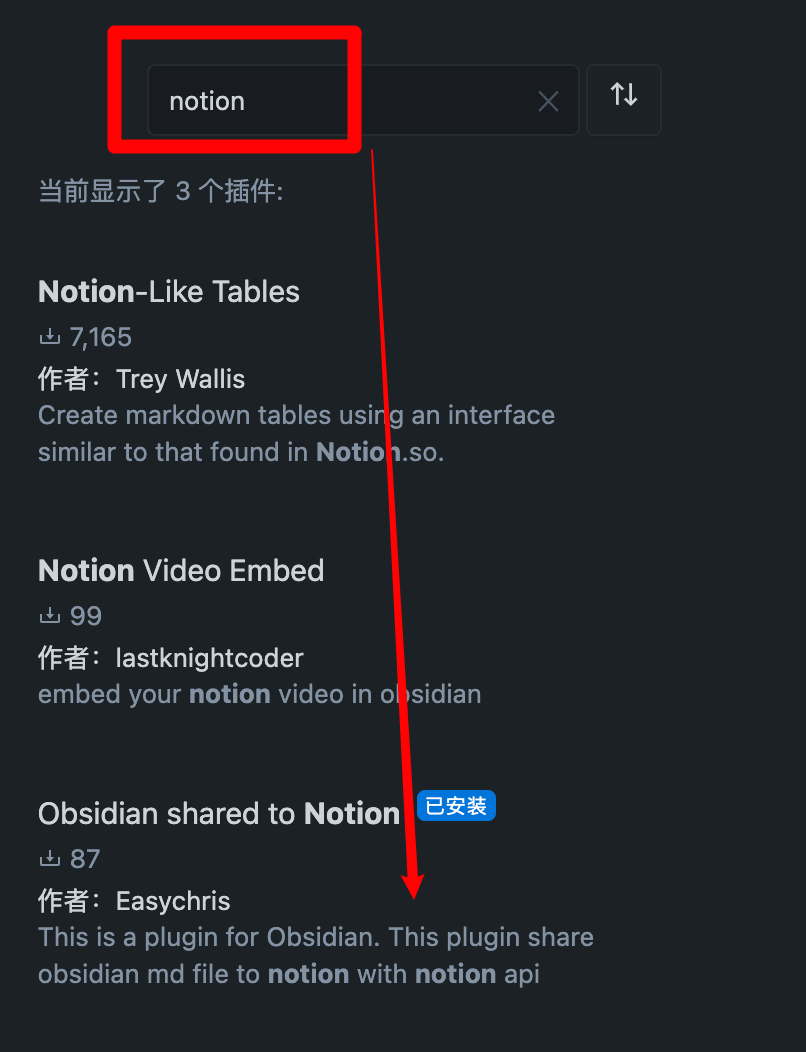
Open Obsidian settings -> Community Plugins -> Browse -> NotionNext -> Share to NotionNext
- Close Obsidian.
- Download the plugin file from Release and unzip it into your Obsidian plugin directory.
- Re-open Obsidian, go to settings, and enable the plugin.
- In the settings, find Obsidian to NotionNext, and enter your NotionNext Database ID and API token.
In the repository, I have uploaded a template which you can directly copy into your template folder. After that, use Obsidian's template feature to create a new note with one click.
If you don't want to use the template, you can also directly create a new file in Obsidian and then copy the content below. Then save it.
---
# default value has been set.
# for any unwanted value, you can delete it or set it to empty.
# for example, if you donot want to set password, you can delete password: "1234" or set it to password: ""
# 我已经在插件中设置了默认值,如果有不需要的选项,可以直接删除。
# 例如你不需要密码选项,你可以将password: "1234"删除,或者将它设置为空。
# !!!!!!!!!!!!
# 现在阶段一定不要修改表头的名字, please do not change the name of the header in YAML front matter
# !!!!!!!!!!!!
titleicon: 📎 # emoji icon, default is 📜, 默认是📜
coverurl: https://img.jxpeng.dev/2023/08/843e27a210847f05a0f7cfb121fec100.jpg # default is empty, 默认是空
type: Post # Post or Page, default is Post, 默认是Post
slug: test # slug for url, default is empty, 默认是空
stats: Draft # Draft, Invisible, Published, default is Draft, 默认是Draft
category: test # default is 'Obsidian', 默认是'Obsidian'
summary: this is a summary for test post # default is empty, 默认是空
icon: fa-solid fa-camera # you can ignore this, default is empty, 默认是空,可直接删除
password: "1234" # if you donot want to set password, you can delete this line, default is empty, 默认是空,可直接删除
# 现在必须开启tags选项,否则会报错
tags:
  - test  # tags for post
  - web # add more tags if you want
---

Contents Below
Usage of the template is as follows:

Plugin preview is shown below

Original README.md
Many Thanks for the original author's work. I've only made some changes to the original author's work. If you find this plugin useful, please give the original author a star.
![]()
![]()


Share of obsidian to Notion 中文文档
Sharing files from Obsidian to Notion with a single click, and Obsidian will automatically add the Notion share link
You are welcome to offer it a star if it can benefit you.

- support for custom page banner
- update the exsit page
- support for mult language
- support for auto copy the share link to clipboard
- support for mobile
- support tags thank for @jannikbuscha
- transfer the bi-link format like [[]] into the format that Notion supports.
Open obsidian setting -> Add plugin -> Search -> notion
Enter BRAT into the plugin market center to find it.
Add EasyChris/obsidian-to-notion to the list of BRAT plugins that have been installed.
Return to the plugin center and turn it on.
cd YOUR_OBSIDIAN_FOLDER/.obsidian/plugins/
git clone https://github.com/EasyChris/obsidian-to-notion.git
Official reference documentation: https://developers.notion.com/docs
Go to https://www.notion.com/my-integrations
Once created, copy secrets toekn
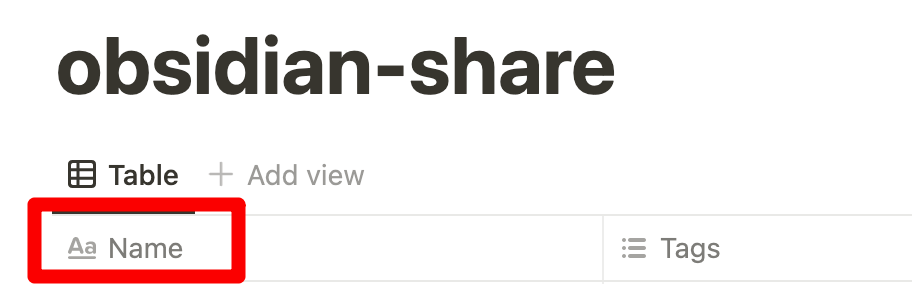
database first custom name must be "Name", otherwise sync to notion will be failed
Create a new page (with public permissions)
Create a new database in the page -> you need full page database

Add integration to your new database

https://www.notion.so/myworkspace/a8aec43384f447ed84390e8e42c2e089?v=...
                                  | --------- Database ID --------|
Fill the configuration with the NOTION_API_KEY and DATABASE_ID you got

Click the upload notion button
 A share link will be automatically generated after successful upload

Banner url must be a image url like: https://i.imgur.com/xxx.jpg If you don't want to use banner, leave it blank
Transfer the Obsidian tags to the Notion table.
It requires the column with the name 'Tags'.

Add tags to your notion page

- open plugin convert tags

- add tags in the head
---
tags: [tag1,tag2]
---

this is test tags
---
tags:
  - tag4
---

this is test tags

Thanks for @jannikbuscha contribution
Notion ID is the your notion site ID that you want to share the file to. if you don't write it, notion will share to the default link like: https://www.notion.so/myworkspace/a8aec43384f447ed84390 that visit this page need to redirect to your site url if you write the Notion ID, it will share to the page link like: https://your_user_name.notion.site/myworkspace/a8aec43384f447ed84390. The visiter don't need to redirect url.
To sync images to your oss or cos bucket, use the Obsidian Image Auto Upload Plugin.
git clone https://github.com/EasyChris/obsidian-to-notion.git
yarn install
yarn dev
node update-version.js
./release.sh
# Thanks
[Development Process | Obsidian Plugin Development Documentation](https://luhaifeng666.github.io/obsidian-plugin-docs-zh/zh/getting-started/development-workflow.html)

[GitHub - devbean/obsidian-wordpress: An obsidian plugin for publishing docs to WordPress.](https://github.com/devbean/obsidian-wordpress)

[GitHub - obsidianmd/obsidian-api](https://github.com/obsidianmd/obsidian-api)

[GitHub - Easychris/obsidian-to-notion: Obsidian Weread Plugin is an plugin to sync Weread(微信读书) hightlights and annotations into your Obsidian Vault.](https://github.dev/zhaohongxuan/obsidian-weread-plugin)

[GitHub - Quorafind/Obsidian-Memos: A quick capture plugin for Obsidian, all data from your notes.](https://github.com/Quorafind/Obsidian-Memos)

[https://github.com/jannikbuscha/obsidian-to-notion](https://github.com/jannikbuscha)

# License
GNU GPLv3