Snackpot is a React Native mobile application that helps your friend or co-worker group decide who should cover the next group expense. How? By making the decision for you.
Requirements
| Tech | Version |
|---|---|
| Node.js | 16.14.0 |
| TypeScript | >= 4.0 |
| Postgres | * |
| Expo Go* | * |
Expo Go is available on App Store / Google Play. It's a great tool for running the app in development mode on your device with no additional upstart.
git clone https://github.com/vxm5091/snackpot.git
Run the below command from the root folder:
cp ./server/.env.example ./server/.env && cp ./app/.env.example ./app/.env
Open the app environment file (./app/.env) and change the IP address to your
local network.
Wifi settings -> Details -> IP address
yarn && cd app && npx expo install && cd ../server/ && yarn
cd ./server && yarn migration:up && yarn seeder:fresh
You can find the seeder logic in ./server/src/seeders/DatabaseSeeder.ts
The server .env file also provides two toggles to generate more or fewer
entities. See data model below for an explanation of the data logic.
You can download it from the App Store or Google Play. Expo Go will allow you to run the app in development mode directly on your device.
yarn start
Run this from the root folder to start both development servers. In your terminal, you will see a QR code. This will link you directly to Expo Go.
Both the frontend and backend are written in Typescript.
Frontend: React Native, React Relay, Expo.
Backend: Node.js, NestJS, GraphQL (Relay), MikroORM, Postgres.
Let's review our problem again: we need a system for deciding, in a balanced fashion, whose turn it is next to pick up the group check.
With each order, if the user pays, their balance goes up. If they receive, their balance goes down. The user with the lowest balance pays for the next order -> their balance goes back up.
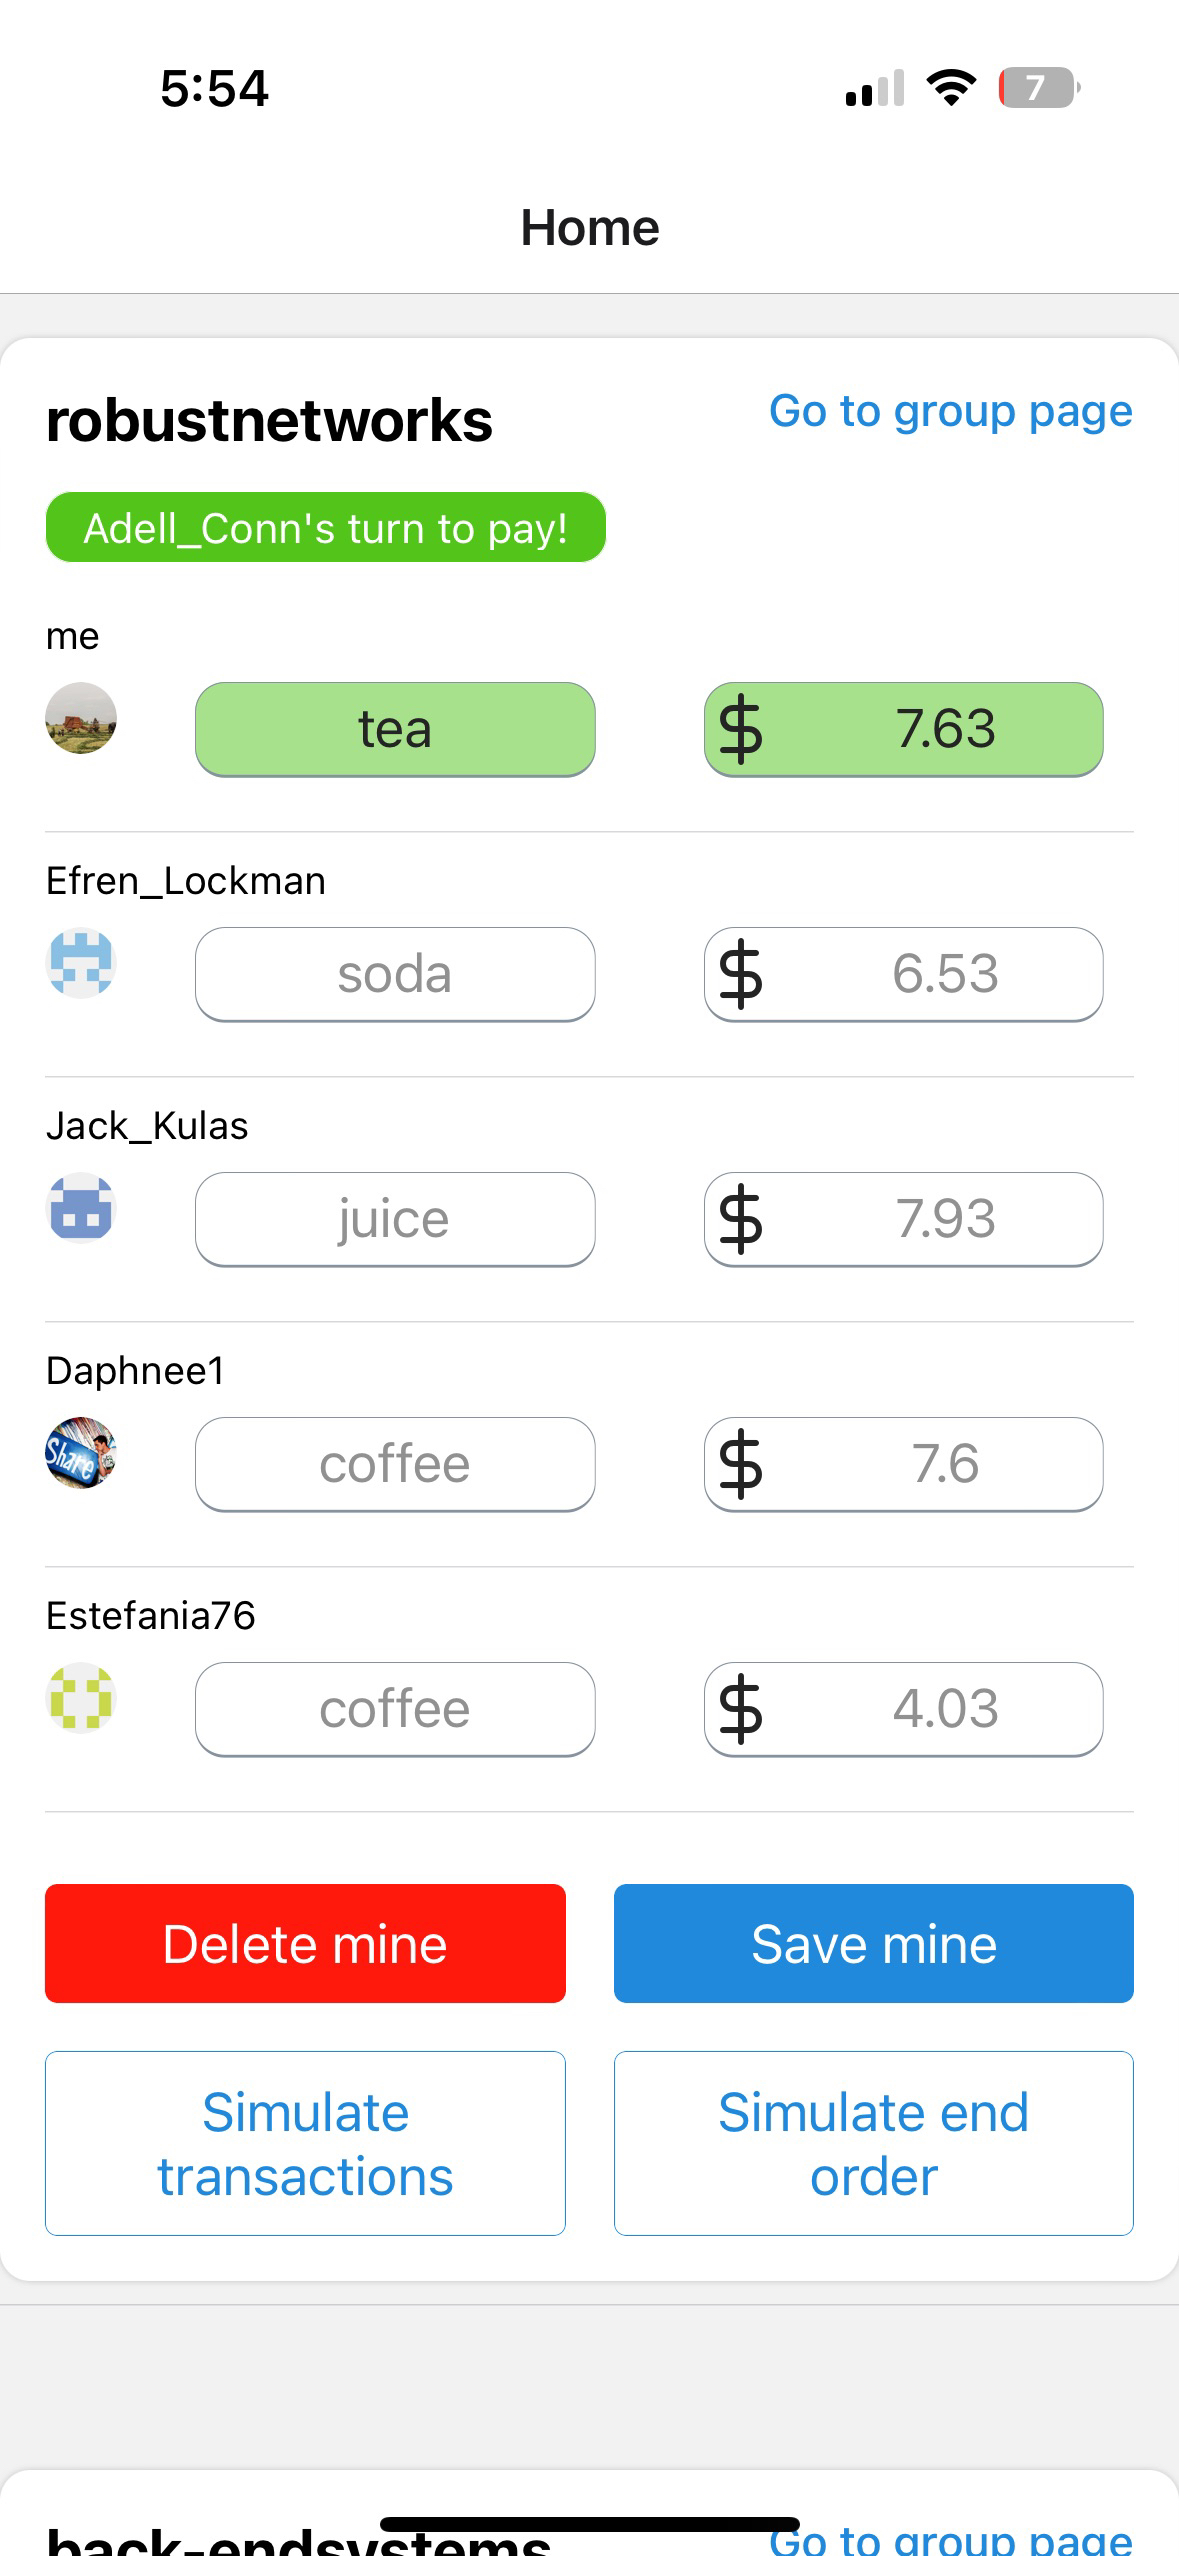
Home Screen - user not paying |
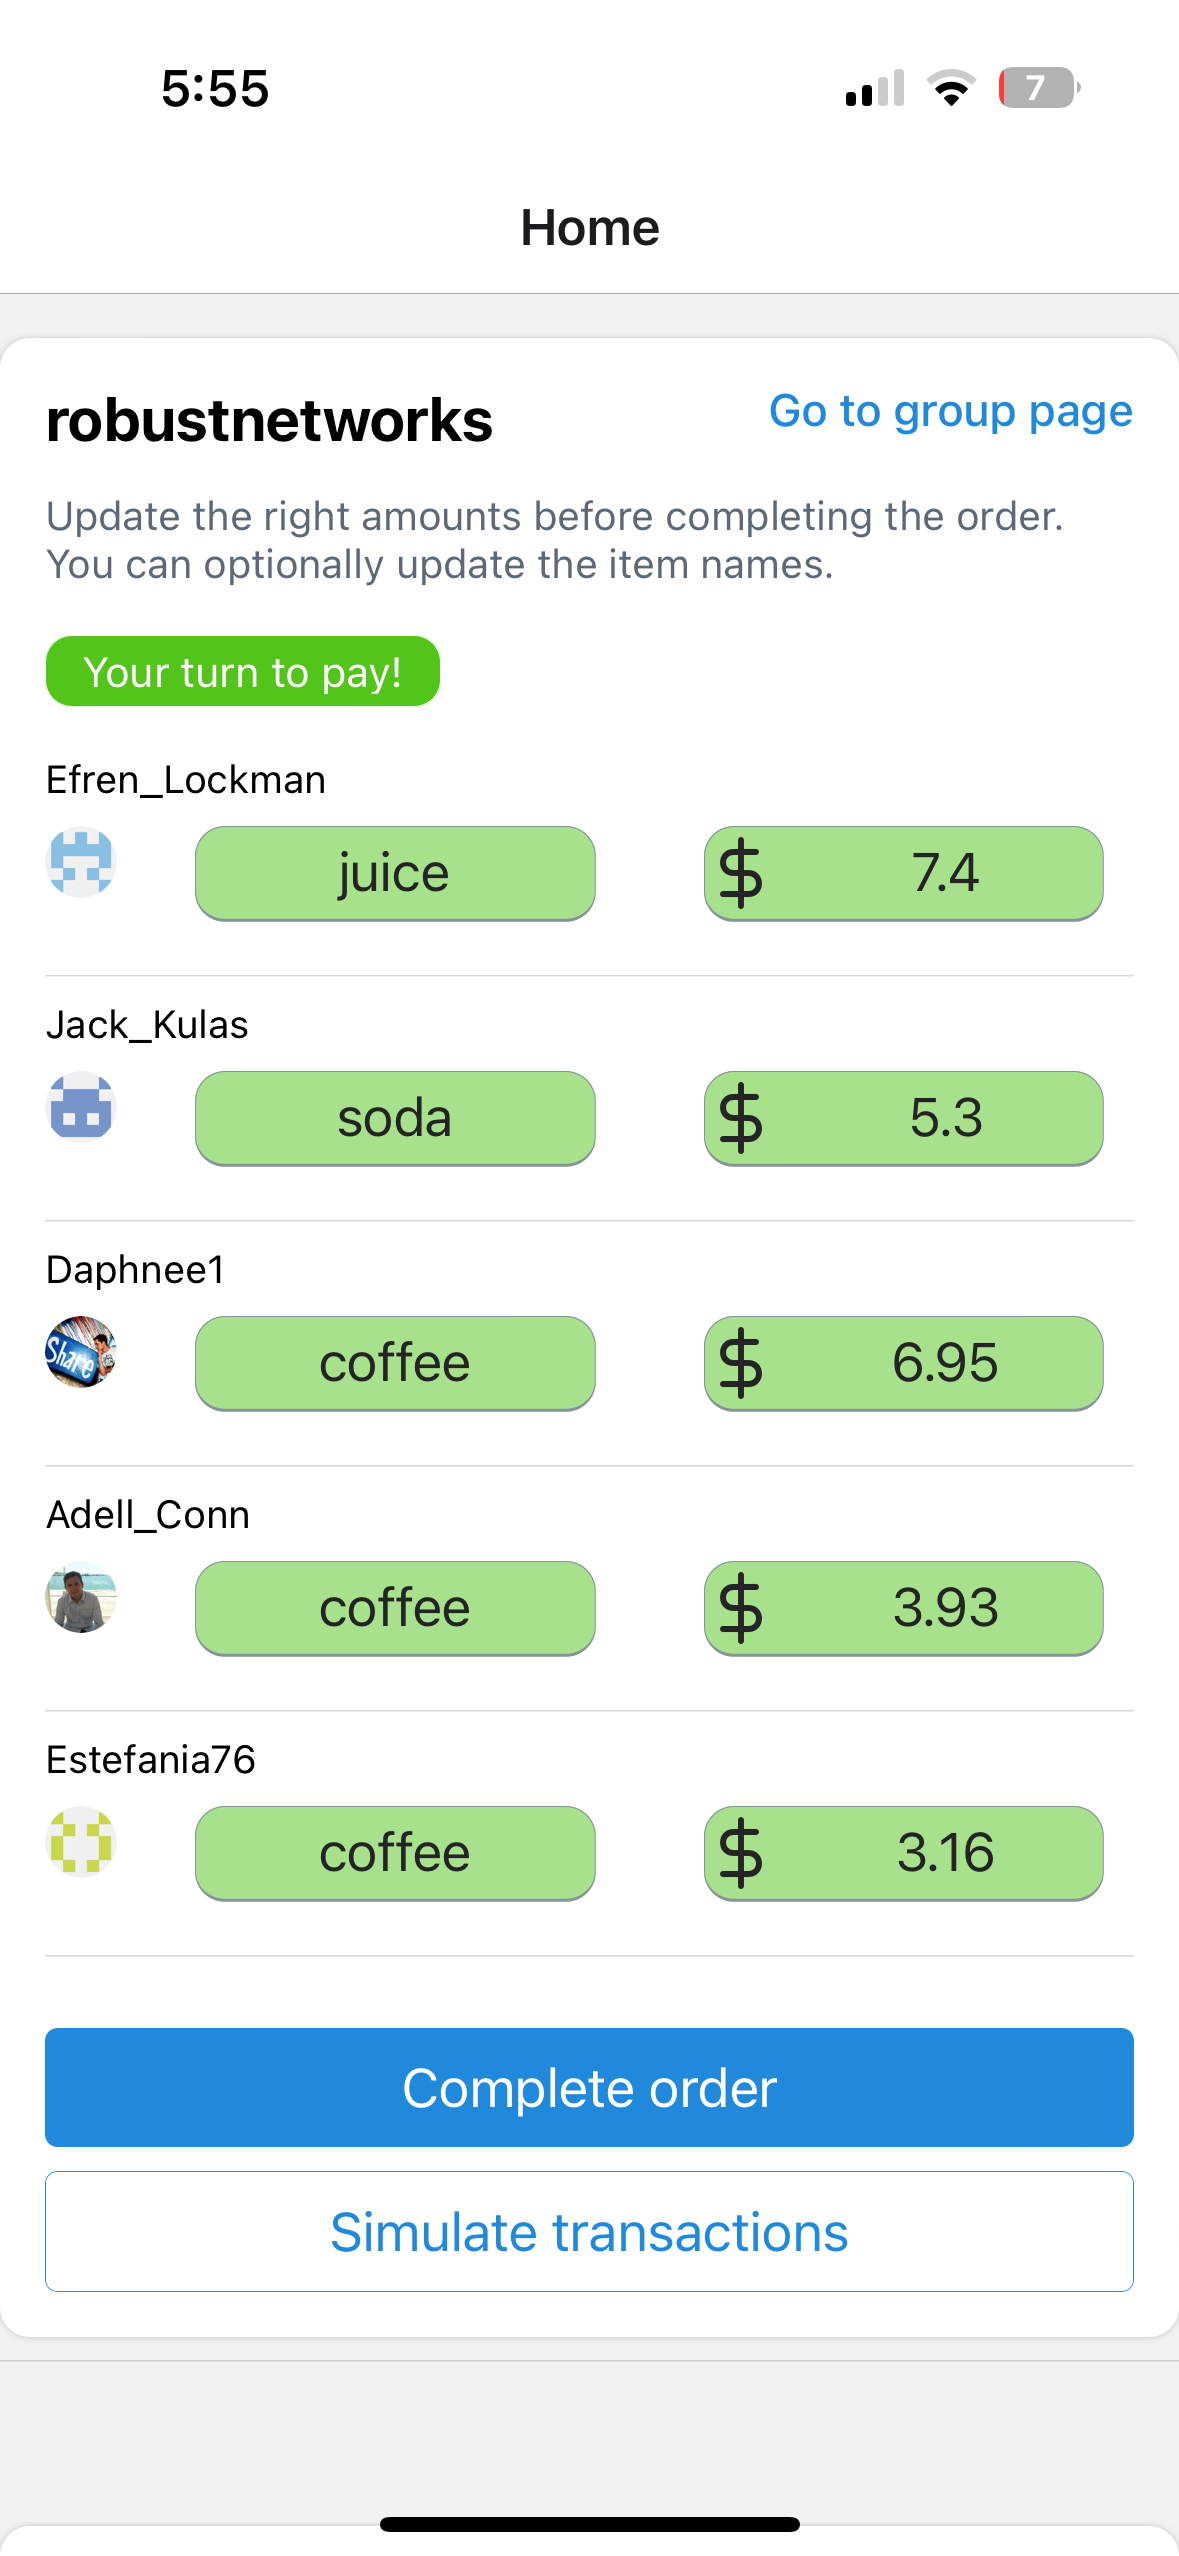
Home Screen - user is paying |
The Home screen shows an active order card for each group the user is in. If there isn't an active order open, the user can start one. The payer will still be chosen based on balance.
The highlighted green fields are the ones the user can edit. When the user is not paying, they just have to input what they got. Filling in the price is optional for the receiving user in case the payer is the only one who goes to pick up the order.
When the user is paying, they can edit all the fields and make any adjustments.
Simulate transactions
When starting a new order, the user's entry will be the only one. This
essentially fills in all the other members' orders with dummy data. Note: if
all the members already have entries, it won't generate new ones.
Simulate end order
In a production flow, only the payer can close out the order. That way, they can
make sure the amounts are right. Since we're in test mode, we want to simulate
closing the order and starting a new one.
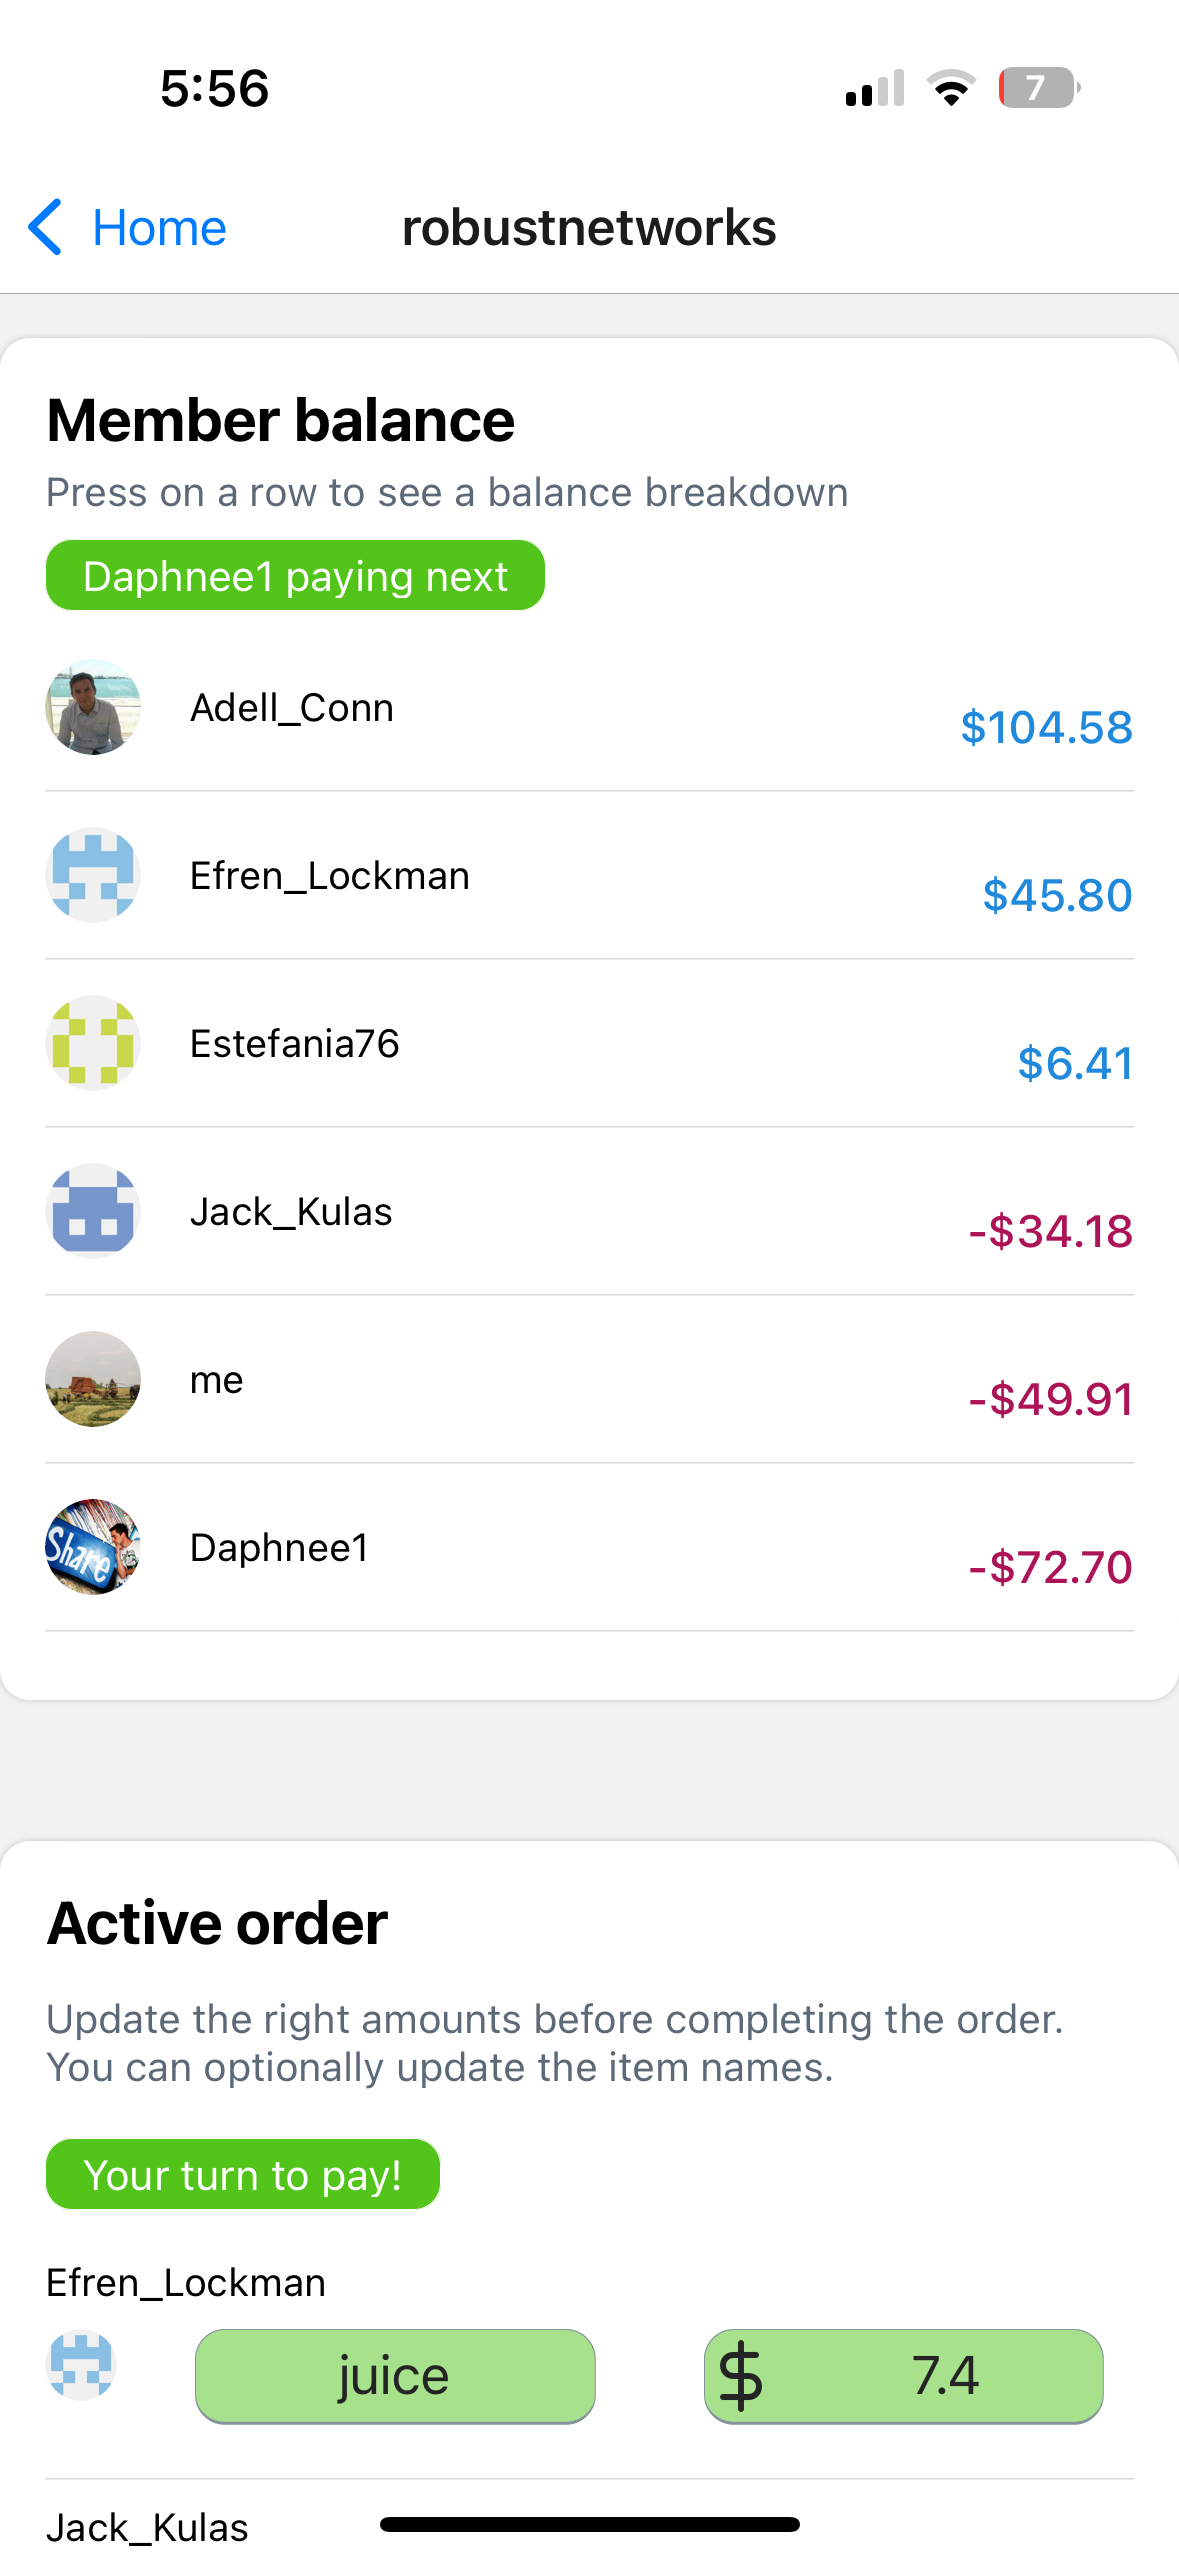
Group Info |
Group info provides a deeper dive on group activity, as well as shows every member's latest balance.
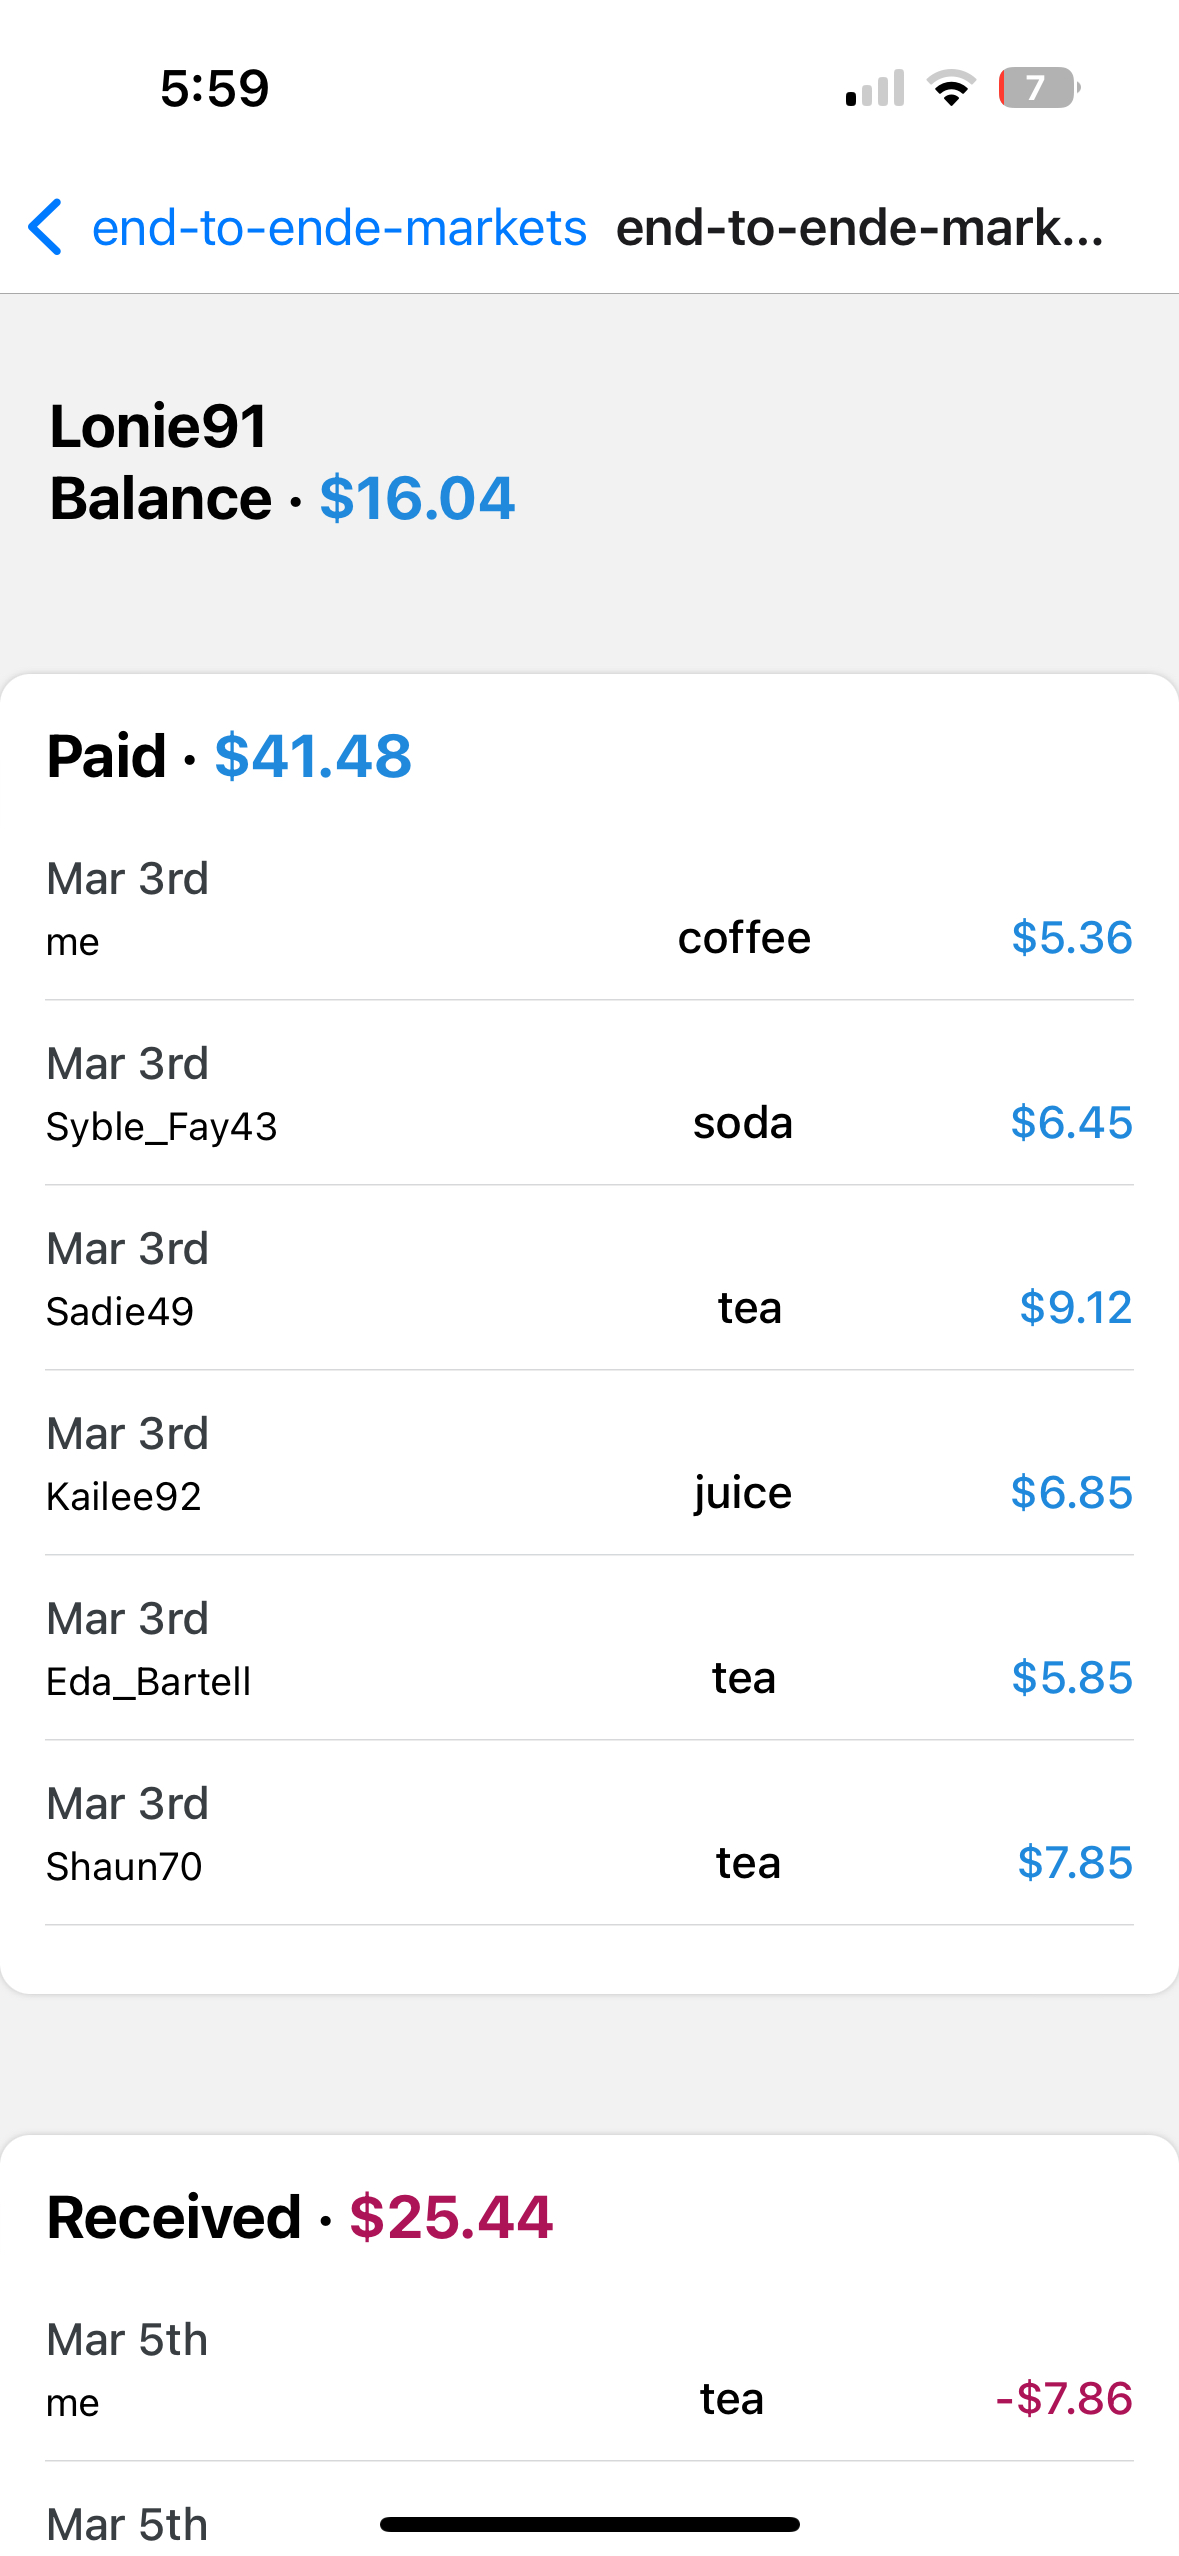
Balance breakdown |
You can press on any row in the member balance table to see a historical breakdown of that user's transactions within the group.
Why SQL?
-
Structured data
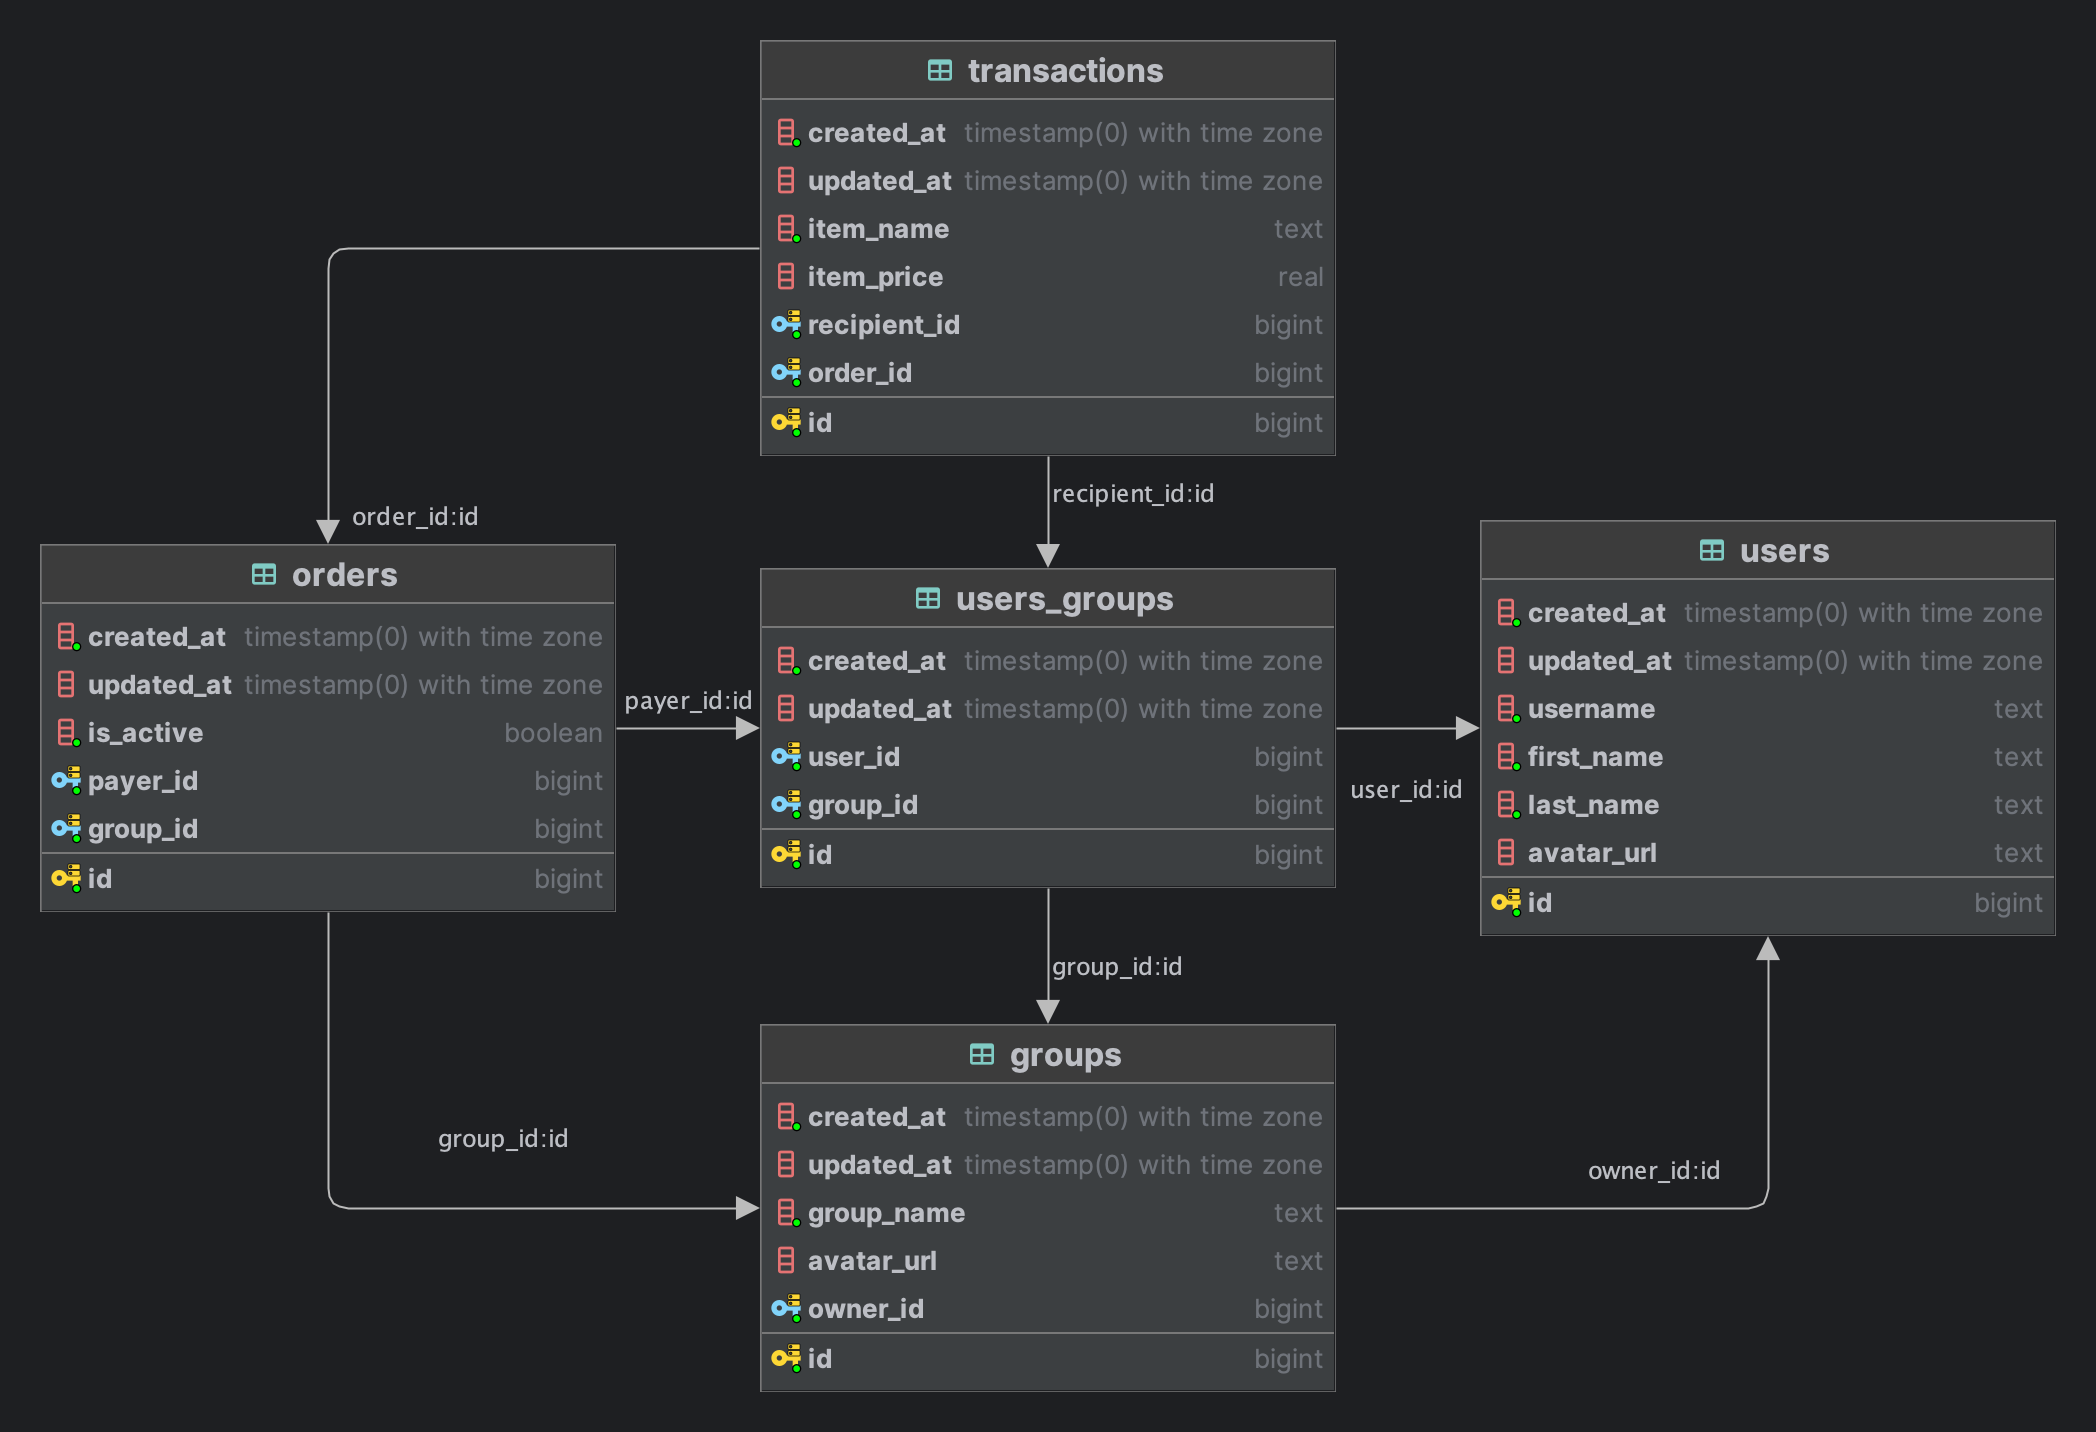
There are specific data points our data model needs in order to produce the output that our users are looking for. For each transaction, we need to know who the receiving group member is, what they got, how much it cost, and what order it relates to. Based on the order, we know who paid. Now we can calculate whose balance goes up, whose balance goes down, and by how much. -
Relational data
I think the diagram above mostly speaks for itself here. Users joins * groups*. Groups create orders, which are made up of transactions between the user paying for the order, and other members of the group. -
Need for complex joins
There isn't much of a first-player mode to this app. It sets out to solve a group problem. As such,users-groupsis really the focal point of the data model. A user's orders and transactions with other users is in the context of the group (think Splitwise as opposed to Venmo). To accurately track a member's balance within the group, we need a structured data model that efficiently joins these entities
Order vs Transaction
An order is composed of transactions between the user whose turn it is
to pay, and each member of the group who got an item. Since the payer is the
same for all transactions in an order, foreign key relationship is kept in
the orders table.
NestJS is a Node.js framework. It provides the guardrails for building a clean and scalable server, as well as all the tools that one might need in the process.
I chose GraphQL over a REST API firstly because of the relational aspect of the data model discussed in the Postgres section above. The beauty of a GraphQL approach, especially during a rapid MVP / iteration stage, is that it removes the pressure of having to think through all the access patterns upfront, or having to add new endpoints as our client-side features evolve. Instead, we do the work upfront, and present the frontend with a blueprint of the data model. The client is then free to traverse that blueprint in any way.
NestJS offers two ways of building GraphQL applications: code first or schema
first. I chose code first, meaning the schema.gql file is generated based on
our Typescript code, as opposed to vice versa. When combined with MikroORM, we
get:
- type safety across the entire backend without having to define additional interfaces, etc.
- Consistency across domains (eg.
compare
CreateTransactionInput,TransactionGraphQL model, andTransactionEntity. different domains, consistent design) and types ( every type is organized the same).
Relay is a GraphQL specification that was developed by the same team at Meta that developed GraphQL. It set out to solve two problems: pagination and caching. On the client side, Meta developed React Relay, a framework used by this app as well. See React Relay's intro to the GraphQL specification for an explanation:
The benefits we get from using React Relay with a Relay-compliant GraphQL API are significant.
- Caching.
The core of the Relay spec is the globally unique ID. This allows React Relay to cache each item reliably. - Fragment composition
Each component declares its own data dependencies. The Relay compiler generates the relevant fragment (and Typescript type), which the parent spreads as a fragment. Let's take a look at an example from our code:
// UserAvatar.tsx

interface IProps extends AvatarProps {
  _data: UserAvatar_data$key;
}

export const UserAvatar: React.FC<IProps> = ({ _data, ...props }) => {
  const data = useFragment(
    graphql`
      fragment UserAvatar_data on User {
        firstName
        lastName
        avatarURL
      }
    `,
    _data,
  );

//   rest of code
};
So these are the fields the UserAvatar component needs. Now here's a
parent component:
// Transaction.tsx

interface IProps {
  _recipientData: Transaction_data$key;
  //   ...
}

export const Transaction: React.FC<IProps> = ({
  _recipientData,
  //   ...
}) => {
  const recipientData = useFragment(
    graphql`
      fragment Transaction_data on User {
        ...UserAvatar_data
        username
      }
    `,
    _recipientData,
  );

  return (
    // ...
    <UserAvatar
      _data={recipientData}
    />
    //  ...
  )
}
Notice what's happening here. Transaction declares its own data
dependencies, and then spreads its children's dependencies as a fragment.
From the perspective of Transaction, it just knows that Avatar needs its
data fragment. What fields are in that fragment is Avatar's business.
This allows us to develop components in a truly modularized and declarative fashion.
Continuing list
- No overfetching
By following the fragment composition pattern above, these fragments can be composed together into a single query that fetches all the required data in one round trip. I usually do this at the screen route level.
const HomeScreenRoute = () => {
  const [queryRef, loadQuery] = useQueryLoader<HomeScreenQuery>(
    graphql`
      query HomeScreenQuery {
        me {
          ...UserAvatar_data
          groups {
            edges {
              node @required(action: THROW) {
                id
                group {
                  node @required(action: THROW) {
                    ...ActiveOrderCard_data
                  }
                }
              }
            }
          }
        }
      }
    `,
  );

  useFocusEffect(
    useCallback(() => {
      loadQuery({}, { fetchPolicy: 'store-and-network' });
    }, [loadQuery]),
  );

  return (
    <Suspense fallback={<CustomSkeleton />}>
      {queryRef && <HomeScreen _queryRef={queryRef} />}
    </Suspense>
  );
};- Re-rendering upon data update
For example, spreading a fragment in the mutation response will re-render any component that relies on that fragment. More fundamentally, whenever the data associated with a fragment is updated in the Relay store, that will trigger a re-render. - Render as you fetch
React Relay is designed to take advantage of the new concurrency paradigm in React. Refer back to theHomeScreenRouteexample above. By leveragingSuspense, we can isolate loading states and produce a more responsive and instantaneous user experience. Our main focus on the frontend is defining the data logic, theSuspenseboundaries, and fallback components. React Relay handles displaying the data that's currently available in the store (if any), suspending the components that don't have any data in the store (mostly on initial render), and updating the store upon receiving a response. - Pagination
Pagination isn't necessarily a top priority for a v1.0 MVP because it'll take at least a bit of time for people to use the app enough to build up long lists of data. But that can quickly change. Pagination is especially critical in a React Native application, where list performance can degrade rapidly if not properly optimized. I'll expand more on this with some examples once I build it in.
Despite having only two fields, itemName and itemPrice, the trickiness
with this component is in managing the different possible scenarios. If a
cell is empty below, that means it's not relevant in that scenario. Note:
we don't care about the user's transaction when the user is also paying for
the order because it has no net impact on their group balance.
| activeOrder (bool) |
userRole | user txn in the form? |
user txn in the database? |
CTA | Editable Fields |
|---|---|---|---|---|---|
| false | CreateOrderButton |
||||
| true | payer | CompleteOrder |
all | ||
| true | recipient | false | false | CreateTransactionButton label = "Add item" |
user |
| true | recipient | true | false | CreateTransactionButton _label = "Confirm" |
user |
| true | recipient | true | true | DeleteMyTransactionButtonUpdateTransactionButton |
user |
- Ensuring form validation, with slightly different rules depending on the
user's role. If the user is
paying, we have to ensure that all rows are valid. When the user is
receiving, we have to ensure that just the user row is valid. Also,
itemPriceis optional for the recipient, but required for the payer.
I solved this through a combination of things:
- leveraged React Hook Form to manage form state at the order level.
useFieldArrayallows us to deal with each row separately, plus provides a convenient API for adding/removing rows, and handling row-level and cell-level validation errors. - Made
Transactiona controlled input wrapper in the event that the transaction is in "edit mode". If the transaction is historical (ie rendered byHistoricalOrderCard), then we simply display the values as<Text>components. InTransaction, I defined validation rules foritemNameanditemPricedepending onuserRole, and adjusted styling in case of validation errors.
- Accurately determining the state of the user's row and reflecting the relevant calls to action.
- When the user presses
Add item, this inserts a row into the form. - Now, the call to action is
Confirm, which posts thecreateTransactionmutation. Before posting the mutation however, we to validate the user's row. In order to validate the user's row, we have to know which row is the user's. I solved this by making theidproperty on the user's Transaction objecttempbefore the initial mutation, and using theuserIndexanduserTransactionIDstate variables. This allows us to find the form row index and perform validation during the submission flow. - Once the user has a Transaction in the database, the value of
idis no longertemp. So here, I leveraged bothuseDidMountanduseDidUpdatehooks to attempt to updateuserIndexboth on initial render and while the form re-renders. This allows us to handle validating an update, or deleting the user's transaction.
- Ignoring tax. The assumption is that that piece balances out over time and the focus is more so on facilitating the decision making behind whose turn it is.
- No authentication. For ease of use, the USER_ID is hard coded on the server.
- Incorporate dataloader on the server side to fix GraphQL N+1 problem
- Testing (e2e, unit tests on resolver / entities (backend) and form / balance components (frontend))
- auth
- Explore more frictionless ways of automating the cost entry portion. After all, who really wants to do expenses on a daily basis? (gamification, auto complete suggestions based on past transactions)
- pagination
- server-side caching
