Android app for demonstrating the speech enhancing of the Deep Denoising AutoEncoder (DDAE). It is is capable of audio recording, playback and de-noising with a pre-trained DNN Tensorflow model.
Target SDK 26
Requires permissions Write to External Storage and Record Audio
These are the models included in the app. Each one could work better or worse in different scenarios.
- DDAE Stationary: DDAE trained on Chinese speech and stationary noise. This model works best on stationary noise such as pink noise and PC fans.
- DDAE Non-Stationary: DDAE trained on Chinese speech and Non-stationary noise. This model works best on Non-stationary noise such as sirens or coughing.
- DDAE All: DDAE trained on Chinese speech and both stationary and Non-stationary noise.
- DDAE English: DDAE trained on English speech and random stationary and non-stationary noise. Catch-all for De-noising English Speech.
If you want to use your own model, follow these steps to change the app, otherwise you can skip this and use the default ones. To export pre-trained models into a format the application can use, you must "freeze" the model into a protobuf file. Do this by using the python script provided called "freeze.py". Make sure you have the save files from the Tensorflow Saver of your training session. At the bottom of freeze.py, configure the variable "model_dir" to the file path of your save files and the variable "output_nodes_names" into the output node of your model. For example, if you are using DDAE, the output node name would be "REG_Net/DNN/Add_4". Now you may run the script and a protobuf file will be generated in the location of "model_dir" called "frozen_model.pb". You may rename this to whatever you like. Next, place this protobuf file in the assets folder of the application located at app/src/main/assets/models/. The TensorflowInferenceInterface will now be able to find and use the frozen model.
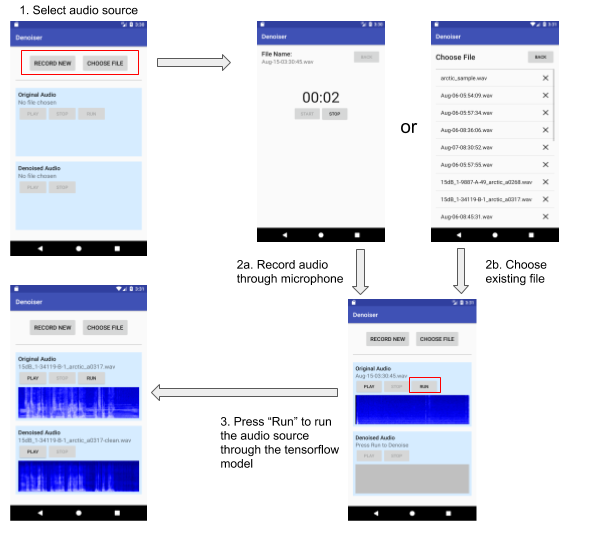
- When the app is first opened, you will be presented with two options for an audio source to run the denoiser on: recording a new file from the internal/external microphone (2a.) or choosing an existing .wav file (2b.). If this is the first time running the app on your device, you must give permissions for the app to use the internal microphone, and to write to external storage when pressing either buttons.
-
- a. Press start to begin the recording. Press stop to end. If you want to retake (and overwrite) the last recording, simply press start again. Pressing save on the top right corner will prompt the user to change the file name and save to external storage.
- b. Press on the file name you would like to use. Press the “X” buttons to delete files.
- Once an audio source from either 2a. or 2b. has been acquired, you will be able to play the file under the section “Original Audio.” The spectrogram of that audio file will be displayed automatically. Press the “Run” button to denoise the audio. The “Denoised Audio” section will now allow you to play the denoised audio and its spectrogram will automatically be generated.
