This Repository is for personal learning and adding comments is the most frequent modifies.
这个仓库用于个人学习,最常见的修改便是添加相关注释。
本项目基于 ZooKeeper release-3.6.1,使用 release 版本更稳定~
请使用 JDK1.8 u211以及更高版本进行编译。
在国内,IDEA 利用 Maven 解析完毕项目之后,也许会发现大量错误,例如:
这张图仅仅截取了部分错误。
首先我们可以将 Version 类写死,因为 org.apache.zookeeper.version.Info 包并不能找到,而这只是用于 zookeeper 用来发布的时候生成版本用的,我们又不发布版本所以直接写死就行了,替换为如下:
public class Version  {

    /*
     * Since the SVN to Git port this field doesn't return the revision anymore
     * TODO: remove this method and associated field declaration in VerGen
     * @see {@link #getHashRevision()}
     * @return the default value -1
     */
    @Deprecated
    public static int getRevision() {
        return -1;
    }

    public static String getRevisionHash() {
        return "1";
    }

    public static String getBuildDate() {
        return "2019-08-11";
    }

    public static String getVersion() {
        return "3.4.14";
    }

    public static String getVersionRevision() {
        return getVersion() + "-" + getRevisionHash();
    }

    public static String getFullVersion() {
        return getVersionRevision() + ", built on " + getBuildDate();
    }

    public static void printUsage() {
        System.out
                .print("Usage:\tjava -cp ... org.apache.zookeeper.Version "
                        + "[--full | --short | --revision],\n\tPrints --full version "
                        + "info if no arg specified.");
        System.exit(1);
    }

    /**
     * Prints the current version, revision and build date to the standard out.
     *
     * @param args
     *            <ul>
     *            <li> --short - prints a short version string "1.2.3"
     *            <li> --revision - prints a short version string with the SVN
     *            repository revision "1.2.3-94"
     *            <li> --full - prints the revision and the build date
     *            </ul>
     */
    public static void main(String[] args) {
        if (args.length > 1) {
            printUsage();
        }
        if (args.length == 0 || (args.length == 1 && args[0].equals("--full"))) {
            System.out.println(getFullVersion());
            System.exit(0);
        }
        if (args[0].equals("--short"))
            System.out.println(getVersion());
        else if (args[0].equals("--revision"))
            System.out.println(getVersionRevision());
        else
            printUsage();
        System.exit(0);
    }
}
然后我们删除顶层目录下的 <scope> 元素:
<dependency>
    <groupId>io.dropwizard.metrics</groupId>
    <artifactId>metrics-core</artifactId>
    <version>3.1.0</version>
</dependency>
<dependency>
  <groupId>org.xerial.snappy</groupId>
  <artifactId>snappy-java</artifactId>
  <version>1.1.7.3</version>
</dependency>
<dependency>
  <groupId>org.eclipse.jetty</groupId>
  <artifactId>jetty-server</artifactId>
</dependency>
<dependency>
  <groupId>org.eclipse.jetty</groupId>
  <artifactId>jetty-servlet</artifactId>
</dependency>
上面这几个删除掉即可。
然后在 IDEA 的 Maven 插件下输入 mvn clean install -DskipTests 命令,这会消耗比较长的时间。
如果还可以报错,很有可能是因为 the great wall 的问题,解决方案有:
- 选择阿里云的 Maven 镜像仓库(记得在设置里 Override);
- 选择机场代理;
- 在 IDEA 的 Maven 配置选项卡中勾选
Always update snapshots;
当然网络问题也会导致依赖错误,因此需要再次执行 mvn clean install -DskipTests 命令。
ZooKeeper 较早的版本需要使用 Ant 进行项目管理,不过最近版本的 zookeeper 已经使用了 maven 进行管理了(你可以轻松地在项目顶层路径下发现 pom.xml 文件,而早前版本没有此文件)。
我们可以使用 IDEA 自动导入 Git 项目的方式来引入 ZooKeeper 项目,不过为了更好地做代码管理,我们建议以如下的方式来导入 ZooKeeper 项目:
- 在 https://github.com/apache/zookeeper/ 下选择一个版本,我们这里选择的使 release-3.6.1,然后 fork 到自己的仓库;或者,你可以选择克隆我这个进行了一定的源码注释的 ZooKeeper 版本,地址如下:git@github.com:Spongecaptain/zookeeper.git
- 在 IDEA 编辑器中导入自己仓库的 ZooKeeper 项目,在项目界面选择
Get From Version Control
选择克隆项目即可。
接着,让我们等待 IDEA 对项目的解析与同步。
当项目通过 IDEA 将项目完全克隆到本地之后,我们可以看到,在 zookeeper/conf/ 路径下已经有一个 zoo_sample.cfg 文件,我们将此文件复制一份,重命名为 zoo.cfg(实际上如何命名都可以,这是默认配置文件的名称)。
我们需要进行配置的修改,将 dataDir 属性修改为在你机器上,你想存储 ZooKeeper 日志文件与快照文件的路径,我这里选择的配置为:
# The number of milliseconds of each tick
tickTime=2000
# The number of ticks that the initial
# synchronization phase can take
initLimit=10
# The number of ticks that can pass between
# sending a request and getting an acknowledgement
syncLimit=5
# the directory where the snapshot is stored.
# do not use /tmp for storage, /tmp here is just
# example sakes.
# 类 Unix 系统配置:dataDir=/usr/local/zkData
dataDir=/usr/local/zkData
# Windows 配置:dataDir=E:\\zkData/data1
# dataDir=E:\\zkData/data1
# the port at which the clients will connect
clientPort=2181
admin.serverPort=8888注意:
- 类 Unix 系统与 Windows 系统有着不同的路径表示方式(你可以参见上述配置文件中的注释);
- admin.serverPort 属性设置为 8888 的原因在于我本机的 8080 端口通常用于 Web 开发,我并不想出现冲突;
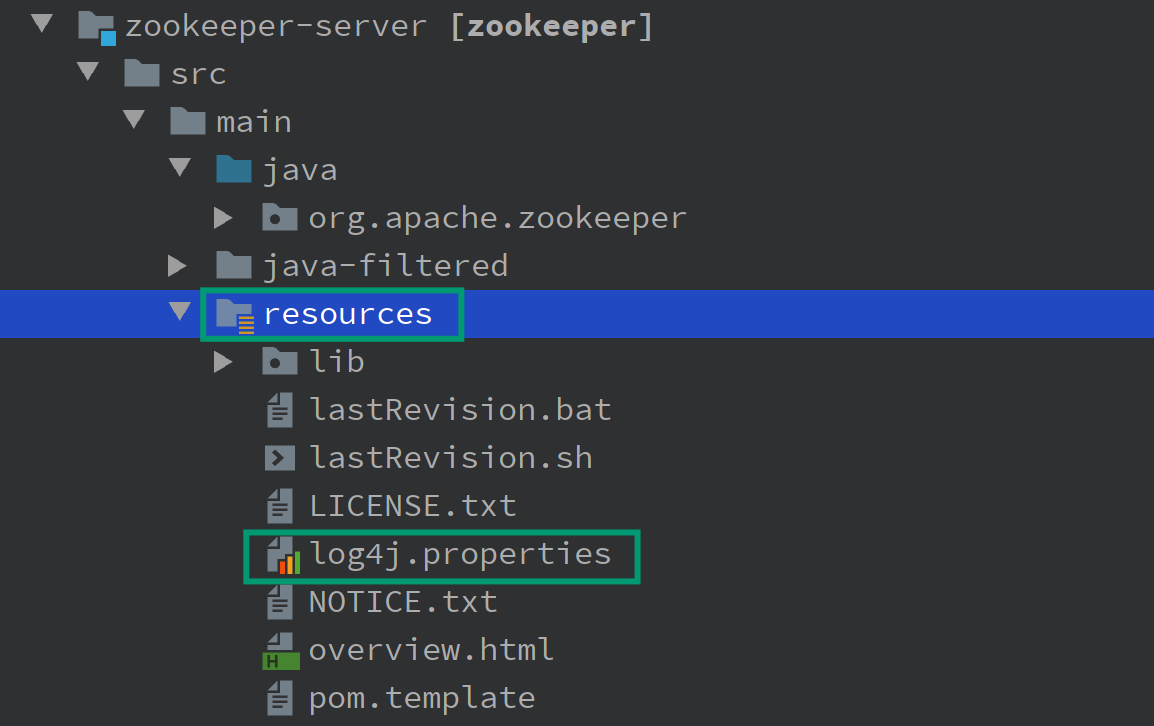
最后,我们还需要复制一份在 zookeeper/conf 目录下天然存在的配置文件 log4j.properties,然后将其复制到 zookeeper-server/src/main/resources 路径下。接着,我们选择将此 resources 目录右击,选择 Mark direct as ,选择 Resources Root。
如下图所示:
这步是必须的,因为我并没有将 resources 路径作为 git 管理的一部分。
如果出现
log4j:WARN No appenders could be found for logger (org.apache.zookeeper.server.quorum.QuorumPeerConfig).错误,那么最大的可能你在 GIT 项目后没有在 IDEA 中将zookeeper-server/src/main/resources路径下右击设置为 root-resources 目录。
由于我编辑器只用 IntelliJ IDEA,因此仅仅对在 IntelliJ 上运行 ZooKeeper 进行说明,不过即使你使用其他 IDE,操作也是类似的。
ZooKeeper 有若干个启动类,有:ZooKeeper 服务端(集群与单机)、ZooKeeper 客户端,因此需要我们确定默认的启动类。
1.单机(standalone)模式下 ZooKeeper 服务端的启动
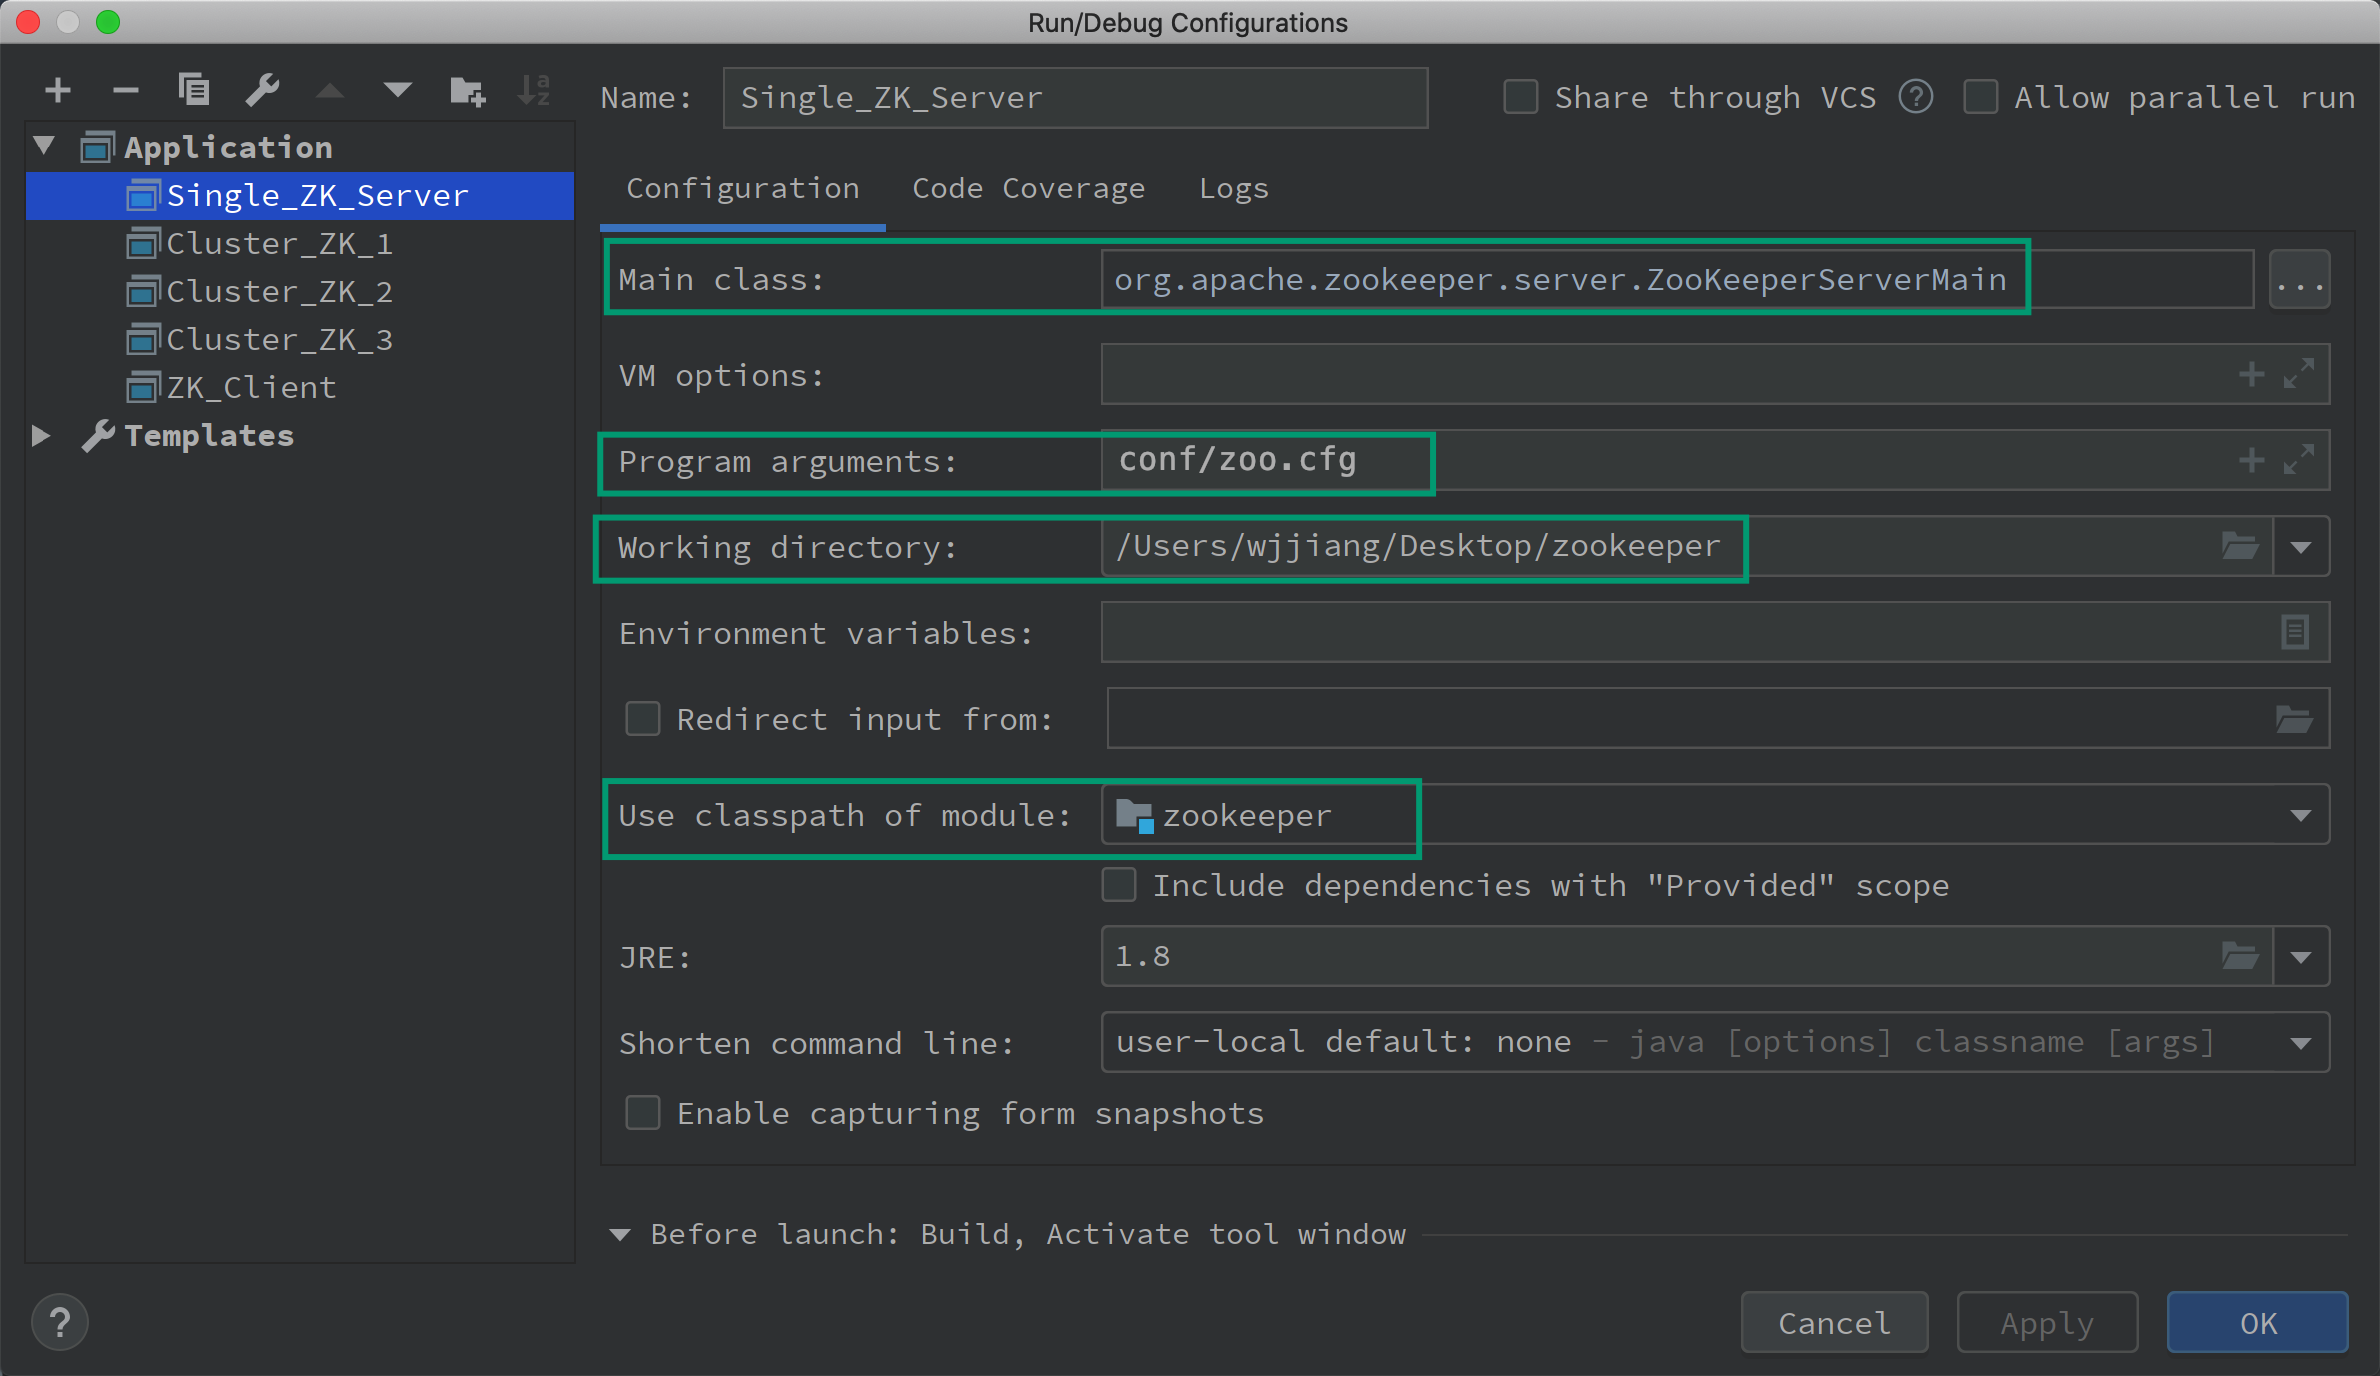
在 IDEA 中选择 Run/Debug Configuration 选项卡,选择添加一个 Application,然后做出如下的配置:
-
Main class :org.apache.zookeeper.server.ZooKeeperServerMain
-
Program argument:conf/zoo.cfg
如果你的配置文件路径在别处,配置文件名称不为 coo.cfg,那么请进行一定的修改。
-
Working directory:/Users/wjjiang/Desktop/zookeeper
这个选项一般默认就有,无需修改,选择项目的根路径即可。总之不要拷贝我的路径,因为在你的电脑上不存在。
-
Use classpath of model:选择 zookeeper
整个配置如下图所示:
事实上,将 Main class 选项改为 org.apache.zookeeper.server.quorum.QuorumPeerMain 也是可以启动单机模型下的 ZooKeeper 服务端,只要配置文件属于单机模式即可。
最后,在 IDEA 上选择 Run selected configuration 选项卡即可。
2.ZooKeeper 客户端启动
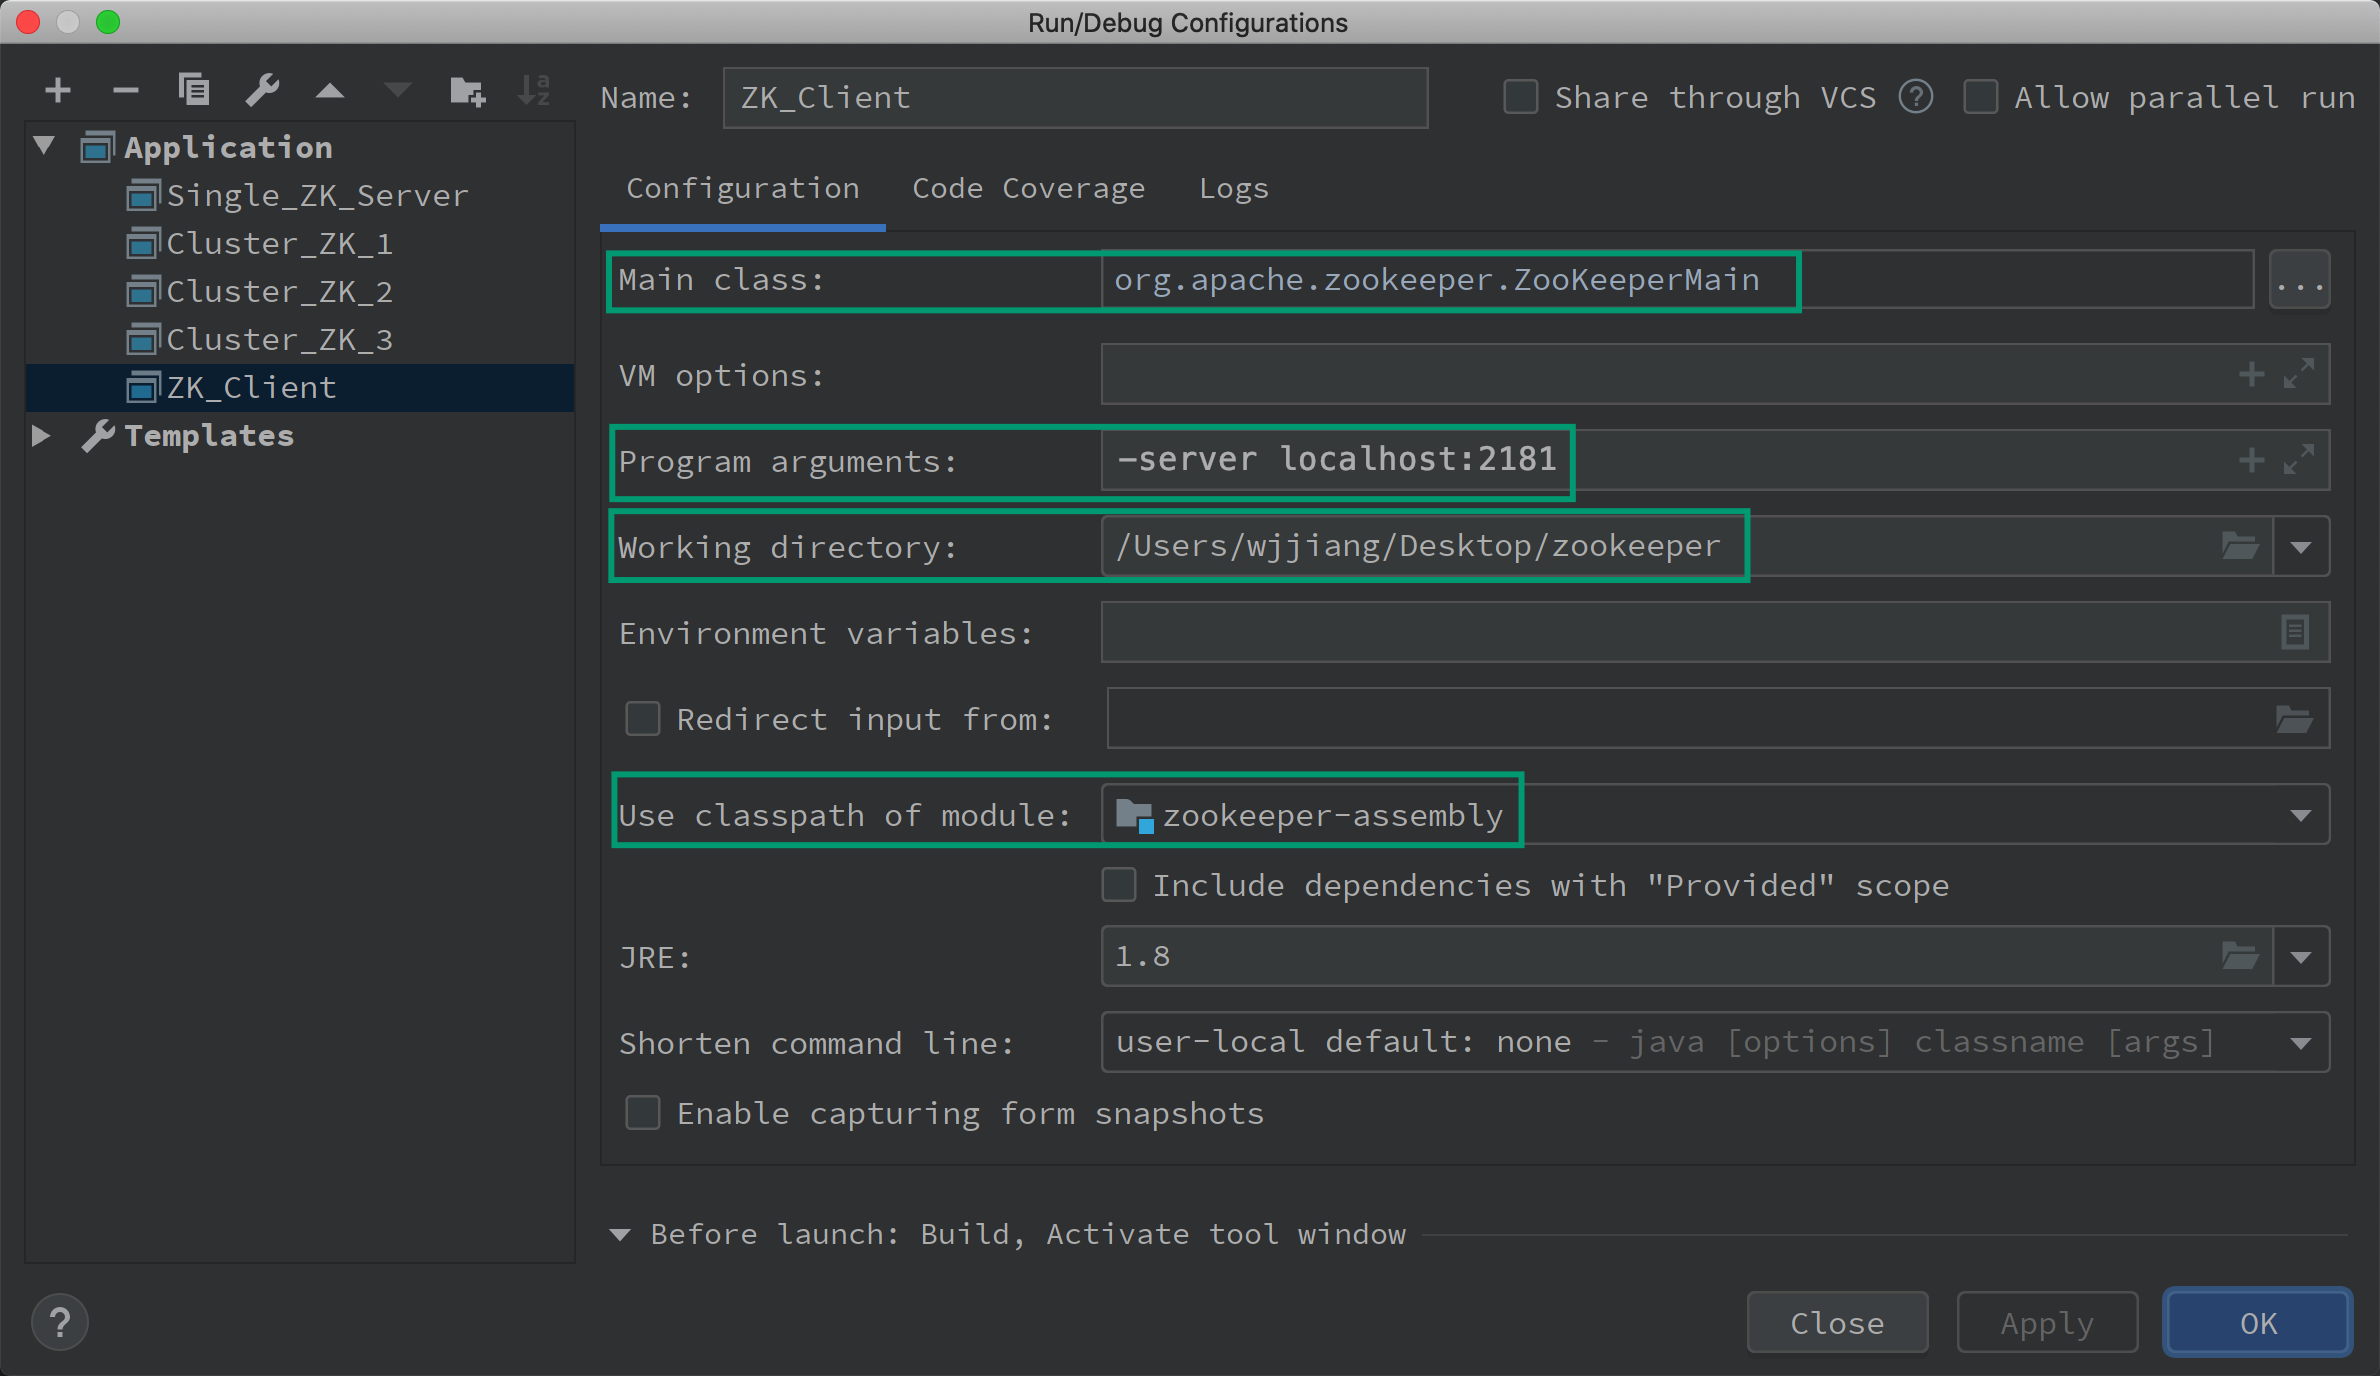
ZooKeeper 客户端启动的配置更简单,其不需要任何配置文件。在 IDEA 中选择 Run/Debug Configuration 选项卡,选择添加一个 Application,然后做出如下的配置:
-
Main class :org.apache.zookeeper.ZooKeeperMain
-
Program arguments:-server localhost:2181
-
Working directory:/Users/wjjiang/Desktop/zookeeper
通常不需要修改,若修改,请修改为你本机的目录。
-
Use classpath of model:选择 zookeeper-assembly
如下图所示:
如果因为依赖而出错,可以选择执行 mvn clean install -DskipTests 命令。
集群模式下客户端启动配置完全不需要修改,而服务端的启动配置需要进行修改。最小规模的 ZooKeeper 集群应当是 3 个,因此我们需要准备 3 个配置文件,这里还是将它们存放于 zookeeper/conf/ 路径下。
zoo1.cfg
tickTime=200000
initLimit=10
syncLimit=5
maxClientCnxns=2
# Mac 的目录配置
dataDir=/usr/local/zkclusterdata/1
# Win 的目录配置
# dataDir=E:\\resources\\Zookeeper\\zookeeper-3.4.11\\conf\\data\\1
clientPort=2181
server.1=127.0.0.1:2887:3887
server.2=127.0.0.1:2888:3888
server.3=127.0.0.1:2889:3889
zoo2.cfg
tickTime=200000
initLimit=10
syncLimit=5
maxClientCnxns=2
# Mac 的目录配置
dataDir=/usr/local/zkclusterdata/2
# Win 的目录配置
# dataDir=E:\\resources\\Zookeeper\\zookeeper-3.4.11\\conf\\data\\1
clientPort=2182
server.1=127.0.0.1:2887:3887
server.2=127.0.0.1:2888:3888
server.3=127.0.0.1:2889:3889
zoo3.cfg
tickTime=200000
initLimit=10
syncLimit=5
maxClientCnxns=2
# Mac 的目录配置
dataDir=/usr/local/zkclusterdata/3
# Win 的目录配置
# dataDir=E:\\resources\\Zookeeper\\zookeeper-3.4.11\\conf\\data\\1
clientPort=2183
server.1=127.0.0.1:2887:3887
server.2=127.0.0.1:2888:3888
server.3=127.0.0.1:2889:3889
每一个配置文件在两点上不同,其余配置实际上都是相同的:
- dataDir 不同伪节点的日志文件与快照文件的存放地址;
- clientPort 不同伪节点对客户端连接的监听端口;
我们需要一次在 zoo1.cfg 的 dataDir 指向的路径下创建 myid 文件,属性为 1,zoo2.cfg 与 zoo3.cfg 处理方式同理,下面是一个例子:
echo '1' > /usr/local/zkclusterdata/1/myid注意事项:这里的目录修改为你的 dataDir 配置,不同的 cfg 文件路径有所区别。
事实上,只有伪集群需要如此这般负责配置,如果节点是真的在不同物理主机上存储(或者依赖于 Docket 等工具进行了隔离),那么配置完全可以相同(除了 myid 文件不同)。
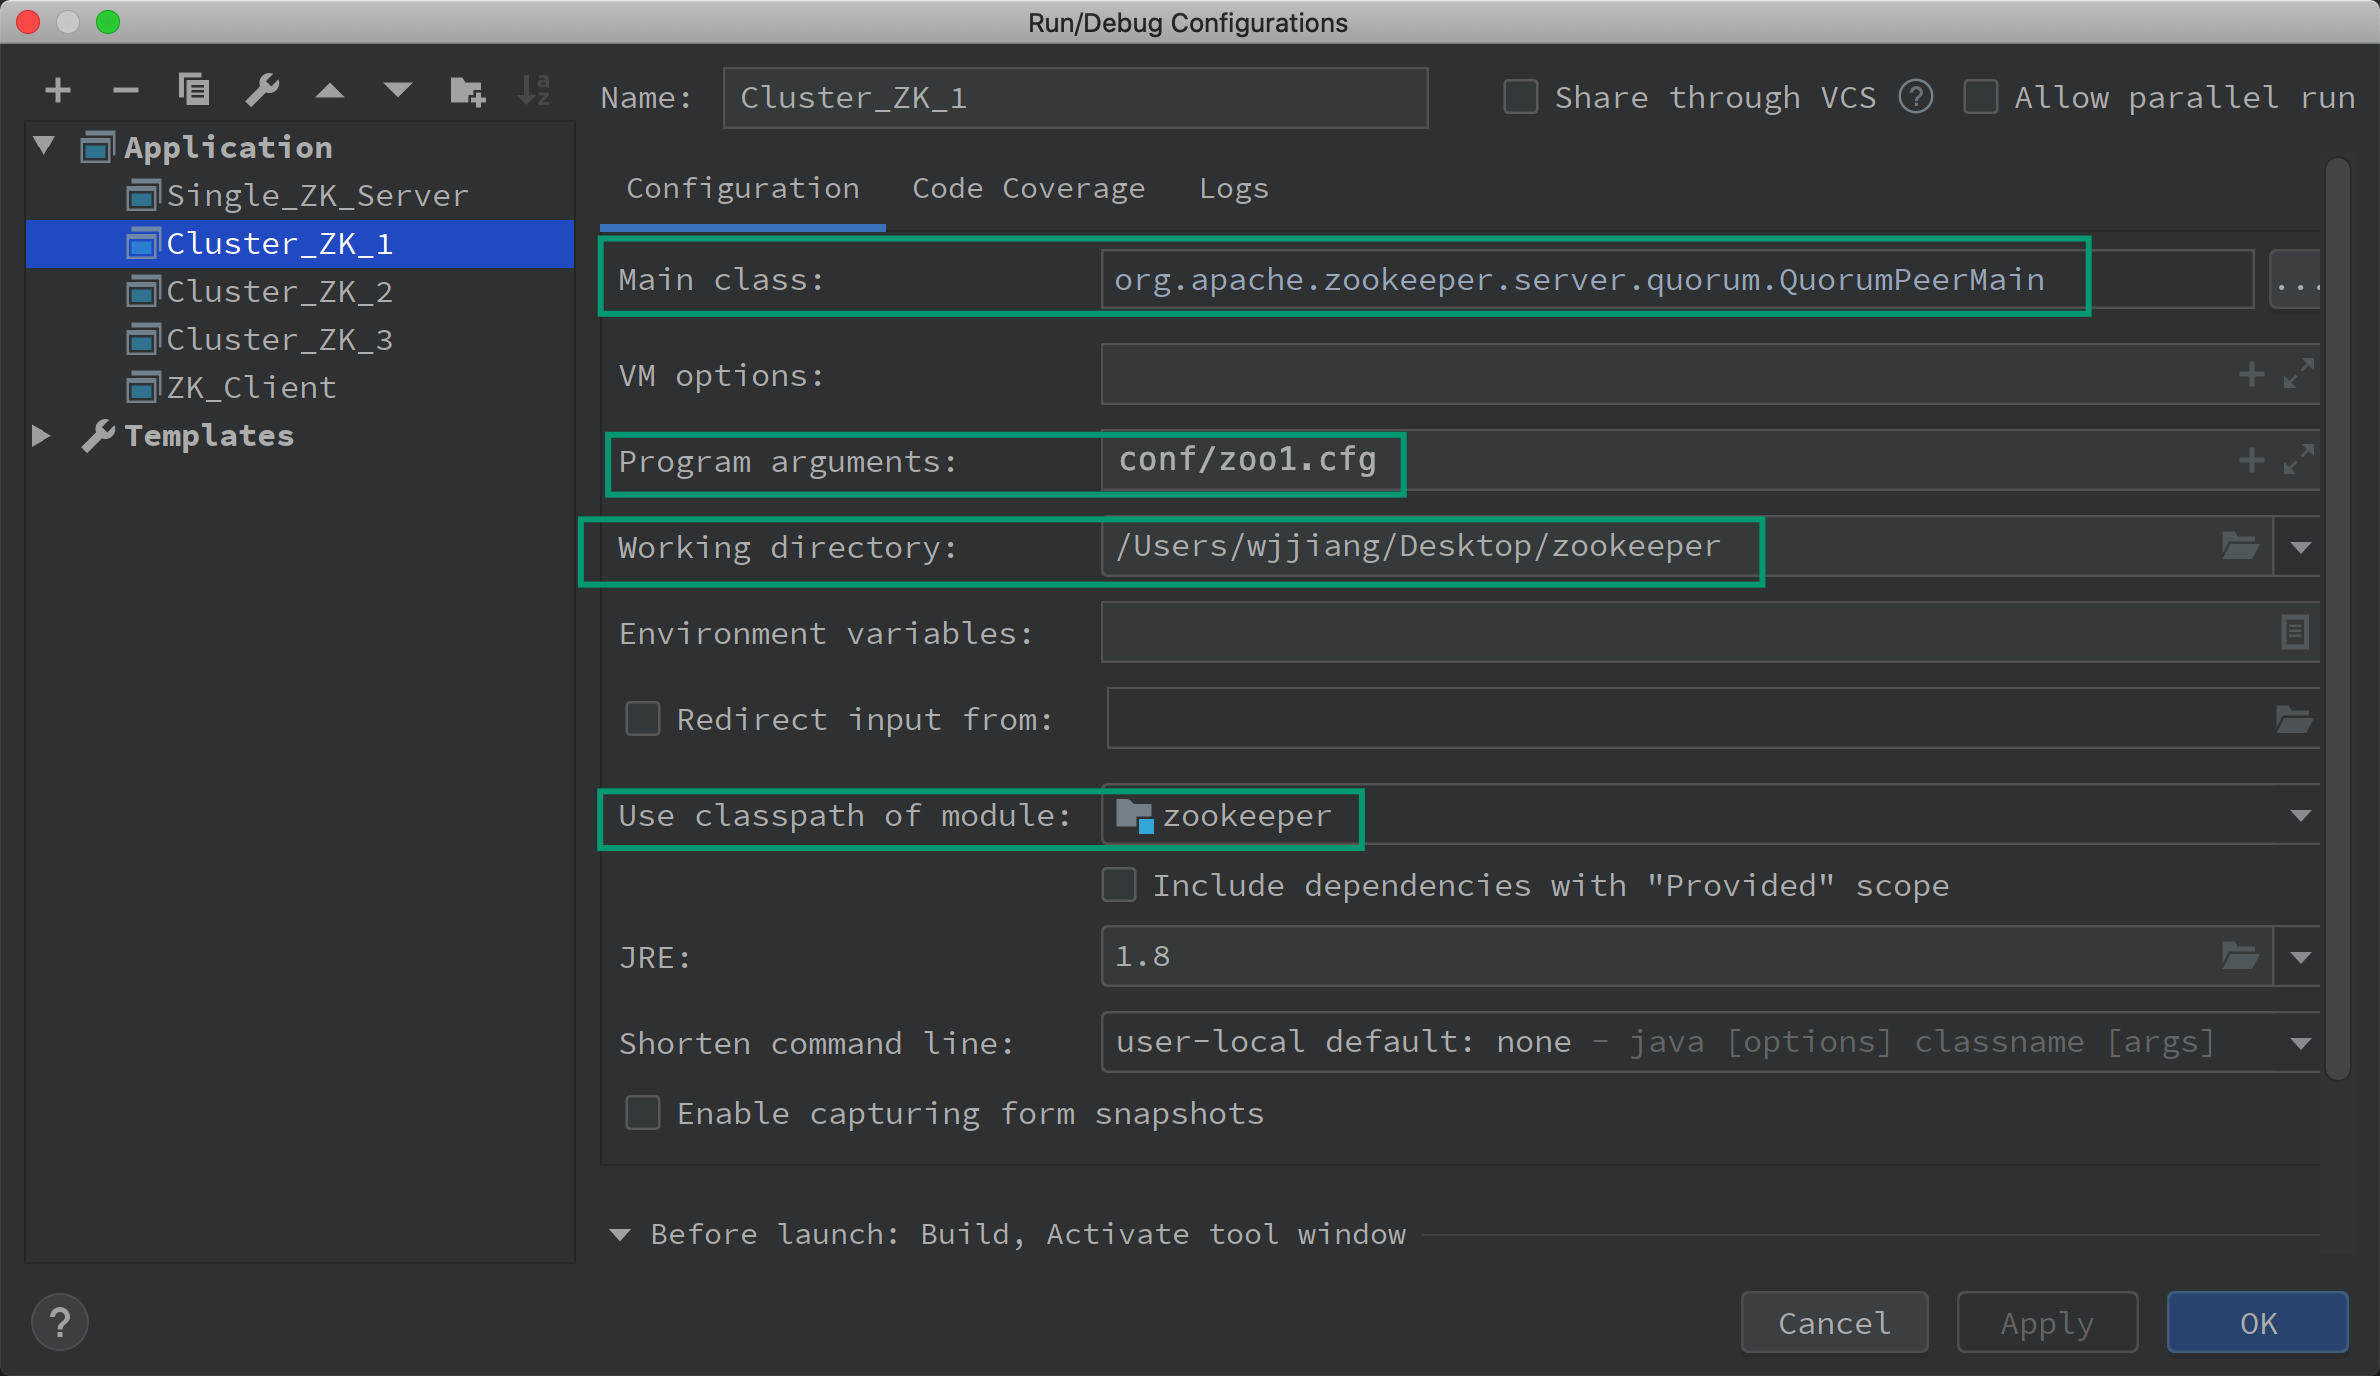
接着我们需要为每一个主机节点在 Run/Debug Configuration 选项卡中进行配置,我们还是以节点 1 为例,配置如下:
-
Main class :org.apache.zookeeper.server.quorum.QuorumPeerMain
-
Program argument:conf/zoo1.cfg
如果是节点 2,那么就配置为 conf/zoo2.cfg,一次类推。
-
Working directory:/Users/wjjiang/Desktop/zookeeper
默认即可。
-
Use classpath of model:选择 zookeeper
如下图所示:
其他两个节点除了在 Program arguments 上不同之外,其余配置都相同。
补充:在集群模式下,客户端应当知道所有 ZooKeeper 服务器节点的地址,因此我们在单机模式下 ZooKeeper 客户端启动配置的基础上,仅仅修改 Program arguments 选项为:-server localhost:2181,localhost:2182,localhost:2183
从 ZooKeeperMain(客户端)、QuorumPeerMain(集群模式服务端)、ZooKeeperServerMain(单机模式服务端)作为入手来学习 ZooKeeper 源码是一个不错的选择。
你可以参考我个人博客上 tag 为 ZooKeeper 的相关源码分析博客:
https://spongecaptain.cool/tags/zookeeper/
最后,欢迎 star!
Enjoy the Source Code !


