This template allows you to deploy SigNoz on aws ecs fargate. (what is signoz?)
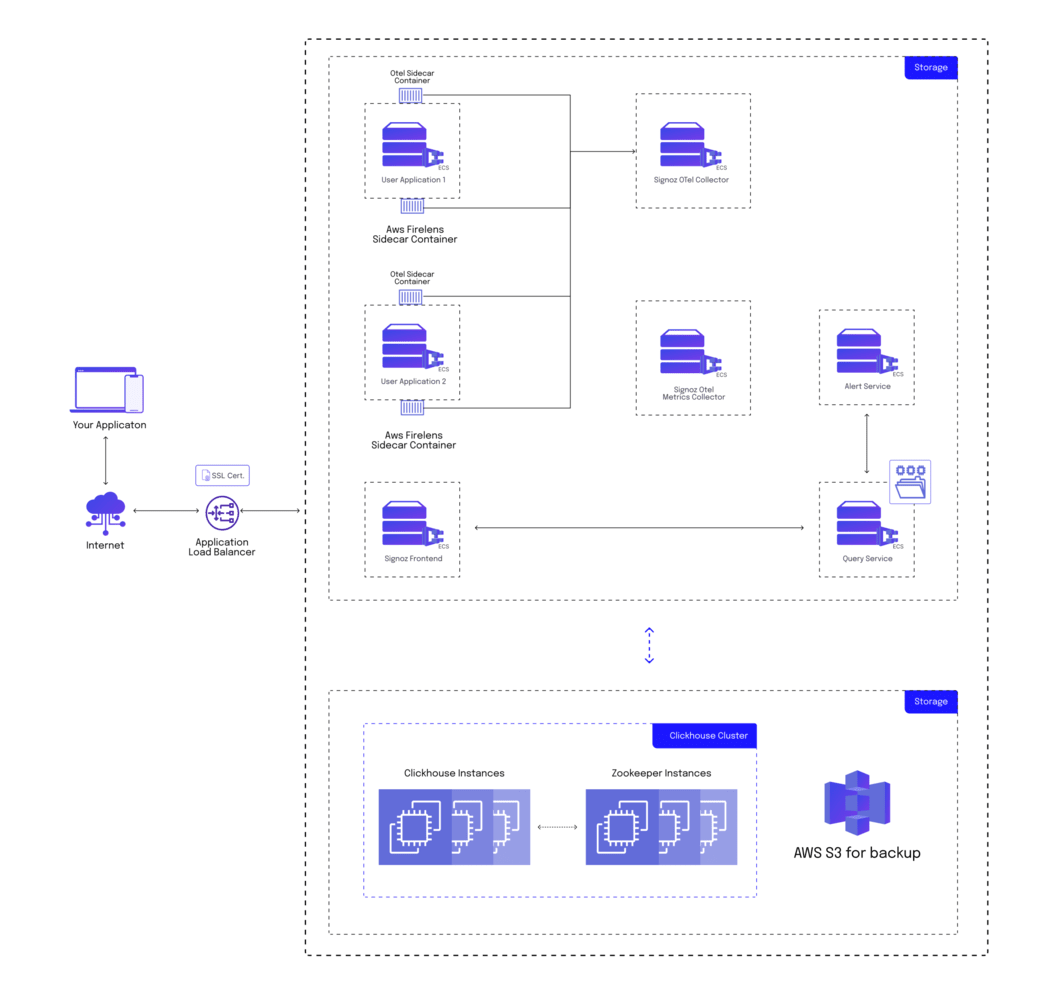
System Architecture of everything we are going to deploy.
This is going to deploy a clickhouse cluster in our vpc and and all the signoz services in our ecs fargate cluster.
- About SigNoz
- Pre-requisites
- Deploying Signoz
- Config-File
- Hosting clickhouse using cloudformation
- Using AWS Copilot
- Instrumenting our application
- Sending logs
- Deploying SigNoz on aws ecs
SigNoz provides comprehensive monitoring for your application. It tracks and monitors all the important metrics and logs related to your application, infrastructure, and network, and provides real-time alerts for any issues.
You can get traces,metrics and logs of your application.
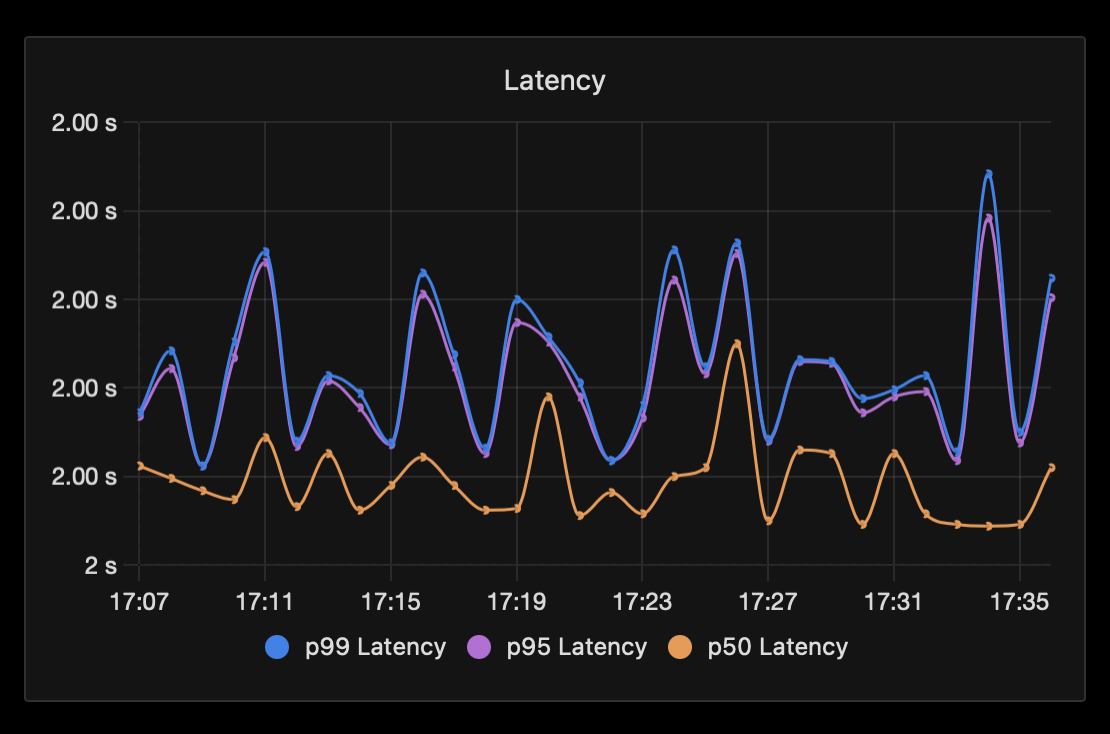 Latency of api calls to a sample application in signoz.
 Traces of our sample application in signoz.
 Logs of our sample application in signoz
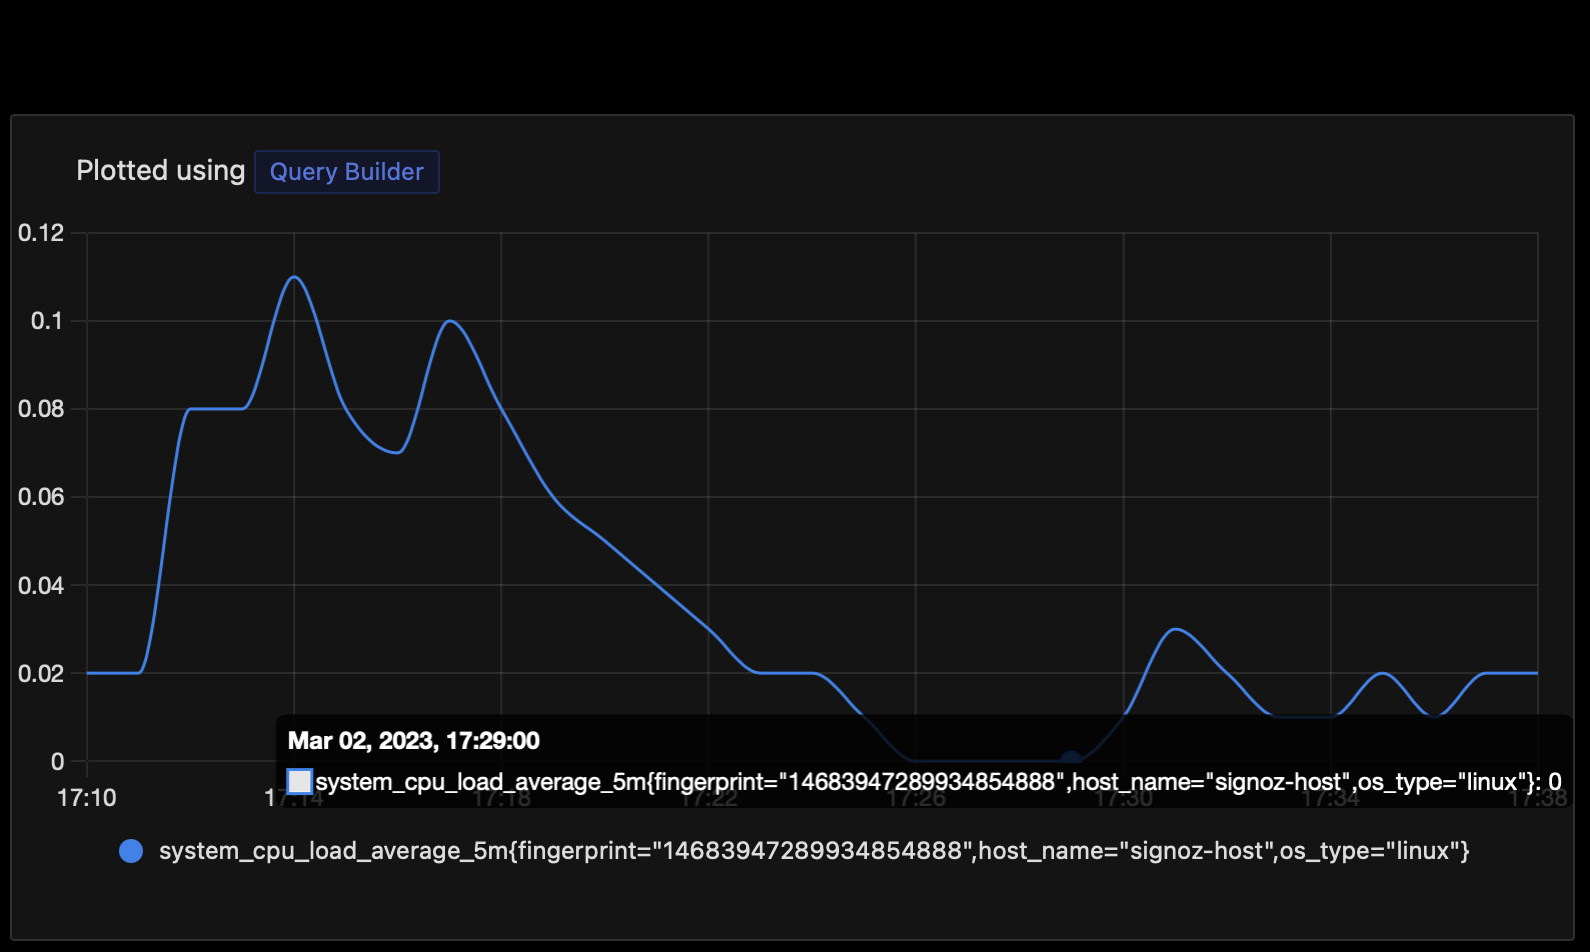 CPU metrics of our sample application in signoz
Self hosting SigNoz on aws ecs fargate is also significantly cheaper than using aws native services like xray and cloudwatch to collect application metrics,traces and logs.SigNoz consists of a clikhouse cluster and multiple services, hosting them is tedious and inconvenient process but this template allows you to do so using a single command.
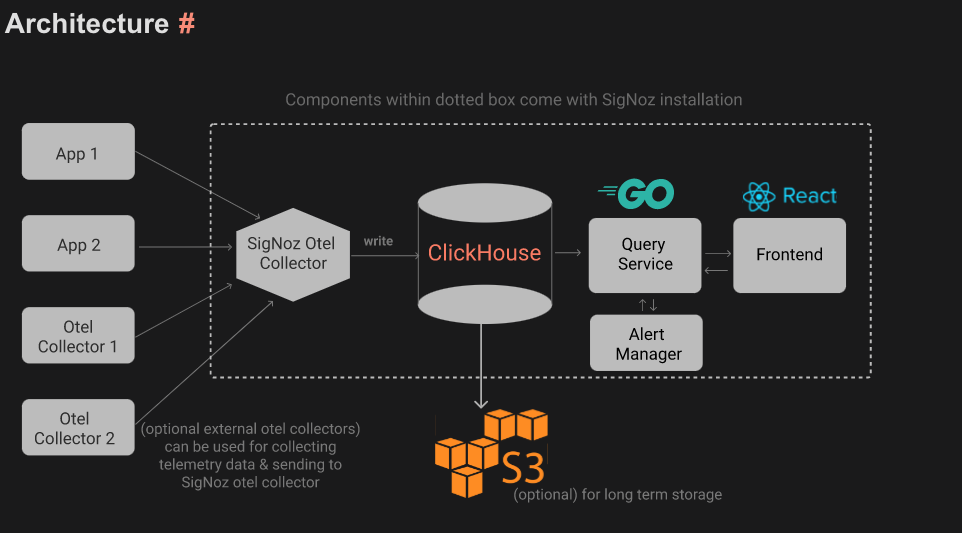
SigNoz architecture:
We will be hosting our own clickhouse cluster using aws cloudformation and host all the services on aws ecs faragate.
- please have bash utility jq installed to process json.
- please have bash utility yq installed to process yml.
- please install the aws-cli and docker.
- Please have aws cli To configured with access key,secret and region.
- please have aws copilot version of the current develop branch on github. To install - use make to install a standalone binary
- please configure signoz-ecs-config.yml file with appropriate values.
The signoz-ecs-config.yml files containes all our configuration :
- name of your aws copilot application, if you want to use an existing app please use the same app name
- environment name of your aws copilot application
-
Config for the clickhouse cluster
- Name of the cloudformation stack which will create the clickhouse cluster
- Disk size of the ec2 instance of the clickhouse in your clickhouse cluster
- Disk size of the EC2 instance of the zookeeper in your clickhouse cluster
- EC2 instance type to provision for Zookeeper
- EC2 instance type to provision for the clickhosue shard
- Host of the clickhouse intance, please keep it black if you want to create your own clickhouse cluster, if your want to use an existing one please replace it with value of the host of one of your clickhouse shards
-
In case you already havee an existing VPC and would like to deploy your application in it, please add in the required details below
- Please fill the value if you want to use an existing vpc, if your want to create a new one please keep it empty
- Subnet of the pre-existing public subnet, otherwise please leave it blank
- Subnet of the pre-existing public subnet, otherwise please leave it blank
- Subnet of the pre-existing private subnet, otherwise please leave it blank
- Subnet of the pre-existing private subnet, otherwise please leave it blank
-
The config related to the custom fluentbit image we will be uploading to aws ecr
- name of the repo in aws ecr for the fluentbit image
- name of the local fluentbit image we will be creating
-
The config related to the custom otel collector image we will be uploading to aws ecr
- name of the repo in aws ecr for the sidecar-otel image
- name of the local sidecar-otel image we will be creating
-
name of the variouse SigNoz service we will be deploying to aws ecs fargate
- name of the SigNoz otel collector service
- name of the SigNoz query service
- name of the SigNoz alert service
- name of the SigNoz frontend service
To instrument your applications and send data to SigNoz please refer- https://signoz.io/docs/instrumentation/
- If your want to use an existing vpc please add the existing vpc block in the signoz-ecs-config.yml file.
- If you want to use your own clickhouse cluster please mention the clickhouse host in the signoz-ecs-config.yml file(by default a new clickhouse cluster would be created).
- If you want to host SigNoz in an existing copilot application, just keep your application name and the enviroment same as the one you want to host SigNoz in.
- You can change the name of cloudformation stack of your clickhouse cluster.
- can change the instance type of your clikhouse or zookeeper hosts.
- You can change the name of various SigNoz services in the config file.
You can also mention the name of a custom config file of the form signoz-ecs-config-suffix, you can mention the suffix by defining an environment variable "$environmentName" and then the scripts will use the custom config file. you revise a wordy sentence in an effortless manner.
clone this repository locally then, configure signoz-ecs-config.yml with appropriate values:
      signoz-app:
      application-name: "tp-signoz"
      environment-name: "dev"
      clickhouseConf:
        stackName: "tp-signoz"
        clickhouseDiskSize: 30
        zookeeperDiskSize: 30
        zookeeperInstanceType: "t2.small"
        instanceType: "t2.small"
        hostName:

      fluentbitConf:
        repoName: "fbit-repo"
        localImageName: "fbit"
      otelSidecarConf:
        repoName: "sidecar-otel"
        localImageName: "sotel"
      serviceNames:
        otel: "otel"
        query: "query"
        alert: "alert"
        frontend: "frontend"
your signoz-ecs-config.yml file
Then execute the script with
make deploy
clone this repository locally then, configure vpc id and subnet id in signoz-ecs-config.yml add the vpc id and all the subnets id
signoz-app:
  application-name: "tp-signoz"
  environment-name: "dev"
  clickhouseConf:
    stackName: "tp-signoz"
    clickhouseDiskSize: 30
    zookeeperDiskSize: 30
    zookeeperInstanceType: "t2.small"
    instanceType: "t2.small"
    hostName:

  fluentbitConf:
    repoName: "fbit-repo"
    localImageName: "fbit"
  otelSidecarConf:
    repoName: "sidecar-otel"
    localImageName: "sotel"
  serviceNames:
    otel: "otel"
    query: "query"
    alert: "alert"
    frontend: "frontend"
  existingVpc:
    vpcId: vpc-09cc39b8b0fa6b10f
    publicSubnetAId: subnet-0787b5ad8b2d8aa41
    publicSubnetBId: subnet-07d3d63b9c87501b0
    privateSubnetAId: subnet-05870291afed3115e
    privateSubnetBId: subnet-045544de09bff69be
your signoz-ecs-config.yml file will look like this
make deploy
If you have already deployed clickhouse cluster and want to deploy all services in a new vpc and fargate cluster:
clone this repository locally then, configure the clickhouse host in signoz-ecs-config.yml
signoz-app:
  application-name: "tp-signoz"
  environment-name: "dev"
  clickhouseConf:
    stackName: "tp-signoz"
    clickhouseDiskSize: 30
    zookeeperDiskSize: 30
    zookeeperInstanceType: "t2.small"
    instanceType: "t2.small"
    hostName: my-clickhouse-host

  fluentbitConf:
    repoName: "fbit-repo"
    localImageName: "fbit"
  otelSidecarConf:
    repoName: "sidecar-otel"
    localImageName: "sotel"
  serviceNames:
    otel: "otel"
    query: "query"
    alert: "alert"
    frontend: "frontend"
your signoz-ecs-config.yml file will look like this
make deploy
clone this repository locally then, configure the clickhouse host in signoz-ecs-config.yml configure vpc id and subnet id in signoz-ecs-config.yml
signoz-app:
  application-name: "tp-signoz"
  environment-name: "dev"
  clickhouseConf:
    stackName: "tp-signoz"
    clickhouseDiskSize: 30
    zookeeperDiskSize: 30
    zookeeperInstanceType: "t2.small"
    instanceType: "t2.small"
    hostName: my-clickhouse-host

  fluentbitConf:
    repoName: "fbit-repo"
    localImageName: "fbit"
  otelSidecarConf:
    repoName: "sidecar-otel"
    localImageName: "sotel"
  serviceNames:
    otel: "otel"
    query: "query"
    alert: "alert"
    frontend: "frontend"
  existingVpc:
    vpcId: vpc-09cc39b8b0fa6b10f
    publicSubnetAId: subnet-0787b5ad8b2d8aa41
    publicSubnetBId: subnet-07d3d63b9c87501b0
    privateSubnetAId: subnet-05870291afed3115e
    privateSubnetBId: subnet-045544de09bff69be
your signoz-ecs-config.yml file will look like this
make deploy
If you have already configured copilot with an app name and environment(the subnets should be the same as the one where clickhouse cluster is present):
clone this repository locally then, configure the clickhouse host in signoz-ecs-config.yml configure vpc id and subnet id in signoz-ecs-config.yml
make deploy-existing-copilot-app
In this template we are using cloudformation to host our clickhouse cluster and aws copilot to host our services on ecs fargate.
The template can be configured if you want to create a new vpc for our clickhouse-cluster or create the cluster in an existing vpc. To create the cluster in an existing vpc just mention the value of existing vpc and subnets in the config file. existingVpc: vpcId: vpc-09cc39b8b0fa6b10f publicSubnetAId: subnet-0787b5ad8b2d8aa41 publicSubnetBId: subnet-07d3d63b9c87501b0 privateSubnetAId: subnet-05870291afed3115e privateSubnetBId: subnet-045544de09bff69be
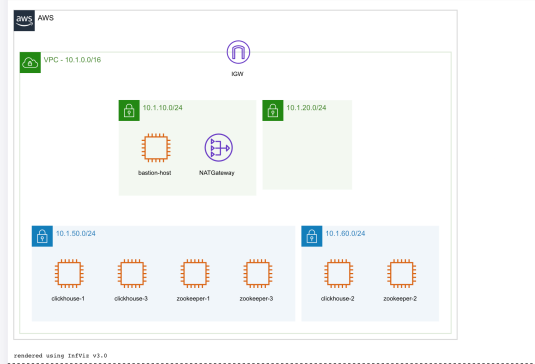
When existing-vpc value is present it will create the following resources:
This will create a new vpc with two private subnets and two public subnets. We will host 3 zookeeper instances and 3 shards of clickhouse instacnce in our private subnets. This will also host a bastion instance in our public instance if we ever want to ssh into our instaces to debug some issues.
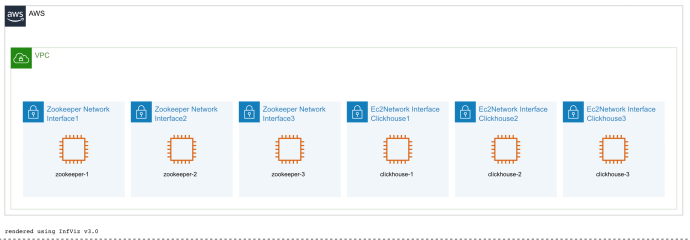
When existing-vpc option is toggled true:
You will also have to configure vpc id,public and private subnets option in signoz-ecs-config.yml file
                              existingVpc:
                                vpcId: vpc-09cc39b8b0fa6b10f
                                publicSubnetAId: subnet-0787b5ad8b2d8aa41
                                publicSubnetBId: subnet-07d3d63b9c87501b0
                                privateSubnetAId: subnet-05870291afed3115e
                                privateSubnetBId: subnet-045544de09bff69be
This creates three zookeeper instances and three clickhouse shards in private subnets of your vpc.
If you are using a managed clickhouse-service, you can mention the host of one of the shards, then will not create it's own clickhouse cluster(on port 9000): signoz-app: clickhouseConf: hostName: my-clickhouse-host
You can use custom ami's for zookeeper or clickhouse instances if your organization has special security needs or want to add more functionality (we have made our own user-data scripts, so each clichouse shard and zookeeper can know about each other at start time). If you do not want to copy your ami's outside of a single region just replace the ImageId field in clickhouse.yaml or clickhous-custom-vpc.yaml cloudformation template. If you want to copy ami's to all region then use ./scripts/copy-ami.sh script and ./scripts/amimap.sh to generate the mappings,then replace the existing mappings with the output.
AWS Copilot CLI simplifies the deployment of your applications to AWS. It automates the process of creating AWS resources, configuring them, and deploying your application. This can save you time and effort compared to manual deployment.It simplifies the deployment of your applications to AWS. It automates the process of creating AWS resources, configuring them, and deploying your application. This can save you time and effort compared to manual deployment. Aws copilot will allow us to deploy all our SigNoz services with minimum configuration
You are free to use your own custon vpc and subnets, though they should be the same as your clickhouse cluster(if hosting in a private subnet). You will also have to configure vpc id,public and private subnets option in signoz-ecs-config.yml file
                                existingVpc:
                                  vpcId: vpc-09cc39b8b0fa6b10f
                                  publicSubnetAId: subnet-0787b5ad8b2d8aa41
                                  publicSubnetBId: subnet-07d3d63b9c87501b0
                                  privateSubnetAId: subnet-05870291afed3115e
                                  privateSubnetBId: subnet-045544de09bff69be
If you have an existing service that you want to instrument, you will have to configure an otel sidecar container to a service which will forward all data to the signoz service.
Please look at the following documentation to add instrumentation to your application. After you have added the code to your application, we will be abel to generate traces and metrics, and we will have to send this data to the SigNoz otel collector. In our setup we will first configure an otel collector sidecar, which will then forward our data to the SigNoz otel collector, to do so we will add the following to our manifest file: (please ensure you have uploaded the appropriate docker image for otel sidecar to aws ecr, you can get the image uri in output.yml file)
                                sidecars:
                                    otel:
                                        port: 4317
                                        image: <AWS_ACCOUNT_ID>.dkr.ecr.ap-southeast-1.amazonaws.com/sidecar-otel:latest # uri of your sidecar otel image
We have configured an otel sidecar to forward our metrics and traces instead of directly sending them to SigNoz otel collector because, this will reduce the latency of our service whenever we are trying to connect to another database or service as we now have to talk to localhost instead of another ecs service.
To manuall upload the sidecar otel image use command:
make otel-sidecar-upload
If you have an existing service whose logs you want to send to signoz, you will have to configure an aws firelens service which will forward all the logs using fluentforward protocol.
To send logs of your application to SigNoz we are going to use aws firelens.FireLens works with Fluentd and Fluent Bit. We provide the AWS for Fluent Bit image or you can use your own Fluentd or Fluent Bit image. We will create our own custom image where will configure rules which will forward logs from our application to the SigNoz collector using the fluentforward protocol. When you deploy the template it will automatically deploy our custom fluentbit image to aws ecr and we have configured our SigNoz otel collector to accept logs via firelens.Using the command make scaffold svcName we can create a sample manifest file for you with firelens preconfigured. Configuring firelens using aws copilot is extremely easy, just add follwing to the mainfest file
                                    logging:
                                        image: public.ecr.aws/k8o0c2l3/fbit:latest
                                        configFilePath: /logDestinations.conf
To manuall upload the fluenbit image use command:
make fluentbit-upload
To scaffold a service with a sample file use command:
make scaffold $service-name
you can copy the ami's in all region using the script :
./scripts/copy-ami.sh
then you can use the script to get a mapping of all ami's using:
./scripts/amimap.sh
Then replace the mappings in the clickhouse.yml cloudformation template
This will stop all the ecs services and your clickhouse cloudformation stack.
make delete-all
Currently the clickhouse servers are configured to backup their data to aws s3 every 24 hours, if your want to change the backup frequency you will have to create your own custom clickhouse ami's. To make your own ami's please use our amis (present in clickhouse.yml clouformation file) as the base and then configure the cron job to run at whateverfrequency you desire.
script for backing up the clickhouse databse(configure you cron job to run this script):
  #!/bin/bash
  BACKUP_NAME=my_backup_$(date -u +%Y-%m-%dT%H-%M-%S)
  clickhouse-backup create --config /etc/clickhouse-backup/config.yml $BACKUP_NAME >> /var/log/clickhouse-backup.log
  if [[ $? != 0 ]]; then
    echo "clickhouse-backup create $BACKUP_NAME FAILED and return $? exit code"
  fi

  clickhouse-backup upload --config /etc/clickhouse-backup/config.yml $BACKUP_NAME >> /var/log/clickhouse-backup.log
  if [[ $? != 0 ]]; then
    echo "clickhouse-backup upload $BACKUP_NAME FAILED and return $? exit code"
  fi
