Neural RGB→D Sensing: Depth and Uncertainty from a Video Camera
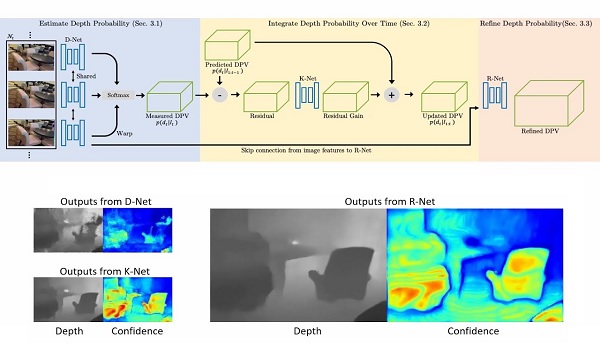
Neural RGB→D Sensor estimates per-pixel depth and its uncertainty continuously from a monocular video stream, with the goal of effectively turning an RGB camera into an RGB-D camera.
The paper will be published in CVPR 2019 (Oral presentation).
See more details in [Project page], [Arxiv paper (pdf)], and [Video (youtube)].
Project members
- Chao Liu, Carnegie Mellon University
- Jinwei Gu, SenseTime
- Kihwan Kim, NVIDIA
- Srinivasa Narasimhan, Carnegie Mellon University
- Jan Kautz, NVIDIA
License
Content in this repository is Copyright (C) 2019 NVIDIA Corporation. All rights reserved. Licensed under the CC BY-NC-SA 4.0 license (https://creativecommons.org/licenses/by-nc-sa/4.0/legalcode).
An exception is the evaluation code in the third_party folder.
-
The DSO patch is licensed under GPL v3.0.
-
The SenseReader code is licensed under MIT License
Getting Started
Clone repository:
git clone https://github.com/NVlabs/neuralrgbd.git
Create an Anaconda environment and install the dependencies:
# (optional) create a new environment if needed
conda create --name neuralrgbd
conda activate neuralrgbd

# install the the dependencies
conda install pip
pip install -r requirements.txt
Download the weights and demo data:
In the code folder
# download weights
cd saved_models && sh download_weights.sh && cd ..

# download demo data
cd ../data && sh download_demo_data.sh && cd ../code
Run demo
Now we can run the DEMO code: in the code folder
sh run_demo.sh
After running the demo, the reseults will be saved in the ../results/demo
folder. The confidence and depth maps are saved in the pgm format, with depth
map scaled with 1000. The correspondence between the output files and the
input image paths are stored in the scene_path_info.txt, with the first line
in the txt file corresponding to the depth and confidence map with index
00000 and so on.
The output format for the following inference parts (test with/without given camera poses) are the same.
Data
For training and evaluation, we use the raw data from the KITTI and ScanNet datasets.
Download KITTI raw data
Download the raw dataset download script from the KITTI dataset page. Then run the script and extract the data.
Download ScanNet
Please refer to the ScanNet GitHub page. You will need to download the dataset AND the C++ Toolkit to decode the raw data.
Note that the default setting for the ScanNet decoder will generate images with larger camera baselines with around 100 frame interval. In our training and evaluation, we use 5-frame interval such that the baseline between consequtive frames is small enough.
In order to get the small baseline images with 5 frame interval, you need to modify the decoder. A modified version and the script we use are included in third_party/SensReader. Please refer to here for decoding the ScanNet files.
Download 7scenes dataset
Download the 7Scenes dataset
and unzip the files into the folders: DATASET_PATH/SCENE_NAME/SEQUIENCE_NAME. For example, the 1st sequence in the chess scene is at
/datasets/7scenes/chess/seq-01.
Test with given camera pose
In this case we assume the camera poses are given with the dataset e.g. ScanNet, KITTI, SceneNet etc..
Assuming the decoded ScanNet dataset is in /datasets/scan-net-5-frame. In the code folder, run
sh local_test.sh
In this example, we test the trained model on one trajectory in the ScanNet dataset, the results will be saved in ../results/te/
Please refer to this page for more details about the parameters and how to test on different datasets
Test without camera pose
We use DSO to get the initial camera poses. Then the camera poses are refined given estimated depth and confidence maps using Local Bundle Adjustment.
(See more details of 3rd party data/libraries in /third_party/README.md)
1. Install & Setup DSO
(1) Please refer to the DSO page to install the dependencies for DSO.
(2) In the ../third_party folder, run
sh setup_dso.sh
2. Run DSO to get the pose esimations & Run inference with Local Bundle Adjustment on Demo data
For demonstration, we will run the inference on one sequence from 7Scenes. First, download the demo data:
# download the demo data
cd ../data && sh download_LBA_demo_data.sh && cd ../code
Then run the demo code:
# run test with LBA
sh local_test_LBA.sh
The results will be saved in results/LBA_demo. For customization, See this page for more details.
Train
Train on KITTI
In the code folder
sh local_train_kitti.sh
You need to change the dataset path KITTI. See this page for more details.
Train on ScanNet
In the code folder
sh local_train_scanNet.sh
You need to change the dataset path for ScanNet. See this page for more details.
Contact
If you have any questions, please contact the primary author Chao Liu <chao.liu@cs.cmu.edu>, or Kihwan Kim <kihwank@nvidia.com>.


