import matplotlib.pyplot as plt
import numpy as np

# Random test data

def draw_boxplot(all_data, labels, all_titles,x_labels, y_labels, nrows=1, ncols=7,figsize=(9, 4) ):
    np.random.seed(19680801)
    #all_data = [np.random.normal(0, std, size=2) for std in range(1, 4)]
    #labels = ['x1', 'x2', 'x3']

    fig, ax_list = plt.subplots(nrows=nrows, ncols=ncols, figsize=figsize)

    bplot_list =  []
    for i_index, i_ax in enumerate(ax_list):

        # rectangular box plot
        bplot1 = i_ax.boxplot(all_data[i_index],
                             vert=True,  # vertical box alignment
                             patch_artist=True,  # fill with color
                             labels=labels)  # will be used to label x-ticks
        i_ax.set_title(all_titles[i_index])

        bplot_list.append(bplot1)


    # fill with colors
    colors = ['pink', 'lightblue', 'lightgreen']
    for bplot in bplot_list:
        for patch, color in zip(bplot['boxes'], colors):
            patch.set_facecolor(color)

    # adding horizontal grid lines
    for ax in ax_list:
        ax.yaxis.grid(True)
        ax.set_xlabel(x_labels)
        ax.set_ylabel(y_labels)

plt.show()封装画图函数的常用功能,方便直接调用画图,
该jupyter notebook中的所有画图函数都汇总在 paint_func.py 文件中,方便直接使用
#配置
import pandas as pd
import numpy as np
from pandas import DataFrame
import matplotlib.pyplot as plt
pd.plotting.register_matplotlib_converters()

%matplotlib inline
import seaborn as sns
from wordcloud import WordCloud, STOPWORDS
from collections import Counter
print("Setup Complete")
Setup Complete
sample_path='./insurance.csv'
df_sample=pd.read_csv(sample_path)
df_sample.head(15)
<style scoped>
.dataframe tbody tr th:only-of-type {
vertical-align: middle;
}
</style>
.dataframe tbody tr th {
    vertical-align: top;
}

.dataframe thead th {
    text-align: right;
}
| age | sex | bmi | children | smoker | region | charges | |
|---|---|---|---|---|---|---|---|
| 0 | 19 | female | 27.900 | 0 | yes | southwest | 16884.92400 |
| 1 | 18 | male | 33.770 | 1 | no | southeast | 1725.55230 |
| 2 | 28 | male | 33.000 | 3 | no | southeast | 4449.46200 |
| 3 | 33 | male | 22.705 | 0 | no | northwest | 21984.47061 |
| 4 | 32 | male | 28.880 | 0 | no | northwest | 3866.85520 |
| 5 | 31 | female | 25.740 | 0 | no | southeast | 3756.62160 |
| 6 | 46 | female | 33.440 | 1 | no | southeast | 8240.58960 |
| 7 | 37 | female | 27.740 | 3 | no | northwest | 7281.50560 |
| 8 | 37 | male | 29.830 | 2 | no | northeast | 6406.41070 |
| 9 | 60 | female | 25.840 | 0 | no | northwest | 28923.13692 |
| 10 | 25 | male | 26.220 | 0 | no | northeast | 2721.32080 |
| 11 | 62 | female | 26.290 | 0 | yes | southeast | 27808.72510 |
| 12 | 23 | male | 34.400 | 0 | no | southwest | 1826.84300 |
| 13 | 56 | female | 39.820 | 0 | no | southeast | 11090.71780 |
| 14 | 27 | male | 42.130 | 0 | yes | southeast | 39611.75770 |
#条形图📊
def draw_bar_chart_plot(data,x=None,y=None,hue=None,ci=None,fig_x=10,fig_y=10,fig_title=None):
    '''
    Ref:
    https://seaborn.pydata.org/generated/seaborn.barplot.html
    https://www.kaggle.com/alexisbcook/bar-charts-and-heatmaps


    1.图的高度表示了,这些变量的集中的趋势
    2.条形图反映的是平均值
    3.两种形式:
     long-form(推荐):
       需要指定x,y (在通常是dataframe中为列名)
     wide-form:
       画图的是根据输入数据(通常是dataframe obj)的每列数据

    4.关键参数:
    data:pandas DataFrame obj
        data的输入格式:
        label_1,  label2 , ...
         x[0]  ,  y_1[0] , y_2[0]
         x[1]  ,  y_1[1] , y_2[1]
         ...
    x:x坐标的name
    y:y坐标的name
    hue:类别对应的column名字
    ci:画图时采样的方式 ,ci==None时不用采样的方式获取观测值
    fig_x:图的长
    fig_y:图的宽
    fig_title:图的标题


    '''

    #设置画布大小
    plt.figure(figsize=(fig_x,fig_y))
    # 添加标题
    if fig_title:
        plt.title(fig_title)
    #label===>设置图中label的标签
    if x is  None and y is None:
        #没有指定列,则所有列全部被使用
        sns.barplot(data=data,ci=ci)
    else:
        #直接使用df的对应列作为y坐标,label_name作为类名
sns.barplot(data=data,x=x,y=y,hue=hue,ci=ci)draw_bar_chart_plot(df_sample)draw_bar_chart_plot(df_sample,x='age',y='bmi',fig_x=20,fig_y=7)#折线图
def draw_line_plot(data,x=None,y=None,hue=None,ci=None,fig_x=10,fig_y=10,fig_title=None):
'''
Ref:
https://seaborn.pydata.org/generated/seaborn.lineplot.html?highlight=lineplot#seaborn.lineplot
https://www.kaggle.com/alexisbcook/line-charts
关键参数:
df的输入格式:
label_1,label2,...
x[0], y_1[0] , y_2[0]
x[1], y_1[1] , y_2[1]
...
data:pandas DataFrame obj
data的输入格式:
label_1, label2 , ...
x[0] , y_1[0] , y_2[0]
x[1] , y_1[1] , y_2[1]
...
x:x坐标的name
y:y坐标的name
hue:类别对应的column名字
ci:画图时采样的方式 ,ci==None时不用采样的方式获取观测值
fig_x:图的长
fig_y:图的宽
fig_title:图的标题
'''
#设置画布大小
plt.figure(figsize=(fig_x,fig_y))
# 添加标题
if fig_title:
plt.title(fig_title)
#label===>设置图中label的标签
if x==None or y==None:
#没有指定列,则所有列全部被使用
sns.lineplot(data=data,hue=hue,ci=ci)
else:
#直接使用df的对应列作为y坐标,label_name作为类名
sns.lineplot(data=data,x=x,y=y,hue=hue,ci=ci)draw_line_plot(df_sample,x='age',y='bmi',hue='smoker')#sample
import numpy as np
uniform_data = np.random.rand(10, 12)#热图
def draw_heatmap(data,annot=False,fmt=None,vmin=None,vmax=None,cmap='YlGnBu',fig_x=10,fig_y=10,fig_title=None):
'''
Ref:
https://seaborn.pydata.org/generated/seaborn.heatmap.html?highlight=heatmap#seaborn.heatmap
https://www.kaggle.com/alexisbcook/bar-charts-and-heatmaps
关键参数:
data:能够转化为2维ndarray,使用dataframe对象时headmap的横纵坐标的label从行列名中自动找出
annot:图中是否标识出label值
fmt:annot的格式,'d'表示整数格式,'.1f'表示小数(保留小数点后一位)
annot和fmt一般要同时使用。
vmin, vmax:热点图的bar中的最大值和最小值范围,不提供则自动统计
cmap:热点图的颜色样式,如“YlGnBu”/"Wistia"
fig_x:图的长
fig_y:图的宽
fig_title:图的标题
'''
#设置画布大小
plt.figure(figsize=(fig_x,fig_y))
# 添加标题
if fig_title:
plt.title(fig_title)
#直接使用df的对应列作为y坐标,label_name作为类名
sns.heatmap(data=data,annot=annot,fmt=fmt,vmin=vmin,vmax=vmax,cmap=cmap)
draw_heatmap(uniform_data,annot=True,fmt='.1f',cmap='Wistia')#散点图
def draw_scatter_plot(data,x=None,y=None,hue=None,size=None,style=None,fig_x=10,fig_y=10,fig_title=None):
'''
Ref:
https://seaborn.pydata.org/generated/seaborn.scatterplot.html?highlight=scatterplot#seaborn.scatterplot
https://www.kaggle.com/alexisbcook/scatter-plots
功能:通过x,y展示和(hue,size,style)等参数来展示不同子集之间的关系
关键参数:
data:能够转化为2维ndarray,使用dataframe对象时headmap的横纵坐标的label从行列名中自动找出
x:明确data中的哪一列作为x轴
y:明确data中的哪一列作为y轴
hue:不同类别对应的column名字====>对应不同的色调
size:不同类别对应的column名字====>对应不同的大小(可通过sizes参数调节大小)
style:不同类别对应的column名字====>对应不同的风格
fig_x:图的长
fig_y:图的宽
fig_title:图的标题
'''
#设置画布大小
plt.figure(figsize=(fig_x,fig_y))
# 添加标题
if fig_title:
plt.title(fig_title)
#直接使用df
if x==None and y==None:
sns.scatterplot(data)
else:
sns.scatterplot(data=data,x=x,y=y,hue=hue,size=size,style=style)
draw_scatter_plot(df_sample,x='bmi',y='charges',hue='children',fig_x=5,fig_y=5)draw_scatter_plot(df_sample,x='bmi',y='charges',style='children',fig_x=5,fig_y=5)draw_scatter_plot(df_sample,x='bmi',y='charges',size='children',fig_x=5,fig_y=5)#带有回归线的散点图
def draw_regplot(data,x,y,fig_x=10,fig_y=10,fig_title=None):
'''
Ref:
https://seaborn.pydata.org/generated/seaborn.regplot.html?highlight=regplot#seaborn.regplot
https://www.kaggle.com/alexisbcook/scatter-plots
功能:画出这些数据,同时画出这些数据的回归模型
data:Dataframe格式的数据
x:横坐标的列名
y:纵坐标的列名
fig_x:图的长
fig_y:图的宽
fig_title:图的标题
'''
#设置画布大小
plt.figure(figsize=(fig_x,fig_y))
# 添加标题
if fig_title:
plt.title(fig_title)
sns.regplot(data=data,x=x,y=y)
draw_regplot(df_sample,x='bmi',y='charges',fig_x=8,fig_y=8)#带有多条回归线的散点图
def draw_lmplot(data,x,y,hue,fig_x=10,fig_y=10,fig_title=None):
'''
Ref:
https://www.kaggle.com/alexisbcook/scatter-plots
https://seaborn.pydata.org/generated/seaborn.lmplot.html?highlight=lmplot#seaborn.lmplot
功能:画出多组数据,同时画出多组数据的回归模型,
data:Dataframe格式的数据
x:横坐标的列名
y:纵坐标的列名
hue:不同类别对应的column名字====>对应不同的色调
fig_x:图的长
fig_y:图的宽
fig_title:图的标题
'''
#设置画布大小
plt.figure(figsize=(fig_x,fig_y))
# 添加标题
if fig_title:
plt.title(fig_title)
sns.lmplot(data=data,x=x,y=y,hue=hue)
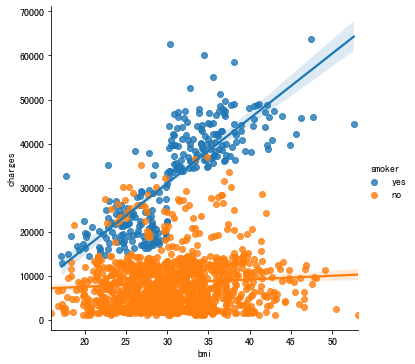
draw_lmplot(df_sample,x='bmi',y='charges',hue='smoker',fig_x=10,fig_y=10)<Figure size 720x720 with 0 Axes>
#群图
def draw_swarmplot(data,x,y,hue=None,fig_x=10,fig_y=10,fig_title=None):
    '''

    Ref:
    https://www.kaggle.com/alexisbcook/scatter-plots
    https://seaborn.pydata.org/generated/seaborn.swarmplot.html?highlight=swarmplot#seaborn.swarmplot

    功能:
    Draw a categorical scatterplot with non-overlapping points.
    画出一个不会有重合点的类别散点图

    data:Dataframe格式的数据
    x:横坐标的列名
    y:纵坐标的列名
    hue:不同类别对应的column名字====>对应不同的色调
    fig_x:图的长
    fig_y:图的宽
    fig_title:图的标题

    '''

     #设置画布大小
    plt.figure(figsize=(fig_x,fig_y))
    # 添加标题
    if fig_title:
        plt.title(fig_title)

    sns.swarmplot(data=data,x=x,y=y,hue=hue)
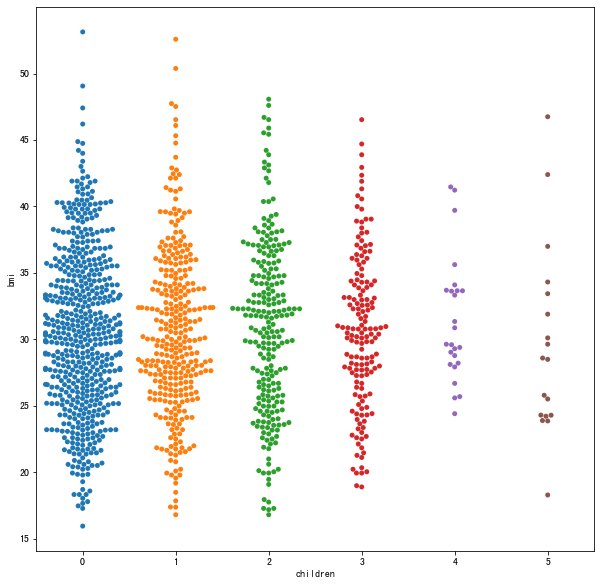
draw_swarmplot(df_sample,x='children',y='bmi')/Users/van/anaconda/anaconda3/envs/python36/lib/python3.6/site-packages/seaborn/categorical.py:1296: UserWarning: 6.1% of the points cannot be placed; you may want to decrease the size of the markers or use stripplot.
warnings.warn(msg, UserWarning)
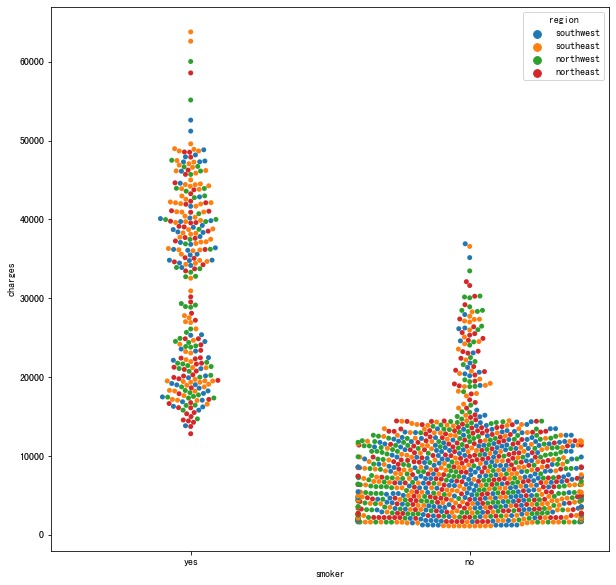
draw_swarmplot(df_sample,x='smoker',y='charges',hue='region')/Users/van/anaconda/anaconda3/envs/python36/lib/python3.6/site-packages/seaborn/categorical.py:1296: UserWarning: 11.4% of the points cannot be placed; you may want to decrease the size of the markers or use stripplot.
warnings.warn(msg, UserWarning)
#词云
def draw_wordcolud(allwords=None,fig_x=30,fig_y=10,fig_title=None):
    #Ref:
    #https://amueller.github.io/word_cloud/
    #
    #allwords:word list
    #
    #
    #WordCloud重要参数:
    #
    #min_font_size:最小的字体大小default=4
    #font_step:字体增长的step
    #max_words:能够画的最多的字
    #stopwords:停用词(不展示)
    #background_color:背景颜色
    #max_font_size:最大的字体尺寸
    #relative_scaling:字的相对大小,relative_scaling=0时,只考虑rank排名,relative_scaling=1字体大小和重要性的两倍成正比
    #           default=’auto’即relative_scaling=0.5,此时只考虑词的重要性
    #repeat:没有达到最大的词数量或者最小的字体大小时,是否重复词云中的word,default=False
    #include_numbers:是否包含数字default=False
    #
    #
    #fig_x:图的长
    #fig_y:图的宽
    #fig_title:图的标题

    #默认列表
    if not allwords:
        allwords={'好':1,'不好':0.001,'差':0.001,'优秀':1}
    #根据频率排序
    mostcommon = sorted(Counter(allwords).items(),key=lambda x:x[1],reverse=True)#[('好',0.1),('优秀',0.2),('不好',0.9),('差',0.8),]#FreqDist(allwords).most_common(100)#来自文本中出现频率最高的100个词

    #设置中文字体的路径
    font = '/Library/Fonts/Songti.ttc'


    wordcloud = WordCloud(width=1600, height=800,font_path=font,relative_scaling=1,repeat=True, background_color='white', stopwords=STOPWORDS).generate(str(mostcommon))

    fig = plt.figure(figsize=(fig_x,fig_y), facecolor='white')

    plt.imshow(wordcloud, interpolation="bilinear")

    #关掉坐标显示
    plt.axis('off')

    plt.title(fig_title, fontsize=50)
    #padding
    plt.tight_layout(pad=0)

plt.show()draw_wordcolud()#密度分布图
def draw_kde_plot(data,x,y,hue=None,shade=True,fig_title=None,fig_x=10,fig_y=10):
'''
Ref:
https://www.kaggle.com/alexisbcook/distributions
https://seaborn.pydata.org/generated/seaborn.kdeplot.html
功能:
Plot univariate or bivariate distributions using kernel density estimation.
使用核密度估计绘制单变量或双变量分布。
用连续变量展示数据的分布。
data:Dataframe格式的数据
x:横坐标列名
y:纵坐标列名
shade:是否使用阴影
hue:不同类别对应的column名字====>对应不同的色调
fig_x:图的长
fig_y:图的宽
fig_title:图的标题
'''
#设置画布大小
plt.figure(figsize=(fig_x,fig_y))
# 添加标题
if fig_title:
plt.title(fig_title)
sns.kdeplot(data=data,x=x,y=y,hue=hue,shade=shade)
draw_kde_plot(df_sample,x='bmi',y='charges',hue='smoker')#分布图
def draw_jointplot(data,x,y,hue=None,kind='kde',fig_title=None,fig_x=10,fig_y=10):
'''
Ref:
https://www.kaggle.com/alexisbcook/distributions
http://seaborn.pydata.org/generated/seaborn.jointplot.html
功能:
Draw a plot of two variables with bivariate and univariate graphs.
用双变量和单变量图绘制两个变量的图。
data:Dataframe格式的数据
x:横坐标列名
y:纵坐标列名
shade:是否使用阴影
hue:不同类别对应的column名字====>对应不同的色调
kind:不同种类的图,包括{ “scatter” | “kde” | “hist” | “hex” | “reg” | “resid” }
fig_x:图的长
fig_y:图的宽
fig_title:图的标题
'''
#设置画布大小
plt.figure(figsize=(fig_x,fig_y))
# 添加标题
if fig_title:
plt.title(fig_title)
sns.jointplot(data=data,x=x,y=y,hue=hue,kind=kind)
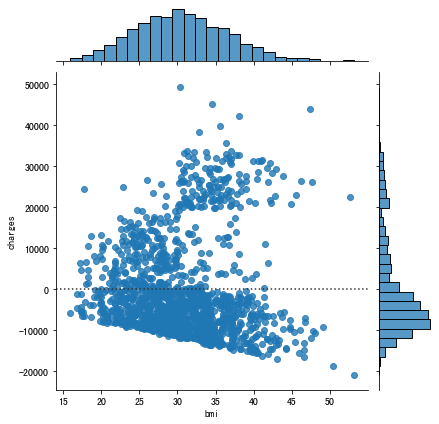
draw_jointplot(df_sample,x='bmi',y='charges',kind='resid')<Figure size 720x720 with 0 Axes>
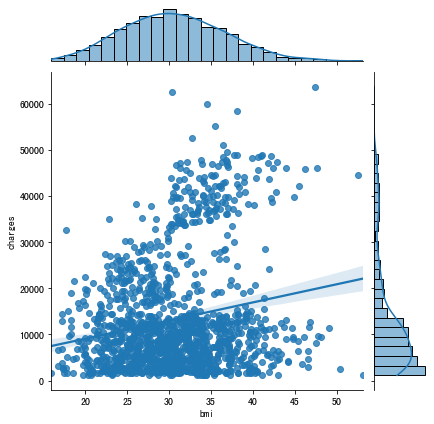
draw_jointplot(df_sample,x='bmi',y='charges',kind='reg')<Figure size 720x720 with 0 Axes>
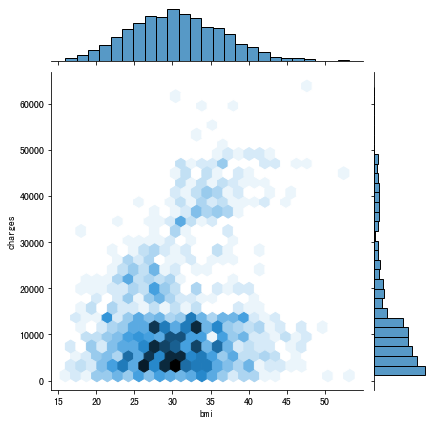
draw_jointplot(df_sample,x='bmi',y='charges',kind='hex')<Figure size 720x720 with 0 Axes>
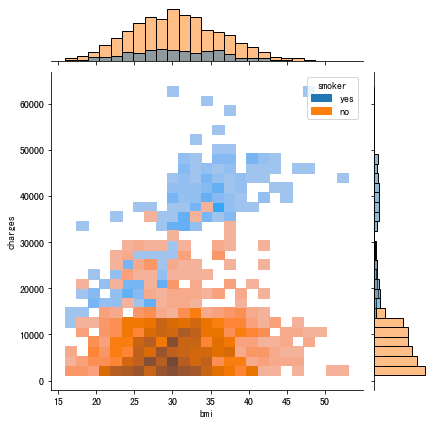
draw_jointplot(df_sample,x='bmi',y='charges',hue='smoker',kind='hist',fig_x=15,fig_y=15)<Figure size 1080x1080 with 0 Axes>
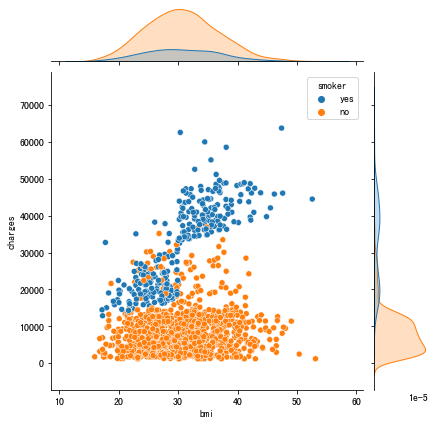
draw_jointplot(df_sample,x='bmi',y='charges',hue='smoker',kind='scatter')<Figure size 720x720 with 0 Axes>


