Flutter in an open Source SDK for creating high-performance mobile apps for IOS and Android. The Flutter makes it easier for you to build user interfaces, while reducing the amount of code required to create and update your app.
- Flutter can be used to build cross platform native applications (Android, IOS, Desktop and Web) using the same codebase.
- The Dart programming language used in Flutter is object oriented and familiar to most developers.
- Development times are significantly faster than other cross-platform frameworks thanks to stateful hot-reloading and excellent virtual device support.
- If we close the application when we open it again we can continue from where we were
- Flutter has a complete design system with a library of Material UI widgets included which speed up the development process.
Flutter is designed for the creation of 2D mobile applications.
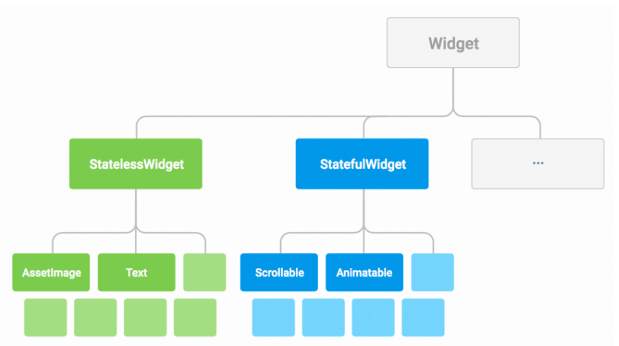
In Flutter everything is a "Widget".
A Widget is a UI building block you can use to assemble your app.
In the following Gif the sample application contains a total of 6 widgets:
 Image attribution: https://uxplanet.org/why-you-should-use-google-flutter-42f2c6ba036c
- The container widget starting on line 17 groups all other widgets in the layout.
- The
appBarwidget displays the text "Flutter Demo Home Page" - The
bodycontains a child widget which in turn has Text and a $_counter placeholder. - The
floatingActionButtonis the button that gets clicked, it contains a child which is the icon. Examples of Widgets include dialog windows, buttons, icons, menus, scroll bars and cards. You can use one of the many built-in Material UI widgets or create your own from scratch.
A widget can be defined as:
- Physical elements of an application (buttons, menus or bars)
- Visual elements such as colors
- Layout and positioning of elements on the screen using a grid system
Widgets are assembled in declarative hierarchy which allows us to easily organise the layout of our App as a series of nested widgets.
Screens are composed of several small widgets that have only one job. Groups of widgets are assembled together to build a functional application.
For example a Container widget contains other widgets that have functions like layout, placement and size.
Screen layout is controlled by combining a container and other smaller widgets.
There are some widgets that have no physical form within the application instead their goal and control some aspects of another Widget.
Like: padding, alignment, row, columns, and grids.
A Flutter layout can have layers to create a visual effect where certain widgets "float" on top of others to give them priority.
Flutter uses layers to represent visual hierarchy
and relative importance or priority of each widget.
To assemble our widgets into an application we use the build() function. e.g:
Widget build(BuildContext context) { ...
For example, the appBar menu
needs to be invoked using the build() function.
It can then have other nested "child" widgets
such as buttons or text.
A StatefulWidget widget, as its' name suggests, stores the state of the UI it represents.
For example the counter widget stores the _counter variable
which keeps track of the number of times the user has clicked the button.
All user interaction that requires storing some data/input uses a StatefulWidget widget.
When the State of an object is changed, the setState() function
should be called to update the UI.
This in turn will invoke the build method
which re-renders the widget.
As in all programming languages, frameworks or platforms the secret to a successful Flutter application is to test it extensively.
Several tests should created included functional tests and UX tests
which can help us discover and fix any bugs before users see them!
An application must have tested all functions, classes or tasks needed to run correctly without errors.
Widget tests are necessary to confirm that they are performing their intended function
and correctly positioned in the layout.
Integration tests serve to test the application as a whole so that we can test the app in a real-world scenario.
To learn more about an example of using TDD: https://github.com/dwyl/flutter-counter-example
Before you dive into Flutter you have to learn the programming language that is used to build Flutter apps, and that is Dart.
Access the link and click Get Started

Select the windows button and then click the "flutter_windows.zip" button.

Extract the file and place the folder in directory "C:"
It's probably best to create a folder in the directory like this.

This is the console that comes inside the folder in this case the Flutter console, can use to see which devices connected, create a project in Flutter.

In order to access Flutter commands without having to open this console, we can use the Windows prompt itself we need to add Flutter to the environment variables.
You need to go to the bin folder and copy the path then go to the computer properties, then go to advanced system settings.

Click on environment variables, then go to edit path and paste the path to Flutter.


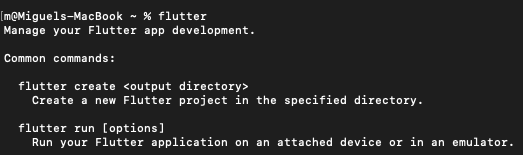
As you can see if you go to the windows prompt and run the command "flutter" it already appears.

Now at the windows prompt if you run the command "flutter doctor" will check if there is anything left to install so that we can develop the applications with Flutter.

If you need to install android studio here is the link:https://developer.android.com/studio
To install dart and flutter just go to the Android studio and press plugins and search for both.
After having everything installed just open the Android Studio that will appear "Start a new Flutter Project".

Provides a framework which implements the basic material design visual layout structure of the Flutter app. Contais various functionality from giving an appbar, a floating button, a drawer, background color, bottom navigation bar and body.
It defines what has to be displayed at the top of the screen. Has various properties like title,padding,brightness.
It's the area below the Appbar and behind the buttons. Any widget in the body is positioned at the top left corner by default.
Is a button displayed floating in the bottom right corner. We use this button to promote a primary action in the application.
Is a panel displayed to the side of the body. One usually has to swipe left to right of right to left to access the drawer. It uses the Drawer properties which is a material design panel that slides from the edge of a Scaffold to show links in an application.
After a lot of research I realized that the only way to log in to Google without using Firebase is through the packages provided by Google.
Using these packages we can make the user log in without saving their personal data, except the data we want to show , like email and username.

Let's get started. First of all we have to create a new Flutter Project.
Choose the Flutter Application option.

Insert the Name of the Project and the company name.
After that in the 'main.dart' remove all the code except the main and switch the (MyApp) to (MaterialApp).
Insert 'Title'.

Create a new class to extend a 'StatefulWidget'.
Change return 'Container' to 'Scaffold' so we can use the features provided by the Scaffold Class.

Enter in 'pubspec.yaml' , then go to google and search for google sign in package flutter or click this link: https://pub.dev/packages/google_sign_in, go to installing and add that command to 'pubspec dependecies'.


Click on "Packages get" as we made a change to the packages to update.

Import the Google package to 'main.dart'.

Create the 'GoogleSignIn' object, provide the scope profile and email to that object.

You need to create a SignInAccount object.
Name that object 'user' to be used to see if he is signed in or signed out.
Inside the 'Scaffold' use the 'AppBar' to add a Title.

In the 'body' create a method '_buildbody'.
Inside that method you need to add a 'ListTile' to display the information,then use a GoogleUserCircleAvatar to display the profile image.

Make the title and subtitle show the 'Name' and 'Email' on the screen. Create a button to be pressed with the text 'Sign out'.


In short, if the user is not connected, a message appears saying "Not Signed in". If this user is already connected, his data is displayed and a button appears saying "Sign Out".
Now, create both _GetSignIn and _GetSignOut methods.
Use the method silently/ SignInSilently(); -> Used to Sign In the user without interaction.

After the UI is completed we need to register the App in the Firebase.
Even if we don't need to use Firebase the App has to be registered there.
So go to: https://console.firebase.google.com/u/0/ In the Firebase console, add a new project and get the same package name from your app.

You will need to get the SHA-1 so go to 'gradlew' and to the terminal and run the command- 'gradlew signinReport'.


Insert the SHA-1 in the Firebase space then, download the file and paste it inside the Android > app.
Follow the steps to add the Firebase SDK / Go to people API:
https://developers.google.com/people/v1/getting-started
Follow those 3 steps.

After that go to credentials and click the user data option.
Click on the API and go for Android or IOS.
Name your app again, put the SHA-1 you got from 'gradlew' and the package name you can find in your 'AndroidManifest.xml'.

Set up the consent screen, go to support email and select your email then click save.
Go to OAuth 2.0 Cliente IDs, select the Android option.
On your Manifest.xml add below the package name this line:
<uses-permission android:name="android.permission.INTERNET"/>Then just edit the button as you like and the Google login is fully functional.

Persisted data ( persitent Date ) are very important for users, since they would be inconvenient to always be writing your information or wait for the network carry the same data again. In these situations, it would be best to store your data locally.
SQLite is one of the most popular methods for storing data locally. For this article, we will use the package ( package ) sqflite acceded to SQLite. Sqflite is one of the most used and updated packages to connect to SQLite databases in Flutter.
In our project, we will open the file pubspec.yaml and search for dependencies. Under dependencies we add the latest version of sqflite and path_provider(which can be removed from pub.dev).
 dependencies:
  flutter:
    sdk: flutter
  sqflite: any
path_provider: anyNow, in our project, we will create a new Database.dart file.
1- Creation of a private builder that can be used only within the class:
class DBProvider {
  DBProvider._();
  static final DBProvider db = DBProvider._();
}
2- Preparation of the database Next we will create the database object and provide you with a getter, which will create an instance of the database, if it has not already been created.
static Database _database;

  Future<Database> get database async {
    if (_database != null)
    return _database;

    // if _database is null we instantiate it
    _database = await initDB();
    return _database;
  }
If no objects are assigned to the database, we use the initDB function to create the database. In this function, we get the directory where we will store the database and create the tables we want:
initDB() async {
    Directory documentsDirectory = await getApplicationDocumentsDirectory();
    String path = join(documentsDirectory.path, "TestDB.db");
    return await openDatabase(path, version: 1, onOpen: (db) {
    }, onCreate: (Database db, int version) async {
      await db.execute("CREATE TABLE Client ("
          "id INTEGER PRIMARY KEY,"
          "first_name TEXT,"
          "last_name TEXT,"
          "blocked BIT"
          ")");
    });
}The data inside our database will be converted to Dart Maps, so first we need to create the Model Classes with the 'toMap' and 'fromMap' methods.
/// ClientModel.dart
import 'dart:convert';

Client clientFromJson(String str) {
  final jsonData = json.decode(str);
  return Client.fromMap(jsonData);
}

String clientToJson(Client data) {
  final dyn = data.toMap();
  return json.encode(dyn);
}

class Client {
  int id;
  String firstName;
  String lastName;
  bool blocked;

  Client({
    this.id,
    this.firstName,
    this.lastName,
    this.blocked,
  });

  factory Client.fromMap(Map<String, dynamic> json) => new Client(
        id: json["id"],
        firstName: json["first_name"],
        lastName: json["last_name"],
        blocked: json["blocked"] == 1,
      );

  Map<String, dynamic> toMap() => {
        "id": id,
        "first_name": firstName,
        "last_name": lastName,
        "blocked": blocked,
      };
}Using 'Insert':
newClient(Client newClient) async {
    final db = await database;
    var res = await db.insert("Client", newClient.toMap());
    return res;
  }
Get Client via an ID:
getClient(int id) async {
    final db = await database;
    var res =await  db.query("Client", where: "id = ?", whereArgs: [id]);
    return res.isNotEmpty ? Client.fromMap(res.first) : Null ;
  }
Obtain all Clients with one condition: In this example, we use rawQuery to map the results list to a list of Client objects:
getAllClients() async {
    final db = await database;
    var res = await db.query("Client");
    List<Client> list =
        res.isNotEmpty ? res.map((c) => Client.fromMap(c)).toList() : [];
    return list;
  }
Update an existing Client:
updateClient(Client newClient) async {
    final db = await database;
    var res = await db.update("Client", newClient.toMap(),
        where: "id = ?", whereArgs: [newClient.id]);
    return res;
  }
Delete a Client:
deleteClient(int id) async {
    final db = await database;
    db.delete("Client", where: "id = ?", whereArgs: [id]);
  }
Delete All Clients:
deleteAll() async {
    final db = await database;
    db.rawDelete("Delete * from Client");
}The first time I tried to change the path of the Flutter folder so that it could be accessed by the terminal without having to use several paths, it did not work, every time I closed the terminal Flutter was no longer recognized.
command not found: flutter
Whenever I used this command:
export PATH="$PATH:~/development/flutter/bin
Then I started to notice that this command only worked for the current terminal, so it was not permanent.
Even using the command that should change the path permanently Flutter was still unrecognized.
This would be the command that would make Flutter access through the terminal permanent:
export PATH="$PATH:[PATH_TO_FLUTTER_GIT_DIRECTORY]/flutter/bin"
Changing the path to where we would have cloned Flutter's Git repository [PATH_TO_FLUTTER_GIT_DIRECTORY]. And then using the command:
source ~/.bash_profile
What will help us refresh the terminal.
But even so, every time I closed and opened the terminal again Flutter was no longer recognized.
So I thought that maybe the best option would be to go to the document and edit it with the "export PATH" command but inside the document itself other than in the terminal.
So I went to Finder / Macintosh HD / Users / and to my user.
How is a hidden file or document we must type cmd + shift + .
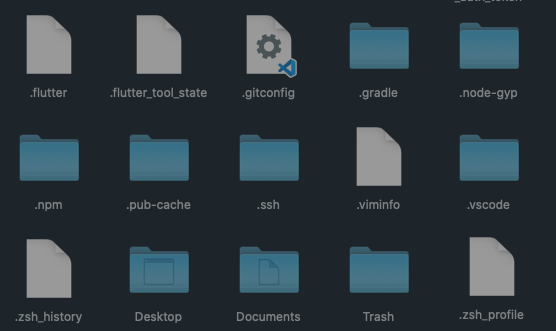
Then I opened my .zhs_profile file and typed the command:
export PATH=/Users/m/Documents/flutter/bin:$PATH
This instructs my terminal environment to export an updated version of the PATH environment variable with flutter/bin path prepended to the current PATH variable. (i.e. add flutter/bin to the PATH so that my terminal knows where to find the flutter CLI)
Then I saved the file and now going to the terminal Flutter is already recognized and can be accessed without having to run any commands.
- Get to know the Flutter platform vividly
- Thoroughly acquaint with all the features of Flutter
- Read through Flutter’s official documentation as it include easy examples that beginners would find helpful. The documents are seasoned with iOS and Android devices. The developers can easily interact with the present device
- Including Google codelabs in the learning process
- Adding the Flutter GitHub repository in the learning process
- Opting for Google’s free beginner Flutter learning course. Google provides a free course for learners.