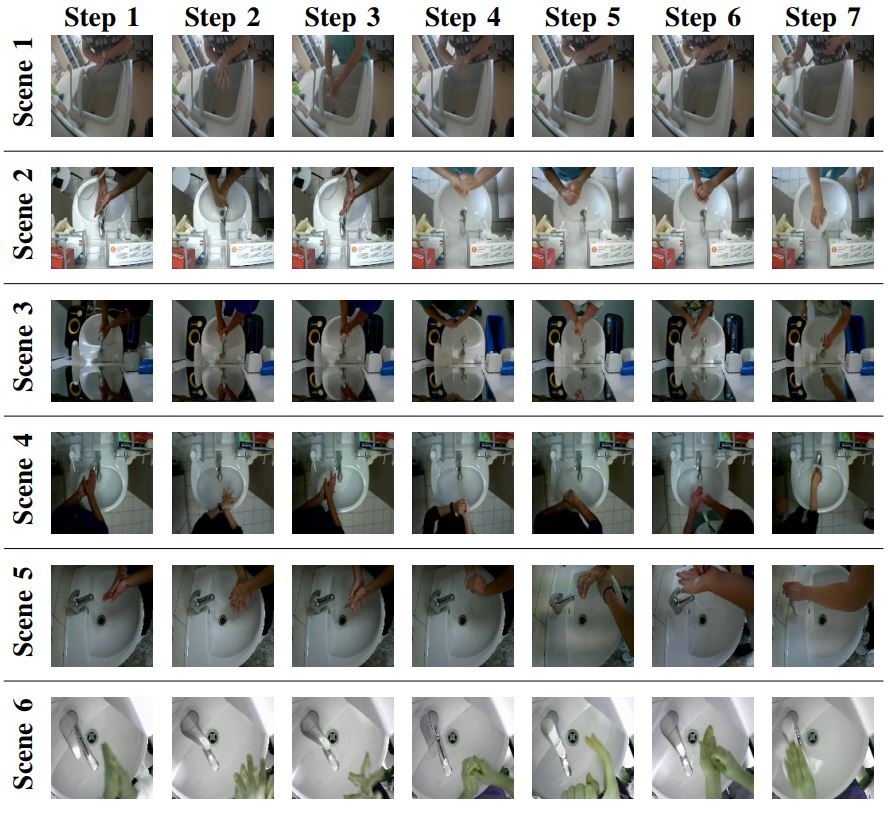
Fine-grained Hand Gesture Recognition in Multi-viewpoint Hand Hygiene
For more information, find out the complete details of our research at |arXiv Preprint|.
In this repo, we provide the code for 2 models that are used for evaluation on the MFH dataset: Amdim and Resnet18. The MFH dataset can be downloaded at this Google Drive link.
Tree of directories
.
├── Amdim
│   ├── models (store pretrained model)
│   ├── output (store output files of performances)
│   ├── train.sh (script file for training)
│   └── test.sh (script file for testing)
└── Resnet18
    ├── models (store checkpoint files)
    ├── output (store output files of performances)
    ├── train.sh (script file for training)
    └── test.sh (script file for testing)
Packages installation
First, we need to build apec - a Nvidia mixed precision library for training model faster and using less memory (this library is for Amdim):
- (Optional: This step is only needed when your system cannot find the path to the CUDA
binandlib. You can first try the steps below, if there is no problem then you may not need this export step.) Export directly in the terminal or add those lines to~/.bashrcand save the file, then runsource ~/.bashrcin terminal. Here, we have tried with CUDA 10.1. If your GPU uses another CUDA version or the path to the CUDAbinandlibon your system is different, you should set to a suitable path.
export PATH=/usr/local/cuda-10.1/bin:$PATH
export LD_LIBRARY_PATH=/usr/local/cuda-10.1/lib64:${LD_LIBRARY_PATH}- Install
minicondafor creating Python virtual environment:
wget https://repo.anaconda.com/miniconda/Miniconda3-latest-Linux-x86_64.sh

chmod +x Miniconda3-latest-Linux-x86_64.sh

./Miniconda3-latest-Linux-x86_64.sh- Create a virtual environment named "pytorch_venv" (or another name you like) with specified version of cudatoolkit and cudnn:
conda create -n pytorch_venv python=3.7 cudatoolkit=10.1.243 cudnn=7.6.5

conda activate pytorch_venv- Install pytorch, torchvision for cudatoolkit 10.1. Their versions must be the ones specified in the below command.
conda install pytorch==1.4.0 torchvision==0.5.0 cudatoolkit=10.1 -c pytorch- Build
apex repo
git clone https://github.com/NVIDIA/apex

cd apex

pip install -v --disable-pip-version-check --no-cache-dir --global-option="--cpp_ext" --global-option="--cuda_ext" ./

cd ..- After complete running, the ternminal will inform that
apexhas been built successfully. If you have any problem with installingapex, you should find more information at the Nvidia apex repo.
Then, to install all the required packages for both Amdim and Resnet18:
pip install -r requirements.txtMFH dataset
Link download the MFH dataset: Google Drive.
Download the zip file and extract its contents to a free space where you have access to.
Below, we will show how to use Amdim or Resnet18 to train and test on this dataset.
Amdim
Download pretrained model
Download the AMDIM pretrained model on ImageNet from this link (This file is provided by the authors of AMDIM). Then, put the .pth file into the folder ./Amdim/models.
Training
In folder Amdim, there is a script file named train.sh which you can use for training.
Before running, you first need to change the values of some arguments in this file:
- Change the value of
--input_dirto the (absolute) path to the MFH dataset folder (required). - Change training hyperparameters (optional):
NC=7 (number of classes, the MFH dataset has 7 classes)
NE=30 (number of epochs)
BS=32 (batch size)
LR=0.0001 (learning rate)
NDF=256 (Amdim default parameter, do not need to change)
N_RKHS=2048 (Amdim default parameter, do not need to change)
N_DEPTH=8 (Amdim default parameter, do not need to change)
TCLIP=20.0 (Amdim default parameter, do not need to change)
PT="pretrainImageNet"
SCENE="Scene1" (a string that represents a scene that you want to train with)
Change the permission for the file to execute:
cd Amdim
chmod +x train.sh
Then, run the file:
./train.shAfter the training completes, there will be a folder ./Amdim/runs that stores the trained model (.pth file).
Testing
Similarly, there is a script file named test.sh which you can use for testing.
Note: Because the .pth file is named after the arguments'values, you need to keep these corresponding arguments in the file test.sh with the same values in train.sh so that the test phase can find the correct file.
Some arguments to change in test.sh:
TEST_SCENE (The scene to evaluate the trained model on: "Scene1", "Scene2", or "Scene3", ...)
--input_dir (The (absolute) path to the MFH dataset folder)
--checkpoint_path (The path to the checkpoint file ".pth" in the folder "runs")
Change the permission for the file to execute:
chmod +x test.shThen, run the file:
./test.shAfter running the test.sh file, there will be an output file storing results in the folder ./Amdim/output.
Resnet18
The Resnet18 folder also has train.sh and test.sh.
Training
Before running, you first need to change the values of some arguments in this file:
- Change the value of
-trdto the (absolute) path to the MFH dataset subfolder (required). This is slightly different to above, instead of just the path to the dataset folder, the path need to go down one more level to the subfolder of "Scene". Depending on what scene you want to train with, you can choose "Scene1", "Scene2", ... - Change training hyperparameters (optional):
-ncl 7 (number of classes)
-e 30 (number of epochs)
-iz 224 (the new size of an input image after resizing)
-bz 32 (batch size)
Change the permission for the file to execute:
cd Resnet18
chmod +x train.sh
Then, run the file:
./train.shAfter the training completes, model files will be saved into ./Resnet18/models.
Testing
Some arguments to change:
-mp (path to the .pth file got from training phase)
-td (path to the subfolder of "Scene" that you want to test on)
-ncl (number of classes)
-iz (the new size of an input image after resizing)
-bz (batch size)
Change the permission for the file to execute:
chmod +x test.shThen, run the file:
./test.shAfter running the test.sh file, there will be an output file storing results in the folder ./Resnet18/output.
Citation
@article{vo2021fine,
  title={Fine-grained Hand Gesture Recognition in Multi-viewpoint Hand Hygiene},
  author={Vo, Huy Q and Do, Tuong and Pham, Vi C and Nguyen, Duy and Duong, An T and Tran, Quang D},
  journal={arXiv preprint arXiv:2109.02917},
  year={2021}
}
License
MIT License
Acknowledgement
[1] Amdim repo


