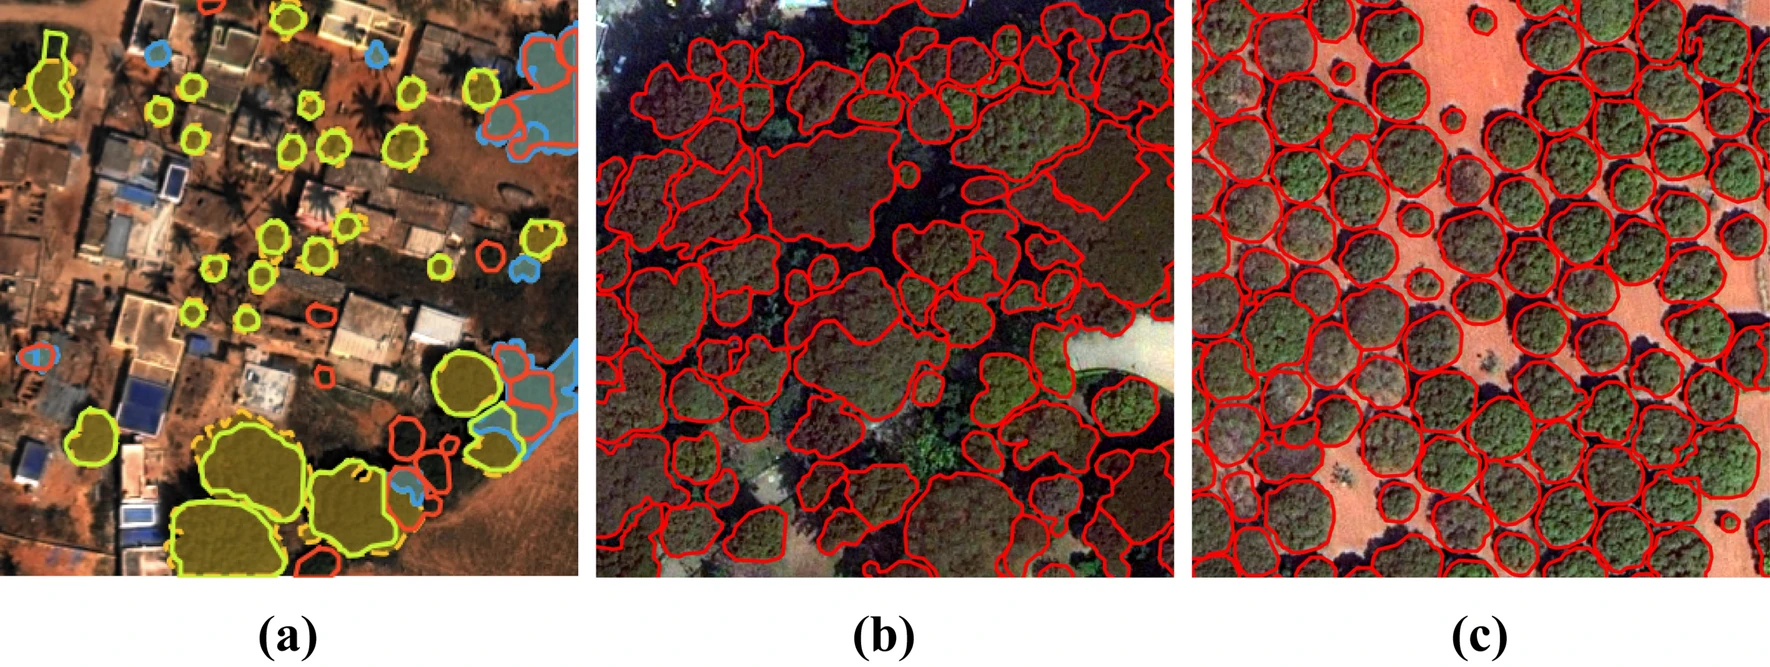
This package performs automatic delineation of individual tree crowns in remote sensing imagery. It has been tested with 30cm WordView-3 images, as well as 5cm aerial images. The contained method is ready for large scale application and has been published here.
This package is under development and feedback, reported issues and contributions are very welcome!
Update: Model weights can be downloaded here
Currently there is no pypi or conda package to install from. You therefore have to clone the package and install manually. Gdal is needed for the installation, which is easiest to install via conda.
# (optional) create new conda env
conda create -n <env-name>
conda activate <env-name>
conda install gdal  # install gdal upfront

# now there are two options: installation via pip or manual

# 1) installation via pip
pip install git+ssh://git@github.com/AWF-GAUG/TreeCrownDelineation.git

# 2) manual install with latest source
cd <path where you want to keep the package>
git clone git@github.com:AWF-GAUG/TreeCrownDelineation.git
cd ./TreeCrownDelineation

# run the package installation, which will also install the dependencies
python ./setup.py install
The package is designed to work with georeferenced imagery and vector data and the training data generation workflow is adapted to that. The neural network expects raster images as input and we need to generate a tree cover mask, tree crown outlines and a distance transform as traning targets. Departing from your target imagery, the workflow looks as follows (we used QGIS):
-
Select training data plots, e.g. rectangular tiles of 100m x 100m
-
Create a vector layer containing the plot outlines and save it as ESRI shapefile or similar.
-
Delineate all trees within the tiles, if possible. Tree groups can be labeled as one polygon, but there should be e.g. a 'class' column which could for example be set to 0 for trees and 1 for groups or similar.
-
Save the vector data as ESRI shapefile, sqlite or similar.
-
Now you have to generate four types of raster imagery by using the provided scripts (see steps 6-9):
- The image tiles
- The tree cover masks
- The tree crown outlines
- The distance transform
Prepare following folder structure:
data/
├── tiles/
│   ├── tile_1.tif
│   ├── tile_2.tif
│   └── ...
├── masks/
│   ├── mask_1.tif
│   └── ...
├── outlines/
│   ├── outline_1.tif
│   └── ...
└── dist_trafo/
    ├── dist_trafo_1.tif
    └── ...
The partition in training and validation data will happen later, on the fly.
-
To create the raster image tiles you can either clip them using QGIS, or use the script provided in
scripts/like so:python clip_image.py -i <path to your source raster> -o <path to data folder>/data/tiles/tile_ -shp <path to shapefile with plots> -
Now we rasterize the delineated tree crowns:
rasterize.py -i <path to data folder>/tiles/* -o <path to data folder>/masks/mask_ -shp <path to delineated crowns shapefile> -
Now the outlines, very similar:
rasterize.py -i <path to data folder>/tiles/* -o <path to data folder>/outlines/outline_ -shp <path to delineated crowns shapefile> --outlines -
And lastly, the distance transform:
rasterize_to_distance_transform.py -i <path to data folder>/tiles/* -o <path to data folder>/dist_trafo/dist_trafo_ -shp <path to delineated crowns shapefile>
The scripts provide some further options e.g. for parallel processing or rasterizing only polygons of a certain class. And yes, the process could be simplified...
The training_example.py file in examples/ showcases how to use the freshly generated data to train a model from scratch. Currently, the script assumes your entire training data fits into memory, because often, hand labelled remote sensing data sets are small. If that's not the case with your data, create an issue.
The most notable options apart from the number of training steps, batch size etc. is whether the NDVI should be appended to the image stack and which image bands contain red and NIR. Furthermore, the NDVI can be rescaled to the interval 0..1 and the outlines can be dilated (widened) by a certain number of pixels, which influences the network performance wrt finding them. For further reference, the documentation of the respective functions should provide more info.
To do
The weights of pre-trained models can be found here. You have to download them manually. The weights can be used by the inference script described below. Apart from that you can load the model via torch.jit.load().
Applying a trained neural network is rather simple by using the inference.py script, although the number of command line arguments is a bit overwhelming. We have to tell the script, which polygon extraction setting we want to use; look at the script's documentation to find out more by typing inference.py -h. It is possible to use several models at once, averaging the results, which improves performance.
Optional parameters (look at the paper for more info):
-ndviwhether or not to concat the NDVI-redred band index (starting from 0)-nirnir band index (starting from 0)--min-distminimum distance between trees in pixels-sigmaGaussian blur standard deviation in pixels-llabel threshold-bbinary masking threshold--divide-bydivide input by this value--rescale-ndvirescale the NDVI to the intercal 0..1
Example call for a RGB-NIR image, appending the NDVI and dividing the input by 255:
inference.py -i <large input image here> -o <output file path and name> -m <path to model file(s)> -ndvi -red 0 -ndvi 3 --divide-by 255
To do
If you use this work in any way, please mention this citation:
@article{freudenberg2022individual,
  title={Individual tree crown delineation in high-resolution remote sensing images based on U-Net},
  author={Freudenberg, Maximilian and Magdon, Paul and Nölke, Nils},
  journal={NCAA},
  year={2022},
  publisher={Springer},
  doi={https://doi.org/10.1007/s00521-022-07640-4}
}