Simple Memcache Server
Design
Cache : Array of LinkedHashMaps with synchronized methods at each Map's methods.
Eviction Policy: LRU. It's achieved using LinkedHashMaps natural structure. By default LinkedHashMaps do not provide LRU evictions, instead a special constructor is provided to create a linked hash map whose order of iteration is the order in which its entries were last accessed, from least-recently accessed to most-recently (access-order).The removeEldestEntry(Map.Entry) method is overridden to impose a policy for removing stale mappings automatically when new mappings are added to the map.
Server: Netty does a lot of the heavy lifting of setting up the server and opening up the socket connection. Due to the asynchronous nature of Netty, it achieves high performance by using as little threads as possible, in comparison to other frameworks that follow the thread per request model. This graph shows how the Netty model works: 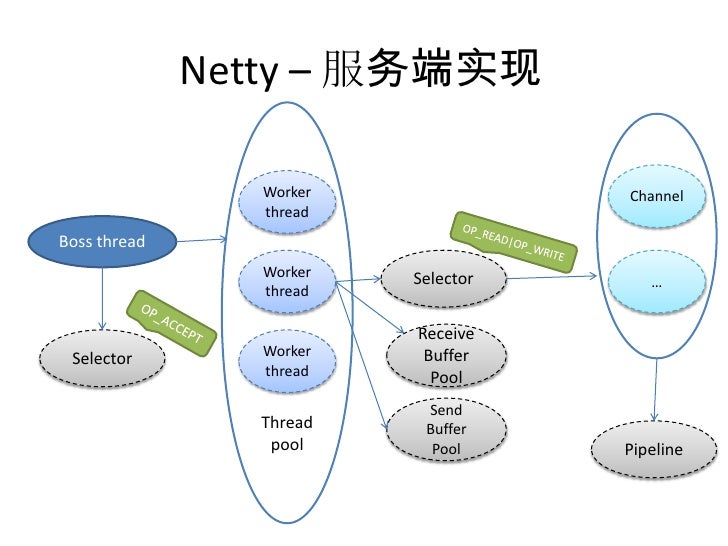
Performance
Since this is a Java application, by default any sort of data that is stored in the Java heap is subject to garbage collection (GC). As the heap grows, GC will remove objects that are not being used, causing the application to pause and therefore reducing the application's throughput and latency. The approach I took was to use some sort of on-heap solution using a List of LinkedHashMap buckets. To achieve concurrency I utilized synchronizations but at the bucket levels, sort of like a poor man's ConcurrentLinkedHashMaps. I believe that this system can perform moderately at decent load as long as the right parameters are passed (including Heap size, concurrency levels, # of worker threads). Unfortunately synchronizations at the map level will eventually affect the system given that they do lock on the map itself. Some sort of data structure that uses CAS mechanism, will help a lot. Another potential bottleneck, and this is sort of related to what I mentioned earlier, is the collisions in the maps. As things grow, we will see more collisions which will affect the lookups and insertions.
Improvements
To improve performance and reliability, there are basically three approaches to this:
- Off-heap If we examine memory usage, ideally we would use a solution that leverages off-heap storage. However, this has its own complications since we would have to manage the non-gc'able memory. Distributed JVM systems such as Cassandra do in fact use off-heap storage through the Unsafe class.
- On-heap A great data structure that we could have leveraged is a ConcurrentLinkedHashMap. This could have helped us with both performance and reliability since it doesn't utilize synchronized blocks but instead relies heavily on native calls to CAS. Unfortunately there isn't a JDK implementation but there are several open-source implementations.
- Distributed By distributing the keys according to some heuristic across the network, we can achieve higher levels of throughput and reliability. Examples include Hazelcast. However, we would have to look into collision strategies in a distributed environment.
In terms of limitations, unfortunately due to lack of time, there wasn't a whole of defensive programming and research.
- Handling of malformed memcached requests is a bit clunky. Normal behavior in memcached allows for malformed requests; however in my implementation I terminate the client if it encounters an exception. This includes spacing between tokens, and number of parameters for each command. As long as the commands are typed correctly, the functionality should work.
- In order to achieve high throughput, it would have been nice to spend more time understanding the guts of Netty. Frameworks like Finagle take big advantage of the asynchronicity of Netty and achieve really powerful performance.
- More testing should have been ideal. Concurrency and Load test the server would help find reliability issues.
Profiling and Monitoring
This could easily be done if we could implement Java Management Extensions (JMX). Basically it provides an architecture to manage resources dynamically at runtime.
JMX has a three level architecture:
- The Probe level - also called the Instrumentation level - contains the probes (called MBeans) instrumenting the resources
- The Agent level, or MBeanServer - the core of JMX. It acts as an intermediary between the MBean and the applications.
- The Remote Management level enables remote applications to access the MBeanServer through connectors and adaptors. A connector provides full remote access to the MBeanServer API using various communication (RMI, IIOP, JMS, WS-* …), while an adaptor adapts the API to another protocol (SNMP, …) or to Web-based GUI (HTML/HTTP, WML/HTTP, …).
By default, JMX provides several information including memory usage, CPU usage, thread usage and class information. Applications can surface their own-business related MBeans to the JMX. There are some instrumentations that are present in the LinkedHashMaps including hits, miss, deletions and insertions, so we could easily include these for statistics and monitoring.
Testing
To test my server I basically had three ways of doing it:
- Unit tests: There are several tests that try to cover parts of the code base.
- Integration tests: There are several integration tests that exercise good parts of the code base. There are also some concurrency tests for the maps but this definitely needs more heavy hitting.
- Manual end to end testing: This included running the server and performing manual tests for each individual command and args
There is definitely a lot more testing that needs to be done for this including running a Server and using spyMemcachedClient to both load test and exercise all the paths of the code base. A good profiling of the system will definitely help once JMX is enabled.
How to Install and Run
Make sure you have Java 8 installed. If you are not sure, go to your command line and type java -version. You should see something like this:
java version "1.8.0_91" Java(TM) SE Runtime Environment (build 1.8.0_91-b14) Java HotSpot(TM) 64-Bit Server VM (build 25.91-b14, mixed mode)
The project itself should work right out of the box as there is a compiled jar under build/libs/. All you need to do is run the shell script which is located in ./bin/run.sh. You can pass different avaiable arguments:
usage: memcached
-b,--boss-threads number of server threads
-c,--concurrency-level defaults to 16, number of buckets for
cache
-m,--max-entries max number of entries in cache
-p,--port port number
-w,--worker-threads number of worker threads
-h,--help displays the available options
Example:
./bin/run.sh -p 5111 -m 100000 -b 16 -w 20
You can also tweak the JVM start args for performance tuning. More info here https://docs.oracle.com/cd/E17904_01/web.1111/e13814/jvm_tuning.htm#PERFM150
If you want to compile and run tests, there is a shell script (gradlew) for un*x and a batch script (gradlew.bat) for windows. The script will run gradle (an open source build tool) and gradle will run the default tasks ('clean', 'build', 'test') which are defined in build.gradle.
Example: ./gradlew
This will generate a folder '/build' which contains other directories including our compiled jar, .class files, resources, etc. The shell script that is in '/bin/' calls java and the proper params.
If you want to open it in IntelliJ:
- Open IntelliJ
- File | New | Project From Existing Sources
- Select your folder
- Import project from external model and pick Gradle
- Select 'Use default gradle wrapper' and Gradle JVM 1.8
- Finish