Technically, this testimonial was for the Photoshop version, But I feel at liberty to add it here as well 😉.
Export To Hype (Illustrator) is a powerful tool that seamlessly exports graphics from Adobe Illustrator to Tumult Hype 4. It is a third-party solution that simplifies the export process by creating a PLIST on the fly and bundling the necessary resources into a hypetemplate or hypesymbol.
This exporter tool was developed after the initial exploration of the concept with Export Hype Photoshop. It has been a game-changer for designers, developers, and publishers who need to create interactive HTML5 content quickly and easily.
The good news is that Export To Hype (Illustrator) is now open source, thanks to the German press agency, which has contributed to its development costs. It is currently used by the agency for many of their infographics, which are bought and used in newspapers worldwide.
With Export To Hype (Illustrator), designers and developers can export their vector graphics from Adobe Illustrator to Tumult Hype 4 without any hassle, ensuring seamless integration and optimal performance. So, if you want to take your interactive HTML5 content to the next level, Export To Hype (Illustrator) is the perfect tool for you.
To use Export To Hype (Illustrator) on Mac, you need to first install an ExtendScript .jsx file for Illustrator. This script provides the necessary functionality to export your Illustrator files to Hype. To install the script, follow these steps:
- Open Finder and navigate to your Illustrator scripts folder. The default path is:
/Applications/Adobe Illustrator CC [version]/Presets/[language]/Scripts. In Terminal, you can use the following command to open the folder:open /Applications/Adobe\ Illustrator\ 2023/Presets.localized/en_US/Scriptsassuming you have Illustrator 2023 installed and your language is set to English. - Copy the "
Export To Hype (Illustrator).jsx" and "Export To Hype (Illustrator).json" files to this folder. - Launch Adobe Illustrator (relaunch if it was already running).
Exporting to Hype Illustrator is a powerful feature that allows you to easily export your Illustrator designs to use in Hype. This tutorial will guide you through the process of exporting your Illustrator file to Hype and explain the various options available to you.
Before you can export your Illustrator file to Hype, you need to make sure that it is set up correctly. Here are some guidelines to follow:
- Organize your artwork into separate layers and groups as needed.
- Make sure that all of your layers and groups are named appropriately and have unique names.
- To export your desired elements, make sure they are located in your top-level layers and not nested within other layers. However, grouping elements together is still permissible.
- Save your file as an .ai file.
Once your Illustrator file is ready, it's time to export it to Hype. Here's how:
- Make sure your your Illustrator file saved as an .ai file, in case your working with an eps-file
- Select "
Export To Hype (Illustrator)" from the Scripts menu (File > Scripts > Export To Hype (Illustrator)). - Follow the prompts to choose your export settings …
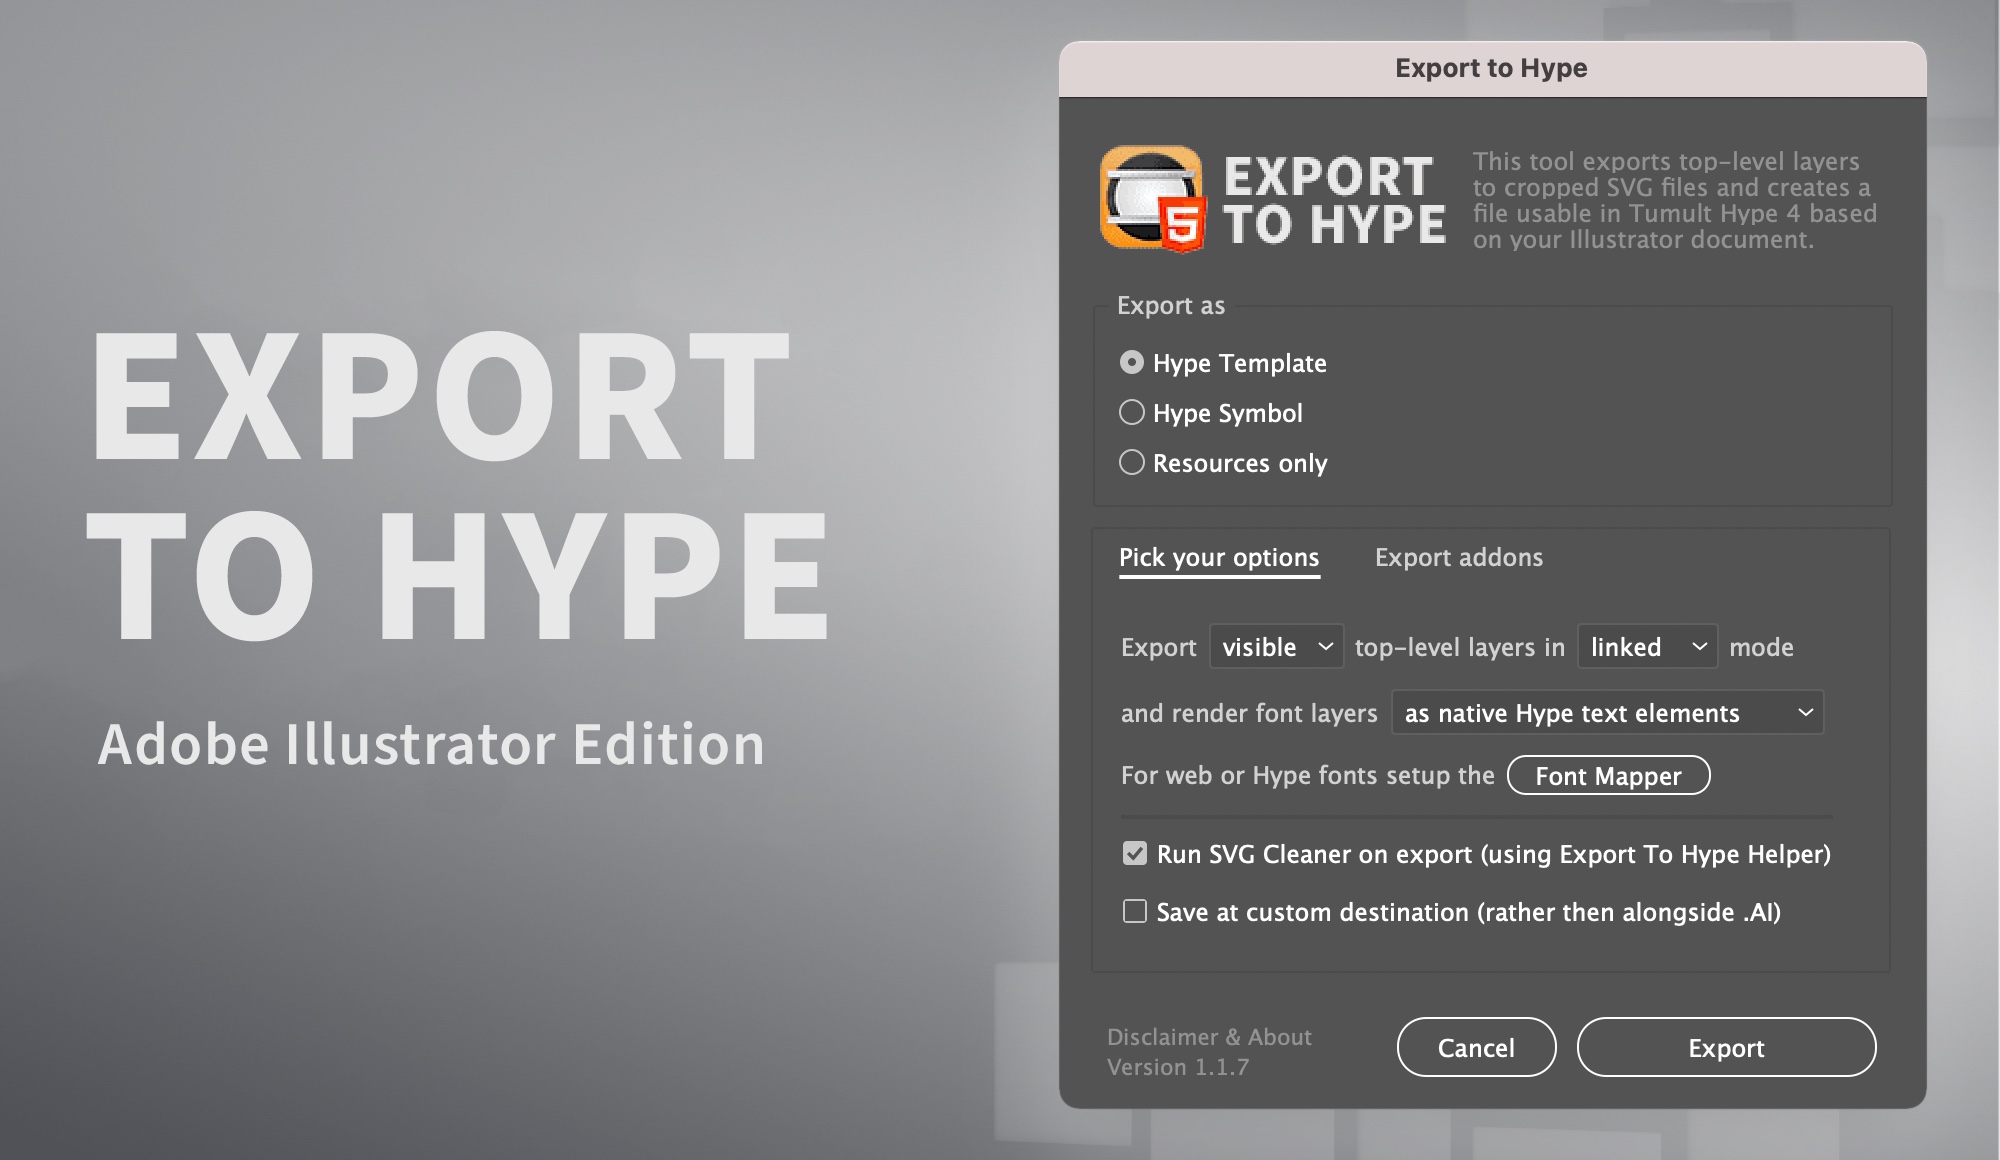
When exporting your Illustrator file to Hype, you have three options for the type of file you want to create: Hype Template, Hype Symbol, or Only Resources.
This option creates a new Hype document using your Illustrator file as a template. The layers and groups in your Illustrator file will be converted into corresponding elements in Hype, such as divs or images. This option is useful if you want to create a new Hype project based on your Illustrator design.
This option exports your Illustrator file as a reusable Hype Symbol, which is a group of elements that can be used repeatedly in your Hype project. When you drag a Hype Symbol into your Hype project, it will retain its original properties and animations. This option is useful if you want to create a reusable element for your Hype project.
This option exports only the resources used in your Illustrator file and doesn't update or create a Hype file. This option is useful if you want to update the resources in your Hype project or just want to relink a file.
Each of these options has its own benefits, depending on your specific needs. Consider the purpose of your project and choose the option that best fits your requirements.
When exporting your Illustrator file to Hype, you have several options to customize how the file is exported. Here's an overview of each option:
This option allows you to choose whether to include only visible layers or all layers, including hidden ones. If you select "Visible," only top-level layers with the eye icon turned on in Illustrator will be exported. If you select "All," all top-level layers in your Illustrator file will be exported, regardless of their visibility.
This option allows you to choose whether to link or inline the SVG content produced. Linked will reference an external SVG file, while inlined* will embed the SVG content directly in the HTML. Linking can be useful if you have multiple instances of the same SVG in your project, as it can reduce the file size. Inlining can be useful if you want to ensure that the SVG content is always available, without an dependency on an external file or if you would like to edit it manually or on the fly (using script) and it also reduces the number of requests to the server. Empty allows you to choose whether to create empty rectangles in the dimensions of the SVG layer or to include the SVG content. If you choose this option empty rectangles will be created in Hype with the dimensions of the SVG layer.
This option allows you to choose how to handle fonts. You can outline fonts to paths (flattened), which converts the text to outlines and creates paths for each character. This option is the most compatible, as it ensures that the text looks the same in any browser. Alternatively, you can include them as regular text (using webfonts) with a font-family attribute, which will reference a font file in your project's resources and inline the layers (as background images are sandboxed). This option ensures that the text looks the same regardless of the browser and reduces the SVG size, but it requires the fonts to be installed (either as a webfont or as a system font). You can also create text layers as empty rectangles (CSS class), which will create empty elements in Hype with the dimensions of the text and attach a class name to the layer. This option is useful if you want to add text to your project later or assign it using CSS, data or variables (more advanced use-cases). Finally, you can include text as native Hype text elements, which will include the text as HTML inside the Hype element. This option is useful if you would like to retain the ability to edit the text in Hype. Finally, you can also choose to disregard text layers altogether by choosing not at all (ignore) if you do not want to include any text in your exported file.
Each of these options allows you to fine-tune the export settings to meet your specific needs. Consider the requirements of your project and choose the option that best fits your needs.
After you have customized your export settings, it's time to export your Illustrator file and open it in Hype. Here are some key takeaways to keep in mind:
When you export your Illustrator file as a Hype Template, you will create a file that, when opened, will launch a Hype file based on the AI file. This allows you to easily create new Hype projects based on your Illustrator design.
When you export your Illustrator file as a Hype Symbol, after double clicking the Hype symbol it will be imported as a nested symbol into the Hype file that is currently open. Alternatively, you can drag the Hype Symbol into any open Hype file. This allows you to easily reuse your Illustrator design in multiple Hype projects.
If you choose to export your Illustrator file as resources, you can use the resources in your Hype project by relinking them with the resources library. This allows you to easily update resources in Hype projects exported using Export To Hype.
To relink a resource in Tumult Hype, you can follow these steps:
- In the Tumult Hype document, select the element that contains the resource you want to relink.
- In the "Element Info" pane on the right side of the Tumult Hype interface, locate the "Resource Library" section.
- Click the "Browse" button next to the "Resource" field. This will open a file browser.
- Locate the new resource file you want to use and select it.
- Click the "Choose" button to close the file browser and update the resource in the "Resource Library" section.
- Click the "Update" button to update the element with the new resource file.
In addition to the standard export settings, there are some advanced settings available that can help optimize your exported file for use in Hype. Here's a closer look at some of these settings:
This option allows you to run SVG Cleaner on your exported file, using the Export To Hype Helper application. SVG Cleaner is a tool that can help optimize your SVG files for use in Hype, by removing unnecessary tags and attributes that can increase file size.
To enable this feature, you must first download and install the Export To Hype Helper application from the GitHub repository. Once installed, you can select the "Run SVG Cleaner on export" option when exporting your Illustrator file to Hype.
To run the Export To Hype Helper application, right-click on it while pressing the alt key and then click on "open." This is necessary because the application is not signed by Apple. The Export To Hype Helper application contains a binary to compress SVG files, which can help reduce file size and optimize your exported file for use in Hype.
In addition to the standard export options, Illustrator to Hype also offers several advanced export addons that can be generated from your Illustrator layers. Here's a closer look at each option:
This option generates a CSS file that references the exported SVG file via a URI. The CSS file can be linked to your Hype project to apply the SVG content as background images linked by class name.
This option generates a CSS file that includes the CSS styles for the exported SVG text content directly in the file. These can also be linked to empty text rectangles based on the class name.
This option generates the mentioned options in a single file.
These get only generated if you rename a text layer in Illustrator to a name of your liking. This option generates a CSS file that includes CSS variables. To ensure compatibility with CSS variable naming conventions and avoid special character. From now on you can use the CSS variables generated by the content of the layer (text only) in your custom CSS classes or in JavaScript code (lives in
:rootand can be used in Hype Data Magic or Hype Action Events etc.).
This option generates the mentioned options in a single file.
This option generates a JavaScript file that references the exported SVG file via a URI. The JavaScript file contains all the SVG data encoded in variables to be used in JavaScript (like in the in the HypeResourceLoad event).
These get only generated if you rename a text layer in Illustrator to a name of your liking. This option generates a JavaScript file that includes the text content of named text layers in JavaScript code for scripting purposes (like in Hype Data Magic or Hype Action Events etc.).
This option generates the mentioned options in a single file.
This option generates all of the available export addons for your Illustrator layers in combined files (JS, CSS).
By selecting one or more of these advanced export addons, you can customize your export even further and create files that can be used to apply styles or manipulate the SVG content in your Hype project. Choose the option or combination of options that best fits your needs and project requirements.
This option encodes the URI for the SVG content using escaped SVG strings. This means that special characters in the SVG content, such as "<" and ">", are replaced with their escaped equivalents, such as "<" and ">". This encoding method is human-readable and easy to edit.
This option encodes the URI for the SVG content using base64 encoding. This means that the SVG content is converted into a base64-encoded string, which is then used as the value of the "data" attribute in the URI. This encoding method is more compact and efficient than escaped SVG strings, but it is not human-readable and cannot be easily edited.
Both encoding options have their own benefits, depending on your specific needs. If you want a more human-readable and editable URI, choose escaped SVG strings. If you want a more compact and efficient URI, choose base64 encoding. Consider the purpose of your project and choose the encoding option that best fits your requirements.
When exporting your Illustrator file to Hype, there is a special naming convention you can use to force inlining of specific layers. Any top-level layer in your Illustrator file that ends with the extension ".inline" will be inlined, regardless of the export settings.
For example, let's say you have an Illustrator file with three top-level layers: "Layer 1", "Layer 2", and "Layer 3.inline". If you choose the "Link" option for SVG content in the export settings, "Layer 1" and "Layer 2" will be linked via a URI, while "Layer 3.inline" will be inlined directly in the HTML, even though it would normally be linked due to the "Link" option being selected.
This naming convention can be useful if you have specific layers that you want to inline for performance or other reasons, while still keeping the rest of the SVG content linked via a URI. Just remember to give the top-level layer the ".inline" extension in order for it to be inlined, regardless of the export settings.
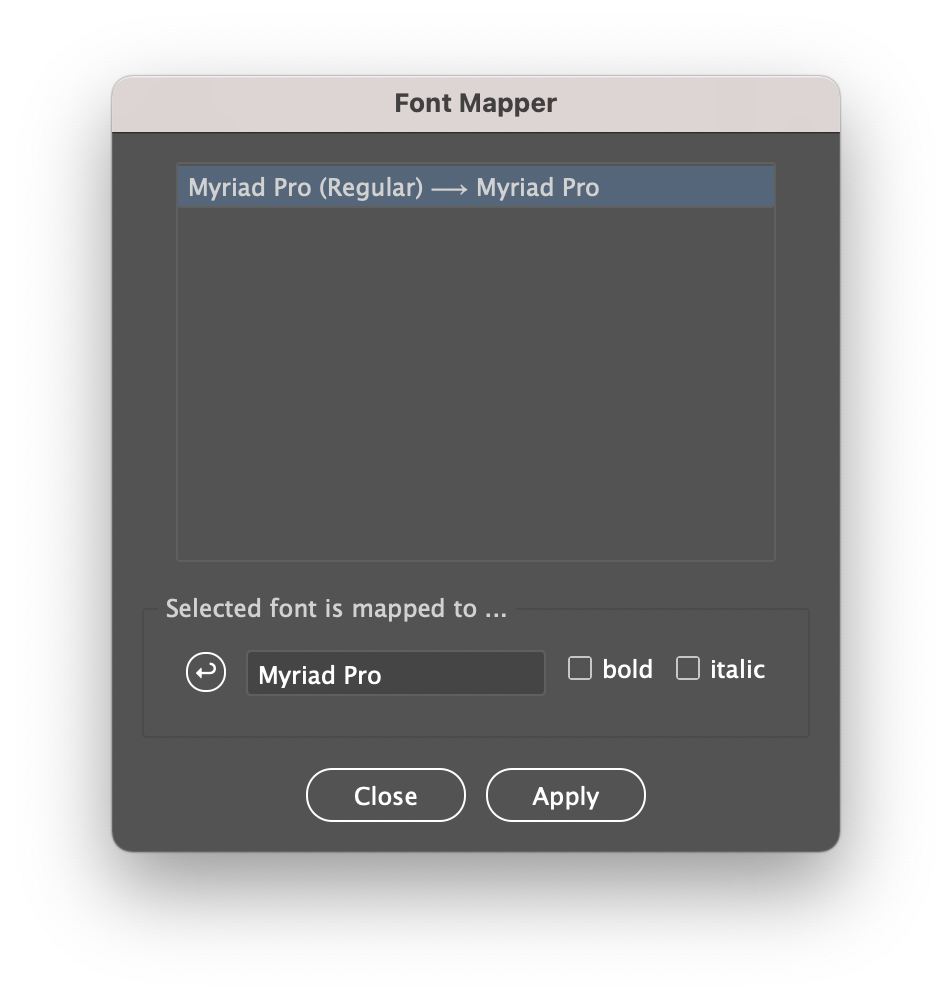
Using the Font Mapper tool, you can easily substitute font names that are not compatible with webfonts with names that are. This can help ensure that the fonts used in your Hype project are displayed correctly and consistently across different platforms and browsers.
Let's say you have an Adobe Illustrator file with a text layer that uses the font "MyriadPro-Regular". However, when you export the file to Hype and select the option "as regular text (using webfonts)", you notice that the font is not rendering correctly in the Hype project.
To fix this issue, you can use the Font Mapper tool in Export To Hype (Illustrator). First, select the option "as regular text (using webfonts)" in the export settings. Then, click on the "Font Mapper" button to open the tool.
In the Font Mapper tool, you can specify the font family name that you want to use instead of the default Postscript name. In this example, you can enter "Myriad Pro" as the font family name. Then, click "Apply" to apply the mapping.
Now, when you export the file to Hype, the font will be rendered correctly in the Hype project, using the font family name "Myriad Pro" that you specified in the Font Mapper tool.
DPA Infocom (Part of Deutsche Presse Agentur, German Press Agency) provided support and financing for my project. They use it to create interactive infographics, which saves time on layout by using .AI or .EPS files from printed materials. I would like to express my gratitude to Kalle Tewes, who played a key role in making this tool a reality (@ktewes on the Forums), and to the German Press Agency for their support and belief in this project that has been ongoing for a long time.
.
I also am grateful to Raimar Heber for the collaborations that allowed me to use the tool myself. My best wishes to Raimar Heber as he embarks on his retirement. I hope that his retirement is filled with joy, peace, and relaxation, and that he enjoys all the good things that life has to offer.
I would like to express my gratitude to the Tumult Hype team for creating the Hype Application. The application bundle contains a wealth of useful files that have made my work creating this tool much easier.
If you find Export to Hype to be a useful tool, consider supporting the development efforts by becoming a sponsor, buying a cup of coffee for the developer, or financing the porting of the tool to another platform. Your support will help ensure that the tool continues to be improved and maintained, benefiting the design and development community. Thank you for your consideration and support!
And visit the forums!
https://www.youtube.com/watch?v=8-sVx0lgwV0
https://www.youtube.com/watch?v=c0GiljZa9B0