Computational Imaging Group (CIG), Washington University in St. Louis
Arxiv | Project Page | video
Official PyTorch Impletement for "Learning Cross-Video Neural Representations for High-Quality Frame Interpolation"
*Other version of packages might affects the performance
opencv-python==4.5.4.58
torchvision==0.11.1
numpy==1.22.0
scipy==1.7.1
pillow>=9.0.1
tqdm==4.62.3
h5py==3.6.0
pytorch-lightning>=1.5.10
CUDA>=11.3
PyTorch>=1.9.1
CUDNN>=8.0.5
Python==3.8.10
Create conda environment
$ conda update -n base -c defaults conda
$ conda create -n CURE python=3.8.10 anaconda
$ conda activate CURE
$ conda install pytorch=1.10.2 torchvision torchaudio cudatoolkit=11.3 -c pytorch
$ pip install -r requirements.txt
Download the repository
$ git clone https://github.com/wustl-cig/CURE.git
Download the pre-trained model checkpoint from here: CURE.pth.tar(Onedrive) or CURE.pth.tar(Google Drive) and put the file in the root of the project dir CURE.
Test on a custom frame: synthesis the intermediate frame between two inputs:
$ python test_custom_frames.py -f0 path/to/the/first/frame -f1 path/to/the/second/frame -fo path/to/the/output/frame -t 0.5
This will synthesis the middle frame between first frame and second frame.
Or just run
$ python test_custom_frames.py
This will generate the result with the provided sample image. The path of output image is predict.png.
Interpolate a custom video:
-
Place your custom video in any path
-
Run the follow command:
$ python intv.py -f 2 -vir /path/to/video -rs 1920,1080 -nf -1 -d 1-
-f: the times of original FPS
-
-vdir: the path to the video
-
-rs: new resolution (1K resolution needs at least 24GB VMemory)
-
-nf: crop the video and leave numbers of frames from the begging
-
-d: downsample the video in temporal domain (make FPS lower)
The output video will be in the same directory of the input video
-
Test on datasets: get quantitative result on evaluating the dataset
-
Download the dataset and place it in
CURE/data/or you could specify the root dir of dataset with args:-dbdirDatasets:
-
UCF101: ucf101.zip(OneDrive) ucf101.zip(Google Drive)
-
Vimeo90K:vimeo90k
-
SNU-FILM: test, eval_modes
-
Nvidia Scene: nerf_data.zip
The data directory should looks like this:
CURE └── data ├──vimeo_triplet | ├──sequences | └──tri_testlist.txt ├──ucf101 | ├──1 | ├──... ├──Xiph | └──test_4k ├──SNU-FILM | ├──eval_modes | | ├──test-easy.txt | | ├── ... | └──test | ├──GOPRO_test | └──YouTube_test ├── x4k | ├──test | └──x4k.txt ├── nvidia_data_full | ├──Balloon1-2 | ├──Balloon2-2 | ├──DynamicFace-2 └── ├──... -
-
Run the following command with args
-d=/dataset/name, where dataset name could be any of"ucf101", "vimeo90k", "sfeasy", "sfmedium", "sfhard", "sfextreme", "nvidia", "xiph4k", "x4k"For example, when testing Vimeo90K dataset, you should run the following command
$ python test.py -d vimeo90kAfter compelete, it will print the testing result and generate a txt file named
result.txt
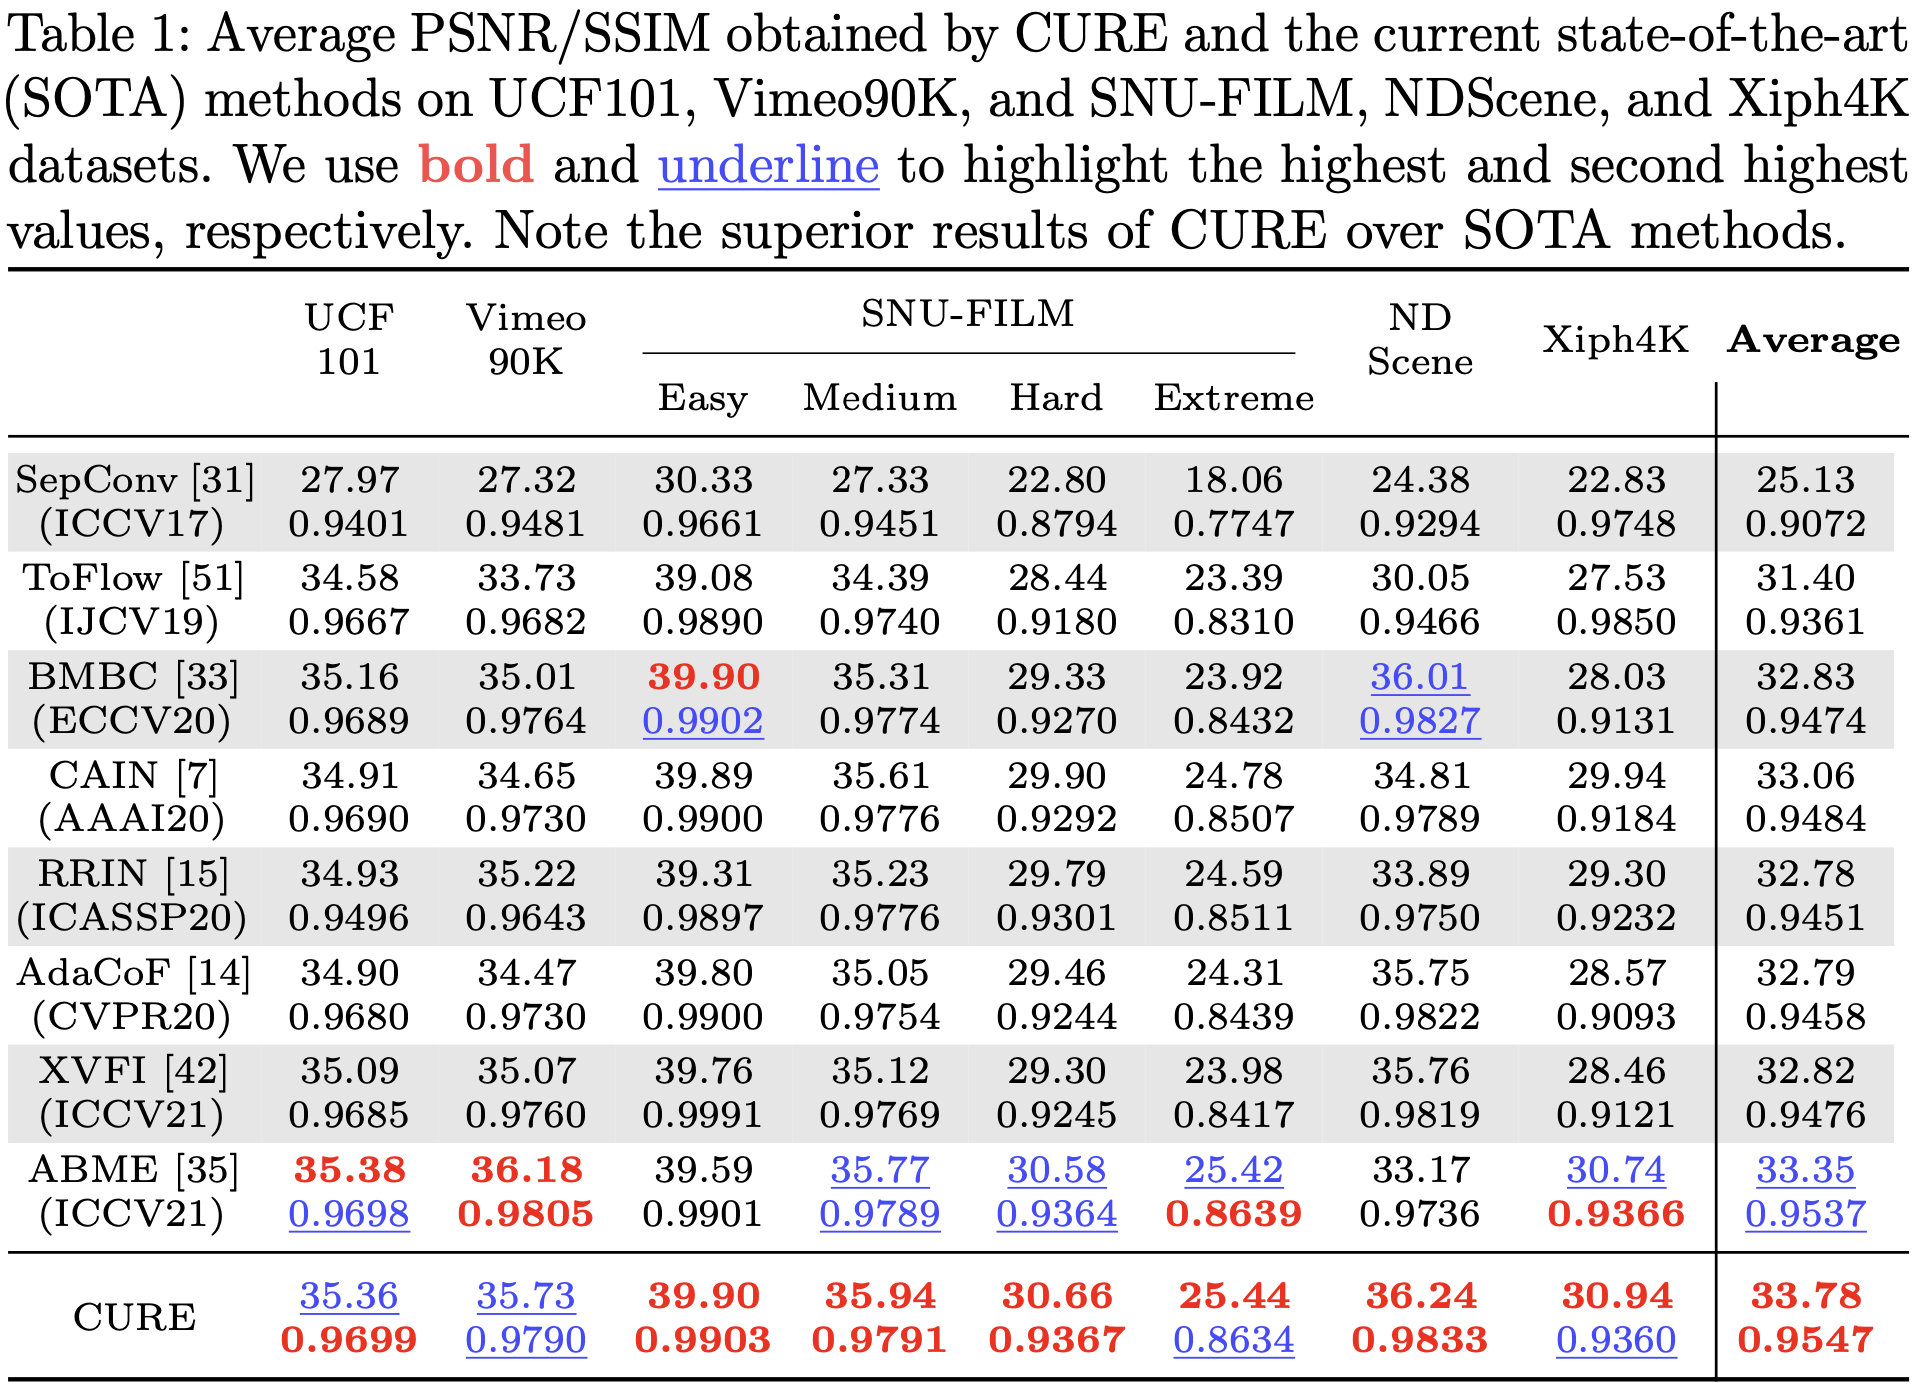
If environment is proporelly created, you will get the following result.
@misc{shangguan2022learning,
      title={Learning Cross-Video Neural Representations for High-Quality Frame Interpolation},
      author={Wentao Shangguan and Yu Sun and Weijie Gan and Ulugbek S. Kamilov},
      year={2022},
      eprint={2203.00137},
      archivePrefix={arXiv},
      primaryClass={eess.IV}
}
RAFT is impleted revised from the official implement: https://github.com/princeton-vl/RAFT
Some of the function was revised from LIIF: https://github.com/yinboc/liif
Pytorch Lightning model: https://www.pytorchlightning.ai
Offical Dataset sources:
Vimeo90K: http://toflow.csail.mit.edu
SNU-FILM: https://myungsub.github.io/CAIN/
UCF101: https://www.crcv.ucf.edu/data/UCF101.php
XIPH4k: https://media.xiph.org/video/derf/.
Nvidia Dynamic Scene: https://research.nvidia.com/publication/2020-06_novel-view-synthesis-dynamic-scenes-globally-coherent-depths
