React demos
Based on
- React
- React 入门实例教程 by ruanyifeng
框架关注点
- 基本语法
- 数据源
- 校验
- 生命周期
- 组件化
- 异步
Index
- Demo01 JSX in HTML
- Demo02 JSX
- Demo03 JSX
- Demo04 组件
- Demo05 this.props.children
- Demo06 PropTypes
- Demo07 真实的DOM节点
- Demo08 this.state
- Demo09 表单
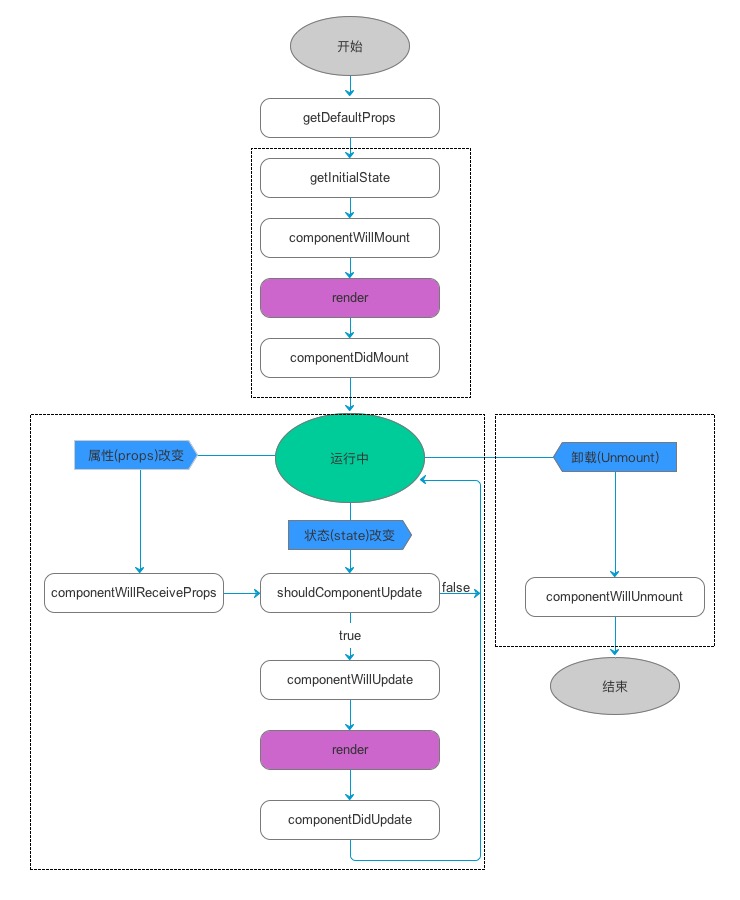
- Demo10 组件的生命周期
- Demo11 componentWillReceiveProps的陷阱
- Demo12 AJAX
- Demo13 教程
- Demo14 命名组件
- Demo15 展开属性
- Demo16 Mixins和无状态函数
- Demo17 ES6 and webpack
Demo01 JSX in HTML
ReactDOM.render()html渲染React.createFactory工厂类React.DOM.ulHTML标签的内置工程方法React.createElementReact.cloneElementReact.renderToString服务端渲染React.findDOMNode
// React 核心库
<script src="../build/react.js"></script>
// React DOM 操作相关
<script src="../build/react-dom.js"></script>
// JSX to JavaScript
<script src="../build/browser.min.js"></script>
// 标识为JSX语法 text/bael
<script type="text/babel">
  ReactDOM.render(
     <h1>Hello, world!</h1>,
     document.getElementById('example')
  );
  //var Factory = React.createFactory(ComponentClass);
  //var root = Factory({ custom: 'prop' });
  //ReactDOM.render(root, document.getElementById('example'));
  //React.DOM.ul({ className: 'my-list' },
  //  React.DOM.li(null, 'Text Content')
  //);
</script>
Demo02 JSX
- 无需引号
- HTML和JS混合使用
- 以
<开头会以HTML渲染 - 以
{开头会以JS渲染style={{opacity: this.state.opacity}}第一层大括号代表的仅仅是以JS解析
var names = ['a', 'b', 'c'];
ReactDOM.render(
  <div>
  {
    names.map((name) => {
      return <div>the letter is {name}</div>
    })
  }
  </div>,
  document.getElementById('example')
);
Warning: Each child in an array or iterator should have a unique "key" prop. Check the top-level render call using <div>. See https://fb.me/react-warning-keys for more information. in div
Demo03 JSX
- HTML和JS的任意组合
- 可以批量添加到模板中
var divs = [
  <div>the letter is a</div>,
  <div>the letteris b</div>
];
ReactDOM.render(
  <div>
    {divs}
  </div>,
  document.getElementById('example')
);
Demo04 组件
React.createClass()创建组件类- 组件必须有
render方法 - 组件render类只能有一个顶层标签
- 标签必须闭合
/><HelloMessage/><HelloMessage></HelloMessage>
- 标签必须跟定义的组件类匹配
this.props获取组件上的属性- JS关键字
class需要写成classNamefor需要写成htmlFor
var HelloMessage = React.createClass({
  render: function() {
    return <h1>Hello {this.props.name}!</h1>;
  }
});
ReactDOM.render(
  <HelloMessage name="World!!!" />,
  document.getElementById('example')
);
Demo05 this.props.children
- 组件的子节点可以通过
this.props.children取到 - this.props.children`在当子节点
- 没有 -
undefined - 一个 -
object - 多个 -
array
- 没有 -
React.Children工具类专门遍历this.props.children- React.Children.map
- React.Children.forEach
- React.Children.count
- React.Children.only
var NoteList = React.createClass({
  render: function() {
    return <ol>
    {
      React.Children.map(this.props.children, function(child) {
        return <div>
          {
            <li>{child}</li>
          }
        </div>
      })
    }
    </ol>
  }
});
ReactDOM.render(
  <NoteList>
    <span>hello</span>
    <span>world</span>
  </NoteList>,
  document.getElementById('example')
);
Demo06 PropTypes
propTypes类型校验集合- {属性:属性类型}
- 注意此处小写
- 同样可以作用于
this.props.children
React.PropTypes字面意思React.PropTypes.string.isRequired
- getDefaultProps
- 为属性设置初始值
var HelloMessage = React.createClass({
  getDefaultProps : function () {
    return {
      name : 'Hello World'
    };
  },

  propTypes: {
    name: React.PropTypes.string.isRequired,
    children: React.PropTypes.element.isRequired
  },

  render: function() {
    // wrong!
    // return <h1>Hello {this.props.name}!</h1><p></p>;
    return <h1>Hello {this.props.name}!</h1>;
  }
});
ReactDOM.render(
  <HelloMessage name="World!!!" />,
  document.getElementById('example')
);
Warning: Failed prop type: Required prop `children` was not specified in `HelloMessage`.
in HelloMessage
Demo07 真实的DOM节点
- 基于virtual DOM,所有操作节点都不是在真实的DOM节点发生的
- change -> virtual Dom -> DOM diff -> DOM
ref="myTextInput"ref 定义节点onClick={this.handleClick}注意事件绑定语法- 根节点只能一个
render中不要访问ref
var HelloMessage = React.createClass({
  handleClick: function() {
    this.refs.myTextInput.focus();
    // this.myTextInput.focuse()
  },
  render: function() {
    return <div>
      <input type="text" ref="myTextInput"/>
      <input type="text" ref={function(input) {
        input.focuse();
      }}/>
      <input type="text" ref={(ref) => this.myTextInput = ref} />
      <input type="button" value="focus the text input" onClick={this.handleClick}/>
    </div>
  }
});
ReactDOM.render(
  <HelloMessage name="World!!!" />,
  document.getElementById('example')
);
Demo08 this.state
- 组件状态通过
this.state维护 getInitialState定义初始状态this.setState- 随着用户互动而产生变化的特性
- 维护状态
- 触发 this.render 重新渲染
- 不应该作为state
- 计算所得属性 直接在
render()里使用this.state.listItems.length + ' list items'比把它放到 state 里好的多。 - React组件
- 基于props的重复数据
- 计算所得属性 直接在
this.props- 一旦定义在组件内就不再改变的属性
var Liked = React.createClass({
  getInitialState: function() {
    return {
      liked: false
    }
  },
  handleClick: function() {
    this.setState({
      liked: !this.state.liked
    })
  },
  render: function() {
    return <div>
      {this.state.liked ? "赞" : ''}
      <input type="button" onClick={this.handleClick}/>
    </div>
  }
});
ReactDOM.render(
  <Liked/>,
  document.getElementById('example')
);
Demo09 表单
- 交互用
onChange(如radio、checkbox、select等) - 取值通过
e.target.value - 别忘记给自身赋值,区分受控组件和不受控组件
- value属性需要伴随着
onChange事件,否则字段将是一个只读字段 - React 组件必须在任何时间点表现视图的状态
- 如果域需要时不变的,那么用
defaultValue <input type="checkbox">和<input type="radio">支持defaultChecked、<select>支持 defaultValue.
var Input = React.createClass({
  getInitialState: function() {
    return {
      text: '',
      // value: 'default 1'
    }
  },
  handelChange: function(e) {
    this.setState({
      text: e.target.value
    })
  },
  handelTextareaChange: function(e) {
    console.log(e.target.value);
  },
  handelSelectChange: function(e) {
    console.log(e.target.value);
  },
  render: function() {
    var value = this.state.value;
    return <div>
      <p>{this.state.text}</p>
      <input type="text" onChange={this.handelChange} value={value}/>
      <br/>
      <textarea name="1" defaultValue="2" onChange={this.handelTextareaChange}/>
      <br/>
      { /*react.js:20483 Warning: Failed form propType: You provided a `value` prop to a form field without an `onChange` handler. This will render a read-only field. If the field should be mutable use `defaultValue`. Otherwise, set either `onChange` or `readOnly`. Check the render method of `Input`.*/ }
      <select value="B" multiple={true} value={['B','C']} >
        <option value="A">Apple</option>
        <option value="B">Banana</option>
        <option value="C">Cranberry</option>
      </select>
    </div>;
  }
});
ReactDOM.render(
  <Input />,
  document.getElementById('example')
);
react.js:20483 Warning: Failed form propType: You provided a `value` prop to a form field without an `onChange` handler. This will render a read-only field. If the field should be mutable use `defaultValue`. Otherwise, set either `onChange` or `readOnly`. Check the render method of `Input`.
Demo10 组件的生命周期
- Mounting
- componentWillMount 组件将要装载
- rendering之前调用
- 即使调用
setState, render只会触发一次
- componentDidMount 组件已装载
- 渲染后立即执行
- 仅客户端有效
- 此时
refs可用 - 先子组件后父组件,冒泡传递
- 此时加载其他框架、
setTimeout、setInterval、AJAX
- componentWillMount 组件将要装载
- Updating
- componentWillReceiveProps(object nextProps)
- 初始化render不会调用此函数
- new props时触发
- 可以比对
this.props和nextProps然后调用this.setState
- shouldComponentUpdate(object nextProps, object nextState)
- 如果定义forceUpdate,此方法不会触发
- 如果return false,
render()不会触发 - 此方法可以在做性能优化时使用,当组件特地多的时候
- componentWillUpdate(object nextProps, object nextState)
- new props or state 时触发
- DOM更新前触发
- 初始化不触发
- 不能使用
this.setState
- componentDidUpdate(object prevProps, object prevState)
- DOM更新后触发
- 初始化不触发
- componentWillReceiveProps(object nextProps)
- Unmounting
- componentWillUnmount
- 从DOM卸载后触发
- 可以清理timers、其他DOM元素
- componentWillUnmount
var Input = React.createClass({
  componentWillMount: function() {
    this.setState({
      text: '123'
    })
    console.log('componentWillMount');
  },
  componentDidMount: function() {
    console.log('componentDidMount');
  },
  componentWillReceiveProps: function(nextProps) {
    console.log('componentWillReceiveProps', nextProps, this.props);
  },
  shouldComponentUpdate: function(nextProps, nextState) {
    return nextProps.id !== this.props.id;
  },
  getInitialState: function() {
    return {
      text: ''
    }
  },
  handelChange: function(e) {
    this.setState({
      text: e.target.value
    })
  },
  render: function() {
    console.log('render');

    var value = this.state.value;
    return <div>
      <p>{this.state.text}</p>
      <input type="text" onChange={this.handelChange} value={value}/>
    </div>
  }
});
var data = {text: 1};
var container = document.getElementById('example');
ReactDOM.render( <Input text={data}/>,container );
Demo11 componentWillReceiveProps的陷阱
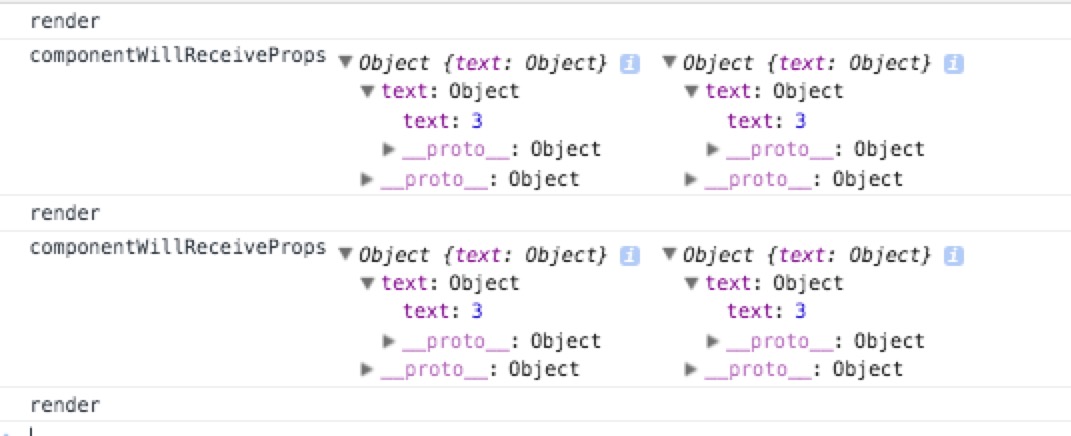
componentWillReceivePropswill be invoked when the props change as the result of a rerender- rerender 重新渲染即会触发,即使props的值并未变化,见下图
- 由于没法跟踪原始数据状态,所以提供
componentWillReceiveProps方法,用户自己判定是否需要修改state,注意componentWillReceiveProps默认不会触发setState的操作 - 此方法有点偏向于异步流程,所以data.text的赋值最后一次才生效
var Input = React.createClass({
  componentWillReceiveProps: function(nextProps) {
    console.log('componentWillReceiveProps', nextProps, this.props);
  },
  getInitialState: function() {
    return { text: ''}
  },
  handelChange: function(e) {
    this.setState({
      text: e.target.value
    })
  },
  render: function() {
    console.log('render', this.state.text);

    var value = this.state.text;
    return <div>
      <p>{this.state.text}</p>
      <input type="text" onChange={this.handelChange} value={value}/>
    </div>
  }
});
var data = {text: 1};
var container = document.getElementById('example');
ReactDOM.render( <Input text={data}/>,container );
data.text = 2;
ReactDOM.render( <Input text={data}/>,container );
data.text = 3;
ReactDOM.render( <Input text={data}/>,container );
Demo12 AJAX
componentDidMount
var UserGist = React.createClass({
  getInitialState: function() {
    return {
      username: '',
      lastGistUrl: ''
    };
  },

  componentDidMount: function() {
    this.serverRequest = $.get(this.props.source, function (result) {
      var lastGist = result[0];
      this.setState({
        username: lastGist.owner.login,
        lastGistUrl: lastGist.html_url
      });
    }.bind(this));
  },

  componentWillUnmount: function() {
    this.serverRequest.abort();
  },

  render: function() {
    return (
      <div>
        {this.state.username} s last gist is
        <a href={this.state.lastGistUrl}>here</a>.
      </div>
    );
  }
  });
  ReactDOM.render(
    <UserGist source="https://api.github.com/users/octocat/gists" />,
    document.getElementById('example')
  );
Demo13 教程
<span dangerouslySetInnerHTML={{ __html: rawMarkup }} />
- XSS攻击风险,请谨慎
handleAuthorChange: function(e) {
  this.setState({author: e.target.value});
},
handleTextChange: function(e) {
  this.setState({text: e.target.value});
},- setState 是extend的语法而不是reset
<Comment author={comment.author} key={comment.id}>- key
- key 作用于组件的重复利用
- 注意:key必须定义在组件props上,而不是组件内部的HTML上面
Demo14 命名组件
- "子组件"可以创建为主组件的属性。
- 注意3种注释的方式
var Form = React.createClass({
    render: function() {
      return (<form>表单:{this.props.children}</form>);
    }
  });
Form.P = React.createClass({
  render: function() {
    return <p>123</p>;
  }
});
Form.Input = React.createClass({
  render: function() {
    return <input type="text"/>
  }
});
ReactDOM.render(
  <Form name="f">
    {/* child comment, put {} around */}
    <Form.P
    /* 123 */
    />
    <Form.Input // end of line comment
    />
  </Form>,
  document.getElementById('example')
);
Demo15 展开属性
props是不可变- 批量定义
props可以借用Spread Attributes ...具体见ES6 - 同属性多次定义,后面的会覆盖前面的
var Component = React.createClass({
  render: function() {
    console.log(this.props)
    return <p></p>;
  }
})
// wrong!
// var component = <Component />;
// component.props.foo = 1;
// component.props.bar = 2;
// embedded:11 Uncaught TypeError: Can't add property foo, object is not extensible
// console.log(component.props);

var props = {};
props.foo = 1;
props.bar = 2;
var component = <Component {...props} bar={3}/>;
ReactDOM.render(
  component,
  document.getElementById('example')
)
// {foo: 1, bar: 3}
console.log(component.props);
Demo16 Mixins和无状态函数
- mixin的方法可以直接调用
- 重复mixin会依次执行,最后执行组建内定义的方法
- 构建的自己的mixins
- ES6不支持mixins
var SetIntervalMixin = {
  componentWillMount: function() {
    this.intervals = [];
  },
  setInterval: function() {
    this.intervals.push(setInterval.apply(null, arguments));
  },
  componentWillUnmount: function() {
    this.intervals.forEach(clearInterval);
  }
};

var TickTock = React.createClass({
  mixins: [SetIntervalMixin], // 引用 mixin
  getInitialState: function() {
    return {seconds: 0};
  },
  componentDidMount: function() {
    this.setInterval(this.tick, 1000); // 调用 mixin 的方法
  },
  tick: function() {
    this.setState({seconds: this.state.seconds + 1});
  },
  render: function() {
    return (
      <p>
        React has been running for {this.state.seconds} seconds.
      </p>
    );
  }
});

ReactDOM.render(
  <TickTock />,
  document.getElementById('example')
);
无状态函数
- 无备份实例,无引用,无DOM节点
- if not 不要使用无状态函数,虽然这是推荐的用法
function HelloMessage(props) {
  return <div>Hello {props.name}</div>;
}
ReactDOM.render(<HelloMessage name="Sebastian" />, mountNode);

const HelloMessage = (props) => <div>Hello {props.name}</div>;
HelloMessage.propTypes = {
  name: React.PropTypes.string
}
HelloMessage.defaultProps = {
  name: 'John Doe'
}
ReactDOM.render(<HelloMessage name="Sebastian" />, mountNode);
##Demo17 ES6 and webpack
- 环境
➜  demo17 git:(master) ✗ npm install react react-dom --save
➜  demo17 git:(master) ✗ npm install babel-loader babel-core babel-preset-es2015 babel-preset-react --save-dev
➜  demo17 git:(master) ✗ npm install babel webpack webpack-dev-server -g
➜ demo17 git:(master) ✗ npm start- 导入依赖
- ./ 当前目录
// main.js
import React from 'react';
import ReactDOM from 'react-dom';
import App from './App';

ReactDOM.render(
  // wrong!
  // <App count="1"/>,
  // right!
  // <App count={1}/>,
  <App/>,
  document.getElementById('app')
)class语法- 构造函数中
this.state代替getInitialState设置state初始值 propTypes和defaultProps是在构造函数里被定义为属性,而不是在 class body 里- 函数绑定3种方式
// App.js

import React from 'react';

export default class App extends React.Component {
  constructor(props) {
    super(props);
    this.state = {
      count: props.count
    };
    // advice! bind first
    this.tick = this.tick.bind(this);
  }
  tick() {
    // wrong! this.state = {}
    this.setState({
      count: this.state.count + 1
    });
  }
  render() {
    // three different ways
    // advice! the first one
    return <div onClick={this.tick}>count: {this.state.count} </div>
    // return <div onClick={this.tick.bind(this)}>count: {this.state.count} </div>
    // return <div onClick={() => this.tick()}>count: {this.state.count} </div>
  }
}

App.defaultProps = { count: 0};
App.propTypes = { count: React.PropTypes.number};

// also
// export default App;
