Toolset for using the Ultimate II+ cartridge for C128 CP/M
Firmware and setting prerequisites and known issues

Version v091-20231030-1632:
- Added CPM UTime: Utility to retrieve present date and time from an NTP server and synch this time to both the Ultimate II+ Real Time Clock as the CP/M system time
- Added CPM UConfig: Utility to set the configuration options for UTime and UMount
- UMount: Bugfixes and added Save REU option
- Added documentation
Version v091-20231021-1542:
- First public alpha of CPM UMount: Utility to mount disk images stored on the Ultimate II+ filesystem in CP/M
- Firmware 3.10f or newer: fully automatic drive detection and support to detect/mount/save CP/M RAM drives
- Firmware 3.xx: automatic device detection possible. But in firmware older than 3.10f automatic device detection is based on hardware drive IDs of the emulated A and B drives of the Ultimate II/II+/II+L cartridge, instead of the software ID. This might give issues if device IDs have been changed by software. To fix this, choose manual override of the automated detected targets using UConfig.
- Firmware before 3.xx: Automatic target detection is not possible, so setting valid drive targets via UConfig is always needed for CPM UMount to work.
Link to Ultimate II/II+/II+L firmware:
- Official released versions: https://ultimate64.com/Firmware
- GitHub: https://github.com/GideonZ/ultimate_releases (might contain newer not yet officially released firmware, or firmware that were temporarily retracted)
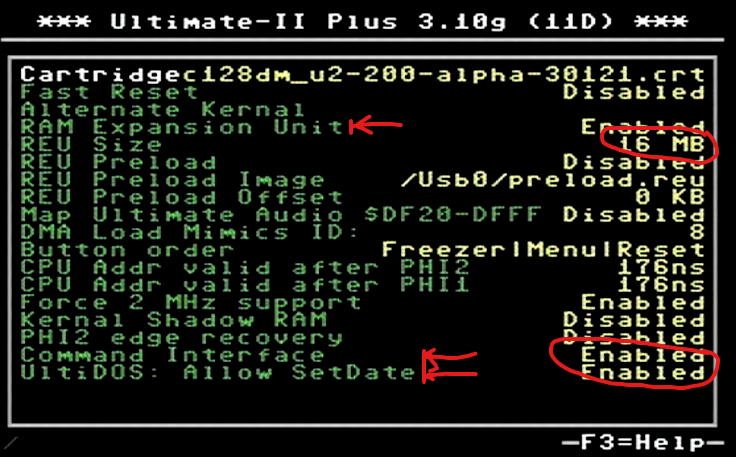
For CPM UTools it is important to check these settings in the C64 and Cartridge Settings menu after pressing F2 from the UI:
- Command Interface: IMPORTANT This setting has to be set to 'enabled' for anything in CPM UTools to work
- UltiDOS: Allow SetDate: This setting has to be set to 'enabled' to allow CPM UTime to change the Ultimate Real Time Clock time
- RAM Expansion Unit: Should be set to 'enabled' to support saving REU memory to a file.
- REU Size: set the desired size of the REU here, maximum is 16 megabytes.
CPM UTools is a little suite of (for now) three utilities to help using the Ultimate II+ cartridge from within CP/M.
Utility to set the CP/M system time (and the UII+ RTC clock) the time received from a user defined NTP server.
This utility can be used to swap and mount virtual disks on your UII+ cartridge, helpful because the UII+ menu is not available under CP/M 80 column mode.
Images can be selected from a file browser, that filters on showing only directories and disk image files.
Utility to set the configuration for CPM UTime and CPM UMount. For CPM UTime, enabling or disabling time query of an NTP server, the NTP server hostname, offset from UTC time in seconds and verbosity on or off can be set. For CPM UMount, automatic valid target detection can be manually overridden, and the default target drive can be set.
In the ZIP file package of a CPM UTools build, two disk images are present, next to the PDF version of this readme file. The .d64 disk image is a C128 CP/M formatted single sided disk image, the .d71 a double sided one. As a real 1571 drive is way faster than a 1541 drive, also the emulated 1571 drive is faster than the 1541. So if your firmware allows it, using the .d71 is recommended for higher speed. The .d64 is provided for compatibility with older firmwares (or the non-+ version of the Ultimate cartridge).
Contents of both images:

| Filename | Program | Description |
|---|---|---|
| UMOUNT.COM | CPM UMount | Disk mounting tool |
| UTIME.COM | CPM UTime | NTP time synching tool |
| UCONFIG.COM | CPM UConfig | Utility to set configuration options for CPM UTime |
| CPMUTOOL.CFG | Coniguration file | File containing configuration settings for the tools |
Note that on first use, both CPM UTime and CPM UConfig create a configuration file on the disk if no one is yet present. A new file called CPMUTOOL.CFG is added to store configuration data.
Obviously, you are free (even encouraged) to copy these files to another disk target, such as your main RAM drive.
You can start UMount, UTime, or UConfig by typing the filename (typing the .com is not needed) and enter.
This application sets the configuration options for CPM UTIme and saves them in the CPMUTOOL.CFG configuration file. It creates this file on first start if no file is present already.
Interface after application start, showing the present configuration settings:

Navigate through the editable options by pressing the CURSOR DOWN or CURSOR UP cursor keys.
ESC will quit the configuration program and save the settings if changed.
RETURN selects the highlighted option for editing.
| Option | Explanation | How to edit |
|---|---|---|
| Detection override | Rely on automated detection of valid target drives (setting is No), or manually select valid targets (setting is Yes) | Press RETURN to toggle between Yes and No |
| Autodetection of valid drives succeeded | Shows if firnware support automatic drive detection | Not an option to change |
| A B C D | Setting per CP/M drive: either is No target or it is a valid target, in which case it shows the drive ID, type and power status | If Detection override is set as Yes, RETURN toggles between No target and Manual Target |
| Target drive | Drive to which images will be mounted | Press RETURN to edit this option, then press CURSOR DOWN or CURSOR UP to change the drive letter, press RETURN to confirm, or press ESC to cancel. |
Screenshots
- Detection override

- Toggle targets

- Set target

| Option | Explanation | How to edit |
|---|---|---|
| NTP host | Host name of the desired NTP server. The default server is pool.ntp.org. | Press RETURN to select option, then enter desired host by typing it, edit by using the CURSOR LEFT and CURSOR RIGHT keys, DEL to delete, RETURN to confirm entry, ESC to cancel. |
| UTC offset | Time offset to UTC (Universal standard time) in seconds. | Press RETURN to select option, then enter desired offset by typing it (noting the signing, so do not forget the minus sign if offsets are negative to UTC), edit by using the CURSOR LEFT and CURSOR RIGHT keys, DEL to delete, RETURN to confirm entry, ESC to cancel. |
| Update from HTP | Sets if time should be synched with the selected NTP server (setting is 'Enabled'), or if only the CP/M system time should be synched to the UII+ Real Time Clock without an NTP request (Disabled). | Press RETURN to toggle between Enabled and Disabled. |
| Verbose | Enabling this option makes the CPM UTime give visual feedback on the steps it performs, disabling will make CPM UTime perform its actions without any visual feedback. | Press RETURN to toggle between Enabled and Disabled. |
Detailed explanation and screenshots
- NTP Host: The application will not check validity of the input, to check if it works and the hostname resolves and results in a successful connection the verbose mode is suggested.

- UTC offset: Offset is set in seconds (to allow for half hour difference time zones and also for finetuning if desired), so multiply the UTC offset in hours by 3600. And note that the offset is signed, so start with a minus for offsets negative to UTC. Default is set on Central European Time, which requires an offset of 3600. Setting to Central European Summer Time would require 7200. Another example: setting to Eastern Standard Time (EST, time zone for a.o. New York City) would be UTC -5, so -5*3600 = -18000. See https://www.timeanddate.com/time/zones/ for all offsets in hours (multiply by 3600 to get to seconds). No inout validation is performed.

- Update from NTP and verbose:

This application is driven by the options stored in the configuration file and does not need further user interaction.
If verbosity is set to no in the configuration file options, nothing will be shown on the screen. If verbosity mode is 'Enabled' and NTP enable is 'Enabled', something like this will be shown on the screen:

This mode is meant to either debug your configuration settings, or if you are simply curious what happens:
- Connecting to the selected hostname of the desired NTP server
- Sending the data request to that server
- Reiving the data and interpreting result
- Showing UNIX epoch received
- Converting that output to time in selected time zone using the UTC offset
- Setting the UII+ Real Time Clock with that time
- Synching CP/M system time with the UII+ RTC clock.
- Confirming success
Note that on any NTP connection error, the CP/M clock will be synched to the unchanged UII+ RTC clock as fallback.
If NTP enable is switched to off, only the synch between UII+ RTC and the CP/M system time takes place, no NTP time request will be performed.
This application enables to mount disk images on the UII+ filesystem to an UII+ emulated drive in CP/M via a file browser.
To facilitate to find disk images quicker and easier in the filebrowsers, all entries not being directories and file images are filtered out.
To properly enable filtering, image filenames should end with the proper corresponding .dxx extension:
- .d64 for 1541 drive type or 1571 drive type
- .g64 for 1541 drive type or 1571 drive type
- .d71 for 1571 drive type
- .d81 for 1581 drive type
Other image types are not presently supported.
Also note that file and dirnames can only be selected if they have a maximum name length of 20 characters, including extension. Reason is memory constraints: allowing for longer filenames would cause less filenames that can be loaded in memory. If you need to select dirs or files with longer names, shorten them first to 20 chars (including extension) at most.
Maximum number of files shown is dependent on the free memory on the target system used. If you have more valid images or subdirectories in your present directory, any entry over that number will not be shown. If you need to reach these dirs or files, consider reorganizing your dir to place the files in subdirs with fewer entries.
After start, this main interface is shown:
On the left the filebrowser is shown. First line is the ID of the Ultimate file system detected, second line shows the present path on that filesystem. Below those two lines the filtered file list is shown in two columns. You can navigate to images and browse through directories here.
In the filebrowser section, entries are shown with a three letter explanation of the type:
| Code | Description |
|---|---|
| DIR | Directory |
| D64 | 1541 images with .d64 extension |
| D71 | 1571 images with .d71 extension |
| D81 | 1581 images with .d81 extension |
| !TL | Name too long to be fully shown. Can not be selected without shortening name |
On the right top, the detected drives and present target drive is shown.

Below that help for the available key commands is shown:
| Key | Function |
|---|---|
| A-D | Select another drive as target by pressing the key to the corresponding drive letter |
| CURSOR KEYS | Navigate the filebrowser area: move in the corresponding direction up, down, left or right |
| RETURN | Select the highlighted file to mount (is ignored if a dir (DIR) or if the filename is too long (!TL) ) |
| P / U | Navigate one page up (U) or one page down (P) |
| T / E | Navigate to the first item (T) or to the last one (E) |
| DEL | Navigate to the parent directory |
| R | Navigate to the root directory |
| H | Navigate to the home directory |
| S | Save REU file in present directory |
| I | Show version information |
| ESC | Quit program |
*** Detailed explanation***
Moving to a subdirectory
Move to a subdirectory by clicking on the desired directory name shown.
Selecting an image to mount
Select an image to mount by pressing RETURN when a valid filename is highlighted (so type .d64, .d71 or .d81).
On success, the following dialogue is presented:

If this is shown, the selected image is already mounted.
Press ESC to exit the CPM UMount application and go back to the CP/M prompt with the new image mounted to the selected target drive.
Press any other key if you want to proceed with CPM UMount (for example if you selected a wrong image or if you want to mount images on other targets as well).
S: Save REU
By pressing S, the contents of the REU memory can be saved to a .reu file in the presently active directory.
First, enter the filename (without .reu extension).

If a file already exists with this name this is shown:

In this case, press Y to proceed and overwrite, No to cancel.
Finally, select the memory size to save using the + (increase size) and - (decrease size) keys, press RETURN to confirm:

Depending on selected memory size, saving can take a while.
I: Version
Pressing I shows the version information. Press a key to continue.

Disk mounter for the Ultimate II+ in CP/M
Written in 2023 by Xander Mol
https://github.com/xahmol/CPMUTools
https://www.idreamtin8bits.com/
Code and resources from others used:
-
Scott Hutter - Ultimate II+ library: https://github.com/xlar54/ultimateii-dos-lib/ (library for the UII+ UCI functions)
-
z88dk C cross compiler for Z80 targets, including C128 CP/M https://github.com/z88dk/z88dk/wiki
-
Jochen Metzinger - ctools https://github.com/mist64/ctools
-
ntp2ultimate by MaxPlap https://github.com/MaxPlap/ntp2ultimate Time via NTP code
-
EPOCH-to-time-date-converter by sidsingh78 https://github.com/sidsingh78/EPOCH-to-time-date-converter/blob/master/epoch_conv.c
-
Bart van Leeuwen for providing CP/M images, testing and advice
-
Gideon Zweijtzer for creating the Ultimate II+ cartridge and the Ultimate64, and the Ultimate Command Interface enabling this software.
-
Tested using real hardware (C128D, C128DCR) using CP/M 3.0 and ZP/M+.
Licensed under the GNU General Public License v3.0
The code can be used freely as long as you retain a notice describing original source and author.
THE PROGRAMS ARE DISTRIBUTED IN THE HOPE THAT THEY WILL BE USEFUL, BUT WITHOUT ANY WARRANTY. USE THEM AT YOUR OWN RISK!