DMBoot 128
Device Manager Boot Menu for the Commodore 128
Written in 2020-2023 by Xander Mol
https://github.com/xahmol/DMBoot
https://www.idreamtin8bits.com/
Changelog release versions
Version v391-20231011-1210:
- Fix of a serious bug causing changing directories to fail via UCI on mounting images or loading a REU file. This causes that mounting images and REU files only succeeded if they were placed in the present working directory (which is usally /11)
- Made F7 exit in the main menu for consistency throughout the program, so F3 became Edit/Reorder/Rename/Delete slots
- Memory optimalisations, a.o. moving image mounting and REU loading functions to a seperate overlay (dmb-exec.prg)
- Added much more comprehensive error handling and text feedback on mounting images and loading REU
Version v391-20230819-1737:
- Second public alpha of DMBoot v4 with a completely new filebrowser.
- The file browser part that in previous version was just a slightly adapted DraBrowse has now for a large part been rewritten to be able to store the directory entries in free VDC memory. On C128s with 16 KB VDC memory this already solves memory issues I had, causing the maximum amount of direntries that could be loaded to be too low for my taste (less than 70 entries). Now it loads up to 175 entries, IMHO perfectly acceptable. If your C128 has 64 KB VDC however, a whopping 48 KB memory is now available, which should be enough for 2.137 dir entries. Did not test that, as I do not have a dir so large, but did manage to succesfully have a testdir with 300 subdirs in memory completely. Would almost dare you to test the limits, I know there is always someone with so many items in a dir that he can still break this limit 😉
- As I had to rewrite the filebrowser part for this anyway, I have also changed some other things: Removed the option in 80 column mode to show two drives at once. Maybe looked cool, but IMHO showing two dirs at once makes only sense for a copyer, not a browser. More importantly, need for two dirs in memory costs valuable memory space and makes allocation routines way more complicates (especially as I could no longer use simple alloc() and pointers as VDC memory is not directly accesible). Instead of this, in 80 column mode now two columns are used to show the directory of the present drives, doubling the number of items that can be shown. Think this makes way more sense for a browser;
- Previously, cursor right triggers a dir change and cursor left a dir up (if possible). With two columns this is counter intuitive, you just want to move left and right. So changed behaviour of cursor left and right to enable sideway navigation. Of course you can still select directories by the ENTER key to go in a dir, and the DEL key to go back.
- Added a page down (P key) and page up (U key) function to quicker navigate large dirs.
- Sort still works, but as VDC memory management is slower, and also now much larger dirs are supported, beware to use it in large dirs as kit then gets very slow.
- Rest should still work unaltered in browser mode (please let me know otherwise).
- File browser now starts with the device ID of the hyperspeed drive (if active), instead of just 8. For me this makes more sense as in DMBoot most logical use of the filebrowser is selecting things on the hyperspeed device ID. Of course the other devices can still be selected by + and - key and F1 for dir refresh.
- Bug fix: Device type detection did not work after passing past a device ID on which no device is active. Solved. Probably this bug has there been a long while, if not from the start. Is actually also present in DraBrowse (made a pull request there as well)
Version v3.91 - 20230627-0852:
- New version with small bugfix reparing that configuration is not saved after deleting a slot.
Version v391-20230608-1541:
- First alpha version of v4 of DMBoot.
- Added the possibility to add mounting disk images for both the A and B drives of the UII+ and loading a REU file to every menu slot.
- Disk images and REU files are selectable via the file browser
- Bug fixes
- Memory optimalisations
Known issues and limitations:
In its present form, the program is very close to full memory. Considering a complete rewrite, but that takes more time than I have in the foreseeable future. Therefore, had to make some sacrifices:
- No validation if the configuration is correct or coherent is done, so setting up valid configurations is the users responsibility Only very limited error handling on executing incorrectly configured menu slots is done
- Mounts and REU file can be added or changed (by adding again and overwriting the previous one), but not deleted seperately. To do so, the whole entry needs to be deleted.
- Adding disk images to mount, a REU file and choosing the file to start erquire all seperate dirtrace actions in the filebrowser, so setting up a menuslot might take up to four entries to the filebrowser and navigating via dirtrace.
- I removed the functionality originiating from DraCopy to view a file in HEX or ASCII, or to perform disk commands from the file browser. As alternative, you can of course add the original DraBrowse/DraCopy as entries in de boot menu.
I personally think these limitations are acceptable as setting up the configiration of the menuslots is not done on a daily basis anyway, you set it up once to use it often.
Version v299-20220812-0958:
- Added Load in C64 mode option with key '6' in the filebrowser. Works on directly executing programs from the filebrowser, as well as adding programs to load in 64 mode as slots in the bootmenu. Keeps supporting user defined commands and disk mounts. Requires Device Manager ROM API v2, so at least c128dm-200-alpha-20409. Thanks to Bart van Leeuwen providing API functionality to his Load 64 program function.
- Minor other improvements / fixes
Version v299-20210909-1708:
- Complete redesign of internal memory structure creating more working memory space
- This enabled placing eveything in one menu again instead of having to start seperate programs for the NTP time and GEOS utilities.
- The ZIP still contains multiple files as the program now makes use of memory overlays that are dynamically loaded on demand. So still unzip all files in the zip to your /usb*/11/ directory.
- New menu options:
- F4: Edit configuration settings for NTP time set and GEOS ram boot (used to be dmbconfig.prg)
- F6: Boot GEOS from REU file using the settings provided with the F4 option
- New functionality:
- Maximum device ID in filebrowser is now 30 instead of 11
- Changing device ID in the filebrowser is now done with + and - keys instead of just F2, to avoid having to click F2 a lot if you want to decrease the ID from say 12 to 11.
- You can now choose to have a disk image mounted on starting a menu slot. The program referred to in the slot will still be loaded from the Ultimate drive, but an image will be mounted on the chosen ID at the same time. This could be a working disk along to the main program, but could also be the program disk if the main executable demands to load parts from a disk. For each menu slot you can choose between either a disk to be mounted, or an user defined command. Both is not possible. Set and select this image from the main menu using: F7 > F2 > choose slot > F1 and enter image details (device ID, path and image file name).
- No changes made to configuration files, so no upgrader needed if you are coming from a 299 version.
- Deleted functionality:
- Removed the previous F4 Boot from floppy option. Not only did I need this space for the new NTP time and GEOS configuration option on F4, but also this functionality is delivered by the DM ROM itself already at boot.
Version v299-20210726-1019:
- Changed configuration file for main program from a sequential file to a binary blob, which loads much faster, so shortening boot time.
- Added dmb-confupd-2-3.prg: Utility to migrate the old sequential config file to the new format
- The new autostart.128.prg now sets time from NTP server on boot before starting DMBoot itself;
- Geosramboot.prg starts GEOS from a specified REU file
- Dmb-config.prg is a program to configure NTP time set and GEOS ram boot configuration
Version v199-20210125-2234:
- Menuslots now are stored in bank 1 memory, giving much more available memory, enabling all other changes below
- Increased possible number of memory slots from 10 to 36, accessable via 0-9 and a-z keys (suggested by Bart van Leeuwen ). Visible in two columns in 80 column mode, in 40 column mode only the first 15 options are shown (did not go for scrolling, at least not yet). Suggest to use therefore the right column for 80 column suported programs.
- Made the other options available via Function-keys (as the letter keys are now taken by the extra menu slots)
- Added option to add a user defined command to each menuslot (e.g. a partition change, a POKE or anything else you can imagine as long as it runs from the BASIC prompt with one enter, fits in 100 chars and does not give screen output other than the READY prompt (suggested by Bob Grimes)
Instructions
Prerequisites:
- UltimateII+ (U2+) cartridge installed, with firmware at version 3.9 or higher (link to firmware page, scroll down for U2 firmware: https://ultimate64.com/Firmware )
- 128 Device Manager ROM installed as Cartridge ROM on the U2+, version 1.99 or higher. (link: https://www.bartsplace.net/content/publications/devicemanager128.shtml )
Installation:
-
Create a directory called '11' on your usb stick, and put the contents of the DMBoot ZIP there. It doesn't really matter if the usb stick is usb0 or usb1 or such, but what is important is the 'default path' setting in the Software IEC menu of the U2+ cartridge is pointing to the proper path for your usb stick. While it doesn't matter if the usb stick is usb0/1 etc, the names of the directory and file are important.
-
Unzipping should place these files in the 11 directory:
-
autostart.128.prg: DMBoot main program that will be auto started on boot (and therefore has to have this name, otherwise the Device Manager ROM will not be able to recognise that this needs to be started)
-
dmb-fb.prg: Memory overlay for the file browser (cannot be executed as stand alone program)
-
dmb-geos.prg: Memory overlay for the GEOS RAM Boot code (cannot be executed as stand alone program)
-
dmb-lowc.prg: Memory overlay for shared functions loaded in the $1300 area (cannot be executed as stand alone program)
-
dmb-menu.prg: Memory overlay for the DMBoot main menu functions (cannot be executed as stand alone program)
-
dmb-util.prg: Memory overlay for the NTP time set and GEOS configuration settings and UI.
-
dmb-exec.prg: Memory overlay for mounting disks and images on launching programs
-
dmb-confupd-3-4.prg: Utility to upgrade the configuration file of the DM Boot main program from the 1.99 version to the 2.99 version. Only needed if coming from a previous version.
-
readme.txt: This readme file.
-
Upgrade instructions from version 1.99 to 2.99:
- If you want to be able to revert to the old version (and also in all other cases as backing up is always a good idea), please backup your present config file as it will be altered/overwritten to the updated format unreadable by the old version.
- The ZIP contains the utility dmb-confupd-2-3.prg to update your present config file to the new format.
- Unzip the ZIP file and transfer first dmb-confupd-2-3.prg to the 11 dir of your UII+ USB drive.
- On your C128, move to the 11 dir and run dmb-confupd-2-3.prg to upgrade the config file. Of course you can also opt to start clean: in that case just delete the dmbootconf.seq file and a new empty one will be created on start of the new DMBoot version. Starting the new DMBoot version with the old config file however gives unexpected results as I did not program a check on the config file version.
- Only then transfer the new autostart.128.prg to the 11 dir of your USB stick.
- You can now reboot as normal. The upgraded config file should be read correctly now.
Upgrade instructions from version 2.99 to 3.9x:
- FIRST BACKUP YOUR PRESENT CONFIGURATION! This is still an alpha releases, so bugs in for example the configuration file upgrade utility might be present
- Upgrade your configuration file by running the DMB-CONFUP-3-4 program
- Add disk image mounts: Go to the filebrowser via F1, go to the correct device, press 'D' for dirtrace, navigate to the desired disk image and press 'A' to mount on drive A or 'B' to mount on drive B. Then select the target menuslot, edit the name if desired, and enter the device ID for the image.
- Add REU files: Go to the filebrowser via F1, go to the correct device, press 'D' for dirtrace, navigate to the desired REU file and press 'ENTER'. Then select the target menuslot, edit the name if desired, choose the REU size via '+' and '-' and press 'ENTER' to confirm.
- NOTE: The REU file needs to be in the same filepath as the drive image for disk A if that one is present (not storage space available for another path to store).
- Select the file to start from a mounted disk image on drive A (instead of running via the hyperspeed file system): Go to the filebrowser via F1, go to the correct device, press 'D' for dirtrace, navigate to the desired file to start and press 'M'. Then select the target menuslot, edit the name if desired.
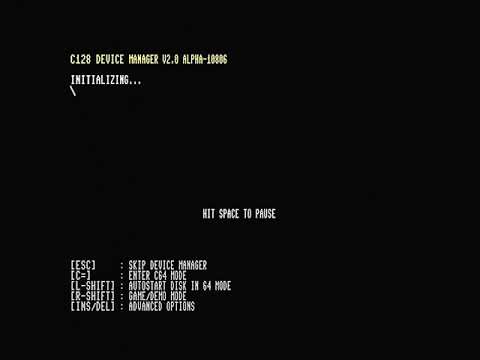
First run:
- At first run no configuration file is present yet for the menu, so only the default menu options are visible:

- For instructions of the menu options: see below.

Add start options via the Filebrowser
- Start options can be added to menuslots 0-9 and A-Z via the Filebrowser. This can be either running an executable program, or booting a specific disk image.
- For this, first choose F1 for filebrowser. You will get a screen like this:

- Full instructions for the filebrowser are below. Here only the quick instructions to add an option to the startmenu.
- Select your desired drive target by switching pressing + or - to increase resp. decrease the device number until the desired device number is selected.
- Refresh directory by F1 if needed (empty column)
- Start a directory trace by pressing D

This starts a trace of your movements through the directory tree, starting from the root directory of your device. You should see the directory refreshing to this root directory. You should also see the TRACE toggle switched to ON in the lower right corner of the screen.
 .
.
-
Also note the other two toggles Frc 8 and FAST: these are toggled by pressing the 8 and F keys.

-
Force 8: This forces the device ID to be loaded from to 8 regardless of the device ID the target is located at. Only works for the U2+ Software IEC drive (identified as U64 in the lowest line of the directory column). This enables loading software that is not supporting other parts of the program from other device IDs as 8
-
FAST: this starts the program in FAST mode. Only use if the target is started in 80 column mode and the target supports it.
-
Browse to your desired target via the Cursor keys: UP/DOWN/LEFT?RIGHT to move within the directory, P for page down and U for a page up, ENTER on a directory or disk image to enter the selected directory or image, DEL to change to parent directory.
-
To choose to have a program executed from the menuslot, select ENTER or F7 on the desired executable
-
To have the program executed in C64 mode from the menuslot, select 6 on the desired executable


- To choose to boot the image you are now in from the menuslot, select F5.
- To select a highlighted disk image (so a directory entry with an .dXX extension), press A or B to add this image to a menuslot as to be mounted on starting from that slot on the Ultimate emulated drive A resp. B. Then select the target menuslot, edit the name if desired, and enter the device ID for the image.

- To select the highligjhted program file to be started from the disk image mounted in drive A instead of from the hyperspeed drive, select the program by pressing M (instead of ENTER). Then select the target menuslot, edit the name if desired.

-
To add a REU file to be loaded at the start of a menu option: navigate to the desired REU file and press 'ENTER'. Then select the target menuslot, edit the name if desired, choose the REU size via '+' and '-' and press 'ENTER' to confirm. NOTE: The REU file needs to be in the same filepath as the drive image for disk A if that one is present (not storage space available for another path to store).
-
No validation if the configuration is correct or coherent is done, so setting up valid configurations is the users responsibility, Only very limited error handling on executing incorrectly configured menu slots is done. Mounts and REU file can be added or changed (by adding again and overwriting the previous one), but not deleted separately. To do so, the whole entry needs to be deleted. Adding disk images to mount, a REU file and choosing the file to start require all separate dirtrace actions in the filebrowser, so setting up a menuslot might take up to four entries to the filebrowser and navigating via dirtrace.
-
After selecting what should be placed in a menuslot option, you should get this screen to select the menuslot position:

- If this slot is already (partly) filled, confirmation is asked. Choose Yes to proceed or No to Cancel.
![]()
- Choose 0-9 or A-Z key to choose the desired slot.
- Enter the desired name for the menuslot and press ENTER
- You now return to the main menu where you should see the menu option appearing.
- Repeat until you have selected all desired menuslot options
F1: Filebrowse menu
The filebrowser based and insprired by the DraBrowse program from https://github.com/doj/dracopy
Menu options are similar, but have diverged in newer DMBoot versions.
| Key | Function |
|---|---|
| F1 / 1 | Read directory in current window |
| + | Increase devicenumber for the current window |
| - | Decrease devicenumber for the current window |
| F5 / 5 | Boot from present directory / image (added compared to DraBrowse) |
| RETURN | Enter directory or run the selected program |
| DEL | Go to parent directory |
| ↑ | Go to root directory |
| T | Go to the first item in the directory |
| E | Go to the last item in the directory |
| S | Show directory entries sorted. WARNING: gets very slow on large dirs |
| P | Go a page down in the directory |
| E | Go a page up in the directory |
| Cursor keys | Navigate in the directory |
| D | Toggle Dirtrace: traces the directory movements from root directory to select menuslot option |
| A | Select the highlighted item as image to be mounted in drive A. Only works in Dirtrace mode, highlighted item should be an image with a .Dxx extention |
| B | Select the highlighted item as image to be mounted in drive A. Only works in Dirtrace mode, highlighted item should be an image with a .Dxx extention |
| M | Select the highlighted program to be started from the disk image mounted in drive A (instead of present device of dir) |
| 8 | Toggle Force 8, forcing device ID 8 on program execution or boot. Works for menuslot option as well as directly from filebrowser. |
| F | Toggle FAST, enabling this makes file execution or boot start in FAST mode. Works for menuslot option as well as directly from filebrowser. |
| Q | Quit to main menu |
F2: Information
Shows information screen. Also shouws how much VDC memory is detected. Press key to return to main menu.

F3: Edit / re-order / delete
Enables to rename menuslots, re-order the slots or delete a slot. Selecting provides this menu:

F4: NTP time / GEOS config
Enables editing the settings for:
- automatically obtaining the actual time from an NTP server and setting the internal clock of the Ultimate II+ to this time
- RAM booting GEOS from a specified REU file with specified images mounted on the UII+ drives.
After pressing F4, you arrive at this screen:

The screens shows you the present settings and allows you to edit them.
- F1 Edit the settings for obtaining the time from an NTP server. This gives you this screen:

-
F1 Toggles to enable or disable updating UII+ time from an NTP server at boot. Default: Enabled.
-
F3 Edits the time offset to UTC (Universal standard time). The offset needs to provided in seconds. Automated adjustment for daylight savings ('Summer' and 'Winter' time) is not provided, so you have to adjust your offset on the change from daylight saving time to not. Example: Central Europen Time requires an offset of 3600, Central European Summer Time of 7200. See https://www.timeanddate.com/time/zones/ for all offsets in hours (multiply by 3600 to get to seconds). Default: 0 (=UTC).
-
F5 Edits the NTP time server to be used. It defaults on pool.ntp.org, but you can specify your own if you want.
-
F7 Back to main menu
-
F3 Edit the GEOS RAM boot configuration options. This gives you this screen:

- F1 Enables editing of the path to and the filename of the REU file to use on your UII+ device. Gives this screen:

- F3 Enables editing the REU file size to match the image you have chosen. Choose + to increase size, - to decrease.

- F5 Edits the device IDs, paths and the filenames of the images you want to mount.

-
F7 Back to main menu
-
F7 Quit configuration tool. Only at this time new settings will be saved.
F5: C64 mode
Go to C64 mode (no confirmation will be asked)
F6: GEOS RAM boot
Boot GEOS from RAM with the specified settings. Those settings need to be configured first (via the F4 option in the main menu) for this to work.
Demonstration of booting GEOS via DMBoot (click picture to see video on Youtube):
F7: Quit to C128 Basic
Exit the bootmenu to the C128 BASIC Ready prompt. Memory will be erased on exit, SLOW mode will be selected also in 80 column mode for compatibility purposes.
- F1 enables renaming a menuslot. Choose slot to be renamed by pressing 0-9 or A-Z. Enter new name. Enter to confirm.

- F2 enables to add a user defined command. This gives this screen:

F1 will then enable to add an image to be mounted before the slot executable is started. Enter device ID (8 or 9 for the emulated drives, or 0 to cancel), path on the USB stick to the image and the image name.
F2 will enable to add a user defined command to be executed before the program in the slot is started. Can be any valid BASIC command.
- F3 enables re-ordering menu slots. Choose slot to be re-ordered by pressing 0-9 or A-Z. Selected menu slot is highlighted white. Move option by pressing UP or DOWN. Confirm by ENTER. Cancel with F7.

- F5 enables deleting a menu slot. Choose slot to be re-ordered by pressing 0-9 or A_Z. Confirm by pressing Y for yes, or N for no.

- F7 takes you back to main menu. Changes made are saved only now.
Screenshot from real device

Credits
Based on DraBrowse:
DraBrowse (db*) is a simple file browser, originally created 2009 by Sascha Bader.
Used version adapted by Dirk Jagdmann (doj)
https://github.com/doj/dracopy
Uses code from: Ultimate 64/II+ Command Library Scott Hutter, Francesco Sblendorio https://github.com/xlar54/ultimateii-dos-lib
Requires and made possible by the C128 Device Manager ROM, created by Bart van Leeuwen. https://www.bartsplace.net/content/publications/devicemanager128.shtml
Requires and made possible by the Ultimate II+ cartridge, created by Gideon Zweijtzer. https://ultimate64.com/
The code can be used freely as long as you retain a notice describing original sources and authors.
THE PROGRAMS ARE DISTRIBUTED IN THE HOPE THAT THEY WILL BE USEFUL, BUT WITHOUT ANY WARRANTY. USE THEM AT YOUR OWN RISK!