Many Organizations adopt DevOps Practices to innovate faster by automating and streamlining the software development and infrastructure management processes. Beyond cultural adoption, DevOps also suggests following certain best practices and Continuous Integration and Continuous Delivery (CI/CD) is among the important ones to start with. CI/CD practice reduces the time it takes to release new software updates by automating deployment activities. Many tools are available to implement this practice. Although AWS has a set of native tools to help achieve your CI/CD goals, it also offers flexibility and extensibility for integrating with numerous third party tools.
In this post, you will use GitHub Actions to create a CI/CD workflow and AWS CodeDeploy to deploy a sample Java SpringBoot application to Amazon Elastic Compute Cloud (Amazon EC2) instances in an Autoscaling group.
GitHub Actions is a feature on GitHub’s popular development platform that helps you automate your software development workflows in the same place that you store code and collaborate on pull requests and issues. You can write individual tasks called actions, and then combine them to create a custom workflow. Workflows are custom automated processes that you can set up in your repository to build, test, package, release, or deploy any code project on GitHub.
AWS CodeDeploy is a deployment service that automates application deployments to Amazon EC2 instances, on-premises instances, serverless AWS Lambda functions, or Amazon Elastic Container Service (Amazon ECS) services.
The solution utilizes following services:
- GitHub Actions : Workflow Orchestration tool that will host the Pipeline.
- AWS CodeDeploy : AWS service to manage deployment on Amazon EC2 Autoscaling Group.
- AWS Auto Scaling : AWS Service to help maintain application availability and elasticity by automatically adding or removing EC2 instances.
- Amazon EC2 : Destination Compute server for the application deployment.
- AWS CloudFormation : AWS infrastructure as code (IaC) service used to spin up the initial infrastructure on AWS side.
- IAM OIDC identity provider : Federated authentication service to establish trust between GitHub and AWS to allow GitHub Actions to deploy on AWS without maintaining AWS Secrets and credentials.
- Amazon S3 : Amazon S3 to store the deployment artifacts.
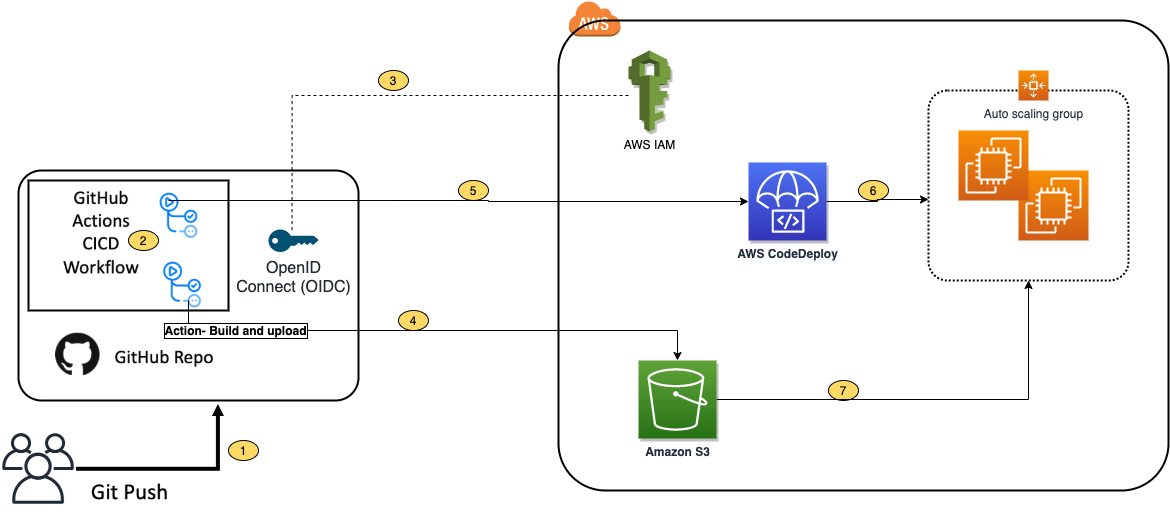
The following diagram illustrates the architecture for the solution:

Before you begin, you need to complete the following prerequisites:
- An AWS account with permissions to create the necessary resources.
- A Git Client to clone the provided source code.
- A GitHub account with permissions to configure GitHub repositories, create workflows, and configure GitHub secrets.
The following steps provide a high-level overview of the walkthrough:
- Clone the project from the AWS code samples repository.
- Deploy the AWS CloudFormation template to create the required services.
- Update the source code.
- Setup GitHub secrets.
- Integrate CodeDeploy with GitHub
- Trigger the GitHub Action to build and deploy the code.
- Verify the deployment.
Clone this repository aws-codedeploy-github-actions-deployment
git clone https://github.com/aws-samples/aws-codedeploy-github-actions-deployment.git
Create an empty repository in your personal GitHub account.
git clone https://github.com/<username>/<repoName>.git
Copy the code. We need contents from the hidden .github folder for the GitHub actions to work.
cp -r aws-codedeploy-github-actions-deployment/. <new repository>

e.g. GitActionsDeploytoAWS
To deploy the CloudFormation template, complete the following steps:
1.	Open AWS CloudFormation console. Enter your account ID, user name and Password.
2.	Check your region, this solution uses us-east-1.
3.	If this is  new AWS CloudFormation account, click Create New Stack. Otherwise, select Create Stack.
4.	Select Template is Ready
5.	Click Upload a template file
6.	Click Choose File. Navigate to template.yml file in your cloned repository at “aws-codedeploy-github-actions-deployment/cloudformation/template.yaml”
7.	Select the template.yml file and select next.
8.	In Specify Stack Details, add or modify values as needed.
        - Stack name = CodeDeployStack.
        - VPC and Subnets = (these are pre-populated for you) you can change these values if you prefer to use your own Subnets)
        - GitHubThumbprintList = 6938fd4d98bab03faadb97b34396831e3780aea1
        - GitHubRepoName – Name of your GitHub personal repository which you created.
9.	On the Options page, click Next.
10.	Select the acknowledgement box to allow the creation of IAM resources, and then select Create.
It will take CloudFormation about 5 minutes to create all the resources. This stack would create below resources.
       - Two EC2 Linux instances with Tomcat server and CodeDeploy agent installed
       - Autoscaling group with Internet Application load balancer
       - CodeDeploy application name and deployment group
       - S3 bucket to store build artifacts
       - Identity and Access Management (IAM) OIDC identity provider
       - Instance profile for Amazon EC2
       - Service role for CodeDeploy
       - Security groups for ALB and Amazon EC2
Please follow the blog post to setup GitHub actions and test the CICD flow.
To avoid incurring future changes, you should clean up the resources that you created.
1. Empty the Amazon S3 bucket:
2. Delete the CloudFormation stack (CodeDeployStack) from the AWS console.
3. Delete the GitHub Secret (‘IAMROLE_GITHUB’)
    1. Go to the repository settings on GitHub Page.
    2. Select Secrets under Actions.
    3. Select IAMROLE_GITHUB, and delete it.
See CONTRIBUTING for more information.
This library is licensed under the MIT-0 License. See the LICENSE file.