In this project, our goal was to write a software pipeline to identify a sequence of digits in an image.
The suggested steps of this project were the following:
- Create a synthetic dataset based on MNIST characters.
- Propose a network to solve the problem on the synthetic dataset.
- Discuss the training method.
- Test the model on a realistic dataset, the SVHN dataset was recommended for this step, and discuss the results.
- Propose changes to the existing model and analyze the new results.
- Test on images that we capture and discuss the results.
- Train a number localizer and discuss the results.
- Test on the same user-captured images.
Before we start coding the first step, it's good to remind us about the purpose of the synthetic dataset in our pipeline. Generally speaking, in an academic study, the datasets are somewhat standardized, and benchmarks for new models are established on top of this "clean data" - in commercial applications, however, that is not the norm. Labeled data to train your models are expensive to obtain, and the best approach is to often train a model in a similar dataset if available and then fine-tune it to the new problem you are trying to solve.
Having said that, we want to make our synthetic data as close as possible to the data you expect to feed your model when you fine-tune it. So the obvious thing is to have a look at a few images from the SVHN dataset and then come up with a "proxy" synthetic dataset.
What we notice is that numbers are not always exactly centered, they appear in several different colors, skew and rotation. So it would be desirable to replicate these features in our synthetic dataset.
Given the limitations of the MNIST dataset that we are using to generate our synthetic data, I decided against experimenting with different colors for the text and background.
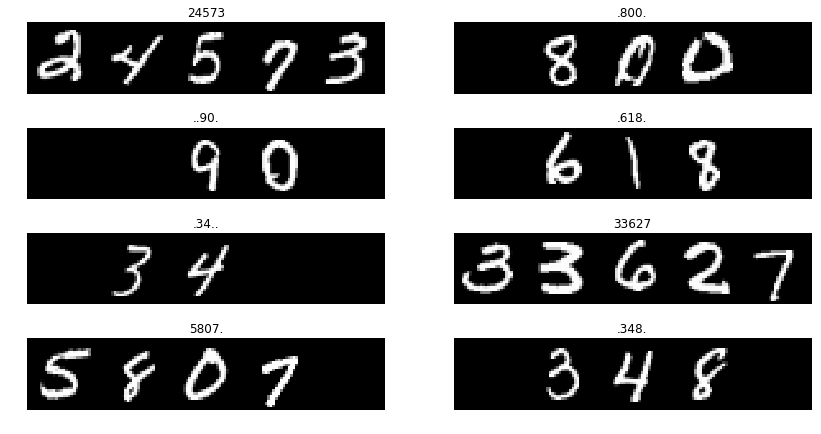
Our synthetic dataset was created by first randomly choosing a number length between 1 and 5 digits, followed by another random decision as to where in the image we would like the sequence to appear (centered, skip first character, etc...) and then finally randomly pulling N digits from the MNIST training dataset.
A snippet of the code can be found below:
# Randomly choose a number length:
img_len = np.random.choice(range(maxlength)) + 1
label = np.empty(5, dtype='str')


# Randomly choose where in our image the sequence of numbers will appear
if img_len < maxlength:
    st_point = np.random.choice(maxlength - img_len)
else:
    st_point = 0

# Assign a location for each valid character
charmap = np.zeros(maxlength)
charmap[st_point:st_point + img_len] = 1


# Define a blank character to ensure our image will have fixed dimensions
blank_char = np.zeros_like(digit_sz)
blank_lbl = "."

# Initialize a blank image with maxlen * digit_dz width and digit_sz height
new_img_len = maxlength * digit_sz[1]
new_img = np.zeros((digit_sz[0], new_img_len))

# Fill in the image with random numbers from dataset, starting at st_point
for i, b in enumerate(charmap):
    if b > 0:
        n = np.random.choice(len(numbers))
        st_pos = i * digit_sz[1]
        new_img[:, st_pos:st_pos + digit_sz[1]] = numbers[n]
        label[i] = str(number_labels[n])
    else:
        label[i] = blank_lbl
When creating the labels I decided to use "." to represent blank spaces to help when visually investigating the dataset.
A few examples can be seen below.
They are not exactly similar, but we were able to showcase similar features between the two datasets.
There were several recommended approaches to create a pipeline to solve our problem, the one that I found more interesting is based on [1] where the authors proposed an end-to-end solution to this problem that does not involve breaking down the problem into localization, segmentation and recognition in different steps.
As Goodfellow et al. describe in their work:
Recognizing arbitrary multi-character text in unconstrained natural photographs is a hard problem. In this paper, we address an equally hard sub-problem in this domain viz. recognizing arbitrary multi-digit numbers from Street View imagery. Traditional approaches to solve this problem typically separate out the localization, segmentation, and recognition steps. In this paper we propose a unified approach that integrates these three steps via the use of a deep convolutional neural network that operates directly on the image pixels
Inspired by the great results they displayed in their study and an elegant solution that would learn from these images without the assistance of a digit localizer, I decided to replicate their work for this pipeline.
The model proposed by Goodfellow et al. is the following:
Our best architecture consists of eight convolutional hidden layers, one locally connected hidden layer, and two densely connected hidden layers. All connections are feedforward and go from one layer to the next (no skip connections). The first hidden layer contains maxout units (Goodfellow et al., 2013) (with three filters per unit) while the others contain rectifier units (Jarrett et al., 2009; Glorot et al., 2011). The number of units at each spatial location in each layer is [48, 64, 128, 160] for the first four layers and 192 for all other locally connected layers. The fully connected layers contain 3,072 units each.
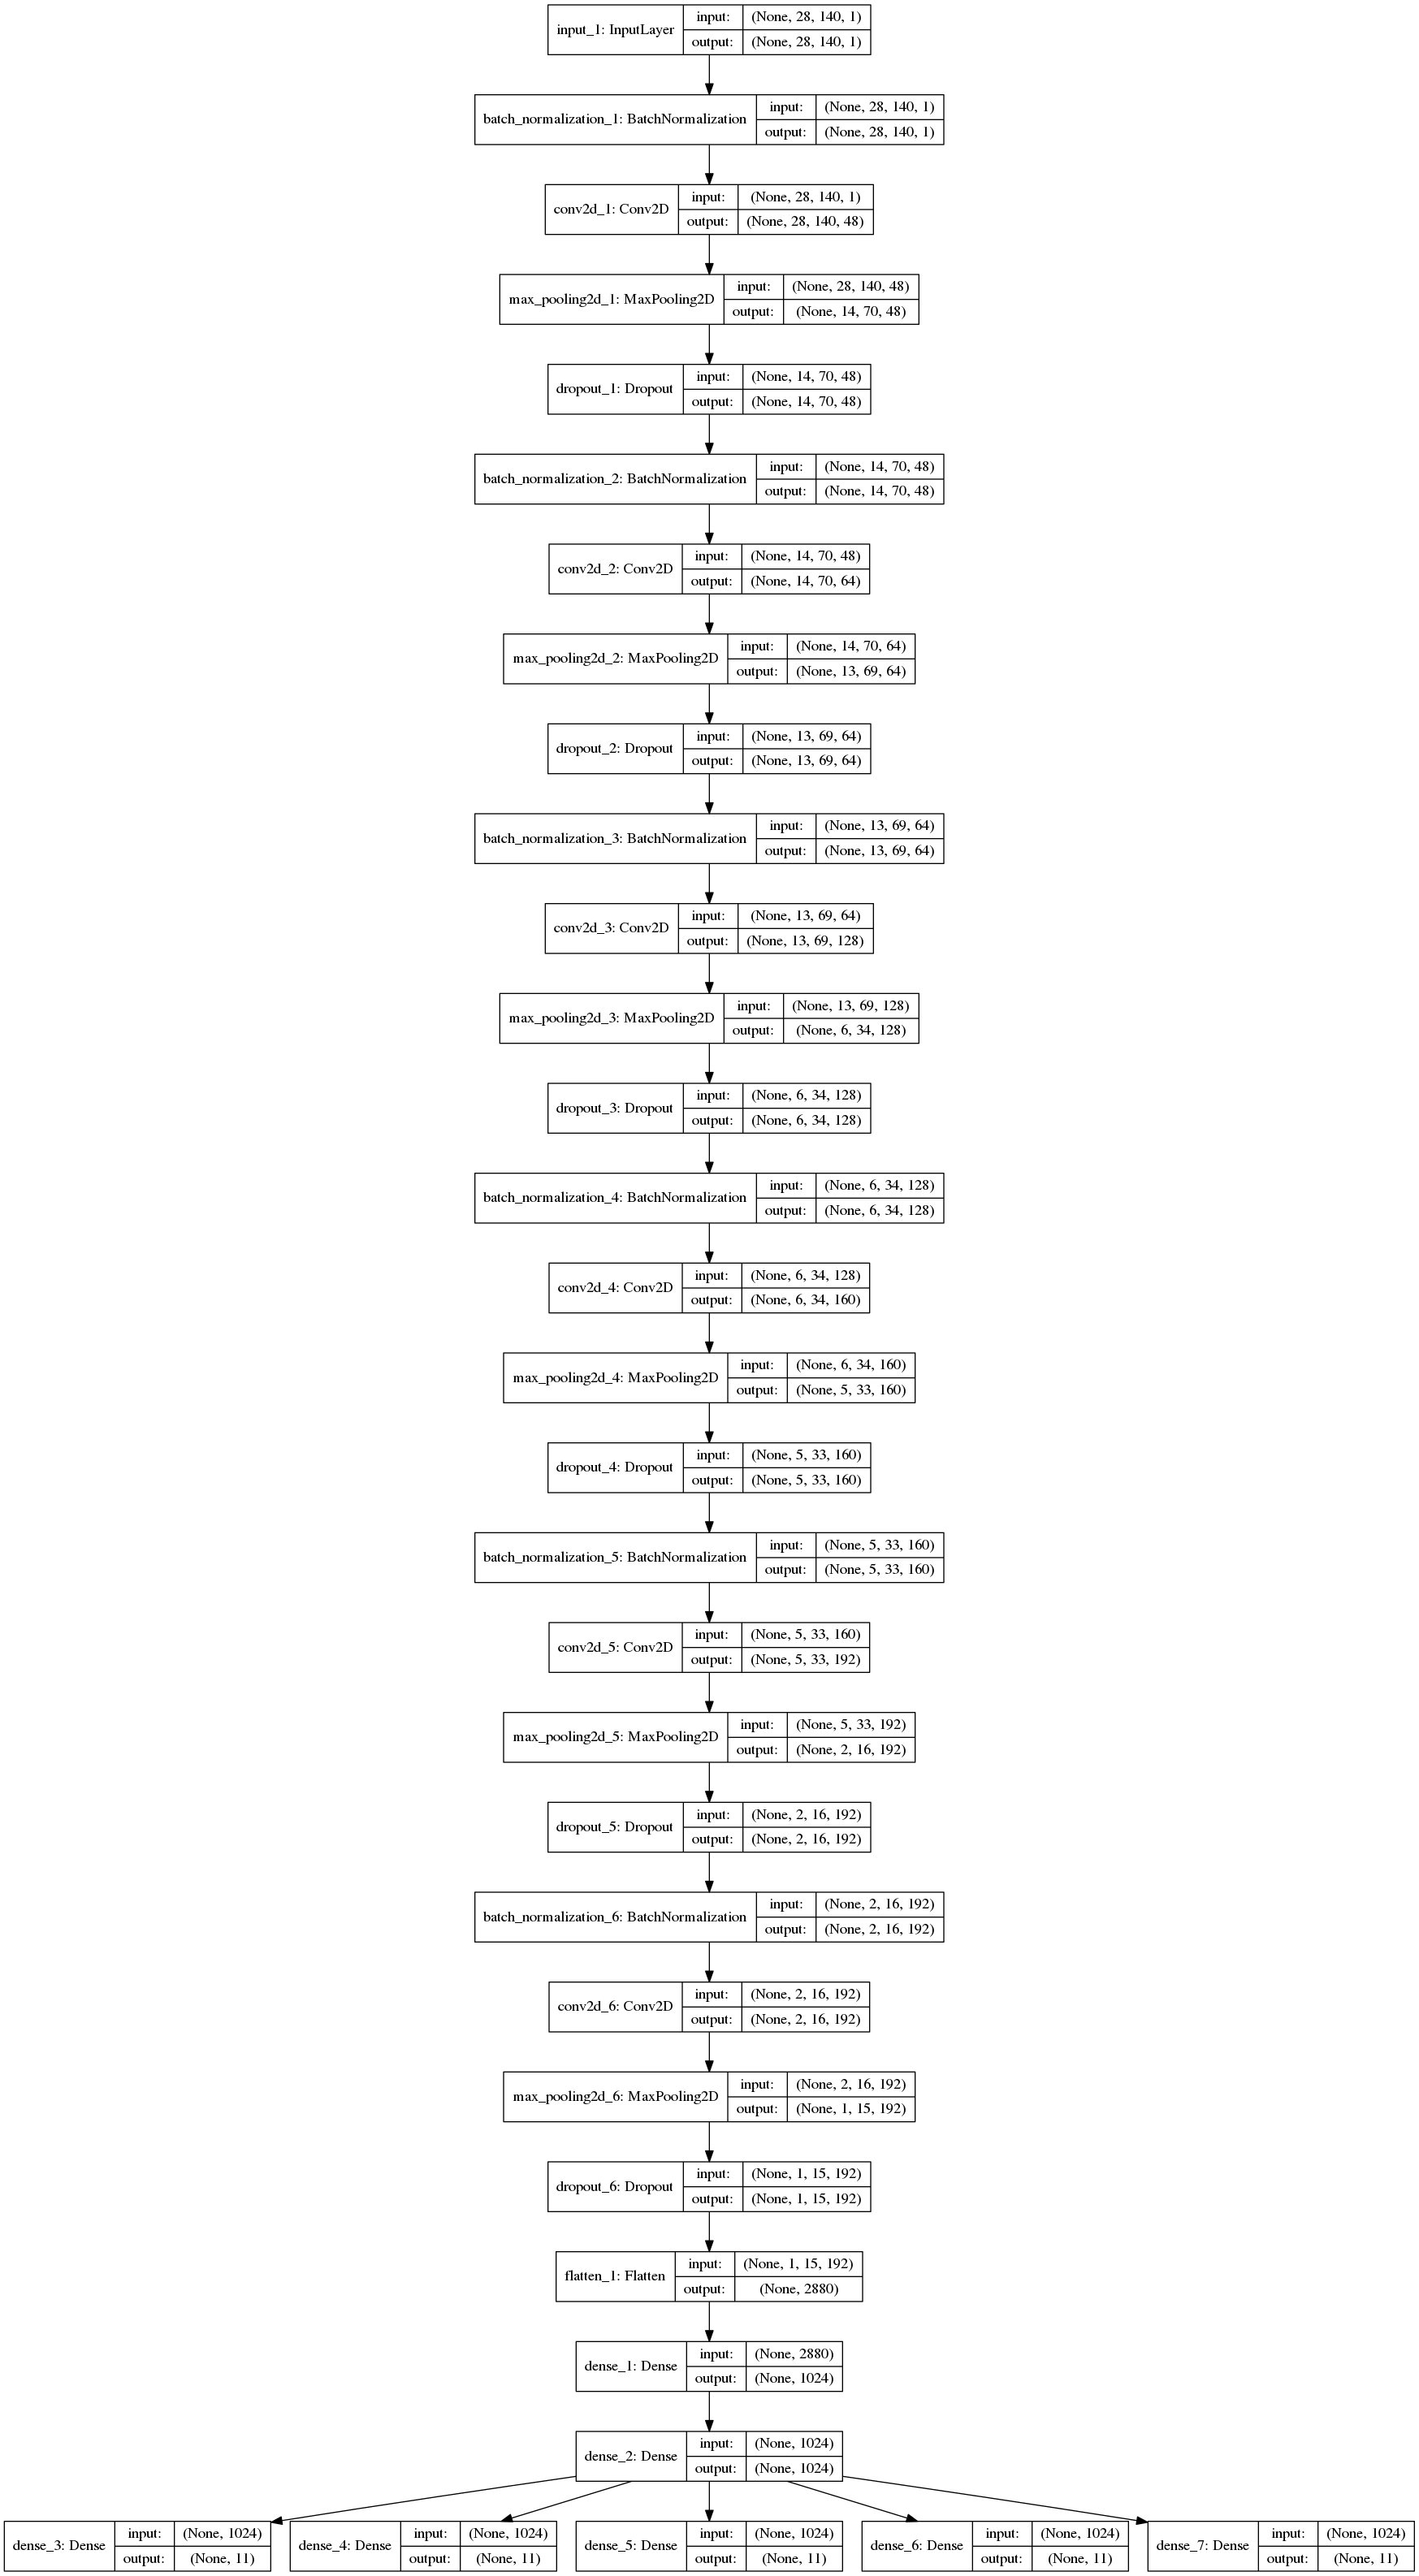
The dimensions of our synthetic images are 28 x 140 x 1 (MNIST dimensions are 28 x 28 and we concatenated up to 5 of them together) and the 11 layer the authors used in their work was too deep for our data, so some modification was needed.
I could have just removed a few of the MaxPooling layers, but since this problem was simpler to solve I decided to completely remove the last two convolutional blocks and the first locally connected hidden layer. I also included BatchNormalization before every convolutional layer and reduced the number of activations on the fully connected layers to 1024.
The final version can be seen below:
The best thing about our synthetic data generator is that it can be combined with a Python generator to create a virtually unlimited training dataset. I have also created a validation dataset generator that would pull numbers from the test set of the MNIST dataset instead of the training set, that was an attempt to minimize leakage of information into the validation set and have skewed results.
When you have unlimited training data, the only problem you need to worry about is for how long to train. In general, it's difficult to end up over fitting to your data if your synthetic data is carefully crafted like ours.
I used a mini-batch size of 128 samples, a number large enough that also fit in my GPU memory, and decided that every epoch should consist of approximately 100k images (as it would in theory allow the model to see each possibility at least once, although in practice we can't be sure) after just two epochs of training our validation accuracy was already above 99.5% for each individual digit so I stopped training.
Measuring accuracy in that way is not recommended, because if our output has any of the digits wrong, the information is useless. So I converted the predicted digits back to string and compared with the ground truth strings generated for 1,000 random images from the validation set and the accuracy this time was 98.5%.
We could probably do better than that, but since the true objective of the pipeline is to be able to perform well on the more realistic dataset I decided that this result was good enough to validate the model and approach chosen.
At this point I realized that I should have also explored the labels from the SVHN dataset and not only the images when creating our synthetic dataset.
The fact that the labels were incompatible made large-scaling impossible without developing a label-conversion function and before doing that I decided to manually test the model in a few selected images to see if it was worth investing the time to convert the labels.
The only processing steps on the new images were to scale to 28 x 140 pixels and convert to gray scale, as that is how our model was trained.
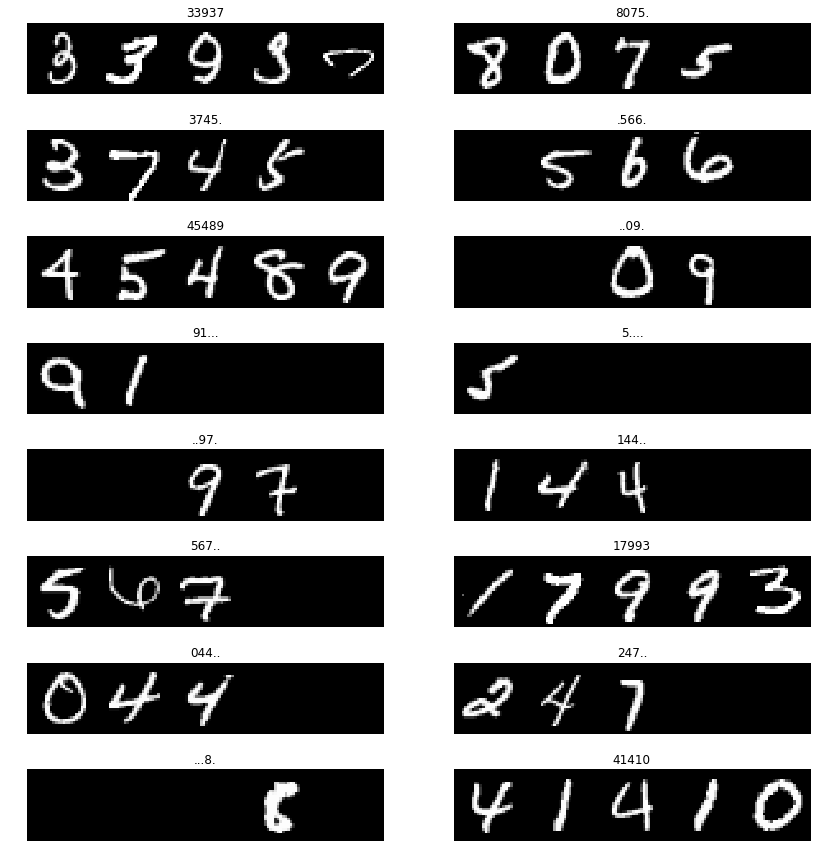
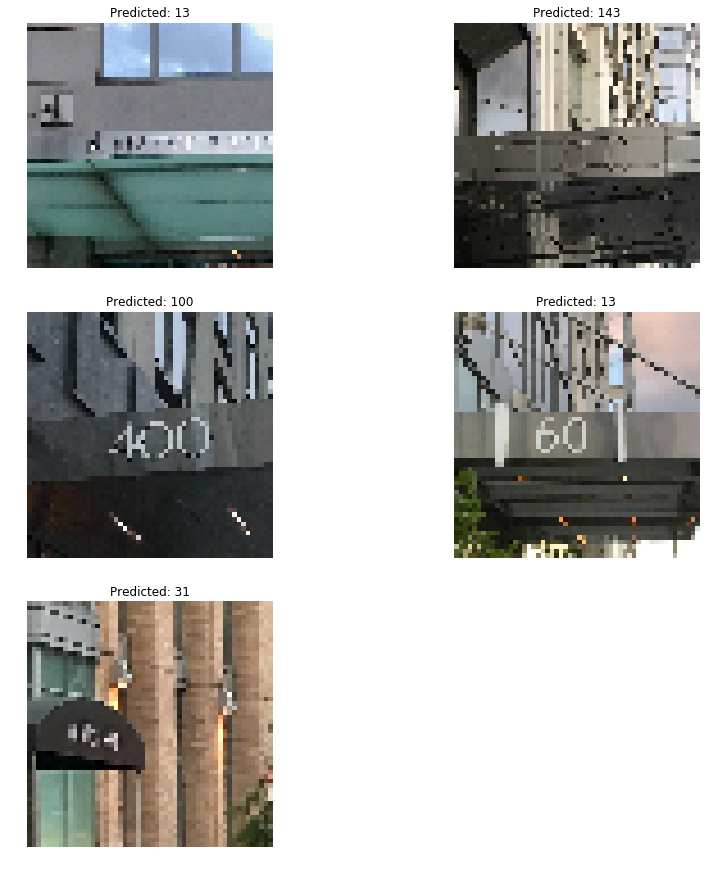
Surprisingly the model was not able to generalize at all, it was incorrect on 100% of the test images. I was obviously expecting a decrease in performance but 0% accuracy was definitely an unpleasant surprise.
A few examples:
Due to the incompatibility of labels and input size between datasets, fine tuning would be more difficult than training a new model. Too bad, as we ended up missing an important part of the purpose of the synthetic dataset, although all this was not completely wasted, we validated that the model architecture we chose is right for the problem at hand.
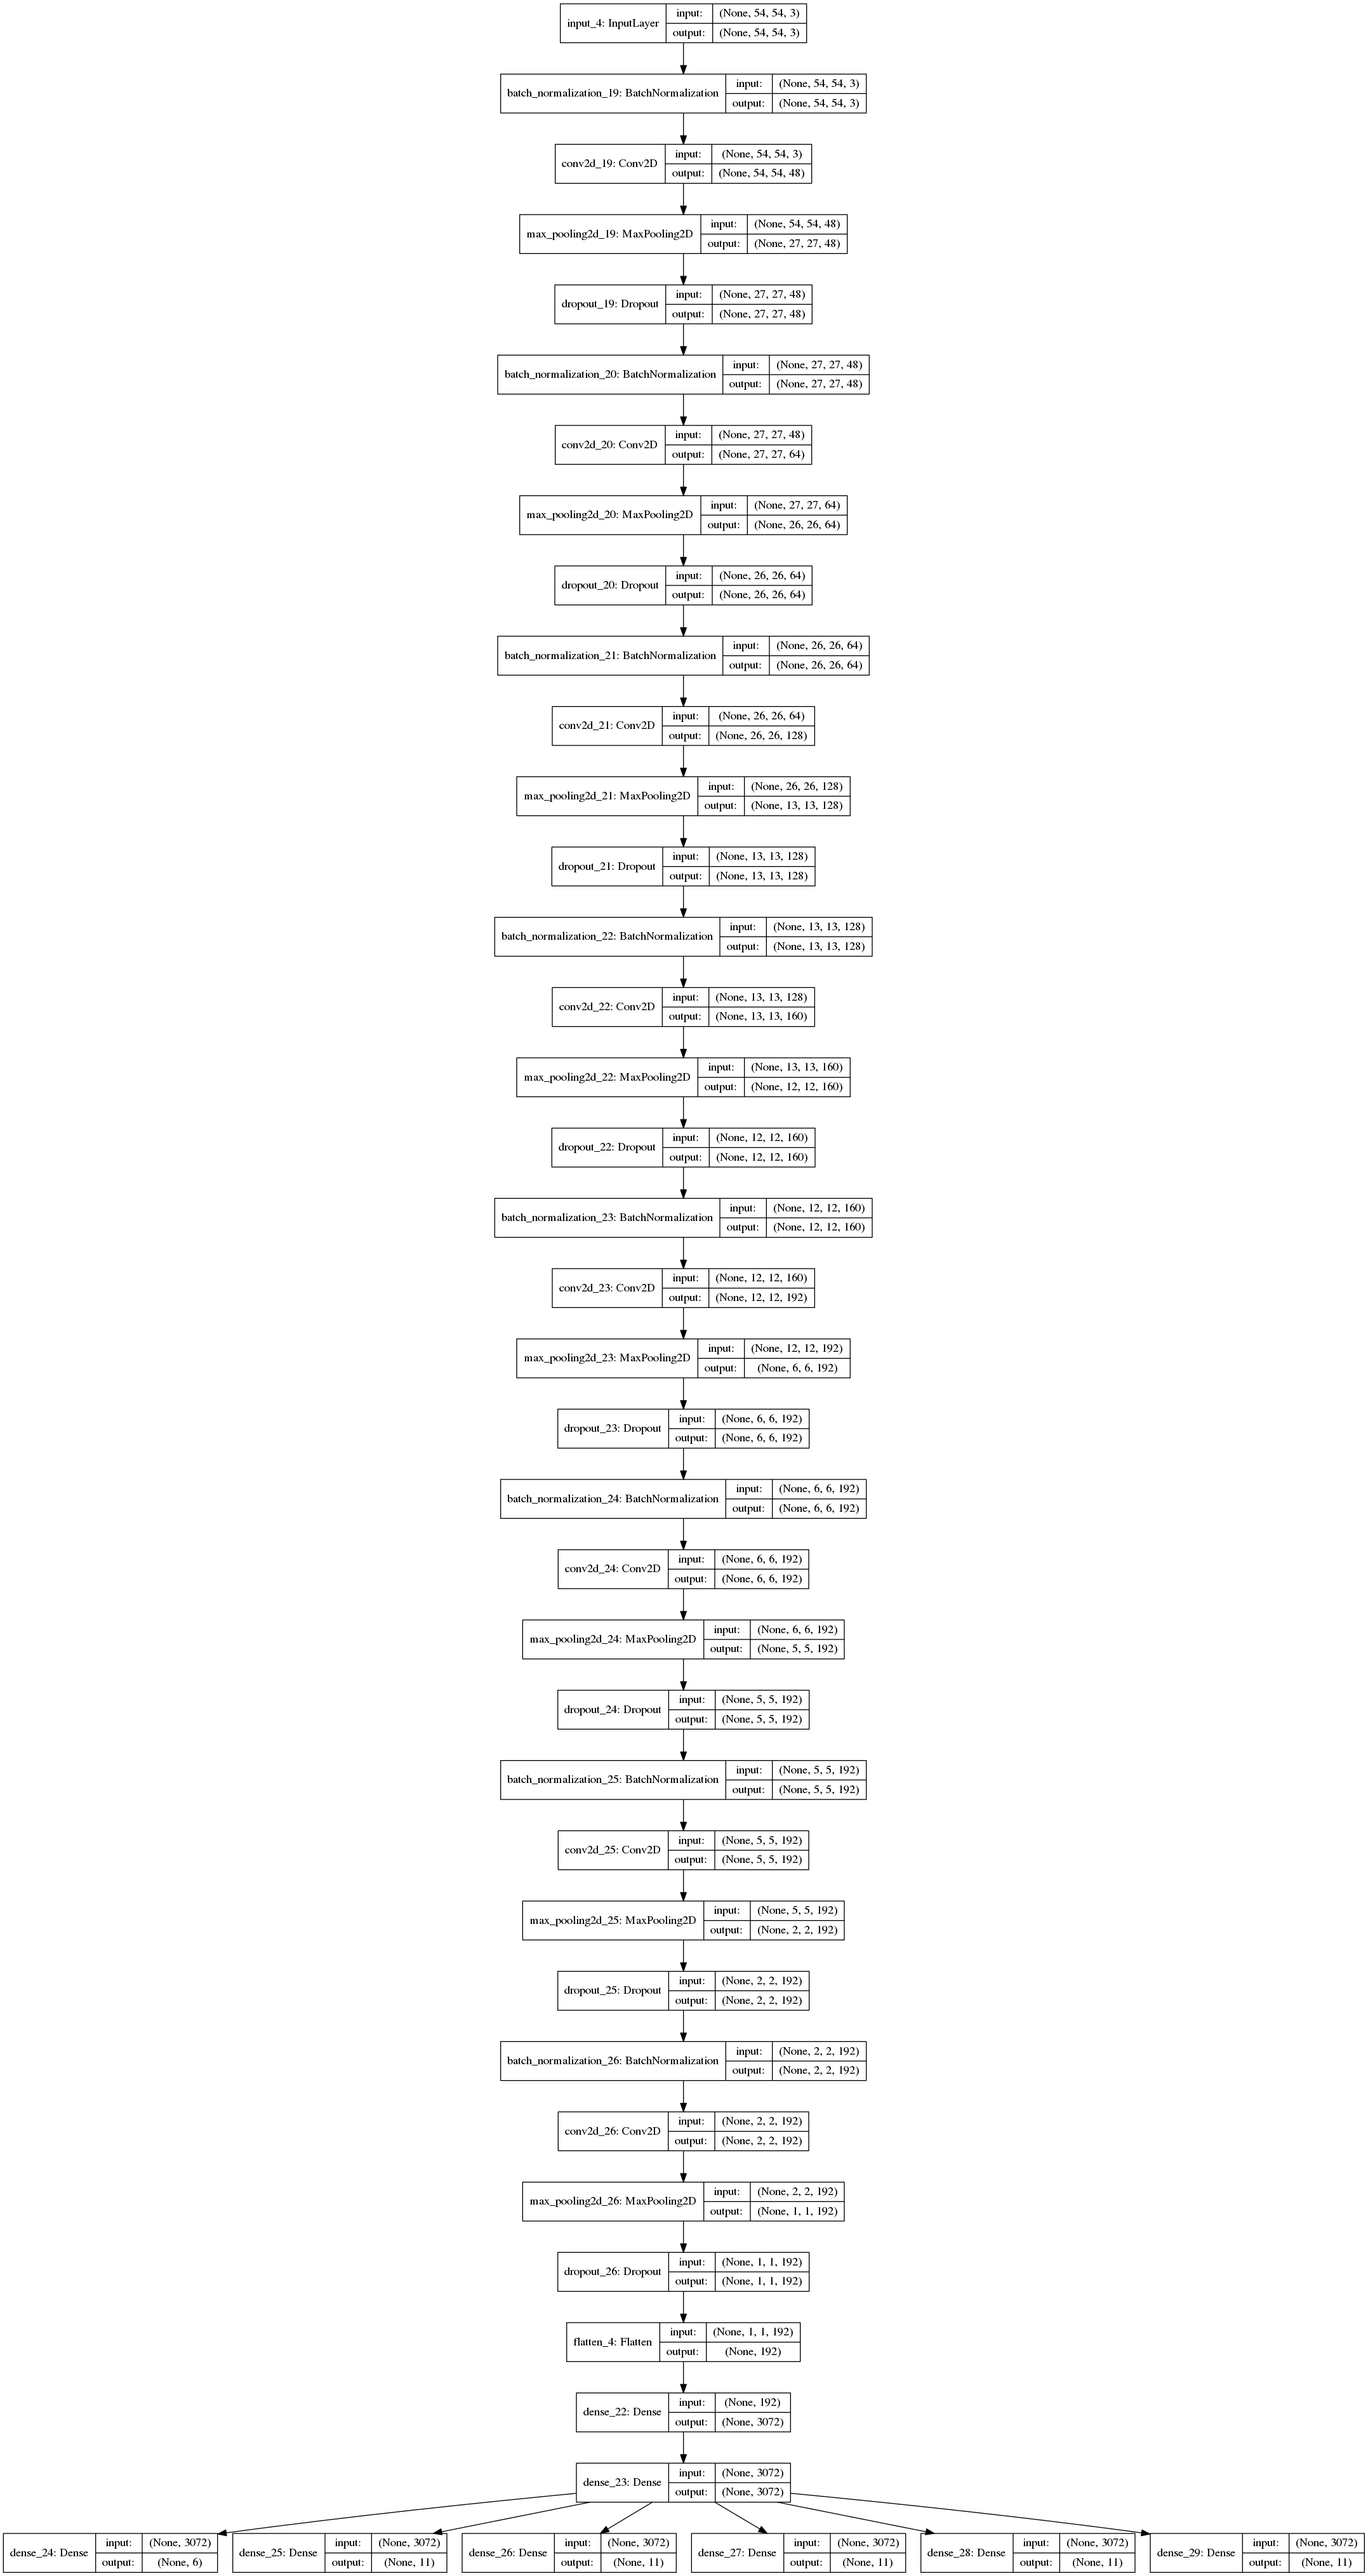
Knowing that we would need to train a new model from scratch gave me the freedom to implement some improvements to the architecture. I added back to the model the two convolutional blocks that were initially removed, I also increased the number of hidden units in the last two fully connected layers and added a new branch of softmax classifier to predict the length of the sequence of digits.
Aside from these few adjustments, the model architecture was very similar and can be seen below:
The SVHN data set provides coordinates of bounding boxes for each digit in an image, but since the purpose of our pipeline is to identify the whole street number in one shot, we needed to pass a cropped version of the image with all numbers in it, and not much more.
We followed the suggested training methodology from Goodfellow et al.
-
Based on the provided bounding boxes, find another box that will contain all digits on the image
-
Expand this bounding box by 30% in each direction and crop the image to this bounding box
-
Resize the cropped image to 64 x 64 pixels
-
Random crop a 54 x 54 sample from the cropped image
Training was again assisted by a python generator, that randomly cropped the 64 x 64 pixel image into 54 x 54 patches, aiming to increase the amount of training data. At this time 20% of the dataset was put aside for validation.
This dataset was a lot more challenging for the model to learn and it needed a couple of thousand of epochs to be able to over fit a tiny subset of images. In [1] the authors needed to train an ensemble of 10 models for over six days to get to the state-of-the-art results published.
Our model was trained under more modest resources performance after 25 epochs was at 83% accuracy. This is significantly below the 98% of human accuracy when labeling this dataset, but is an indication that we are on the right track.
The best way to test if a model generalizes well is to feed a data that the model has never seen during training - that's why it's so important to set aside a test set.
Another important point is that deep learning is often seen as a "black box that will solve all your problems" and although it is indeed a very powerful tool that can be used in many different applications, each specific model will be useful to a given set of problems.
To showcase such limitations I chose images that are very different than the images the model was trained on. The expectation is that the model will fail to find the correct answer on these images, but if we change them slightly, into something familiar to the model, it should have a similar performance than we had in our test set.
All the images have the number clearly visible on them, but they are very small when compared to the size of the image, and the large background is likely to throw the model off.
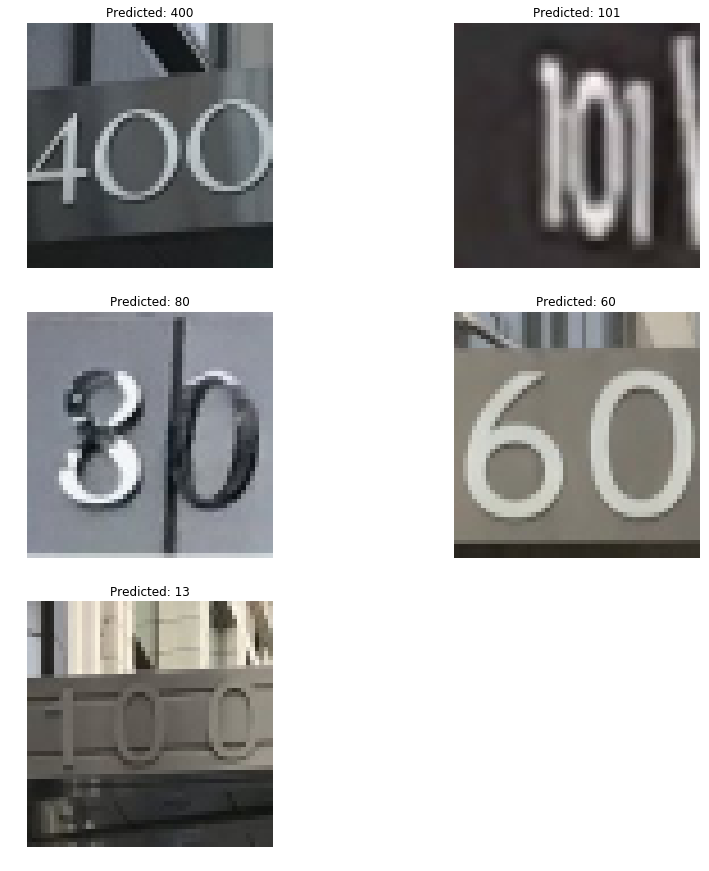
As we already suspected, the results were pretty bad - 0% accuracy. The downsampling from 1,100 x 1,100 pixels to 54 x 54 also made it a lot harder to process the numbers.
Now a fair approach - we feed crops of these images, showing just the street numbers this time. The results is 80% accuracy, validating what we found using our test set during model evaluation.
The toy study above show that segmentation is still a key part of a robust pipeline to accurately identify street numbers in images. We certainly could train the same pipeline that we used above in higher resolution images, where the text is a smaller subset of the whole image, but it would be extremely expensive to compute and when designing efficient pipelines for commercial applications it may be in the best interest to use a two-stage approach, segmenting the text first and labeling it afterwards.
Such a model would still be expensive to train, but much cheaper to compute at test time and could be deployed to devices with more limited resources, like smart phones for example.
The approach we are taking below is to train on the rather small images from the SVHN dataset and use it as a proof of concept, and we do not anticipate that the segmentation model will work well on the 5 test images we used above. The reason being the same that the recognition failed, they are too different from the training set.
Image localization and segmentation is an important field of deep learning applied to visual recognition and as such there are several different models that can be used.
In this study we briefly explored a simple regression of the bounding boxes coordinates by minimizing the L2 distance between prediction and ground truth, then improved the model to use the Dice Coefficient instead and finally using a more robust architecture called U-net.
Since the first two approaches are quite simple, we will focus on just discussing the U-net model.
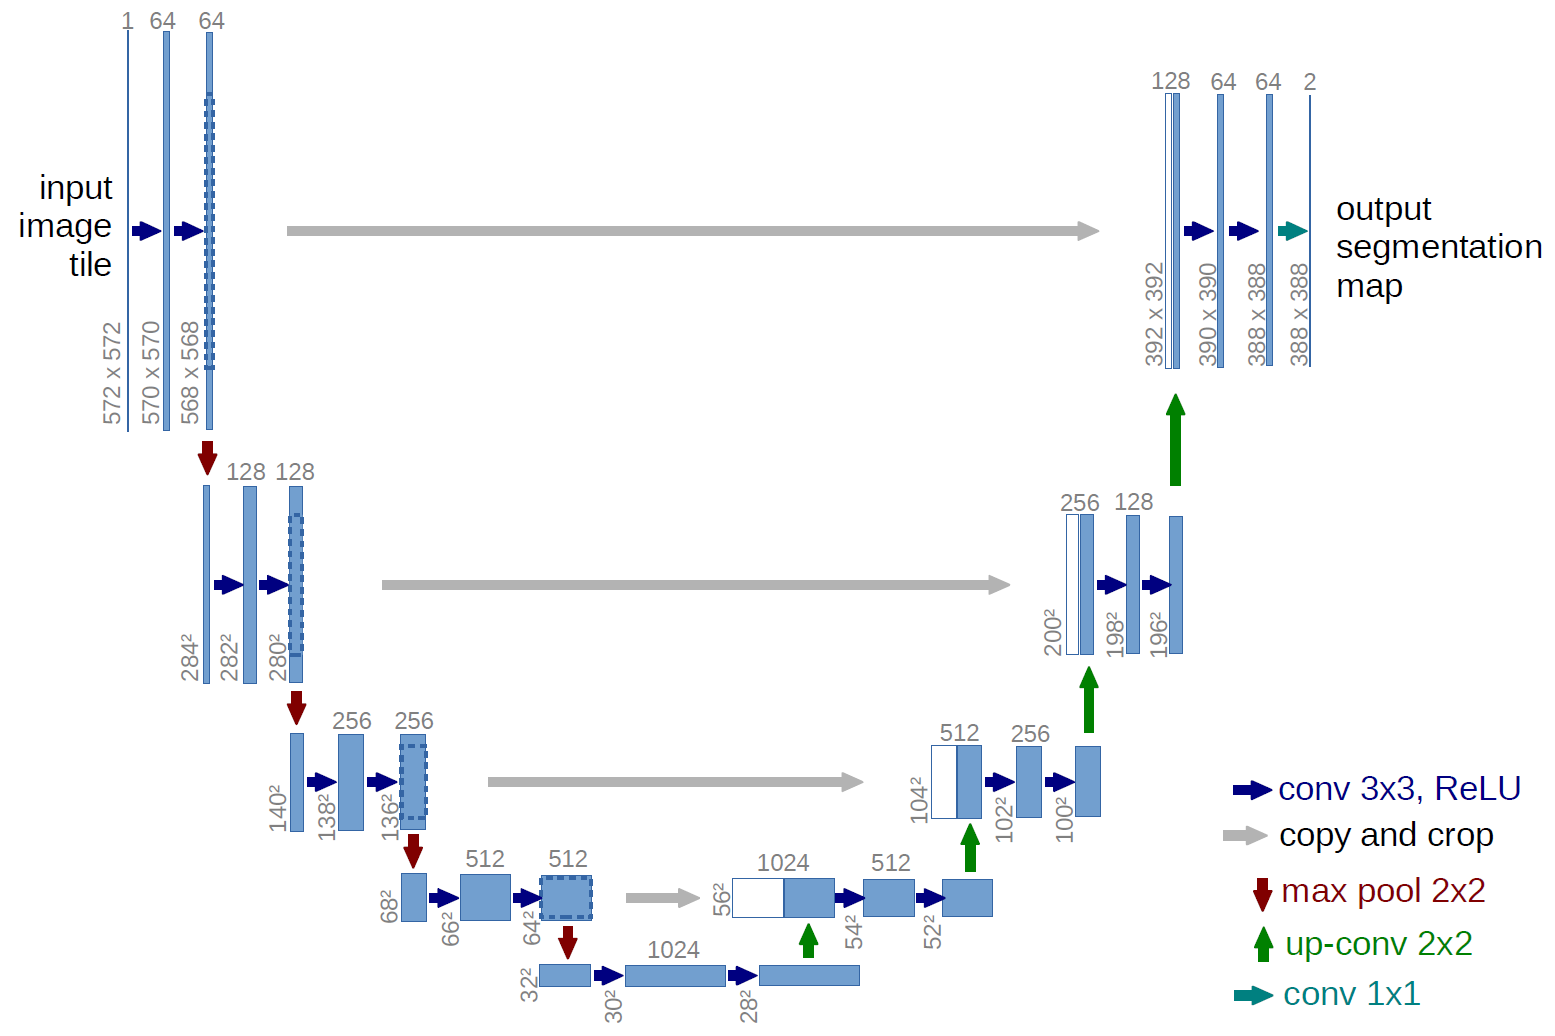
The architecture consists of a contracting path (left side) and an expansive path (right side). The contracting path follows the typical architecture of a convolutional network. It consists of the repeated application of two 3x3 convolutions (unpadded convolutions), each followed by a rectified linear unit (ReLU) and a 2x2 max pooling operation with stride 2 for downsampling. At each downsampling step we double the number of feature channels. Every step in the expansive path consists of an upsampling of the feature map followed by a 2x2 convolution (“up-convolution”) that halves the number of feature channels, a concatenation with the correspondingly cropped feature map from the contracting path, and two 3x3 convolutions, each followed by a ReLU. The cropping is necessary due to the loss of border pixels in every convolution. At the final layer a 1x1 convolution is used to map each 64-component feature vector to the desired number of classes. In total the network has 23 convolutional layers.
 Source: https://lmb.informatik.uni-freiburg.de/people/ronneber/u-net/
The U-net is a fully convolutional network that can be split into two different phases - downsampling and upsampling. During the downsampling steps, the depth of each block increases, but also the convolutional features are stored to be concatenated during the upsampling steps.
Due to our images being a lot smaller than the images the authors used in their work, we decided to make a few changes to our implementation.
First we halved the depth at each convolutional block, the other change was to add zero padding to each layer in order to avoid excessive reduction in our dimensions. The zero padding is a controversial decision as we are introducing black pixels to the image and it could affect the accuracy, and for a more robust implementation we should either use larger images with no padding or maybe reflective padding instead.
The full graphic can be seen below
The model was trained for 15 epochs and accuracy was at 87.8% as measured by the Dice coefficient.
A sample of the ouptput can be seen below:
As expected the model doesn't perform well on the images we provided and the reasons are the same as before, the images are too different when compared to the training set, but we can see that the model is correctly identifying patches of the image that have a high likelihood of containing a number (e.g "blobs").
Although the model didn't perform well on the images we selected, the architecture is a proven one that can find segments of images that are most likely to contain street numbers. Moreover, it was designed with classification in mind, so we could train a modified version that would already also classify the image patch into how many digits are you most likely to find in that patch, and if the label we find with our digit recognition architecture has a different number of digits we can reject that classification.
[1] Multi-digit Number Recognition from Street View Imagery using Deep Convolutional Neural Networks
[3] U-Net: Convolutional Networks for Biomedical Image Segmentation

