English / 简体中文
One-Click to deploy well-designed ChatGPT web UI on Vercel.
一键免费部署你的私人 ChatGPT 网页应用。
This project wont make any updates until June 3rd, 2023, and will not accept any issue feedback. Only community Pull Requests will be accepted, and please provide a detailed description of the problem being solved in the PR, otherwise it will be immediately closed.
- Deploy for free with one-click on Vercel in under 1 minute
- Privacy first, all data stored locally in the browser
- Markdown support: LaTex, mermaid, code highlight, etc.
- Responsive design, dark mode and PWA
- Fast first screen loading speed (~100kb), support streaming response
- New in v2: create, share and debug your chat tools with prompt templates (mask)
- Awesome prompts powered by awesome-chatgpt-prompts-zh and awesome-chatgpt-prompts
- Automatically compresses chat history to support long conversations while also saving your tokens
- I18n: English, 简体中文, 繁体中文, 日本語, Français, Español, Italiano, Türkçe, Deutsch, Tiếng Việt, Русский, Čeština, 한국어
- System Prompt: pin a user defined prompt as system prompt #138
- User Prompt: user can edit and save custom prompts to prompt list
- Prompt Template: create a new chat with pre-defined in-context prompts #993
- Share as image, share to ShareGPT #1741
- Desktop App with tauri
- Self-host Model: support llama, alpaca, ChatGLM, BELLE etc.
- Plugins: support network search, calculator, any other apis etc. #165
- User login, accounts, cloud sync
- UI text customize
- 🚀 v2.0 is released, now you can create prompt templates, turn your ideas into reality! Read this: ChatGPT Prompt Engineering Tips: Zero, One and Few Shot Prompting.
- 🚀 v2.7 let's share conversations as image, or share to ShareGPT!
- 在 1 分钟内使用 Vercel 免费一键部署
- 完整的 Markdown 支持:LaTex 公式、Mermaid 流程图、代码高亮等等
- 精心设计的 UI,响应式设计,支持深色模式,支持 PWA
- 极快的首屏加载速度(~100kb),支持流式响应
- 隐私安全,所有数据保存在用户浏览器本地
- 预制角色功能(面具),方便地创建、分享和调试你的个性化对话
- 海量的内置 prompt 列表,来自中文和英文
- 自动压缩上下文聊天记录,在节省 Token 的同时支持超长对话
- 多国语言支持:English, 简体中文, 繁体中文, 日本語, Español, Italiano, Türkçe, Deutsch, Tiếng Việt, Русский, Čeština
- 拥有自己的域名?好上加好,绑定后即可在任何地方无障碍快速访问
- 为每个对话设置系统 Prompt #138
- 允许用户自行编辑内置 Prompt 列表
- 预制角色:使用预制角色快速定制新对话 #993
- 分享为图片,分享到 ShareGPT 链接 #1741
- 使用 tauri 打包桌面应用
- 支持自部署的大语言模型
- 插件机制,支持联网搜索、计算器、调用其他平台 api #165
- 界面文字自定义
- 用户登录、账号管理、消息云同步
- 🚀 v2.0 已经发布,现在你可以使用面具功能快速创建预制对话了! 了解更多: ChatGPT 提示词高阶技能:零次、一次和少样本提示。
- 💡 想要更方便地随时随地使用本项目?可以试下这款桌面插件:https://github.com/mushan0x0/AI0x0.com
- 🚀 v2.7 现在可以将会话分享为图片了,也可以分享到 ShareGPT 的在线链接。
- Get OpenAI API Key;
- Click
, remember that
CODEis your page password; - Enjoy :)
If you have deployed your own project with just one click following the steps above, you may encounter the issue of "Updates Available" constantly showing up. This is because Vercel will create a new project for you by default instead of forking this project, resulting in the inability to detect updates correctly.
We recommend that you follow the steps below to re-deploy:
- Delete the original repository;
- Use the fork button in the upper right corner of the page to fork this project;
- Choose and deploy in Vercel again, please see the detailed tutorial.
If you encounter a failure of Upstream Sync execution, please manually sync fork once.
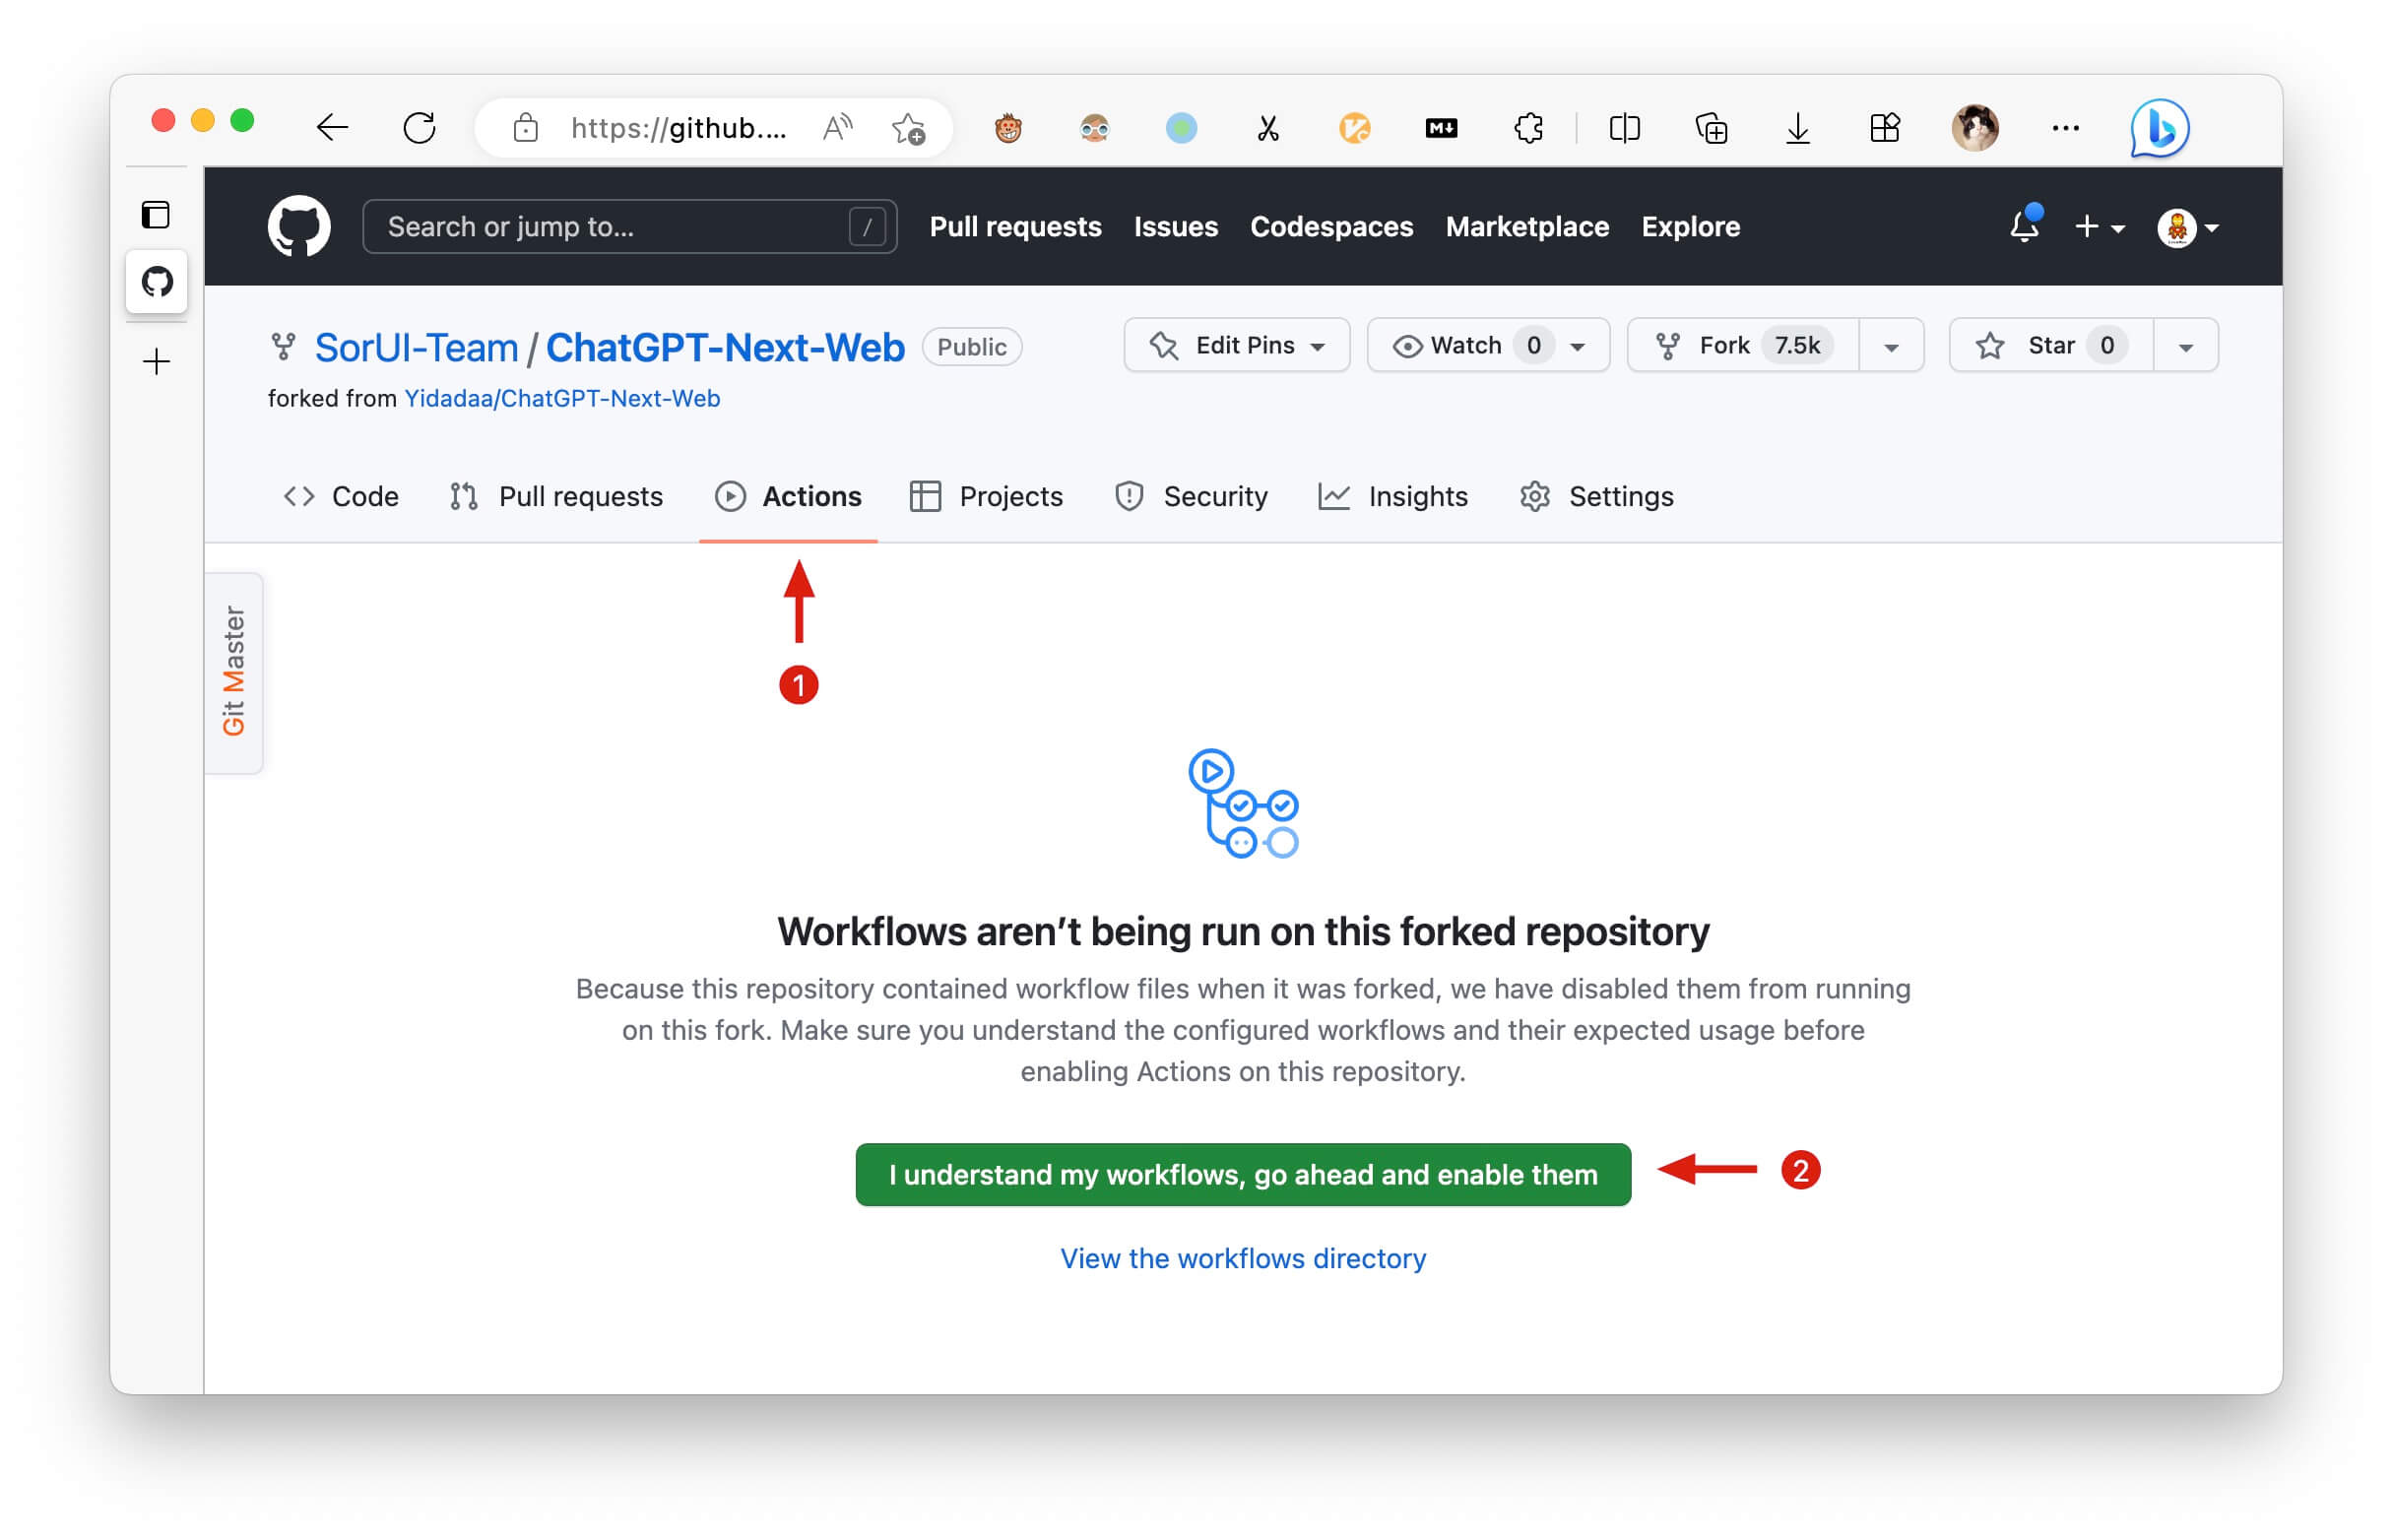
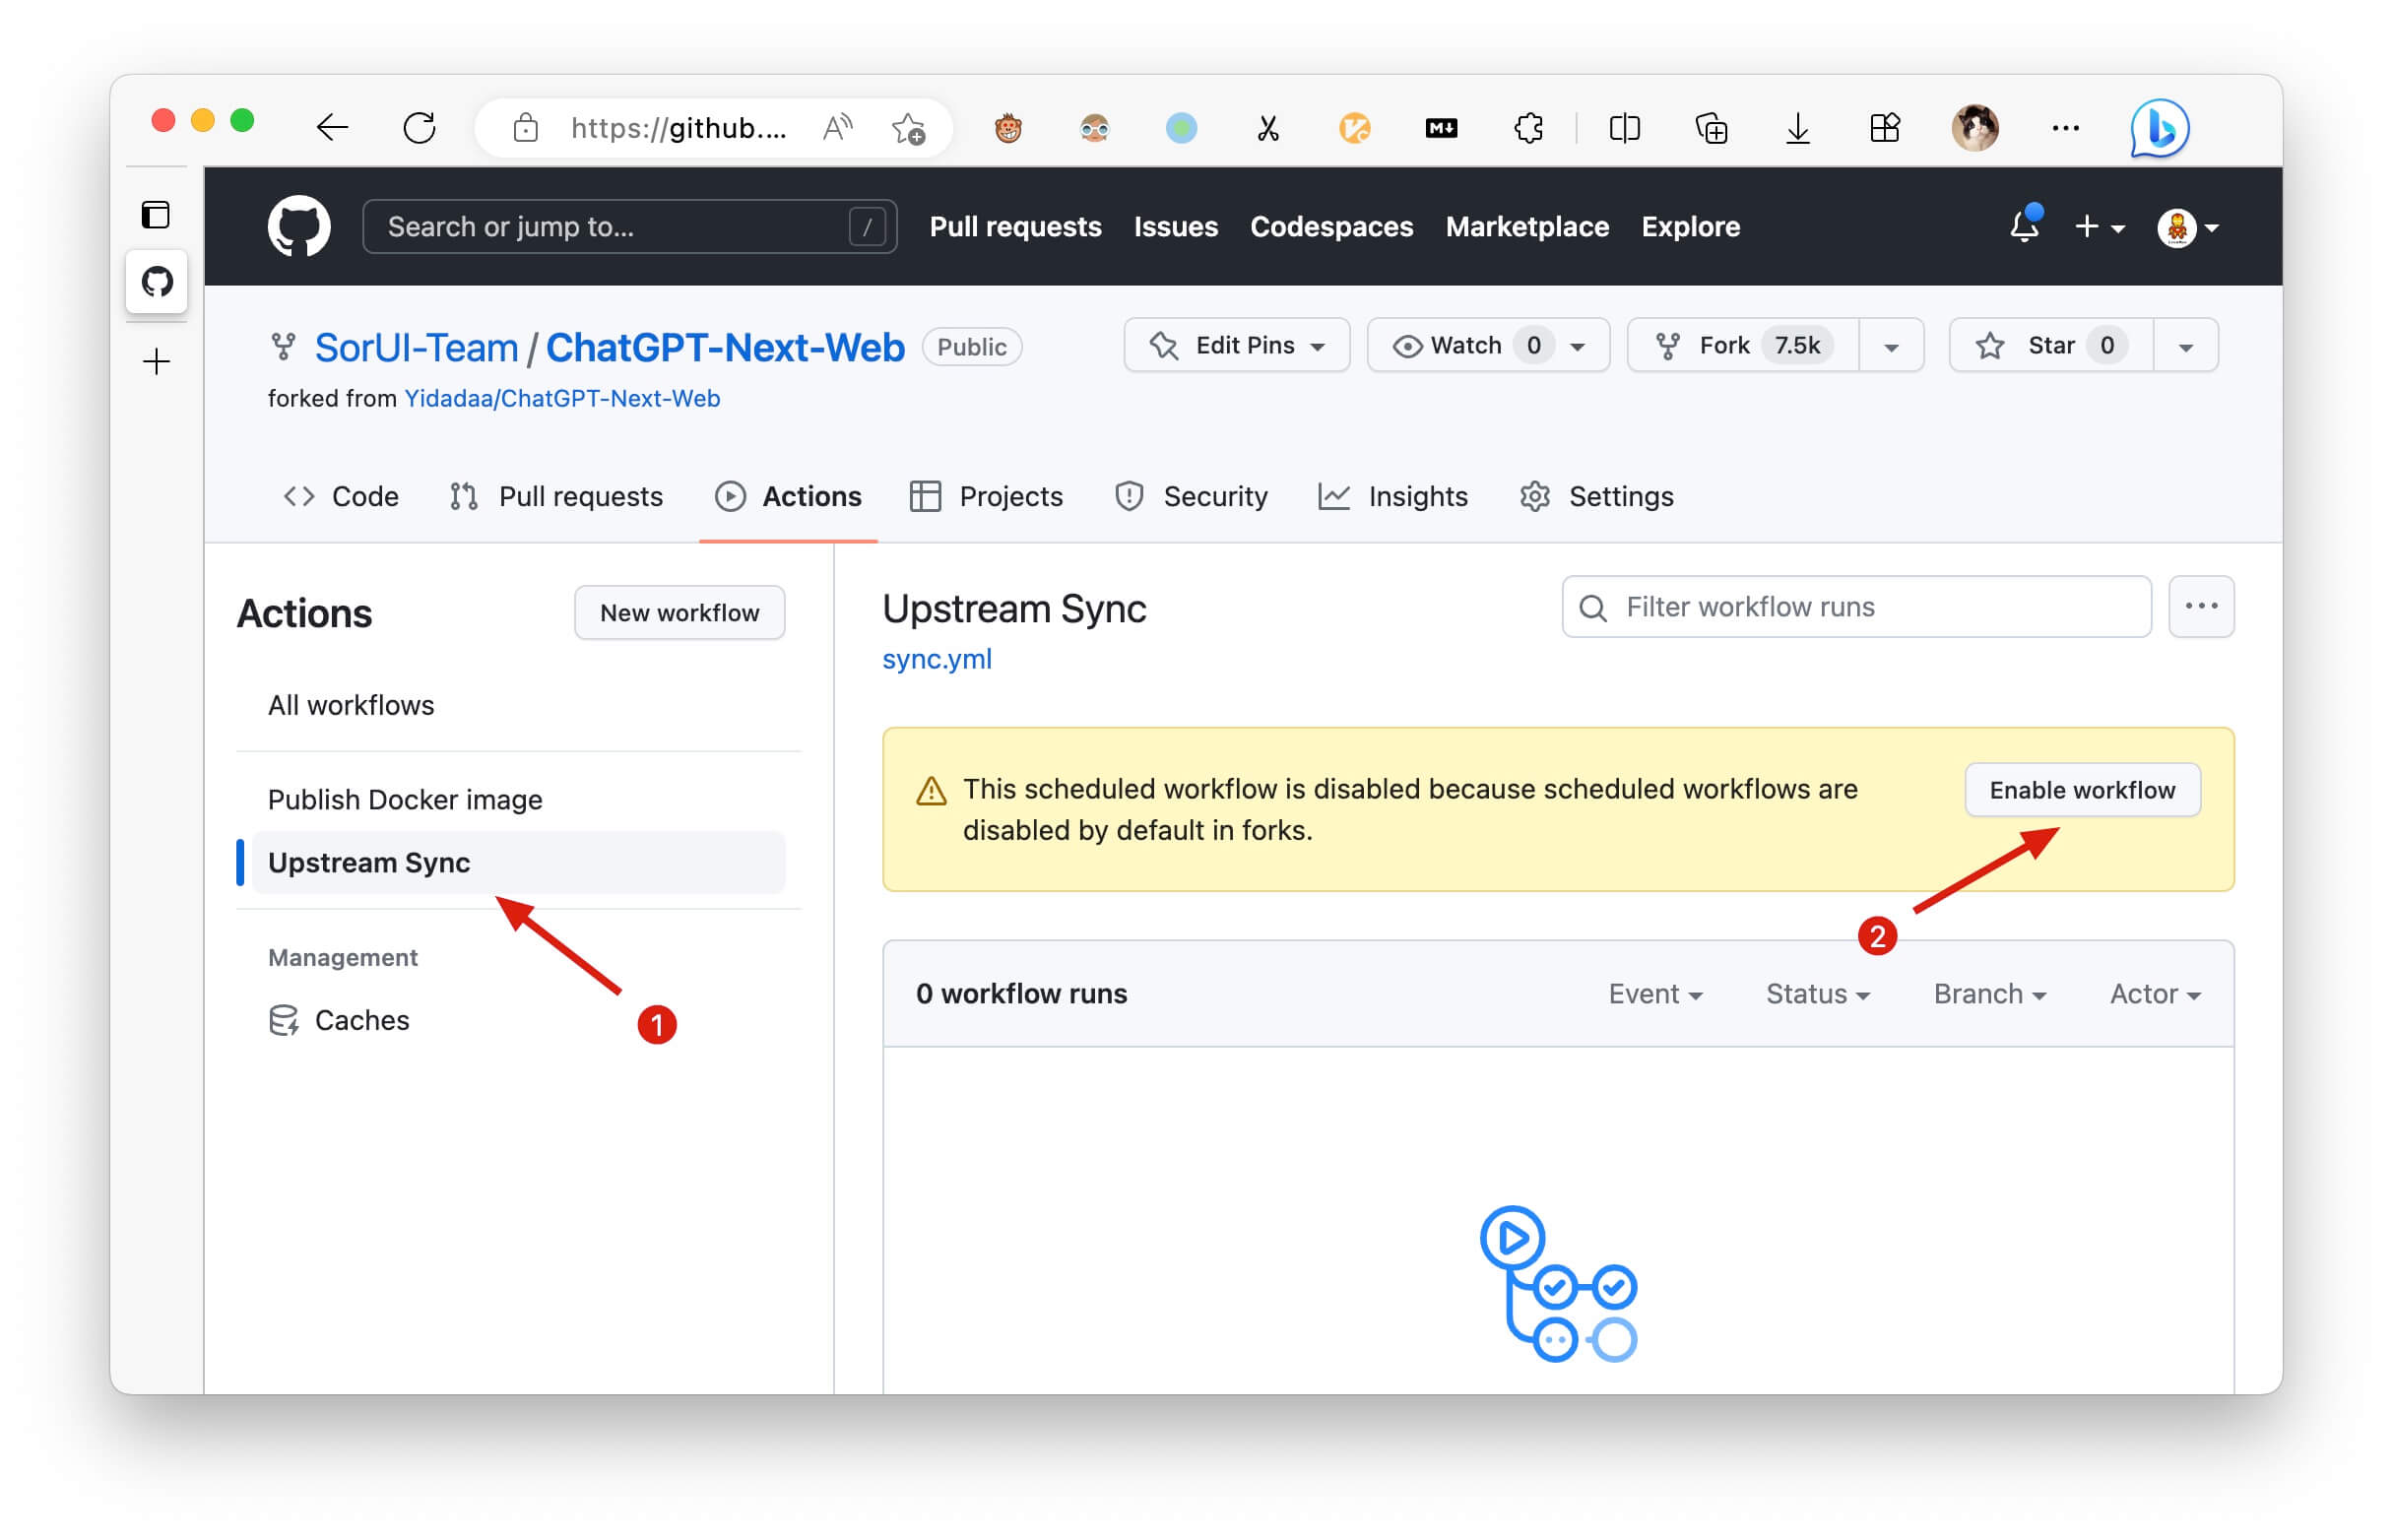
After forking the project, due to the limitations imposed by GitHub, you need to manually enable Workflows and Upstream Sync Action on the Actions page of the forked project. Once enabled, automatic updates will be scheduled every hour:
If you want to update instantly, you can check out the GitHub documentation to learn how to synchronize a forked project with upstream code.
You can star or watch this project or follow author to get release notifictions in time.
This project provides limited access control. Please add an environment variable named CODE on the vercel environment variables page. The value should be passwords separated by comma like this:
code1,code2,code3
After adding or modifying this environment variable, please redeploy the project for the changes to take effect.
Your openai api key.
Access passsword, separated by comma.
Default:
https://api.openai.com
Examples:
http://your-openai-proxy.com
Override openai api request base url.
Specify OpenAI organization ID.
Default: Empty
If you do not want users to input their own API key, set this value to 1.
Default: Empty
If you do not want users to use GPT-4, set this value to 1.
Before starting development, you must create a new .env.local file at project root, and place your api key into it:
OPENAI_API_KEY=<your api key here>
# 1. install nodejs and yarn first
# 2. config local env vars in `.env.local`
# 3. run
yarn install
yarn devdocker pull yidadaa/chatgpt-next-web
docker run -d -p 3000:3000 \
-e OPENAI_API_KEY="sk-xxxx" \
-e CODE="your-password" \
yidadaa/chatgpt-next-webYou can start service behind a proxy:
docker run -d -p 3000:3000 \
   -e OPENAI_API_KEY="sk-xxxx" \
   -e CODE="your-password" \
   -e PROXY_URL="http://localhost:7890" \
yidadaa/chatgpt-next-webbash <(curl -s https://raw.githubusercontent.com/Yidadaa/ChatGPT-Next-Web/main/scripts/setup.sh)仅列出捐赠金额 >= 100RMB 的用户。
@mushan0x0 @ClarenceDan @zhangjia @hoochanlon @relativequantum @desenmeng @webees @chazzhou @hauy @Corwin006 @yankunsong @ypwhs @fxxxchao @hotic @WingCH @jtung4 @micozhu @jhansion @Sha1rholder @AnsonHyq @synwith


