Don't you want to know how to store your own data, other people's data, all kinds of data? When you read the word data, do you say data or data????? Are you mad that you read that two different ways?
In this workshop, we're going to rebuild our SA7 assignment. In case you don't remember, that's the lab with polls and upvotes/downvotes. Instead of using MongoDB and Mongoose, we're going to use PostgreSQL and Sequelize! You will learn how to install PostgreSQL and work with it through the command line interface. Then, we'll use Sequelize, a promise-based ORM (Object Relation Mapping) for Node.js.
We know our presentation about databases was interesting, and you probably know all about PostgreSQL now. But just in case you need a reminder, PostgreSQL (if you wanna impress your friends, call it Postgres) is an open source relational database management system.
🚀 Open up your Terminal and install postgresql with brew.
brew install postgresql
Wow, you're killing it. You just installed PostgreSQL. Now, let's get it running in the background. You can do this with the following command:
brew services start postgresql
Your terminal should have spit out ==> Successfully started postgresql (label: homebrew.mxcl.postgresql).
Alright, you CS GOD, now that PostgreSQL is running as a service, let's connect to it.
psql is the PostgreSQL interactive terminal. Running psql dbname will connect you to a PostgreSQL host. Just in case you want use PostgreSQL on your final project, here are some options for connecting with psql:
-h — --host=HOSTNAME | database server host or socket directory (default: "local socket")
-p — --port=PORT | database server port (default: "5432")
-U — --username=USERNAME | database username (default: "your_username")
-w — --no-password | never prompt for password
-W — --password | force password prompt (should happen automatically
We're not trying to do anything fancy, so let's connect to the default postgres database with the following command:
🚀 psql postgres
You're now inside psql in the postgres database. The shell prompt becomes postgres=# .
The prompt ends in # which tells us we're logged in as the absolute CS GOD superuser, or root.
Psql meta-commands that are processed by psql itself start with a backlash. To see what database, user, and port we've connected to, run \conninfo.
Here are some other meta-commands:
\c | Connect to a new database
\dt | List all tables
\du | List all roles
\list | List databases
\q | Exit psql connection
We know, isn't this amazing. PostgreSQL got us all like...
Windows users, if you run into problems with the psql console, check out "Notes for Windows Users" in the PostgreSQL docs.
We're gonna create a role called me (or whatever you wish) and give it a password password (or whatever you wish). According to the PostgreSQL documentation, "a role is an entity that can own database objects and have database privileges; a role can be considered a 'user', a 'group' or both depending on how it is used." In this case, we'll be using a role as a user. Run the following command (it does not need a backslash since it is not a meta-command):
CREATE ROLE me WITH LOGIN PASSWORD 'password';
If the command is run correctly, you should see CREATE ROLE printed back to you.
We can use the command ALTER ROLE to change the attributes of a PostgreSQL role. We want to alter the role of me so that it can create other roles and new databases.
ALTER ROLE me CREATEDB;
If you now run \du, you should see something like this:
                                   List of roles
 Role name |                         Attributes                         | Member of
-----------+------------------------------------------------------------+-----------
 Tim       | Superuser, Create role, Create DB, Replication, Bypass RLS | {}
 me        | Create DB                                                  | {}
Now, run \q to quit. You should now be in the default Terminal connection.
Run psql -d postgres -U me to connect postgres with me. Our prompt should now show postgres=> instead of postgres#, meaning we're not logged in as a superuser (root).
🚀 Run the following to create your 'Polls' database:
CREATE DATABASE polls;
Let's see it in the list!
\list
Cool. We're done with psql for now. Quit by typing \q.
🚀 If you haven't already, fork this repo, clone it, and cd into the directory. Run the following commands and read down to resolve any errors:
yarn install
yarn add sequelize pg pg-hstore
Here, we're adding sequelize, node-postgres (a PostgreSQL client for Node.js), and pg-hstore (a node package for serializing/deserializing JSON data to hstore format).
😨 If you get an error, it is probably because sequelize has jumped to Node 12, and you haven't...do so by brew upgrade node.
Open up your workshop directory in VSCode, Atom, or whatever. (If you're a CS GOD, you'll do the rest of this workshop in emacs).
Navigate to src/models/ and create two files: author.js, and poll.js.
Thus, we will have two models (author and poll), and a we will setup database connection inside src/models/index.js.
Open your index.js file.
:rocket: Underneath the 'PART 1' comment, paste this:
const sequelize = new Sequelize('postgres://me:password@localhost:5432/polls');

const models = {
  Author: sequelize.import('./author.js'),
  Poll: sequelize.import('./poll.js'),
};

Object.keys(models).forEach((key) => {
  if ('associate' in models[key]) {
    models[key].associate(models);
  }
});

export { sequelize };

export default models;
Let's break this down.
This connects to the PostgreSQL database with a new instance of Sequelize. The address localhost:5432 works because we kept running postgres as a service in brew, and postgres' default port is 5432!
You will see me:password and polls inside that connection URI. If you followed the database tutorial, these are the credentials for the me ROLE, and polls database! If you didn't, change them accordingly.
🚀 Under src/models, create poll.js and author.js.
First, we want to create a author model. Paste the following in author.js:
const author = (sequelize, DataTypes) => {


};

export default author;
Now we're going to define our author model. First, we've define the author model by using sequelize.define. Notice, the name is unique; we dont want to have different users with the same name. Postgres and Sequelize already gave us some validation!
const Author = sequelize.define('author', {
    name: {
      type: DataTypes.STRING,
      unique: true,
    },
  });
🚀 Now we should have:
const author = (sequelize, DataTypes) => {
 const Author = sequelize.define('author', {
    name: {
      type: DataTypes.STRING,
      unique: true,
    },
  });


};

export default author;
Next, we create an association by calling hasMany providing the poll model as the first argument. We use hasMany because each author can write multiple polls. In creating associations, you can also use hasOne, belongsTo, and belongsToMany. The documentation can be found here: http://docs.sequelizejs.com/class/lib/associations/base.js~Association.html
belongsTo is a 1:1 association. One poll is associated with one author.
hasMany is a 1:n association. One author can have n polls!
Paste this after the Author definition, inside the author object.
Author.associate = (models) => {
    Author.hasMany(models.Poll, { onDelete: 'CASCADE' });
  };
  return Author;
You will notice that we added onDelete: 'CASCADE'. What this means is, that when an Author object gets deleted (or 'dropped') in the database, we will also delete all the Poll objects associated with it! Makes sense, right?!
🚀 Now, your final author model should look like this:
Expand me!
const author = (sequelize, DataTypes) => {
 const Author = sequelize.define('author', {
    name: {
      type: DataTypes.STRING,
      unique: true,
    },
  });
  Author.associate = (models) => {
    Author.hasMany(models.Poll, { onDelete: 'CASCADE' });
  };
  return Author;
};

export default author;
Let's create our 'poll' model. Rock on.
You don't need us for this, get coding CS GOD!
Right?
Okay, fine we'll help you out.
Paste the following in poll.js:
const poll = (sequelize, DataTypes) => {


};

export default poll;
Okay, same as before, let's define Poll using sequelize's define method. :rocket: Paste the following inside 'poll' that we just made.
const Poll = sequelize.define('poll', {
   text: {
     type: DataTypes.STRING,
   },

   imageURL: {
     type: DataTypes.STRING,
   },

   upvotes: {
     type: DataTypes.INTEGER,
     defaultValue: 0,
   },

   downvotes: {
     type: DataTypes.INTEGER,
     defaultValue: 0,
   },

 }, {
   getterMethods: {
     score() { return this.upvotes - this.downvotes; },
   },
 });

 return Poll;
WOAH that was a lot of code. Not at all! We did the same thing as before, defining our poll with text, imageURL, upvotes, and downvotes. We define the data type by setting type: equal to STRING for a string and INTEGER for an integer value. Notice, upvotes and downvotes have a default value of 0.
You'll notice that we have getterMethods on the model object, specifically one method called score. These is similar to those virtuals we used back with Mongoose.
Sweet! Now let's associate the poll with an author using the commands associate and belongsTo by placing this chunk of code after getterMethods (before return Poll):
In this portion, we are associating the Poll with the author of that specific poll.
Poll.associate = (models) => {
    Poll.belongsTo(models.Author);
  };
If you're really struggling, here's what the end result should be:
Click to expand!
const poll = (sequelize, DataTypes) => {
  const Poll = sequelize.define('poll', {
    text: {
      type: DataTypes.STRING,
    },

    imageURL: {
      type: DataTypes.STRING,
    },

    upvotes: {
      type: DataTypes.INTEGER,
      defaultValue: 0,
    },

    downvotes: {
      type: DataTypes.INTEGER,
      defaultValue: 0,
    },

  }, {
    getterMethods: {
      score() { return this.upvotes - this.downvotes; },
    },
  });

  Poll.associate = (models) => {
    Poll.belongsTo(models.Author);
  };

  return Poll;
};
export default poll;
Now run yarn dev in terminal, and if you open up http://localhost:9090/ in your browser, you will see that we need to handle some routes. 🚀 Let's fetch all the polls!
Open up src/server.js and add this to the top:
import models, { sequelize } from './models';
import createAuthorsWithPolls from './polls';
Beneath the first 'PART 3.1' comment, paste:
// sync Sequelize
const eraseDatabaseOnSync = true;
sequelize.sync({ force: eraseDatabaseOnSync }).then(async () => {
  if (eraseDatabaseOnSync) {
    createAuthorsWithPolls();
  }
});
The sync command will push (aka migrate) all of our model changes to the database, create all the models, tables, predefined rows (polls) etc.
By setting eraseDatabaseOnSync to true, we're essentially saying that we want our database to be wiped (tables dropped) every time we restart the server. It's up to you if you want to set it to false or true.
This is basically the same as it was when we did SA7 with MongoDB. The syntax is a bit different, as we aren't using controllers.
We're adding the author to the model. Scroll down to the second excessively gigantic 'PART 3.1' comment, and add the following:
// default index route
app.get('/', (req, res) => {
  models.Poll.findAll({

  })
    .then((polls) => {
      res.render('index', { polls });
    }).catch((error) => {
      res.send(`error: ${error}`);
    });
});
Check what's happening in the browser.
🚀 We want to add the author to the model. In order to do that, paste this line in between the brackets of the findAll method.
include: [{ model: models.Author }],
Now we are getting all the posts from all of the authors included in each model.
// default index route
app.get('/', (req, res) => {
  models.Poll.findAll({
    include: [{ model: models.Author }],
  })
    .then((polls) => {
      res.render('index', { polls });
    }).catch((error) => {
      res.send(`error: ${error}`);
    });
});
🚀 Now, let's make it so our users can create new posts. Add the following below the 'PART 3.2' comment.
app.post('/new', (req, res) => {
  const newpoll = {
    text: req.body.text,
    imageURL: req.body.imageURL,
  };


});
Simple stuff^ right. Just a JS object populated w/ the req.body for now.
Add this block of code under newpoll (within app.post). We're doing the same thing as in part 3.1 and including the author in the newpoll that you create.
models.Poll.create(
    newpoll, {
      include: [{ model: models.Author }],
    },
  ).then((poll) => {


    });
Next, add this block under .then((poll). Here, we are creating the poll object with the information from the form users can fill out. We then findOrCreate the author they provided and link it to the poll.
.then((poll) => {
      // if there is no author with that name already, create one
      models.Author.findOrCreate({
        where: { name: req.body.author },
      })
        .then((author) => {
          poll.setAuthor(author[0]); // findOrCreate returns an array, so we just need the first one
          poll.save(); // finally update the object with the new association
        })
        .then(() => {
          res.redirect('/');
        });
    });
🚀 Finally, we redirect to the home page.
This is what you should end up with for the POST /new route!
Click to expand!
So we have:
  app.post('/new', (req, res) => {
  const newpoll = {
    text: req.body.text,
    imageURL: req.body.imageURL,
  };

  models.Poll.create(
    newpoll, {
      include: [{ model: models.Author }],
    },
  )
    .then((poll) => {
      // if there is no author with that name already, create one
      models.Author.findOrCreate({
        where: { name: req.body.author },
      })
        .then((author) => {
          poll.setAuthor(author[0]); // findOrCreate returns an array, so we just need the first one
          poll.save(); // finally update the object with the new association
        })
        .then(() => {
          res.redirect('/');
        });
    });
  });
Feel free to test that making a new poll works! Expand your window if the new poll link is hidden.
🚀 Let's make it so we can upvote/downvote polls. Add the following below the 'PART 3.3' comment.
app.post('/vote/:id', (req, res) => {
  const vote = (req.body.vote === 'up');

  models.Poll.findByPk(req.params.id).then((poll) => {
    console.log(`updating vote: ${poll} ${vote}`);
    if (vote) {
      poll.increment('upvotes');
    } else {
      poll.increment('downvotes');
    }
    res.send(poll);
  });
});
Essentially, we are finding all the Polls with that id (primary key - aka Pk) from the URL. Should be only one, right.
Then, we are using some predefined sequelize methods such as increment to change integer values without having to run update or save etc.
However, we can't yet vote until we can get that author's poll. Go ahead and vote on your new poll and see what happens.
Now that we've created a relational database associating authors with posts, we can request only the posts of a specific author. Add the following below the `PART 3.4' comment.
app.get('/author/:id', (req, res) => {
  models.Poll.findAll({

    include: [{ model: models.Author }],
  })
    .then((polls) => {
      res.render('index', { polls });
    }).catch((error) => {
      res.send(`error: ${error}`);
    });
});
Here, we're requesting all the polls associated with a specific author with the line where: { authorId: req.params.id },:
where: { authorId: req.params.id },
Click to expand!
So we have:
app.get('/author/:id', (req, res) => {
  models.Poll.findAll({
    where: { authorId: req.params.id },
    include: [{ model: models.Author }],
  })
    .then((polls) => {
      res.render('index', { polls });
    }).catch((error) => {
      res.send(`error: ${error}`);
    });
});
Now we should be able to vote on all polls.
Pretty cool, right?
Navigate into src/polls.js. You'll see we've already created some polls for you.
Notice how polls was not a field in the model, but now it became one after the 'associate' part. Sequelize pluralized it from poll to polls by itself! WOWOWOW. ComputerSciencyyyy.
Cool stuff. Now that we have everything working, try playing around with the page in your browser now. Pay attention to what happens in the terminal window (the one running yarn dev).
You should see a bunch of SQL queries!
For the final part of the workshop, we will try to help you visualize this stuff a bit using pgAdmin.
🚀 Let's create a postgres user in our database. Open a new Terminal window and type in psql postgres.
We're a superuser now, and let's create another one that we can use for logging into pgAdmin!
CREATE ROLE postgres PASSWORD 'password' SUPERUSER CREATEDB CREATEROLE INHERIT LOGIN;
This is a postgres user with password password. He can do a bunch of stuff, but most importantly, he is a superuser that can login!
If you run \du you should see this.
postgres=# \du
                                   List of roles
 Role name |                         Attributes                         | Member of
-----------+------------------------------------------------------------+-----------
 me        | Create DB                                                  | {}
 mihovilm  | Superuser, Create role, Create DB, Replication, Bypass RLS | {}
 postgres  | Superuser, Create role, Create DB                          | {}
Cool. Quit psql with \q.
🚀 Now, let's download pgAdmin 4 from this website https://www.pgadmin.org/download/. If you're on a Mac, you can download it straight from here.
🚀 Install it (drop into Applications folder) and try running it.
Let's set it up so we can connect to our postgres service!
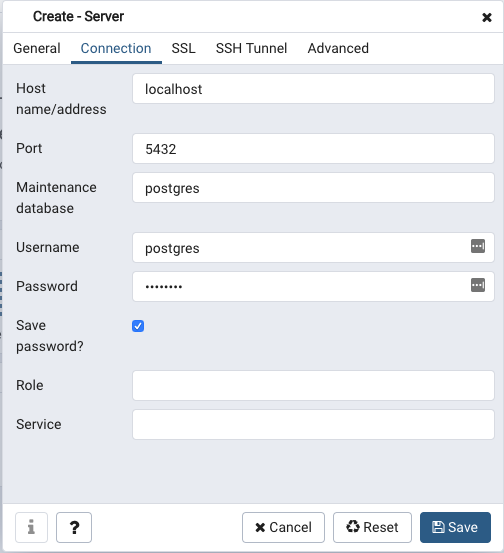
Inside the pgAdmin dashboard under Quick Links, click Add new Server.
In the popup, under the default General tab, name it whatever you want. We named it Local.
In the Connection tab of the popup, add localhost as the Host name/address.
Port is 5432. Username is, guess what, postgres, and the password is password.
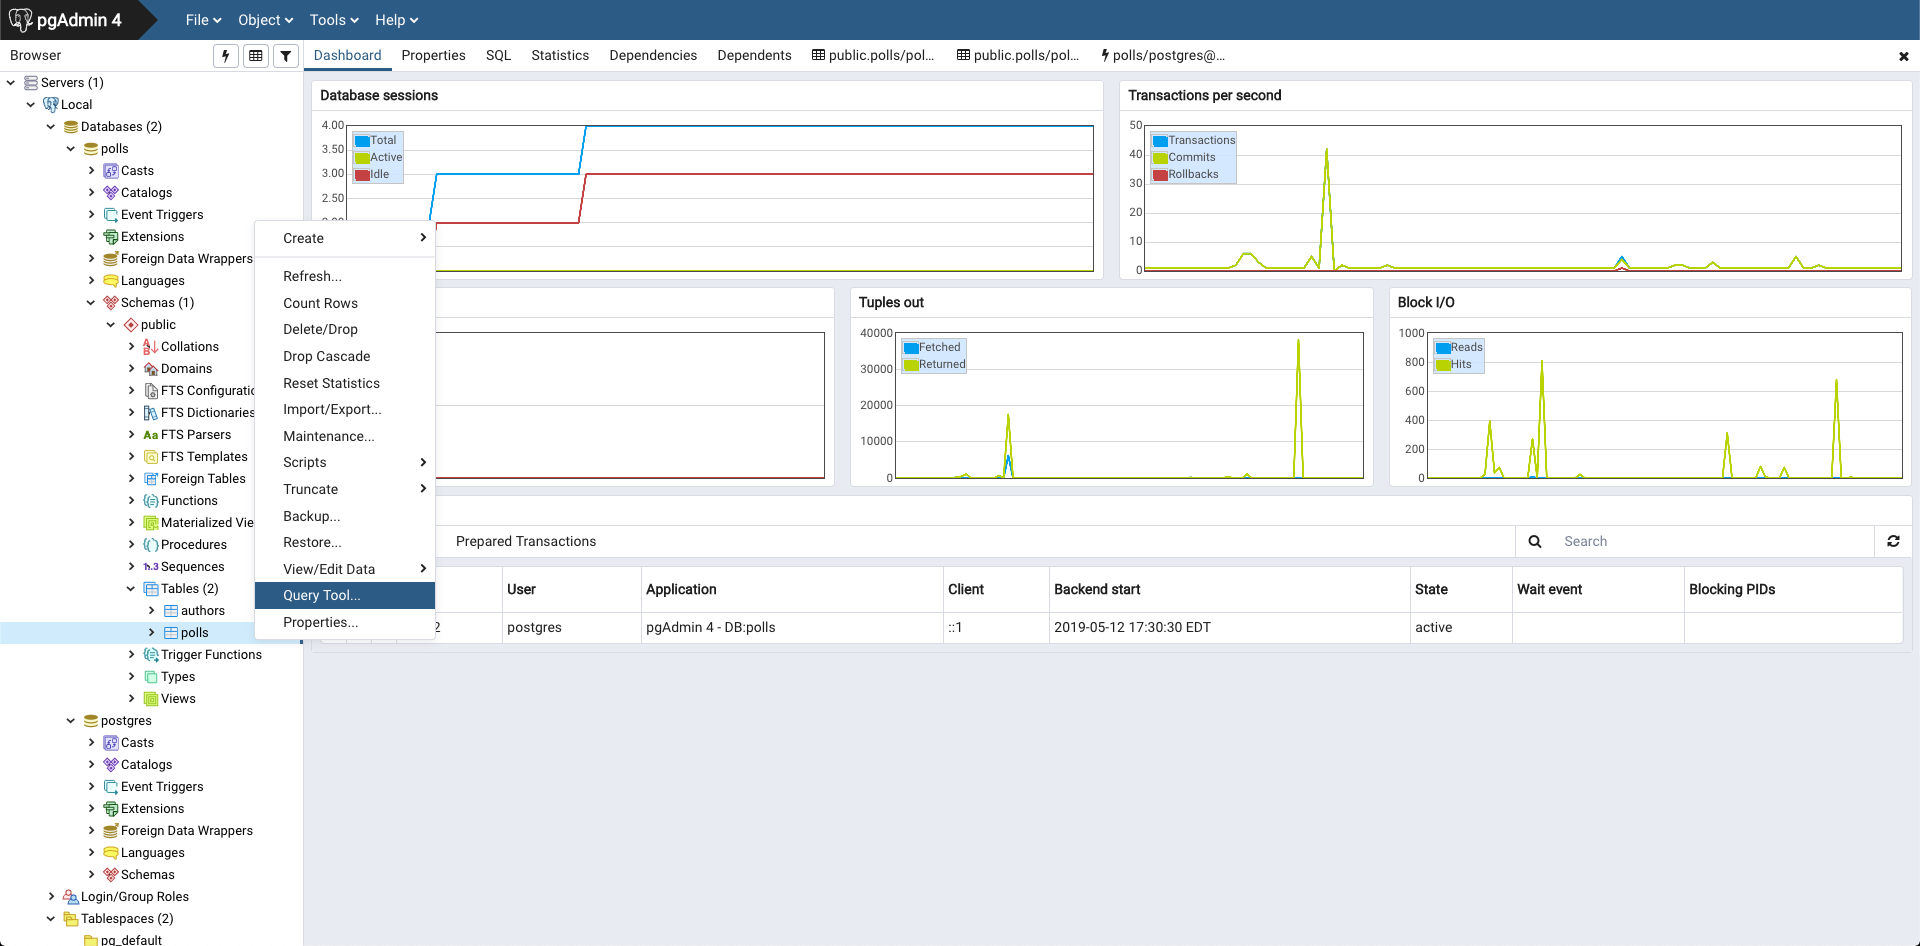
Click save and let's play around now! On the left dropdown, click the new server you just made. You should see your dashboard change and have a bunch of weird charts.
Use the dropdown on the left to go into your server, Databases, polls, and Schemas. Under public, there should be a Tables dropdown.
Here you have two tables, as we have two models! Sequelize can create a bunch more if you tell it to. Right click on polls and click Query Tool.
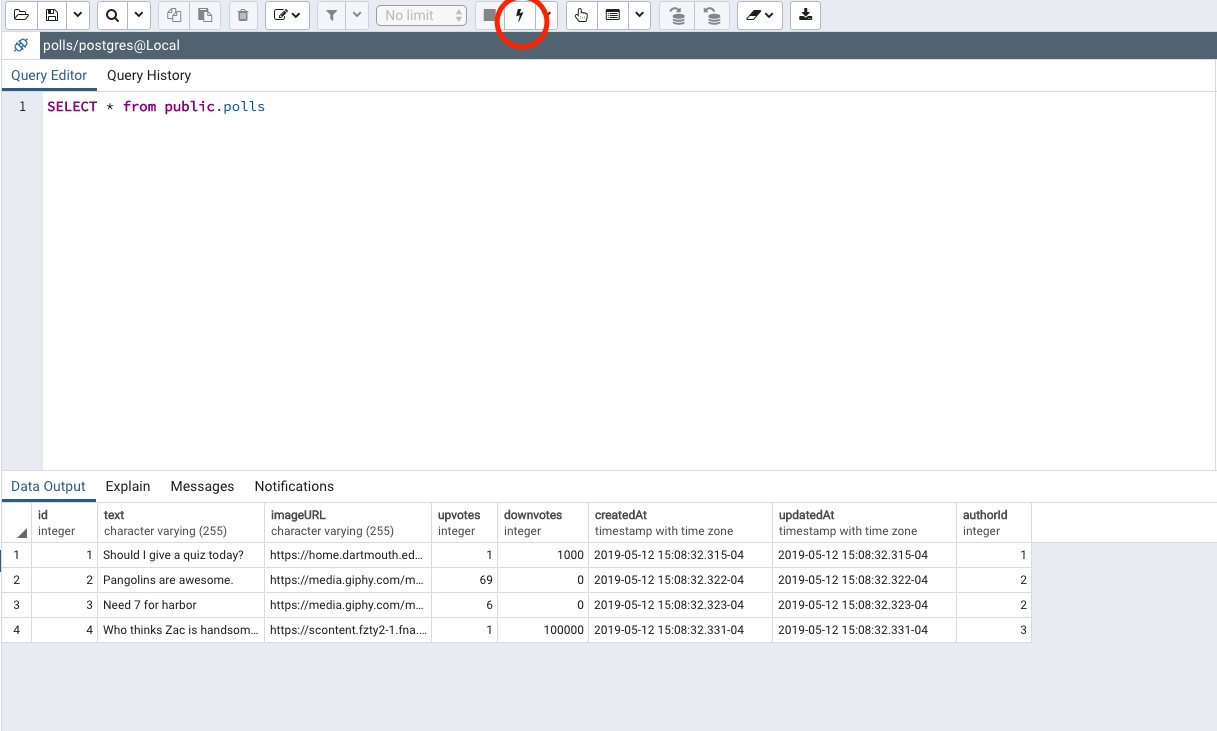
🚀 Now you can run some queries!
For e.g. you can run SELECT * from public.polls; Run it by clickin' the little bolt icon or pressing F5.
That's it! Play around with some SQL queries like SELECT * from public.polls ORDER BY upvotes DESC;.
If you need some SQL guidelines, here's a quick intro.
Also while in polls or authors table, check out different pgAdmin tabs (on top). We think the SQL and Statistics ones are cool.
- Learned how to create your own relational database
- Learned the differences between relational/non-relational databases
- Basics of postgreSQL
- Basics of sequelize
- Create a delete button on the output page and run a query to delete the posts by a specific author
- Create a search bar and run a query to get all the post made by a specific author
- When would you use postgreSQL over mongoDB or firebase?
- What are the downsides of using a relational database? What are the main differences between a relational and non-relational database?
https://docs.google.com/presentation/d/135N0LlxpvDi1RCzaM-2bawaW82yWbCsNBO90cY460Ss/edit?usp=sharing
- https://blog.logrocket.com/setting-up-a-restful-api-with-node-js-and-postgresql-d96d6fc892d8
- https://computer.howstuffworks.com/question599.htm
- https://stackshare.io/sequelize
- https://medium.com/@paigen11/sequelize-the-orm-for-sql-databases-with-nodejs-daa7c6d5aca3
- https://milinaudara.wordpress.com/2014/05/24/an-introduction-to-sequelize-js/
- https://gist.github.com/zcaceres/742744b708393c022703b615d1bffbb1
- https://www.robinwieruch.de/postgres-express-setup-tutorial/
- http://docs.sequelizejs.com/


