PodEmu is Android application that allows you to connect your Android device to iPod docking station or your car audio system. PodEmu supports both AiR (Advanced) and Simple modes so you can control your Android music app directly from docking station or from your cars steering wheel. PodEmu uses serial protocol to communicate with iPod docking station so it will work only with "old" 30-pin iPod connectors. Lightning interface is not supported.
XDA Developers discussion for this app is here
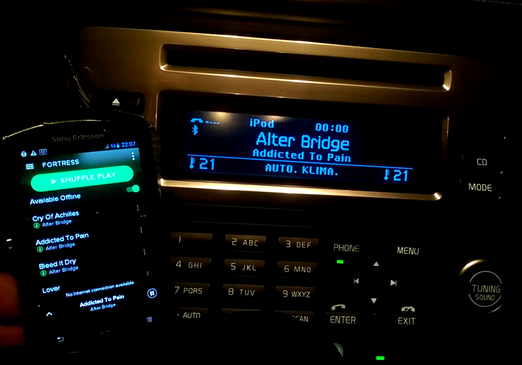
PodEmu in action:
- No root required
- Display track/time information for currently playing song on your car audio system or docking station display.
- Control your favourite Android music app (eg. Spotify, YouTube, Amazon Prime Music, Apple Music) directly from car's steering wheel or docking station remote control
- Download docking station color image to android device. Car audios usually have this feature.
- Support for Bluetooth serial devices. You can assemble the dongle and connect your android completely wirelesly.
- Entirely Open Source :) You can modify and redistribute as long as you comply with GPLv3.
- Android device with USB host support (USB host support not required if you are using FT311D or FT312D dongles, or Bluetooth)
- DIY cable or DIY bluetooth dongle. Unfortunately there is no ready-to-use cables available on the market so you need some basic soldering skills to assemble your own cable. Read further for details.
PodEmu will support any music application out of the box if this application properly declares notification in notification/status bar. The table below summarizes the behavior of the applications with which PodMode was tested.
Additionally, please remember, that in order support track/album/artist/playlist/genre navigation fully PodEmu need to have this information provided. Unfortunately there is no way to retreive this information through the notification bar. In the best case PodEmu is only able to gather information about currently played track, total playlist size and current track position. Therefore PodEmu is trying to mimic the rest of the information for the docking station to be able to operate. Please also note, that each docking station behaves differently and therefore final behaviour will be also different. Feel free to provide feedback with your experience on XDA thread or raise an issue through GitHub issue tracker.
| Application | Support for basic control (play/pause, prev, next) | Provides metadata information | Additional information |
| Google Play Music | yes | yes | fully works |
| Spotify | yes | yes | Metadata does not contain ListSize and ListPosition information. Default list is generated with ListSize=11. Additionally, Spotify delays notifications after you scroll the song forward or backward, so playback position maynot be updated in your car instantly. |
| TIDAL | yes | yes | ListSize and ListPosition not provided, so generic playlist with size 11 is generated. Scrolling seems to be updated immediately. |
| PowerAmp | yes | yes | All notes are the same as for Spotify |
| Apple Music | yes | yes | Stable with PodEmu, instant status updates |
| Amazon Prime Music | yes | yes | Artworks are not downloaded. The rest works properly. |
| YouTube | yes | yes | YouTube does not notify when the track is paused. |
If you don't see your favourite app in the table above, don't worry, most probably it will still work with PodEmu.
ListSize and ListPosition information is very important to be able to see the total amount of songs in the playlist from the docking station and to be able to select random song from list and jump to it. Whenever this information is missing PodEmu will not know how many songs are in the the current playlist and will not support "jump to" command. In such case you will see one album, that contains 11 songs. Also remember, that even if ListSize information is provided, PodEmu don't know track names "a priori". Therefore, first time you browse them from docking station, you will see titles like "Track XYZ" for all of them. However, once the song is played, it's title is remembered at given position. This list is flushed when total count of song is changed or application is restarted.
To work properly PodEmu requires to be connected to your car using two separate channels:
- audio channel (obvious)
- data channel (for controll and metadata information)
Audio is transmitted through "calssic" analog lines. For metadata serial interface is used. PodEmu will not work with usb/lightning cable, because with such cables all information (including audio) is transmitted digitally and PodEmu is not able to interpret it (plus due to Android architecture it might not be possible to properly recognize the external device and talk to it).
Both channels mentioned above could be connected directly using wires, or bluetooth modules. Below you can find multiple options available to connect your Android device with iPod 30-pins interface.
Audio channel can be connected directly, by wires, or with use of BT module that supports A2DP profile, for example XS3868, RN52, BK8000L.
Data channel could be connected by wires. In this case you will need any USB-to-serial interface like FT232R, FT231X, FT311D, FT312D, PL2303, CP2102, CP2105, CP2108 or CP2110. Alternatively, you can also connect it with any BT module that supports SPP profile (except BLE devices which are too slow). For BT you can use modules like HC05, HC06, RN52.
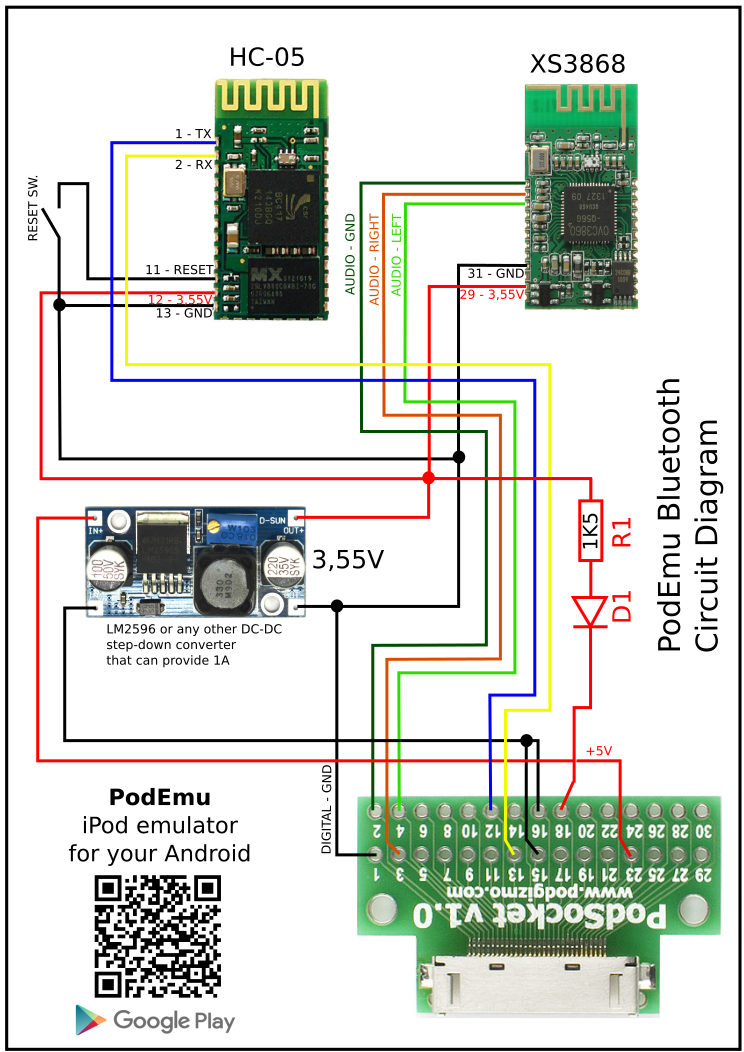
Obviously you will also need to power all the modules up. There are multiple ways to do it. Below is an example of wiring diagram for XS3868 and HC05 modules that are powered up by LM2596, but you can use any power suply that can provide appropreate voltage and current.
Note for all diagrams below: R1/D1 elements are only required for those cars/docking stations where car or docking station expects the pin 18 to be pulled up to 3.3V by iPod. Otherwise it will not recognize iPod connection. R1 is required to limit the current and D1 is added to protect the dongle (could be ommitted to be honest). If you are not sure if you car needs it, it is safe to start without R1/D1 and if car does not recognize connection, then just add it.
This is the simplest and the most reliable version of connection.
Supported serial interfaces:
- FTDI: FT232R, FT231X, FT311D, FT312D
- Prolific: PL2303
- SiLabs: CP2102, CP2105, CP2108, CP2110
PodEmu was tested with FT312D, PL2303, FT232R, CP2102. Other chips should also work (as claimed by driver developer), but were never tested with PodEmu.
Bluetooth setup was tested with HC-05 as serial interface device and XS3868 to stream audio. Connection diagram that was used is the following:
Before start using HC-05 it need to be configured properly. To do this you need to issue the following commands:
AT+NAME=PodEmuSPP - to change module name. Instead of PodEmuSPP you can use whatever you like.
AT+UART=57600,1,0 - to change baud rate. This command is mandatory for PodEmu to work correctly.
Instead of using HC-05 and XS3868 you can use any other BT modules that provide SPP and A2DP profiles. SPP is a profile for serial communication. A2DP is a BT profile used for audio connection.
Important notes:
- do not short audio ground (pin 2) with power ground (pins 15 and 16). If you do it, significant noise will appear.
- voltage is set to 3,55V and not to 3,3V. 3.3V is normal operating voltage for HC-05, 3.6V is maximum for HC-05. However 3.6V should be minimum voltage for XS3868. When voltage drops below 3.5V, XS3868 will produce audible warnings. To avoid it, but to stay within HC-05 voltage limits it is recommended to set voltage between 3.5V and 3.6V. There are known cases when slight exceeding 3.6V burned HC-05.
- before using HC-05 it need to be configured. You need to change Baud Rate to 57600 (or whatever rate is required by your car/dock station) AT+UART=57600,0,0 For details about configuring HC-05 please refer to this manual
- changing device name is not required, because you can choose the device from paired devices list from the application
- after BT module is configured, you need to manually pair with it. Once paired, start PodEmu, go to settings and select your device from the list of paired devices. Then PodEmu will connect automatically.
- serial interface cable has higher priority to connect, so if it is attached, BT will not connect. Detach the cable first and then restart the app.
Setup with RN-52 module is shown below. The big advantage of this module is that it supports both audio and serial profiles, so you don't need to pair your phone with 2 bluetooth modules. Disadvantage is high price (~25 USD).
Note: if you use SparkFun breakout board as depictured above, for some reason they didn't made the pad for AudioGND pin, so you'll need to solder to pin 39 of the module (AGND). This is 6th pin from the topmost right side on the picture above. Luckily there is thick copper area below "SPK_L-" that you can use.
There is minor issue with such connection. Due to the fact that RN-52 is using differential output and we are using only audio positive lines, there are electrical spikes few seconds after audio goes mute. It can be heard as single "clicks" few seconds after going on mute.
Before using RN-52 module you need to program it. It is done by connection GPIO9 pin to ground. Then you can connect module to you computer to standard COM port using UART_TX and UART_RX and program it. Commands you will need:
su,04 - set baud rate 57600
sd,06 - enable only A2DP and SPP discovery profiles
sk,06 - enable only A2DP and SPP connection profiles
sn,PodEmu - set device name to RN52-PodEmu
ss,0F - set default gain level to maximum
For those who has pcb production skills I recommend to use this schematics. In comparison to previous RN-52 schematics, this implementation uses TPA6112 audio amplifier with differential input. Using this amplifier eliminates "single clicks on mute" issue described in previous section.
Note: Don't forget to setup RN-52 module as described in previous section.
My personal implementation of this dongle looks like this:
EasyEDA project files: https://easyeda.com/e-lab/podemu-module
Please use "Issues" tab on GitHub to report a problem or request an enhancement. You can also report a problem directly from application. For this, just enable "Enable debug collecting" option in settings, then reproduce the issue, and then use option "Send debug to developer". This will send debug file with all logs from application. Don't worry, it will not collect your personal data. However, while sending, please don't forget to describe the problem you are encounting - otherwise your email will be ignored.
- USB Serial For Android: https://github.com/mik3y/usb-serial-for-android
- ByteFIFO class: http://www.java2s.com/Code/Java/Threads/ByteFIFO.htm
- Android Developer Icons: http://www.androidicons.com/
- Question mark icon: http://www.clipartpanda.com/categories/animated-question-mark-for-powerpoint


