In this repository we show how to run and test Scala Spark Jobs on your dev machine using Visual Studio Code Remote -Containers extension to enable quick feedback loop showing how your newly introduced changes behave.
One option is to install and configure Java, Spark and sbt on your local machine, what can be quite cumbersome. If you are one of those developers, who like to experiment with various technologies, you already might have found yourself in situation when your dev machine became totally messy due to all the dev tooling installations you performed. Luckily Docker containers came for the rescue and enabled us to create development environments running inside the Docker Containers, with all the tooling available and without polluting or dev machine.
Visual Studio Code and its Remote - Container extension made it very easy to build the dev environment inside a Docker container and to perform the entire development in this environment.
Below we provide step by step guide on how to setup the local dev environment for Scala Spark Jobs inside container.
Note: this approach can be utilized also in case you are using Databricks to host your jobs and you still want to have possibility of local development without using Databricks Connect and without having to run Databricks cluster.
-
Follow installation guide state in the documentation Visual Studio Code Remote - Container extension
-
Create Dockerfile to define Dev Container
As a first step you should create .devcontainer folder in the root folder of your Scala solution and create a Dockerfile in this folder. As we need Spark and Scala to be installed in the dev container we are using bitnami/spark:3.0.0 base image which already provides those. In the Docker file, we first set user to root, so that Remote - Container extension has rights to create folders for the solution inside the Docker container and we expose Spark Master console running on port 8080. Notice also commented out piece of Dockerfile which demonstrates how to install additional packages if needed.
Dockerfile:
FROM bitnami/spark:3.0.0
USER root

# Installing package into Spark if needed
# spark-shell --master local --packages "<package name>"

EXPOSE 8080
Note: In case your dev environment required multiple Docker containers to run, it is also possible to use Docker-Compose.yml file to create multi container dev environments. In devcontainer.json file you should then specify which service defined in docker-compose file VS Code should connect to.
-
Create devcontainer.json configuration file
From documentation: 'A
devcontainer.jsonfile in your project tells Visual Studio Code how to access (or create) a development container with a well-defined tool and runtime stack.' In other words using devcontainer.json you can forward environment variables and arguments to your container, define settings and extensions you want your VS Code instance running in container to have and other. In our case we are configuring following settings:- Forwarding SPARK_MODE argument to Spark engine running in the container.
- VS Code settings - start integrated linux bash shell when connected to the container).
- VS Code extensions to be installed
- scalameta.metals - Scala language server, enabling code enabling code completions, type at point, goto definition capabilities and many more. It also works with sbt, Gradle, Maven and Mill thanks to Bloop, a fast Scala build server to enable build and running of scala code.
- Set port forwarding for container to forward port 8080 where Spark master console is running.
- Set overrideCommand to false, otherwise VS Code Remote - Container extension would override default command of bitnami base image and Spark would not start.
There is quite a lot of other options you can set in devcontainer.json. For more details please refer to the documentation.
-
Open Visual Studio Code command windows by pressing CTRL+SHIFT+P and run Remote-Containers: Open Folder in Container command. This will initiate build and run of the development Docker container.
Now everything is setup to run Scala Spark Job inside dev container. As mentioned we have installed Scalameta.Metals extension which enables us to build and run Scala code. Let's see how to use it on the sample code in this repository.
In this repository you can find two Scala files. In the main folder there is CubeCalculator.scala file containing logic to calculate volume of a cube and in the test folder there is CubeCalculatorTest.scala file with two simple tests we will run. One of them tests CubeCalculator logic and second one demonstrates how to connect to Spark Engine running in the container. It makes use of MrPowers.spark-fast-tests Apache Spark test library for Scala, which for instance allows to do assertions on top of Data Frames. Solution folder also contains build.sbt file, which holds Scala build configuration which get's picked up by Metals extension.
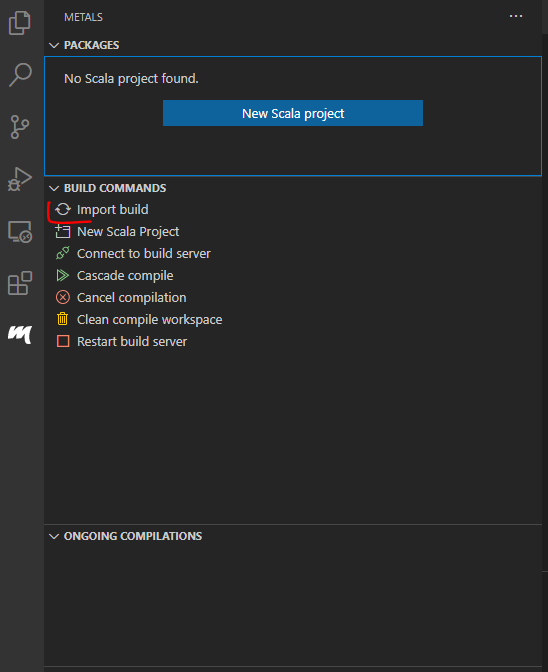
So that we can run the Scala code first we need to run Import build using Metals extension:
Note that metals extension is using embedded sbt launcher but it has some limitations documented here. In case you want to use your own sbt script, you can install it in the separate RUN step in dev container Dockerfile by adding following lines just after the USER root line:
RUN \
  apt-get update && apt-get install -y gnupg2 && \
  echo "deb https://dl.bintray.com/sbt/debian /" | tee -a /etc/apt/sources.list.d/sbt.list && \
  curl -sL "https://keyserver.ubuntu.com/pks/lookup?op=get&search=0x2EE0EA64E40A89B84B2DF73499E82A75642AC823" | apt-key add  && \
  apt-get update && \
  apt-get install -y sbt && \
  sbt sbtVersion
Then you just need to configure the metals extension to use the desired sbt script as documented in the provided link. This should be possible in devcontainer.json file. We haven't explored a way how to do it, as we didn't need to use custom sbt script.
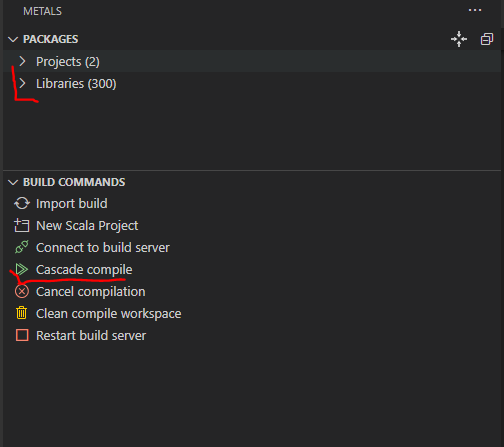
After build is done, you should see that metals recognized your solution packages. Next you need to compile your files by running Cascade compile. If Cascade compile option does not invoke compilation, just expand the Projects packages or navigate to Scala files you want to compile .
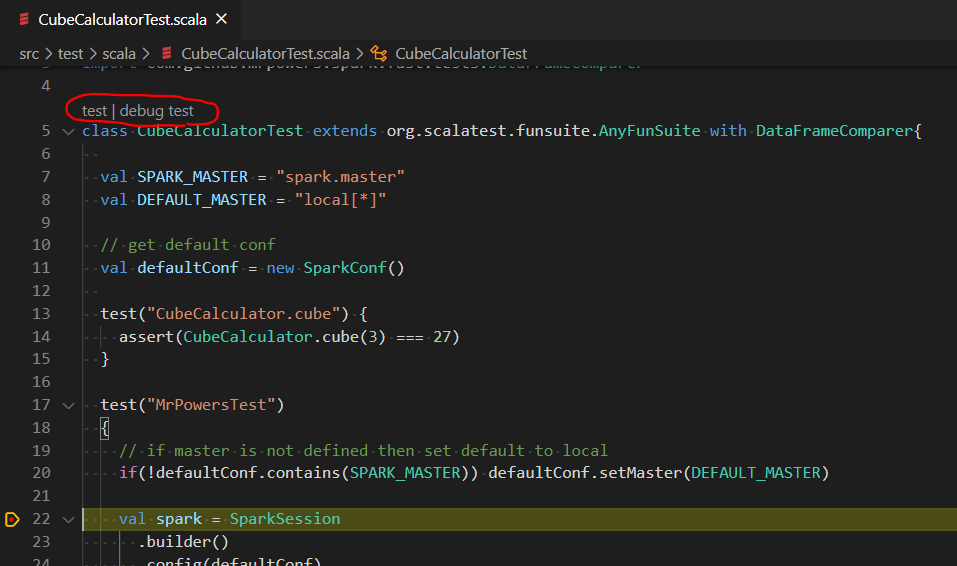
Once the files are compiled you will see run | debug respectively test | debug test options on top of your object/class definitions. Now if you create breakpoint in your code and you will run debug, those breakpoints will be hit.
If you want to use Visual Studio Code native run/debug approach you should include your configuration in launch.json. Below we are providing example of configuration we use to run the tests:
{
    "version": "0.2.0",
    "configurations": [
      // Test class configuration
      {
        "type": "scala",
        "request": "launch",
        // configuration name visible for the user
        "name": "Test class",
        // full name of the class to run
        "testClass": "CubeCalculatorTest",
        // optional build target name in case there is more than one
        // class with the same name
        "buildTarget": "root-test"
      }
    ]
}
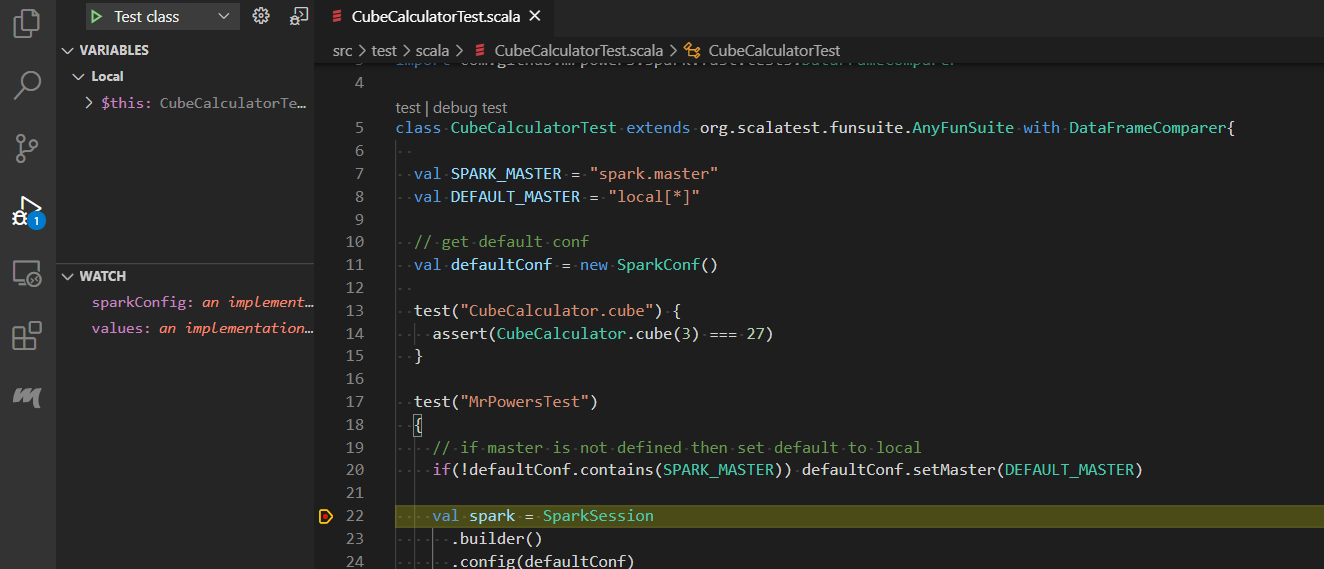
Then if you navigate to Run tab, you can select the run configuration (Test class in our case) and run it, while breakpoints will be hit as well.
This repository demonstrates how to start with local development of Scala Spark Jobs without need of installation of Spark Tooling on your local dev machine. It by no means describe advanced dev scenarios, but it aims to provide jump start guidance on how to start debugging your Scala Spark Jobs and summarizes exploration work done when dipping my toes into the waters of development of Scala Spark Jobs.


