sulcata-web
Description
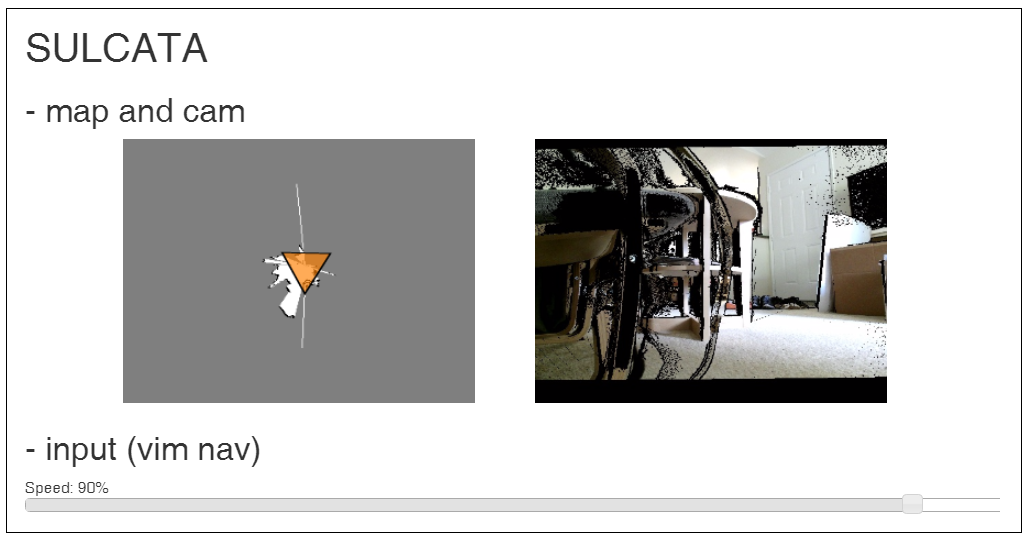
This repository is a part of a robot integration project, which is SULCATA. You need to set up SULCATA on your system before SULCATA-WEB. The main goal of this repository is an easy web interface for users. For that, keyop buttons, 2D map, and rectified video from kinect v2 will be shown on web browser. Unlike previous way - accessing by another ROS host, web interface can provide easy access so that you can access your sulcata system from most of modern web browser (I recommend chrome though).
Users can:
- control Kobuki via web interface.
- monitor a 2D map on your web browser.
- watch a video stream on your web browser.
See also https://youtu.be/e_FdrEWOHgA
Maintainer
Table of contents
Requirement
The requirement is same as SULCATA.
Keyop Example
This example is based on keyboard-teleop-js. You can see a slide bar on your web page and type your keyboard to send key siganl to roscore through ros-bridge.
Installation
In order to install the required node stack, you can download the code from this repository.
sudo apt-get install ros-indigo-rosbridge-*
sudo apt-get install ros-indigo-robot-pose-publisher
sudo apt-get install ros-indigo-mjpeg-server
sudo apt-get install npm node
sudo ln -s /usr/bin/nodejs /usr/bin/node

cd ~/Download
git clone http://github.com/bus710/sulcata-web
cd sulcata-web/keyop-example
npm install
Launch
cd ~/Download/sulcata-web/scripts
./06_rosbridge

# in a new terminal
cd sulcata-web/keyop-example
npm start
Access
After above steps, you can access your robot via web browser. However, make sure that you access to the correct ip address. Since my system has an address as '192.168.0.5', I accessed to '192.168.0.5:3000'.

Now you can type keys on your web browser such as up, down, left, right keys to control your Turtle-bot/Kobuki.
Map Example
This example was built on the previous keyOp-example so that you can see a 2D map but at the same time, you can control your robot as same as the keyOp-example.
Installation
In order to install the required node stack, you can download the code from this repository.
sudo apt-get install ros-indigo-rosbridge-*
sudo apt-get install ros-indigo-robot-pose-publisher
sudo apt-get install ros-indigo-mjpeg-server
sudo apt-get install npm node
sudo ln -s /usr/bin/nodejs /usr/bin/node

cd ~/Download
git clone http://github.com/bus710/sulcata-web
cd sulcata-web/map-example
npm install
Launch
cd ~/Download/sulcata-web/scripts
./06_rosbridge

# in a new terminal
cd ~/Download/sulcata-web/scripts
./07_robot_pose_publisher

# in a new terminal
cd sulcata-web/map-example
npm start
Access
After above steps, you can access your robot via web browser. However, make sure that you access to the correct ip address. Since my system has an address as '192.168.0.5', I accessed to '192.168.0.5:3000'.
Cam Example
This example was built on the previous keyOp-example + map-example so that you can see a video stream but at the same time, you can control your robot and see a map as same as the keyOp-example and map-example. (Although the keyboard-teleop-js was used for this example, there is some modification to adjust keycode values for vim navigation style - hjkl.)
Installation
In order to install the required node stack, you can download the code from this repository. Also you need to install mjpeg-server to add video server to ros.
sudo apt-get install ros-indigo-rosbridge-*
sudo apt-get install ros-indigo-robot-pose-publisher
sudo apt-get install ros-indigo-mjpeg-server
sudo apt-get install npm node
sudo ln -s /usr/bin/nodejs /usr/bin/node

cd ~/Download
git clone http://github.com/bus710/sulcata-web
cd sulcata-web/cam-example
npm install
Launch
cd ~/Download/sulcata-web/scripts
./06_rosbridge

# in a new terminal
cd ~/Download/sulcata-web/scripts
./07_robot_pose_publisher

# in a new terminal
cd ~/Download/sulcata-web/scripts
./08_mjpeg_server

# in a new terminal
cd sulcata-web/cam-example
npm start
Access
After above steps, you can access your robot via web browser. However, make sure that you access to the correct ip address. Since my system has an address as '192.168.0.5', I accessed to '192.168.0.5:3000'.

Now you can see the map and video when you control your robot.
Commentary
How to build a mixture with ROS, node.js, and roslibjs examples?
First of all, I had to devide the example code from Rbotwebtool project. Since the example has the unified source code with html part and javascript part for client only, I had to do 4 main tasks.
- building an web server by using node.js.
- deviding the source code into different files.
- merging keyOp, 2D map, and cam project.
- Running node.js server.
For no.1, Fortunately, node.js/express provides a helpful utility, which is express-generator. Once you run express-generator in your project's root dierectory, the command makes a typical structure with jade(html), css, and js files as below file tree. After generating the typical structure, you should install additional node libraries. When you issue npm install, the command reads package.json and automatically installs all the required libraries. (but, of course, please use the package.json file from this repository.)
For no.2, the example file from robotwebtool should be separated to several files. For html, two jade files (view/layout.jde and view/index.jade) were used. The javascript part is just saved to the client.js file (public/javascript/client.js).
For no.3, you may have to know some basic javascript syntax since I modifed each javascript code from three different projects into the client.js file. However, it wasn't about algorithm so that if you find the pattern, it is just copy and paste.
For no.4, you only need to run npm start in the root directry. In our case, the root can be one of those: keyop-example, map-example, or cam-example.
This is the basic directory structure after express-generator
keyop-example
├── app.js
├── bin
│   └── www
├── package.json
├── public
│   ├── images
│   ├── javascripts
│   │   └── client.js
│   └── stylesheets
│       └── style.css
├── routes
│   ├── index.js
│   └── users.js
└── views
    ├── error.jade
    ├── index.jade
    └── layout.jade
In addition to apply keyboardteleop.js, you should copy the library files into the public/build directiry then the sturucture should be same as below. (You also can use cdn though.)
keyop-example
├── app.js
├── bin
│   └── www
├── package.json
├── public
│   ├── build
│   │   ├── keyboardteleop.js
│   │   └── keyboardteleop.min.js
│   ├── images
│   ├── javascripts
│   │   └── client.js
│   └── stylesheets
│       └── style.css
├── routes
│   ├── index.js
│   └── users.js
└── views
    ├── error.jade
    ├── index.jade
    └── layout.jade
How to find a specific topic?
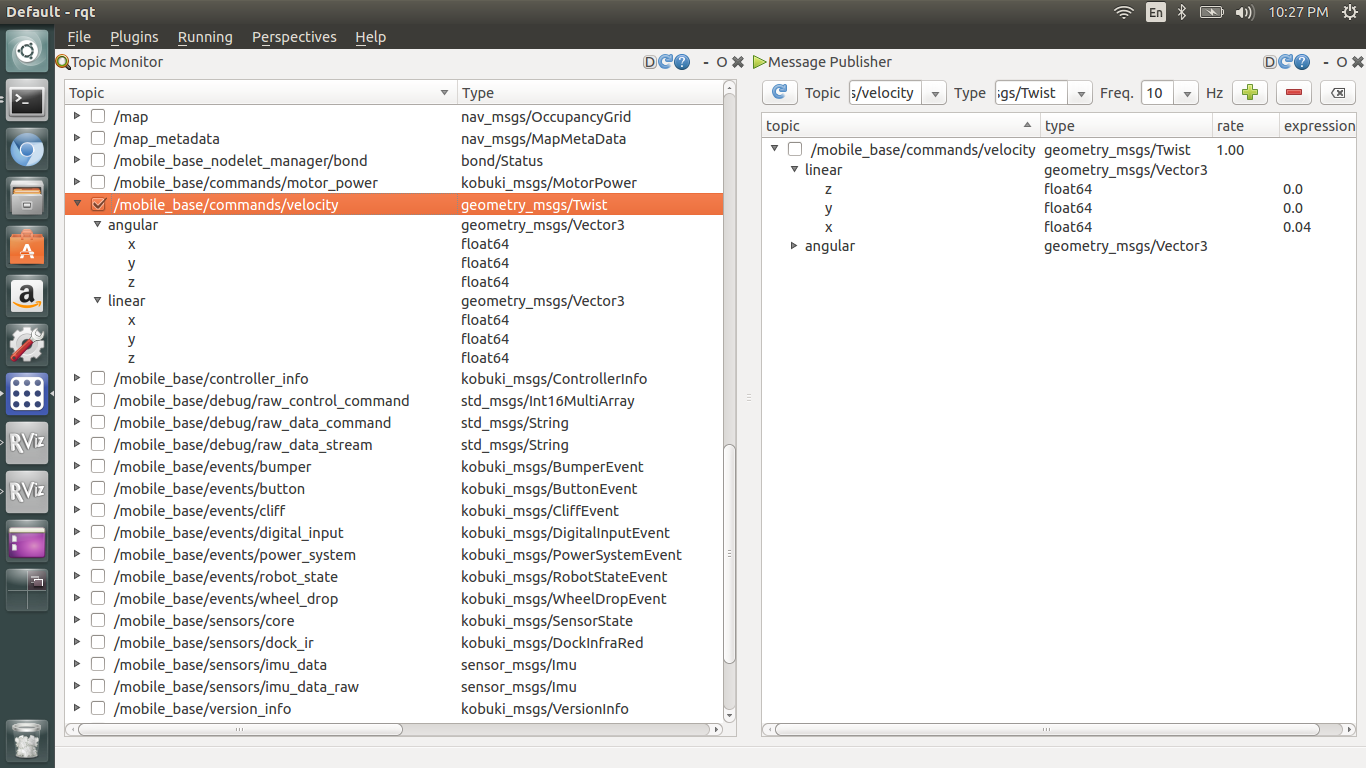
If you have a different robot system, you should check your topics from roscore to adjust this stacks for your own system. If you check the client.js file, you might be noticed that there is a variable, which is "teleop". It is a javascript object and it contains the location of a certain topic.
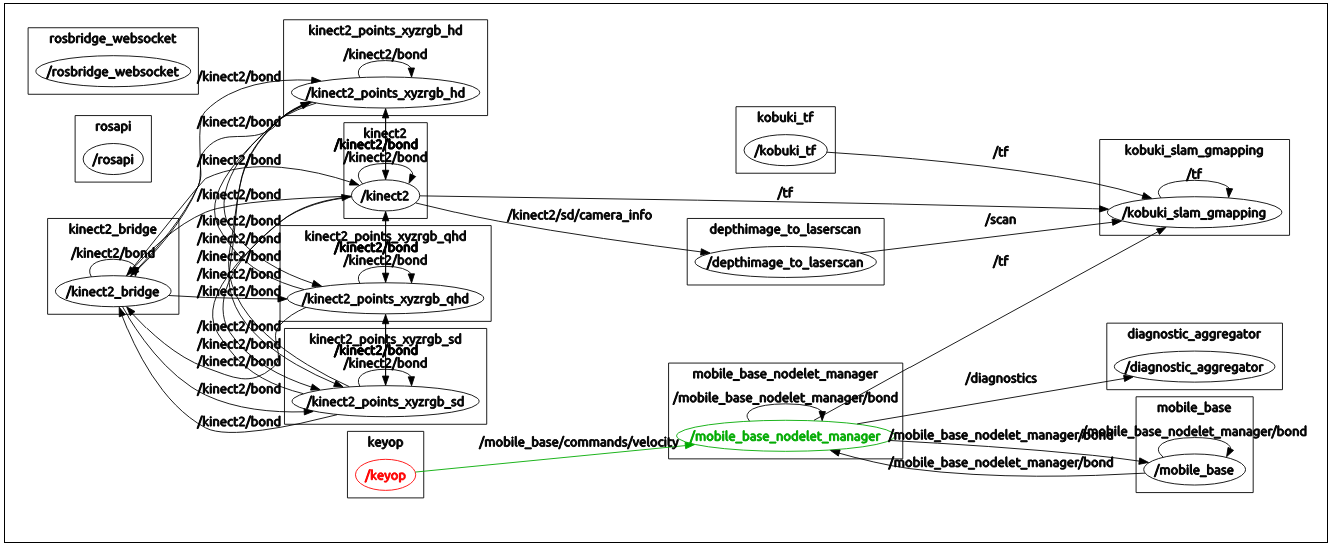
As below screenshots, you can trace/control topics by using rqt so that you also can find the correct topics for your web interface. In this case, it is /mobile_base/commands/velocity. You can find the spot to change the topic from public/javascript/client.js.
Todolist
Now you can control/monitor your system via the web interface. What will you try after this? I might try these goals in the future. If you are interested or want to suggest something, please do PR or leave issues.
- web based action manager.
- web based 3D reconstruction.
- web based navigation.
Reference
[1] http://wiki.ros.org/Books/ROS_Robot_Programing
[2] https://github.com/oroca/rosbook_kobuki
[3] http://wiki.ros.org/kobuki
[4] https://github.com/GT-RAIL/keyboardteleopjs
[5] http://wiki.ros.org/keyboardteleopjs/Tutorials/CreatingABasicTeleopWidgetWithSpeedControl
[6] http://wiki.ros.org/nav2djs/
[7] http://wiki.ros.org/nav2djs/Tutorials/CreatingABasicNav2DWidget

