Rob-GAN: Generator, Discriminator and Adversarial Attacker
Below is my running environment:
- Python==3.6 + PyTorch>=0.4.0
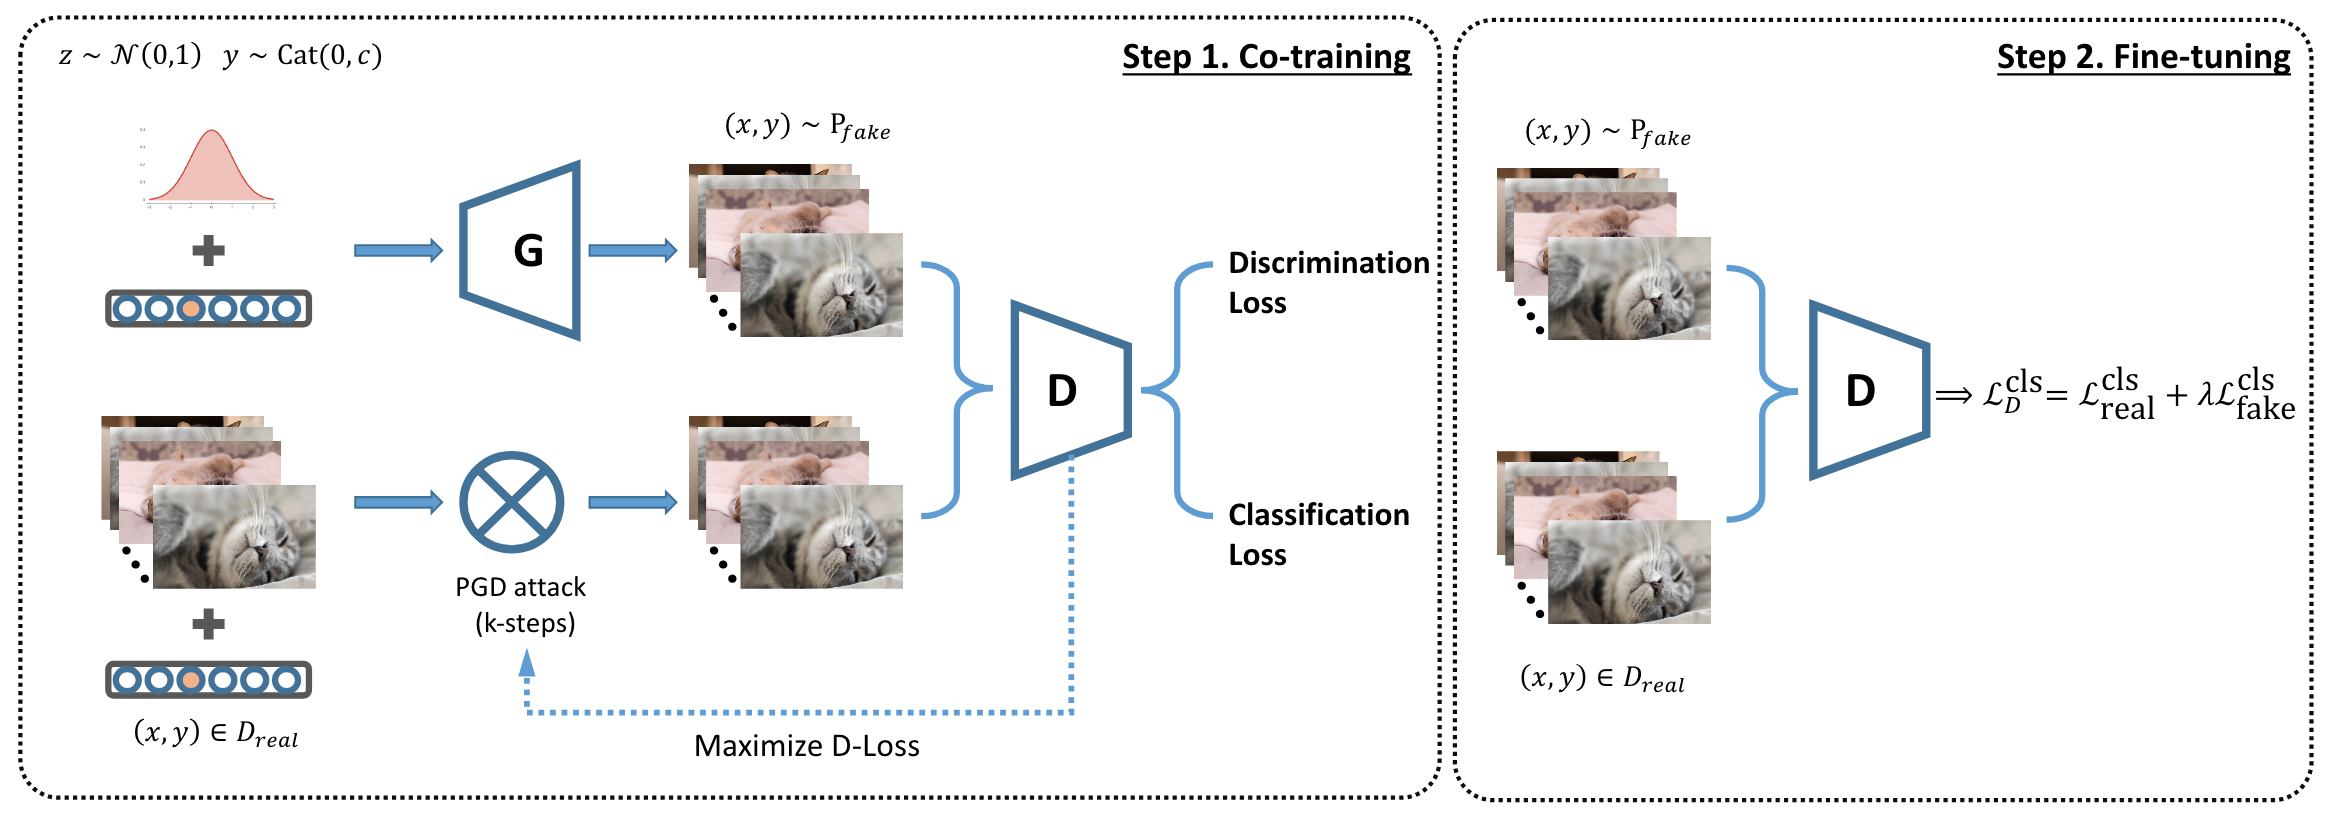
train.[py, sh]: GAN training (Step 1)fintune.[py, sh]: Fine-tuning (Step 2)eval_inception.[py, sh]: Evaluate the inception scoreacc_under_attack.[py, sh]: Evaluate the accuracy under PGD attack/dis_models: discriminators/gen_models: generators/layers: customized layers/miscs: loss function, pgd-attack, etc.
Follow the SNGAN-projection steps to download and pre-process data.
Hereafter, I assume the 1000-class ImageNet data is stored in /data1/sngan_data, 143-class ImageNet data is stored in /data1/sngan_dog_cat and /data1/sngan_dog_cat_val (for validation).
To run 143-ImageNet(64px) + AdvGAN, one can issue the following command (this can be done by modifying train.sh):
mkdir ./ckpt.adv-5.64px-143ImageNet
CUDA_VISIBLE_DEVICES=1,2,3,4,5 python ./train.py \
    --model resnet_64 \
    --nz 128 \
    --ngf 64 \
    --ndf 64 \
    --nclass 143 \
    --batch_size 64 \
    --start_width 4 \
    --dataset dog_and_cat_64 \
    --root /data1/sngan_dog_cat \
    --img_width 64 \
    --iter_d 5 \
    --out_f ckpt.adv-5.64px-143ImageNet \
    --ngpu 5 \   # use as many GPUs as you can!
    --starting_epoch 0 \
    --max_epoch 200 \
    --lr 0.0002 \
    --adv_steps 5 \ # PGD-attack iterations
    --epsilon 0.03125 \ # PGD-attack strength
    --our_loss # add this flag for our NEW loss
Key arguments: --model, --nclass, --dataset, --img_width, --epsilon. We keep other arguments unchanged through all experiments in our paper.
Similarly, we can do fine-tuning by running ./finetune.sh
mkdir ckpt.adv-5.64px-143ImageNet.finetune # storing the output models
last_epoch=100 # you might change this
CUDA_VISIBLE_DEVICES=2,3,4,5 python finetune.py \
    --model resnet_64 \
    --netD ./ckpt.adv-5.64px-143ImageNet/dis_epoch_${last_epoch}.pth \
    --netG ./ckpt.adv-5.64px-143ImageNet/gen_epoch_${last_epoch}.pth \
    --ndf 64 \
    --ngf 64 \
    --nclass 143 \
    --dataset dog_and_cat_64 \
    --batch_size 128 \
    --root /data1/sngan_dog_cat \
    --img_width 64 \
    --steps 5 \
    --epsilon 0.03125 \
    --lam 0.3 \ # find a suitable weight for fake images, typically 0.3~0.8
    --lr 1.0e-3 \
    --ngpu 4 \ # use as many GPUs as you can!
    --out_f ckpt.adv-5.64px-143ImageNet.finetune \
    > >(tee log_finetune.txt) 2>error.txt
Key arguments: $last_epoch, --model, --nclass, --dataset, --img_width, --epsilon, --lam. We keep other arguments unchanged through all experiments in our paper.
TODO
Evaluating inception scores, accuracy under attack, etc.
Please consider to cite this paper if you find it helpful in your research:
@inproceedings{liu2019robgan,
    title={Rob-GAN: Generator, Discriminator and Adversarial Attacker},
    author={Liu, Xuanqing and Hsieh, Cho-Jui},
    booktitle={Proceedings of the IEEE Conference on Computer Vision and Pattern Recognition},
    year={2019}
}
We would like to thank develpers of SN-GAN for providing the source code.
