nostalgic-swartz - VMware NSX Advanced Load Balancer by Avi Networks on top of GCP infrastructure using Terraform + Ansible.
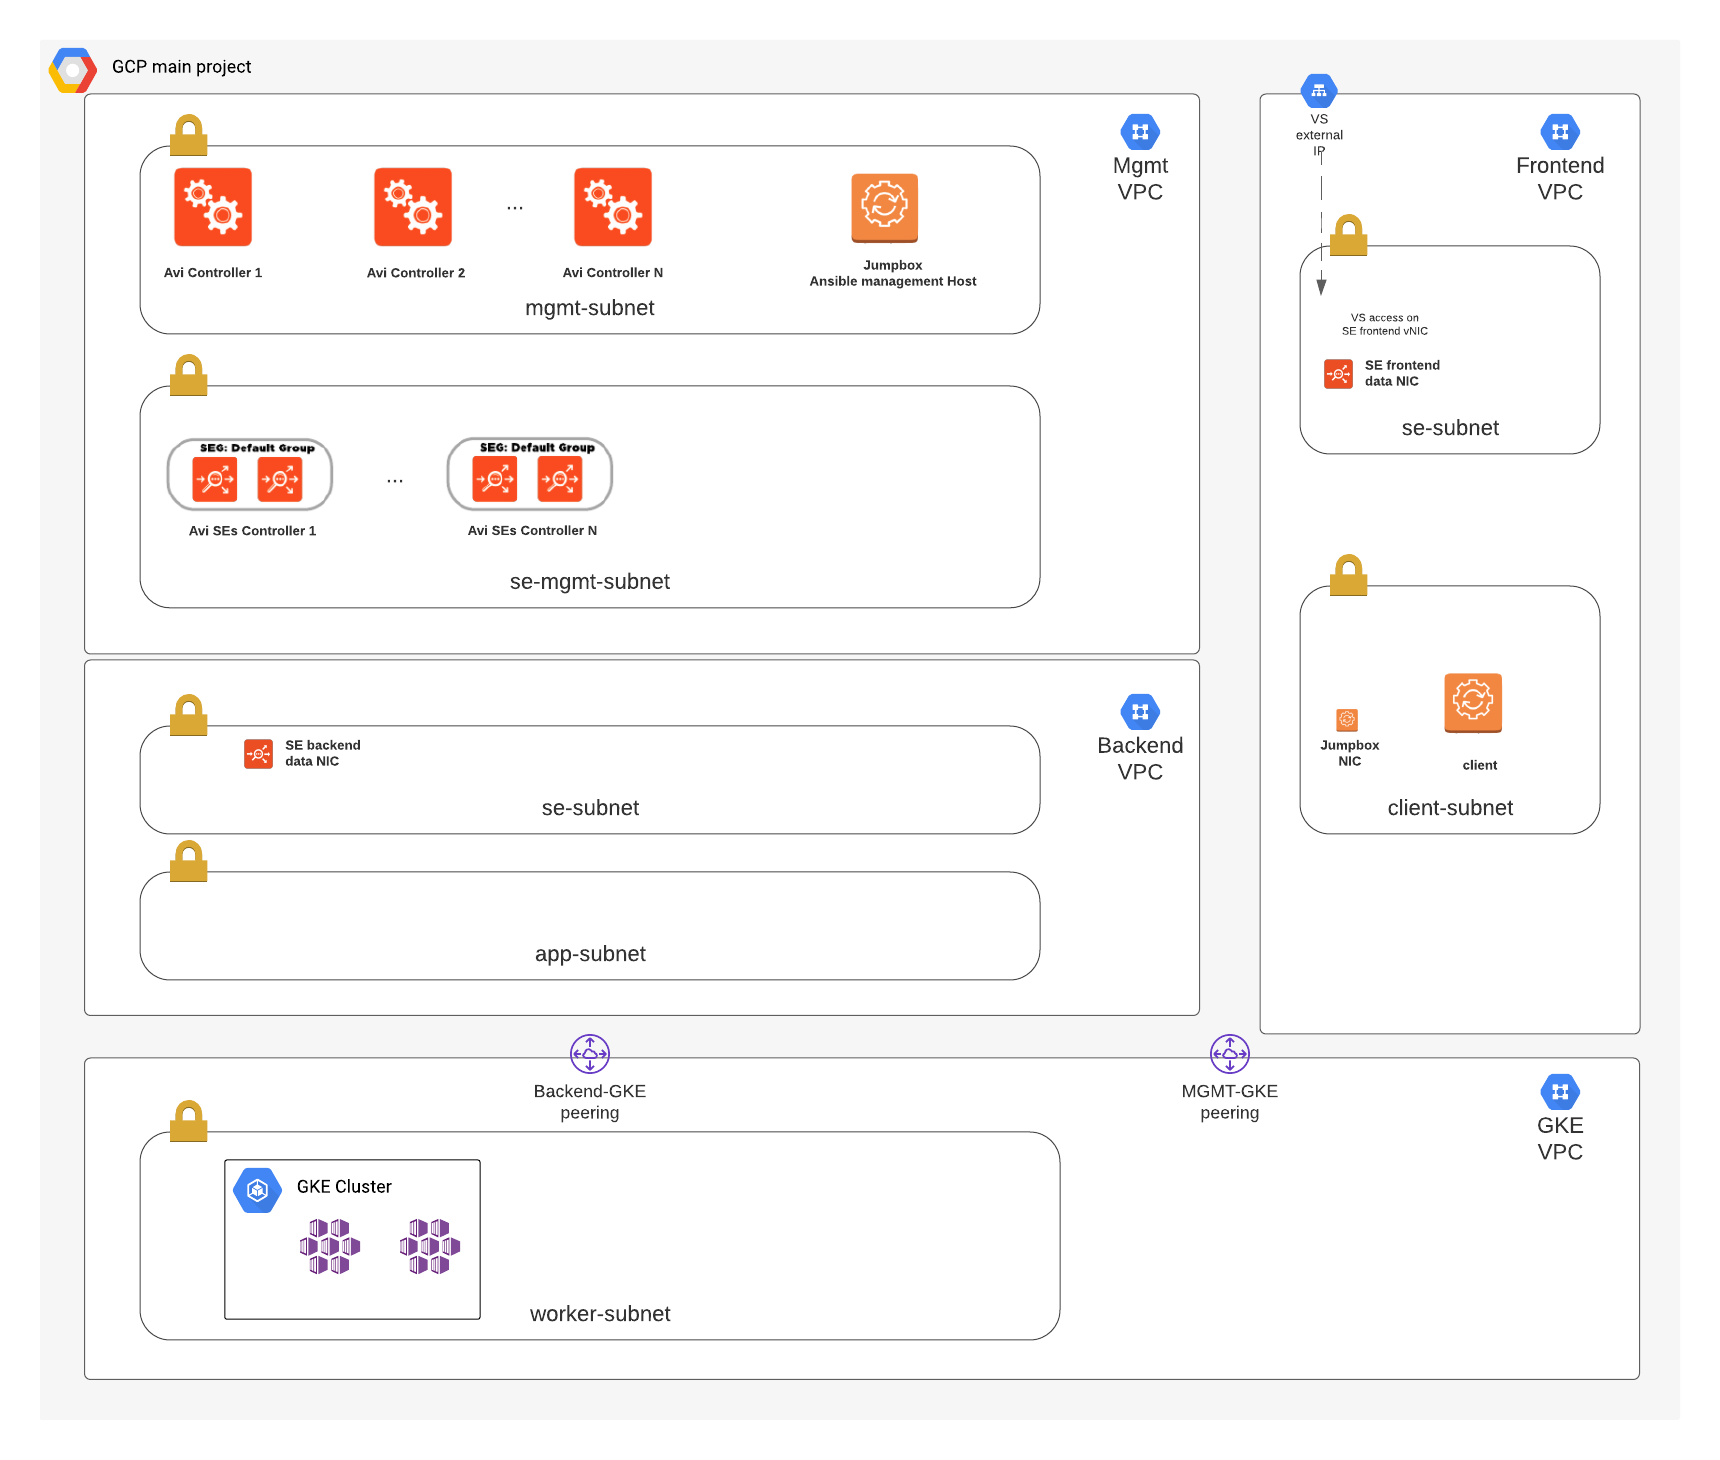
Framework for deploying infrastructure on GCP leverages Terraform, which includes the creation of VPC networking components as well as VM instances for the Avi controller, Jumpbox and a client for management/testing. Ansible is used to configure Avi, including the basic system settings and creating a GCP cloud on a two-arm config mode. For more details please refer to the following articles:
https://avinetworks.com/docs/20.1/gcp-full-access-deployment-guide/ https://avinetworks.com/docs/20.1/configuring-gcp-cloud-network/
| Application Name | Node Port | Description |
|---|---|---|
| kuard | HTTP/30000 | https://github.com/kubernetes-up-and-running/kuard |
| avinetworks | HTTP/30001 | https://hub.docker.com/r/smarunich/avinetworks-demo |
| juice | HTTP/30003 | https://owasp.org/www-project-juice-shop/ |
| hackazon | HTTP/30080, HTTPS/30443 | https://github.com/rapid7/hackazon |
| dvwa | HTTP/30081 | http://www.dvwa.co.uk/ |
- Terraform 0.12.10 or later
- Ansible 2.6 or later
- Access keys to GCP
- Avi Controller Image (20.1.X) created on GCP https://avinetworks.com/docs/20.1/gcp-full-access-deployment-guide/#upload
NOTE: all the deployment work is suggested to be performed within avitools container: https://github.com/avinetworks/avitools
- Clone the repository https://github.com/jaristizabalc/nostalgic-swartz
root@avitools:~# git clone https://github.com/jaristizabalc/nostalgic-swartz
Cloning into ‘nostalgic-swartz'...
- Initialize a Terraform working directory
root@avitools:~/nostalgic-swartz# terraform init
Initializing the
backend... Initializing provider plugins... Checking for available
provider plugins...

* provider.local: version = "~> 1.4"
* provider.random: version = "~> 2.2"
* provider.template: version = "~> 2.1"
* provider.tls: version = "~> 2.1"
* provider.vsphere: version = "~> 1.17"

Terraform has been successfully initialized!
- Copy the minimum required variables template
root@avitools:~/nostalgic-swartz# cp sample_terraform_tfvars terraform.tfvars
- Fill out the required variables - terraform.tfvars
avi_admin_password = "AviNetworks123!"
avi_default_password = "58NFaGDJm(PJH0G"
avi_api_version = "20.1.3"
pod_count = 1
id = "avigcp"
owner =

project_id =
gcp_region =
gcp_zone =
controller_image =

gcp_key_file =
vip_network_cidr = "192.168.1.0/24"
domain_name =
se_machine_type = "n1-standard-4"
gcp_key_file is a json format file containing the authentication keys, refer to this article for more information: https://cloud.google.com/iam/docs/creating-managing-service-account-keys
- Update vars_infra.tf with appropriate VM template names for jumpbox,controller, server (client testing VM) and gke node objects
variable "jumpbox" {
  type = map
  description = "Jumpbox config"
  default     = {
    machine_type = "n1-standard-2"
    disk = "60"
    image = "ubuntu-os-cloud/ubuntu-1604-lts"
    disk_type = "pd-standard"
  }
}
variable "controller" {
  type = map
  description = "GCP instance type for Avi controllers"
  default     = {
    machine_type = "n1-standard-4"
    disk = 128
    disk_type = "pd-ssd"
  }
}
variable "server" {
  type = map
  description = "GCP instance type for servers"
  default     = {
    machine_type = "n1-standard-2"
    disk = 10
    image = "ubuntu-os-cloud/ubuntu-1604-lts"
    disk_type = "pd-standard"
  }
}
variable "gke_node_info" {
  type = map
  description = "Collection of GKE nodes comfiguration variables"
  default     = {
    machine_type = "e2-medium"
    disk = 30
    min_count = 1
    max_count = 2
    locations = "us-west1-a,us-west1-b,us-west1-c"
  }
}
- Update vars_infra.tf with IPs and names for the VPC Network and Subnet configuration:
variable "mgmt_network" {
  type = map
  description = "Management Network information"
  default     = {
    mgmt_subnet = "mgmt-subnet"
    se_subnet =  "se-subnet-mgmt"
    vpc_name = "jda-tf-mgmt-vpc"
    cidr = "10.10.0.0/16"
  }
}
variable "frontend_network" {
  type = map
  description = "Frontend Network information"
  default     = {
    client_subnet = "client-subnet"
    se_subnet =  "se-subnet-frontend"
    vpc_name = "jda-tf-frontend-vpc"
    cidr = "10.20.0.0/16"
  }
}
variable "backend_network" {
  type = map
  description = "Backend Network information"
  default     = {
    app_subnet = "app-subnet"
    se_subnet =  "se-subnet-backend"
    vpc_name = "jda-tf-backend-vpc"
    cidr = "10.30.0.0/16"
  }
}
variable "gke_network" {
  type = map
  description = "GKE Network information"
  default     = {
    worker_subnet = "gke-worker-subnet"
    worker_cidr =  "10.100.0.0/16"
    ip_range_pods = "gke-pod-range"
    ip_range_pods_cidr = "10.110.0.0/16"
    ip_range_services = "gke-services-range"
    ip_range_services_cidr = "10.120.0.0/16"
    vpc_name = "jda-tf-gke-vpc"
  }
}
- Update vars_pod.tf with appropriate id and owner values
variable "id" {
  description = "A prefix for the naming of the objects / instances"
  default     = "avigcp"
}

variable "owner" {
  description = "Sets the GCP Owner tag appropriately"
  default     = "avi-tf"
}
- Prepare the terraform plan
root@avitools:~/nostalgic-swartz# terraform plan
Plan: 22 to add, 0 to change, 0 to destroy.
------------------------------------------------------------------------
Note: You didn't specify an "-out" parameter to save this plan, so
Terraform can't guarantee that exactly these actions will be performed
if "terraform apply" is subsequently run
- Apply the terraform plan
aviadmin@avitools:~/nostalgic-swartz# terraform apply

Plan: 57 to add, 0 to change, 0 to destroy.
Do you want to perform these actions?   Terraform will perform the
actions described above.   Only 'yes' will be accepted to approve.

Enter a value: yes

Apply complete! Resources: 22 added, 0 changed, 0 destroyed.
- SSH into the environment
aviadmin@avitools:~/nostalgic-swartz# ls keys/
generated-access-key-kid.pem  generated-access-key-kid.pub
aviadmin@avitools:~/nostalgic-swartz# ssh -i keys/generated-access-key-kid.pem [jumpbox public IP] -l ubuntu
- Accessing the GKE cluster Terraform creates the local file "kubeconfig-${var.id}", use this to access the cluster and get the worker node IPs in order to configure backend server pools later on:
kubectl --kubeconfig "kubeconfig-${var.id}" get nodes -o wide
Verify the services are running properly in the cluster:
kubectl --kubeconfig "kubeconfig-${var.id}" get services
- Export kubeconfig variable to simplify commands:
export KUBECONFIG=kubeconfig-${var.id}
Leverage AKO ingress controller, for more details visit https://avinetworks.com/docs/ako/1.3/avi-kubernetes-operator/ AKO version tested: 1.3
- Install AKI via Helm: latest tarball at https://helm.sh/docs/intro/install/
wget https://get.helm.sh/helm-v3.5.3-linux-amd64.tar.gz
tar -zxvf helm-v3.5.3-linux-amd64.tar.gz
mv linux-amd64/helm /usr/local/bin/helm
helm repo add ako https://avinetworks.github.io/avi-helm-charts/charts/stable/ako
- Create network space for AKO
kubectl create ns avi-system
- Edit the config file ako/values.yaml Details of the values at https://github.com/avinetworks/avi-helm-charts/blob/master/charts/stable/ako/values.yaml The provided file has values matching the parameters created by this integration on the NSX-ALB controller, make sure to check the terraform outputs for the private IP of the controller and replace it on the values.yaml file
controllerHost: "[Controller private IP]"
- Install AKO
helm install ako/ako --generate-name --version 1.3.1 -f values.yaml --set ControllerSettings.controllerHost=[controller IP/name] --set avicredentials.username=admin --set avicredentials.password=[password] --namespace=avi-system
- Verify AKO pod
kubectl get pds -n avi-system
- Review AKO logs
kubectl logs -f -n avi-system ako-0
- Ingress objects created on GKE will be discovered by AKO and mapped to NSX-ALB objects.
