YOLO-Pose:https://github.com/TexasInstruments/edgeai-yolov5
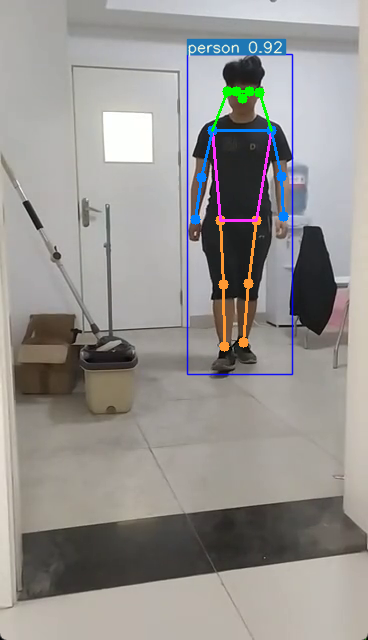
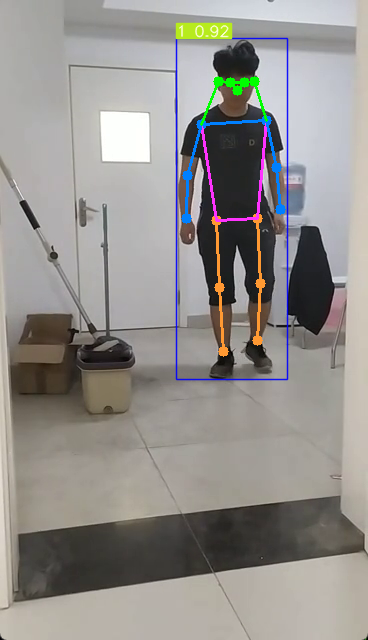
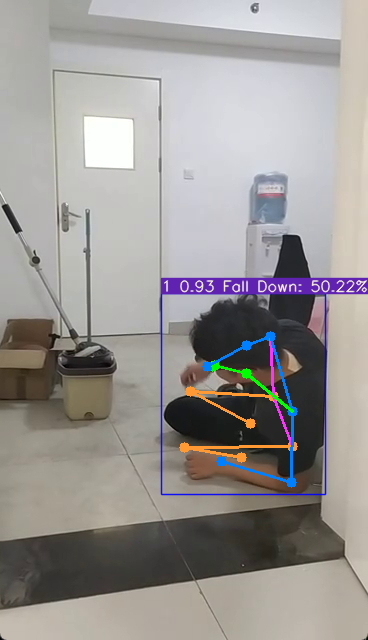
YOLO-POSE was used for key point detection, Bytetrack for tracking, and STGCN for fall and other behavior recognition.
Key point detection, run the command below:
python detect.py --weights "yolov5m_pose_960_lite.pt" --kpt-label --view-img
Key point detection+Bytetrack, run the command below:
python detect_track.py --weights "yolov5m_pose_960_lite.pt" --kpt-label --view-img
Key point detection+Bytetrack+STGCN, run the command below:
python detect_track_stgcn.py --weights "yolov5m_pose_960_lite.pt" --kpt-label --view-img
YOLOv7-Pose: [https://github.com/Bigtuo/YOLOv7-Pose-Bytetrack-STGCN]
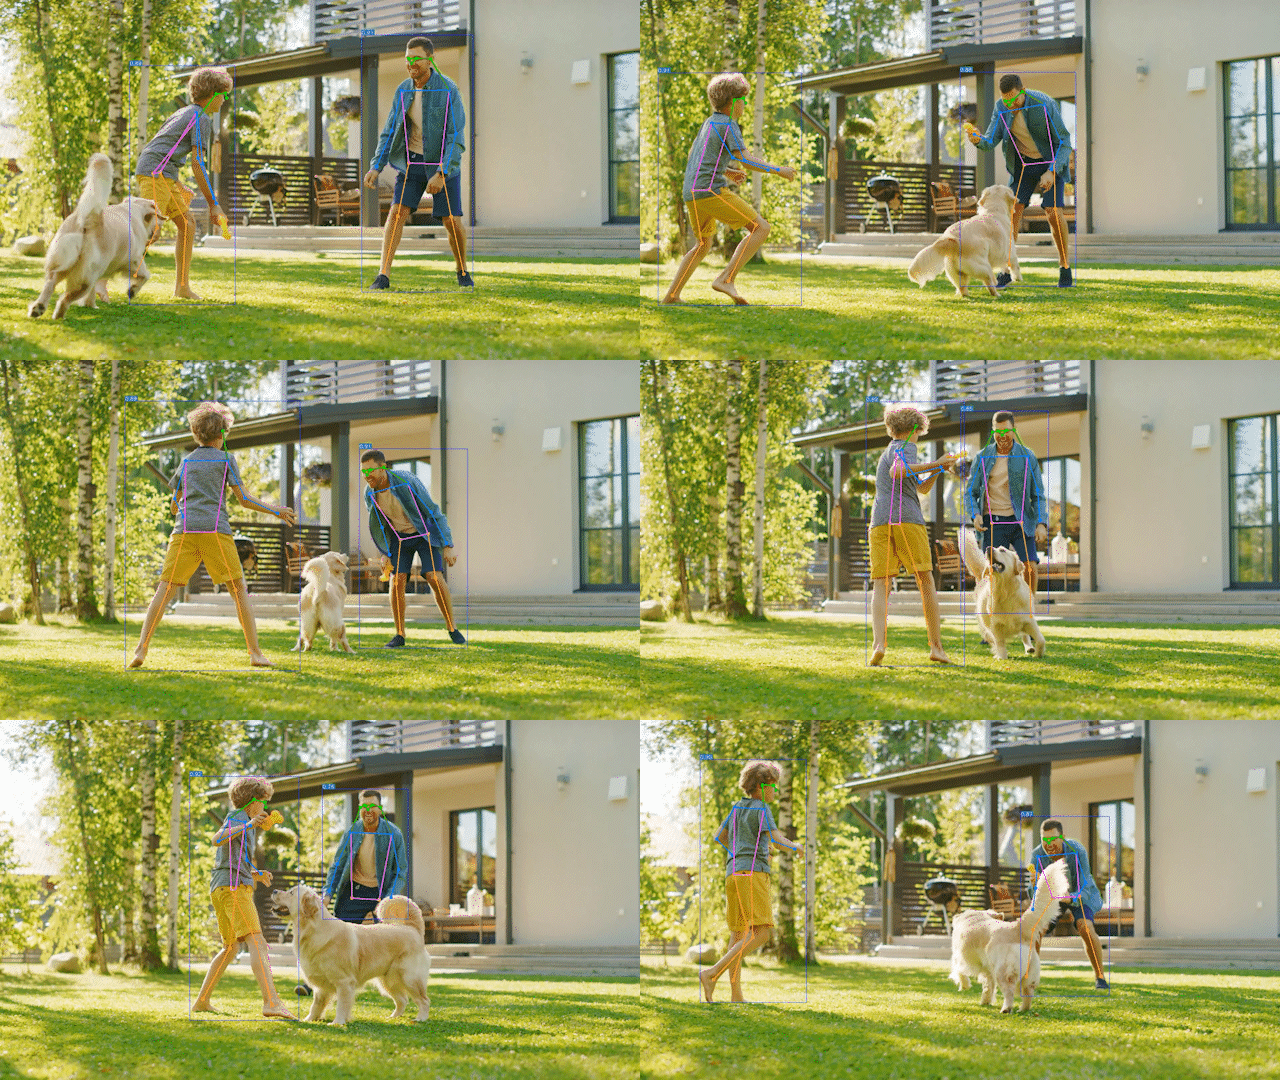
This repository is the official implementation of the paper "YOLO-Pose: Enhancing YOLO for Multi Person Pose Estimation Using Object Keypoint Similarity Loss" , accepted at Deep Learning for Efficient Computer Vision (ECV) workshop at CVPR 2022. This repository contains YOLOv5 based models for human pose estimation.
This repository is based on the YOLOv5 training and assumes that all dependency for training YOLOv5 is already installed. Given below is a samle inference.
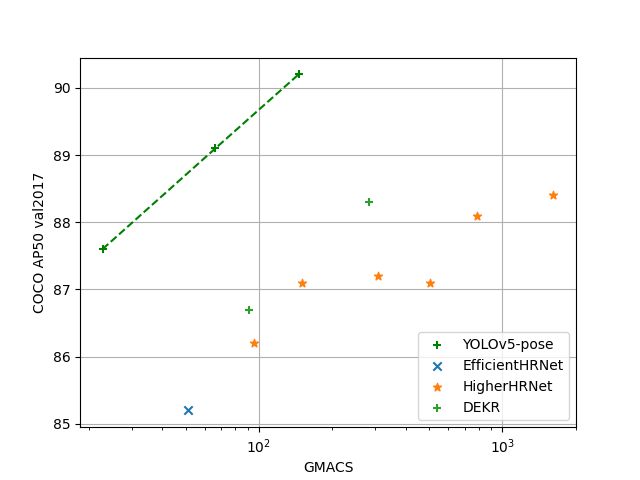
YOLO-Pose outperforms all other bottom-up approaches in terms of AP50 on COCO validation set as shown in the figure below:
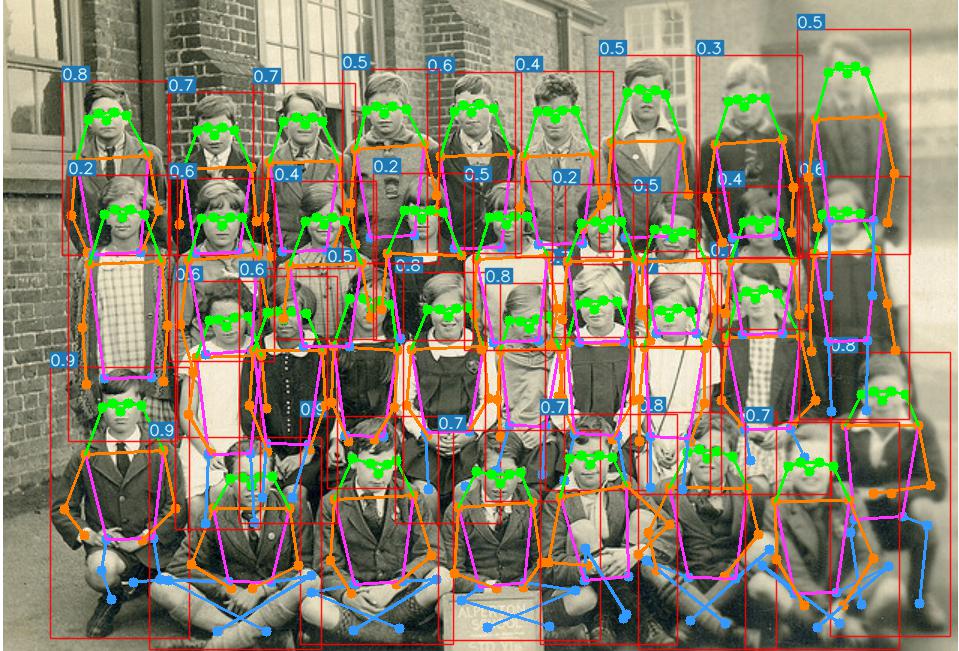
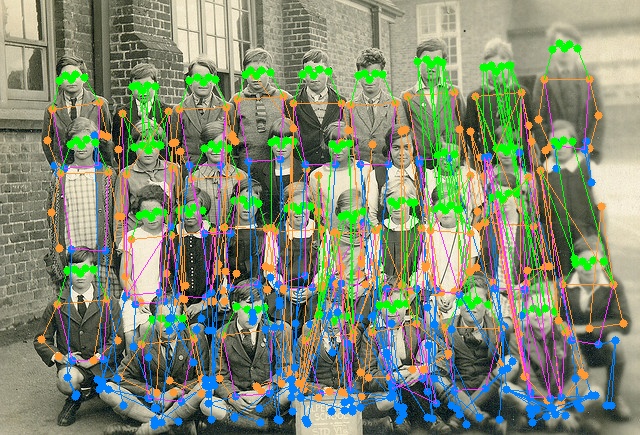
- Given below is a sample comparision with existing Associative Embedding based approach with HigherHRNet on a crowded sample image from COCO val2017 dataset.
| Output from YOLOv5m6-pose | Output from HigherHRNetW32 |
|---|---|
 |
 |
The dataset needs to be prepared in YOLO format so that the dataloader can be enhanced to read the keypoints along with the bounding box informations. This repository was used with required changes to generate the dataset in the required format. Please download the processed labels from here . It is advised to create a new directory coco_kpts and create softlink of the directory images and annotations from coco to this directory. Keep the downloaded labels and the files train2017.txt and val2017.txt inside this folder coco_kpts.
Expected directoys structure:
edgeai-yolov5
│   README.md
│   ...
│
coco_kpts
│   images
│   annotations
|   labels
│   └─────train2017
│       │       └───
|       |       └───
|       |       '
|       |       .
│       └─val2017
|               └───
|               └───
|               .
|               .
|    train2017.txt
|    val2017.txt
| Dataset | Model Name | Input Size | GMACS | AP[0.5:0.95]% | AP50% | Notes |
|---|---|---|---|---|---|---|
| COCO | Yolov5s6_pose_640 | 640x640 | 10.2 | 57.5 | 84.3 | opt.yaml, hyp.yaml, pretrained_weights |
| COCO | Yolov5s6_pose_960 | 960x960 | 22.8 | 63.7 | 87.6 | opt.yaml, hyp.yaml, pretrained_weights |
| COCO | Yolov5m6_pose_960 | 960x960 | 66.3 | 67.4 | 89.1 | opt.yaml, hyp.yaml, pretrained_weights |
| COCO | Yolov5l6_pose_960 | 960x960 | 145.6 | 69.4 | 90.2 | opt.yaml, hyp.yaml, pretrained_weights |
Pretrained models for all the above models are a person detector model with a similar config. Here is a list of all these models that were used as a pretrained model. Person instances in COCO dataset having keypoint annotation are used for training and evaluation.
| Dataset | Model Name | Input Size | GMACS | AP[0.5:0.95]% | AP50% | Notes |
|---|---|---|---|---|---|---|
| COCO | Yolov5s6_person_640 | 960x960 | 19.2 | 71.6 | 93.1 | opt.yaml , hyp.yaml |
| COCO | Yolov5m6_person_960 | 960x960 | 58.5 | 74.1 | 93.6 | opt.yaml , hyp.yaml |
| COCO | Yolov5l6_person_960 | 960x960 | 131.8 | 74.7 | 94.0 | opt.yaml , hyp.yaml |
One can alternatively use coco pretrained weights as well. However, the final accuracy may differ.
Train a suitable model by running the following command using a suitable pretrained ckpt from the previous section.
python train.py --data coco_kpts.yaml --cfg yolov5s6_kpts.yaml --weights 'path to the pre-trained ckpts' --batch-size 64 --img 960 --kpt-label
                                      --cfg yolov5m6_kpts.yaml
                                      --cfg yolov5l6_kpts.yaml
TO train a model at different at input resolution of 640, run the command below:
python train.py --data coco_kpts.yaml --cfg yolov5s6_kpts.yaml --weights 'path to the pre-trained ckpts' --batch-size 64 --img 640 --kpt-label
This is a lite version of the the model as described here. These models will run efficiently on TI processors.
| Dataset | Model Name | Input Size | GMACS | AP[0.5:0.95]% | AP50% | Notes |
|---|---|---|---|---|---|---|
| COCO | Yolov5s6_pose_640_ti_lite | 640x640 | 8.6 | 54.9 | 82.2 | opt.yaml, hyp.yaml, pretrained_weights |
| COCO | Yolov5s6_pose_960_ti_lite | 960x960 | 19.3 | 59.7 | 85.6 | opt.yaml, hyp.yaml, pretrained_weights |
| COCO | Yolov5s6_pose_1280_ti_lite | 1280x1280 | 34.4 | 60.9 | 85.9 | opt.yaml, hyp.yaml, pretrained_weights |
| COCO | Yolov5m6_pose_640_ti_lite | 640x640 | 26.1 | 60.5 | 86.8 | opt.yaml, hyp.yaml, pretrained_weights |
| COCO | Yolov5m6_pose_960_ti_lite | 960x960 | 58.7 | 65.9 | 88.6 | opt.yaml, hyp.yaml, pretrained_weights |
Train a suitable model by running the following command:
python train.py --data coco_kpts.yaml --cfg yolov5s6_kpts_ti_lite.yaml --weights 'path to the pre-trained ckpts' --batch-size 64 --img 960 --kpt-label --hyp hyp.scratch_lite.yaml
                                      --cfg yolov5m6_kpts_ti_lite.yaml
                                      --cfg yolov5l6_kpts_ti_lite.yaml
TO train a model at different at input resolution of 640, run the command below:
python train.py --data coco_kpts.yaml --cfg yolov5s6_kpts_ti_lite.yaml --weights 'path to the pre-trained ckpts' --batch-size 64 --img 640 --kpt-label --hyp hyp.scratch_lite.yaml
The same pretrained model can be used here as well.
We have performed some experiments to evaluate the impact of changing the activation from SiLU to ReLU on accuracy for a given model. Here are some results:
| Dataset | Model Name | Input Size | GMACS | AP[0.5:0.95]% | AP50% | Notes |
|---|---|---|---|---|---|---|
| COCO | Yolov5m6_pose_960_ti_lite | 960x960 | 58.7 | 65.9 | 88.6 | activation=ReLU |
| COCO | Yolov5m6_pose_960_ti_lite | 960x960 | 58.7 | 67.0 | 89.0 | activation=SiLU |
We performed a set of experiments where we start with the keypoint decoder having a single convolution to increasing the depth by once depth-wise convolution at a time. The table below shows the improvement of accuracy with the addition of each convolution in the keypoint decoder.
| Dataset | Model Name | Input Size | GMACS | AP[0.5:0.95]% | AP50% | Notes |
|---|---|---|---|---|---|---|
| COCO | Yolov5s6_pose_960 | 960x960 | 19.4 | 60.3 | 85.5 | opt.yaml, hyp.yaml |
| COCO | Yolov5s6_pose_960 | 960x960 | 20.1 | 60.9 | 86.0 | opt.yaml, hyp.yaml |
| COCO | Yolov5s6_pose_960 | 960x960 | 20.8 | 61.2 | 85.6 | opt.yaml, hyp.yaml |
| COCO | Yolov5s6_pose_960 | 960x960 | 20.8 | 61.4 | 85.9 | opt.yaml, hyp.yaml |
| COCO | Yolov5s6_pose_960 | 960x960 | 21.5 | 61.8 | 86.4 | opt.yaml, hyp.yaml |
| COCO | Yolov5s6_pose_960 | 960x960 | 22.2 | 62.3 | 86.3 | opt.yaml, hyp.yaml |
| COCO | Yolov5s6_pose_960 | 960x960 | 22.8 | 62.3 | 86.6 | opt.yaml, hyp.yaml |
The final model with six depth-wise layers is used as the final configuration of the YOLO-Pose models. This is not used for the YOLO-Pose-ti-lite models though.
-
Run the following command to replicate the accuracy number on the pretrained checkpoints:
python test.py --data coco_kpts.yaml --img 960 --conf 0.001 --iou 0.65 --weights "path to the pre-trained ckpt" --kpt-label -
To test a model at different at input resolution of 640, run the command below:
python test.py --data coco_kpts.yaml --img 960 --conf 0.001 --iou 0.65 --weights "path to the pre-trained ckpt" --kpt-label
- Run the following command to export the entire models including the detection part,
python export.py --weights "path to the pre-trained ckpt" --img 640 --batch 1 --simplify --export-nms # export at 640x640 with batch size 1 - Apart from exporting the complete ONNX model, above script will generate a prototxt file that contains information of the detection layer. This prototxt file is required to deploy the moodel on TI SoC.
- If you haven't exported a model with the above command, download a sample model from this link.
- Run the script as below to run inference with an ONNX model. The script runs inference and visualize the results. There is no extra post-processing required. The ONNX model is self-sufficient unlike existing bottom-up approaches. The script is compleletey independent and contains all perprocessing and visualization.
cd onnx_inference
python yolo_pose_onnx_inference.py --model-path "path_to_onnx_model"  --img-path "sample_ips.txt" --dst-path "sample_ops_onnxrt"  # Run inference on a set of sample images as specified by sample_ips.txt
[1] Official YOLOV5 repository
[2] yolov5-improvements-and-evaluation, Roboflow
[3] Focus layer in YOLOV5
[4] CrossStagePartial Network
[5] Chien-Yao Wang, Hong-Yuan Mark Liao, Yueh-Hua Wu, Ping-Yang Chen, Jun-Wei Hsieh, and I-Hau Yeh. CSPNet: A new backbone that can enhance learning capability of
cnn. Proceedings of the IEEE Conference on Computer Vision and Pattern Recognition Workshop (CVPR Workshop),2020.
[6]Shu Liu, Lu Qi, Haifang Qin, Jianping Shi, and Jiaya Jia. Path aggregation network for instance segmentation. In Proceedings of the IEEE Conference on Computer Vision and Pattern Recognition (CVPR), pages 8759–8768, 2018
[7] Efficientnet-lite quantization
[8] YOLOv5 Training video from Texas Instruments
[9] YOLO-Pose Training video from Texas Instruments:Upcoming
ae56a11 (YOLO-POSE was used for key point detection, Bytetrack for tracking, and Stgan for fall and other behavior recognition)
