Cloud Functions for Firebase を使って、Excelファイル内のデータをCloud Firestoreへ投入したり、FirestoreのデータをExcelファイルとしてダウンロードしたりする、サンプル集です。
以下のことができるようになります。
- Excelデータを読み込んで、Firestoreへ保存
- Firestoreデータを読み出して、Excelへ流し込んでダウンロード
- Excelファイルを、Storageへアップロード(上記で用いるExcelテンプレートをアップロード)
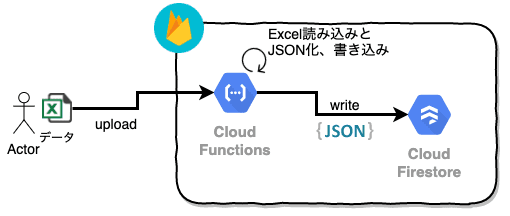
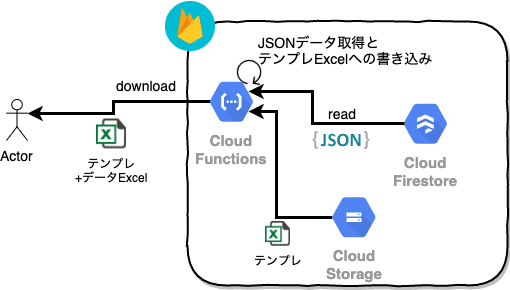
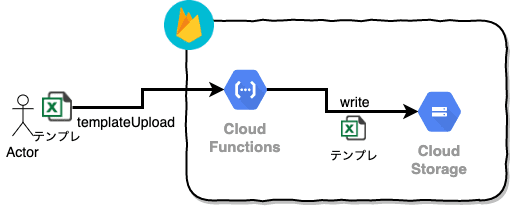
それぞれ、図的には下記のようになります。
ローカルのExcelファイルを、Cloud Functionsへアップロード。FunctionsはExcelファイルを読み込んでJSONデータを生成し、Firestoreにデータを書き込みます。
Cloud Functionsを呼び出すとFunctionsがFirestoreからデータを取得。またCloud Storageに置いたテンプレートExcelファイルを取り出してそこにデータを書き込み、Excelファイルをダウンロードします。
ついでに、テンプレートのExcelをCloud Functions経由で、Cloud Storageへアップロードします。
Node.js はインストールされてる前提で、firebase-toolsのインストールから。
$ node --version
v10.18.1

$ npm i -g firebase-tools

+ firebase-tools@7.12.1
added 516 packages from 325 contributors in 20.769s

$ firebase --version
7.12.1
続いてFirebaseへのログイン。下記のコマンドを実行するとブラウザが起動するので、そちらでFirebaseにログインしておきます。
$ firebase login

✔  Success! Logged in as xxxx@example.com
今回のサンプルのコードをGitHubからダウンロードして、使用するFirebaseのプロジェクトを設定しておきます。
$ git clone https://github.com/masatomix/excel2firestore.git --branch develop
$ cd excel2firestore/

$ firebase use --add
? Which project do you want to add? slackapp-sample
? What alias do you want to use for this project? (e.g. staging) default

Created alias default for slackapp-sample.
Now using alias default (slackapp-sample)
$
その他Firebase上で
- Cloud Functions for Firebase が利用可能な状態
- Cloud Storage が利用可能な状態
- Cloud Firestore が利用可能な状態
にしておきましょう1。
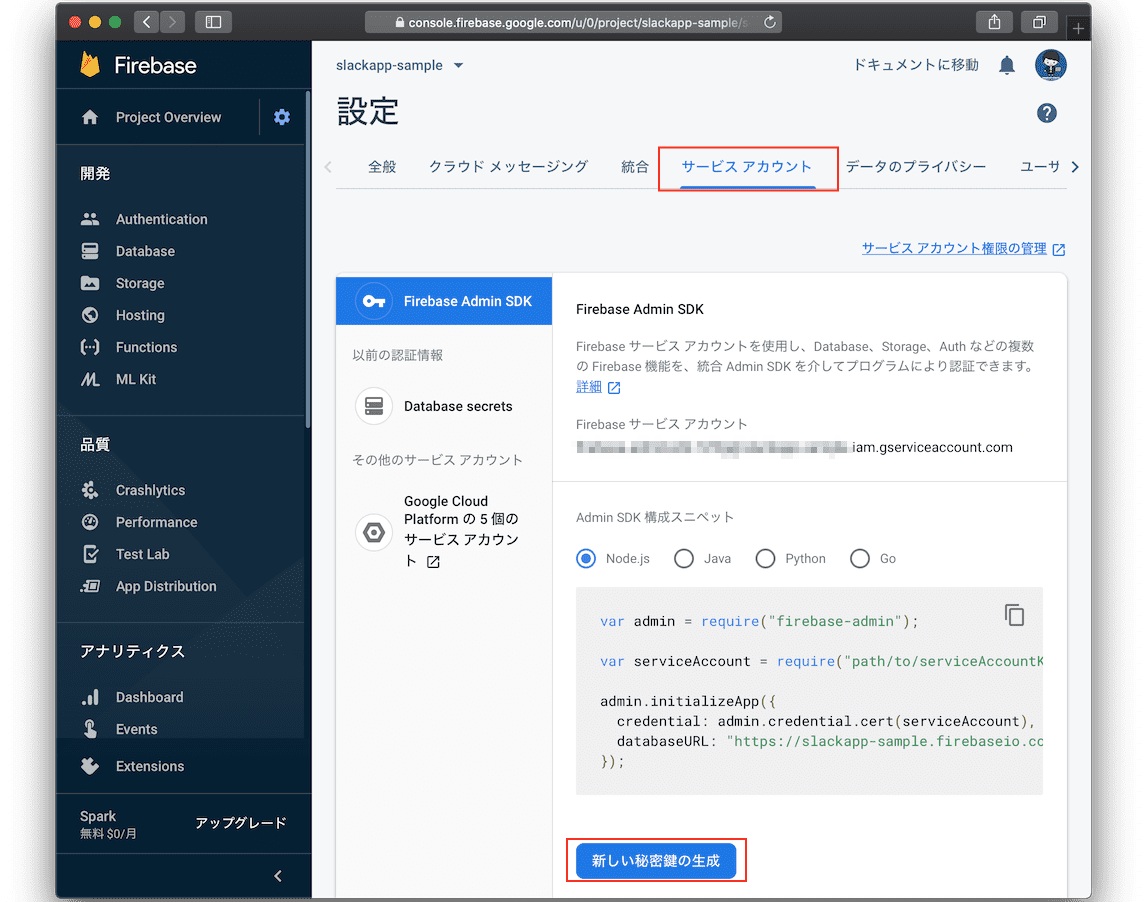
FunctionsからFirestoreへ読み書きを行うために「サービスアカウントJSONファイル」が必要です。 Firebaseのプロジェクトの左メニューの歯車アイコンから「プロジェクトの設定」を選択 >> サービスアカウント 画面でJSONファイルを生成・取得しておいてください。
その後、ソースコード上の ./functions/src/firebase-adminsdk.jsonという名前で配置しておいてください。
StorageのURLを指定します。Firebaseのプロジェクトの左メニュー >> Storage を選択。
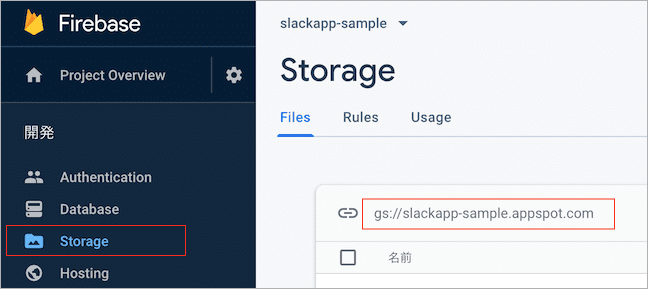
gs://slackapp-sample.appspot.com がStorageのURLなのでそれを設定します。
$ cd functions/
$ cat ./src/firebaseConfig.ts
export default {
  apiKey: '',
  authDomain: '',
  databaseURL: 'https://slackapp-sample.firebaseio.com', ←今回使いません
  projectId: 'slackapp-sample',          ←今回使いません
  storageBucket: 'slackapp-sample.appspot.com',    ← 正しいStorage名に。
  messagingSenderId: '',
  appId: ''
}
以上で準備は完了です。
$ npm i
...
found 0 vulnerabilities

$ npm run serve

> functions@0.0.6-SNAPSHOT serve /Users/xxx/excel2firestore/functions
> npm run build && firebase serve --only functions

> functions@0.0.6-SNAPSHOT build /Users/xxx/excel2firestore/functions
> tsc

⚠  Your requested "node" version "8" doesn't match your global version "10"
✔  functions: Emulator started at http://localhost:5000
i  functions: Watching "/Users/xxx/excel2firestore/functions" for Cloud Functions...
✔  functions[api]: http function initialized (http://localhost:5000/slackapp-sample/us-central1/api).
起動したので、別のターミナルから。。
$ pwd
/Users/xxx/excel2firestore/functions
$- Excelデータを、Firestoreへ
$ curl http://localhost:5000/slackapp-sample/us-central1/api/samples/upload -F file=@samples.xlsx -X POST
- Firestoreデータを、整形されたExcelへ
$ curl http://localhost:5000/slackapp-sample/us-central1/api/samples/download -o result.xlsx
- Excelファイルを、Storageへ
$ curl http://localhost:5000/slackapp-sample/us-central1/api/samples/templateUpload -F file=@samples.xlsx -X POST
その他、Functionsとともに配置済みのExcelファイルからデータを取り出し、データを読み書きするサンプルです。(説明は割愛します。)
curl http://localhost:5000/slackapp-sample/us-central1/api/samples/sample1 -X POST
curl http://localhost:5000/slackapp-sample/us-central1/api/samples/sample1

curl http://localhost:5000/slackapp-sample/us-central1/api/samples/sample2 -X POST
curl http://localhost:5000/slackapp-sample/us-central1/api/samples/sample2

curl http://localhost:5000/slackapp-sample/us-central1/api/samples/sample3 -X POST
curl http://localhost:5000/slackapp-sample/us-central1/api/samples/sample3

curl http://localhost:5000/slackapp-sample/us-central1/api/samples/sample4 -X POST
curl http://localhost:5000/slackapp-sample/us-central1/api/samples/sample4基本的なFunctionsのコード(Expressを使った部分とか)は省略します。興味があればCloneしたコードをご確認ください:-)
HTTPでFormからアップロードされてくるデータを取り扱うための「busboy」を用いてファイルのデータを取得し、一旦ファイルとして書き出します。次のそのファイルから「xlsx-populate-wrapper」を使ってExcelファイルを読み込み、Firestore へデータを書き込んでいます。内容的には Google Cloud内のドキュメント#マルチパートデータ の内容ほぼそのままですね。
また xlsx-populate-wrapper は「xlsx-populate」のWrapperですが、ファイルの読み書きで変更したい箇所があったので、forkしてすこしだけ改変させてもらいました。
オリジナル: https://github.com/juniorCitizen/xlsx-populate-wrapper
import { Request, Response } from 'express'
import * as admin from 'firebase-admin'

import { excel2Sample4 } from './sample4'

import * as path from 'path'
import * as os from 'os'
import * as Busboy from 'busboy'
import * as fs from 'fs'

const SAMPLE4: string = 'sample4'

export const upload = async (request: Request, response: Response) => {
  // https://cloud.google.com/functions/docs/writing/http?hl=ja
  // https://qiita.com/rubytomato@github/items/11c7f3fcaf60f5ce3365
  console.log('start.')

  // Node.js doesn't have a built-in multipart/form-data parsing library.
  // Instead, we can use the 'busboy' library from NPM to parse these requests.
  const busboy = new Busboy({ headers: request.headers })
  const tmpdir = os.tmpdir()

  // This object will accumulate all the uploaded files, keyed by their name.
  const uploads: { [key: string]: string } = {}
  const fileWrites: Array<Promise<any>> = []

  busboy.on('file', (fieldname, file, filename, encoding, mimetype) => {
    // file: NodeJS.ReadableStream
    console.log('busboy.on.file start.')
    console.log(`File [${fieldname}]: filename: ${filename}, encoding: ${encoding} , mimetype: ${mimetype}`)

    // Note: os.tmpdir() points to an in-memory file system on GCF
    // Thus, any files in it must fit in the instance's memory.
    const filepath = path.join(tmpdir, filename)
    uploads[fieldname] = filepath

    const writeStream = fs.createWriteStream(filepath)
    file.pipe(writeStream)

    // File was processed by Busboy; wait for it to be written to disk.
    const promise = new Promise((resolve, reject) => {
      file.on('end', () => {
        writeStream.end()
        excel2Sample4(filepath)
          .then((datas: any[]) => {
            for (const instance of datas) {
              admin
                .firestore()
                .doc(`${SAMPLE4}/${instance.operationId}`)
                .set(instance)
            }
            resolve(datas)
          })
          .catch(err => reject(err))
      })
      // writeStream.on('finish', resolve)
      // writeStream.on('error', reject)
    })
    fileWrites.push(promise)
  })

  // Triggered once all uploaded files are processed by Busboy.
  // We still need to wait for the disk writes (saves) to complete.
  busboy.on('finish', async () => {
    console.log('busboy.on.finish start.')
    const results: any[] = await Promise.all(fileWrites)

    for (const file of Object.values(uploads)) {
      fs.unlinkSync(file)
    }
    const length = results
      .map(result => result.length)
      .reduce((acc, value) => acc + value)
    // response.status(200).send(`${Object.keys(uploads).length} file executed.`)
    response.status(200).send(`${length} 件処理しました。`)
  })

  const reqex: any = request
  busboy.end(reqex.rawBody)
}
下記では、Excelから取得した行データを、Firestoreに書き込む前にJSONデータにしています。JSON生成をゴニョゴニョやってますが、開発してるWEBアプリ向けのデータ構造に変換しているだけで、記事観点での本質的な意味はありません。
Excel上日付のデータについては、Excelのシリアル値(number)が取得されるので、Date型への変換などを行っています。
import * as admin from 'firebase-admin'

import { xlsx2json, dateFromSn, toBoolean } from './commonUtils'

const SAMPLE1: string = 'sample1'
const SAMPLE4: string = 'sample4'

export const excel2Sample4 = (path: string): Promise<Array<any>> => {
  const format_func = (instance: any): any => {
    const now = admin.firestore.Timestamp.now()
    const data: any = {
      operationId: instance.operationId,
      driver: {
        ref: admin.firestore().doc(`${SAMPLE1}/${instance.driverId}`)
      },
      opeType: String(instance.opeType),
      opeDateFrom: dateFromSn(instance.opeDateFrom),
      opeDateTo: dateFromSn(instance.opeDateTo),
      opeStatus: String(instance.opeStatus),
      destinationDate: dateFromSn(instance.destinationDate),
      isUnplanned: toBoolean(instance.isUnplanned),
      createdAt: now,
      updatedAt: now,
    }
    return data
  }
  return xlsx2json(path, SAMPLE4, format_func)
}
下記は、実際にExcelファイルから行データを生成する処理です。
import xPopWrapper = require('xlsx-populate-wrapper')

/**
 * Excelファイルを読み込み、各行をデータとして配列で返すメソッド。
 * @param path Excelファイルパス
 * @param sheet シート名
 * @param format_func フォーマット関数。instanceは各行データが入ってくるので、任意に整形して返せばよい
 */
export const xlsx2json = async function (path: string, sheet: string, format_func?: (instance: any) => any): Promise<Array<any>> {
  const workbook = new xPopWrapper(path)
  await workbook.init()

  const instances: Array<any> = workbook.getData(sheet)
  if (format_func) {
    return instances.map(instance => format_func(instance))
  }
  return instances
}

/**
 * Excelのシリアル値を、Dateへ変換します。
 * @param serialNumber シリアル値
 */
export const dateFromSn = (serialNumber: number): Date => {
  return XlsxPopulate.numberToDate(serialNumber)
}

export const toBoolean = function (boolStr: string | boolean): boolean {
  if (typeof boolStr === 'boolean') {
    return boolStr
  }
  return boolStr.toLowerCase() === 'true'
}
Cloud StorageからテンプレートとなるExcelファイルを取得します。またFirestoreからはExcelに書き込むデータを取得し、再び「xlsx-populate-wrapper」を使ってExcelファイルへデータを書き込んで、ユーザへのResponseへExcelデータとして返却します。データをExcelへ書き込みつつ、ある程度の書式設定・罫線の描画も行っています。
import { Request, Response } from 'express'
import * as admin from 'firebase-admin'

import { getSample4Promise } from './sample4'

import * as path from 'path'
import * as os from 'os'

const SAMPLE4: string = 'sample4'
import xPopWrapper = require('xlsx-populate-wrapper')


export const download = async (request: Request, response: Response) => {

  const bucket = admin.storage().bucket()
  const fileName = 'output.xlsx'
  const fullPath = path.join(os.tmpdir(), fileName)
  try {
    await bucket.file(fileName).download({
      destination: fullPath,
    })
    // ファイル読み込み
    console.log(fullPath)
    const workbook = new xPopWrapper(fullPath)
    await workbook.init()

    const rowCount = await addRow(workbook)
    applyStyles(workbook, rowCount)

    const newFileName = 'download.xlsx'
    const newFilePath = path.join(os.tmpdir(), newFileName)

    // 書き込んだファイルを保存
    await workbook.commit(newFilePath)
    console.log(newFilePath)

    response.download(newFilePath, newFileName)
  } catch (error) {
    console.log(error)
    response.status(500).send(error)
  }
}

const addRow = async (workbook: any): Promise<number> => {
  const datas = await getSample4Promise()

  const convertedDatas = datas.map(data =>
    Object.assign(data, {
      isUnplanned: String(data.isUnplanned) // Booleanだけは、Excelでfalseが表示出来ず。文字列化することにした。
    })
  )

  workbook.update(SAMPLE4, convertedDatas) // 更新
  return datas.length
}
// https://www.npmjs.com/package/xlsx-populate#style-reference
// https://support.office.com/en-us/article/Number-format-codes-5026bbd6-04bc-48cd-bf33-80f18b4eae68?ui=en-US&rs=en-US&ad=US
// https://www.tipsfound.com/vba/07015
const applyStyles = (workbook: any, rowCount: number) => {
  const sheet = workbook.getWorkbook().sheet(SAMPLE4)
  sheet.range(`D2:D${rowCount + 1}`).style('numberFormat', '@') // 書式: 文字(コレをやらないと、見かけ上文字だが、F2で抜けると数字になっちゃう)
  sheet.range(`G2:G${rowCount + 1}`).style('numberFormat', '@') // 書式: 文字(コレをやらないと、見かけ上文字だが、F2で抜けると数字になっちゃう)
  sheet.range(`E2:F${rowCount + 1}`).style('numberFormat', 'yyyy/mm/dd') // 書式: 日付
  sheet.range(`H2:H${rowCount + 1}`).style('numberFormat', 'yyyy/mm/dd hh:mm') // 書式: 日付+時刻

  // データのある行に、罫線を引く
  sheet.range(`A2:I${rowCount + 1}`).style('border', {
    top: { style: 'thin' },
    left: { style: 'thin' },
    bottom: { style: 'thin' },
    right: { style: 'thin' }
  })
}
import * as admin from 'firebase-admin'

const SAMPLE4: string = 'sample4'


type QuerySnapshot = admin.firestore.QuerySnapshot
type DocumentSnapshot = admin.firestore.DocumentSnapshot

export const getSample4Promise = async (): Promise<Array<any>> => {
  const returnArray: any = []

  const snapshot: QuerySnapshot = await admin.firestore().collection(SAMPLE4).get()
  snapshot.forEach((docref: DocumentSnapshot) => {
    const orgData = docref.data()! // nullはない、と仮定
    // プロパティを再定義。
    const data = Object.assign(orgData, {
      opeDateFrom: orgData.opeDateFrom.toDate(),
      opeDateTo: orgData.opeDateTo.toDate(),
      destinationDate: orgData.destinationDate.toDate(),
      createdAt: orgData.createdAt.toDate(),
      updatedAt: orgData.updatedAt.toDate(),

      driverId: orgData.driver.ref.id,
      driver: orgData.driver.ref,
    })
  })
  return returnArray
}
登り電文のExcelファイルを受けとるのは、先ほどもでてきた「busboy」で。先ほどはファイルとして一時的に書き出しましたが、今回は受けとったデータをそのまま、Cloud Storage へ保存しています。
import { Request, Response } from 'express'
import * as admin from 'firebase-admin'

import * as Busboy from 'busboy'

export const templateUpload = async (request: Request, response: Response) => {
  // https://qiita.com/rubytomato@github/items/11c7f3fcaf60f5ce3365
  console.log('start.')
  const busboy = new Busboy({ headers: request.headers })
  const bucket = admin.storage().bucket()

  // This object will accumulate all the uploaded files, keyed by their name.
  const uploads: { [key: string]: string } = {}

  busboy.on('file', (fieldname, file, filename, encoding, mimetype) => {
    console.log('busboy.on.file start.')
    console.log(`File [${fieldname}]: filename: ${filename}, encoding: ${encoding} , mimetype: ${mimetype}`)

    uploads[fieldname] = filename

    file.on('data', async (data) => {
      console.log(`File [${fieldname}] got ${data.length} bytes`)
      try {
        await bucket.file(filename).save(data, {
          contentType:
            'application/vnd.openxmlformats-officedocument.spreadsheetml.sheet'
        })
      } catch (error) {
        console.log(error)
        response.status(500).send(error)
      }
    })

    file.on('end', () => {
      console.log('file.on.end start.')
      console.log(`File [${fieldname}]: filename: ${filename} Finished.`)
    })
  })

  // Triggered once all uploaded files are processed by Busboy.
  // We still need to wait for the disk writes (saves) to complete.
  busboy.on('finish', () => {
    console.log('busboy.on.finish start.')
    response
      .status(200)
      .send(`${Object.keys(uploads).length} file(s) uploaded.`)
  })

  const reqex: any = request
  busboy.end(reqex.rawBody)
}
細かい説明は省略してしまいましたが、だいたいこんな感じです。。
お疲れさまでしたー。
- busboy HTTPでアップロードされたファイルを処理するライブラリ
- xlsx-populate Excelのパーサ
- xlsx-populate-wrapper そのWrapper
- Google Cloud内のドキュメント#マルチパートデータ busboyのサンプル
- FirebaseのHostingとCloud Functionsを利用してStorageへファイルをアップロードするデモアプリケーション busboyとStorageの連係処理の参考にさせてもらいました!感謝です。また、Firebaseの環境設定から丁寧に書いてあります。
- CloudFunctionsからCloudStorageへ画像をアップロードする 上記は一度ファイルに書き出してましたが、こちらは直接Storageへ。感謝です
- 0.0.6 リファクタリング。複数ファイルをアップロードされたときの考慮を追加。
- 0.0.5 firebase-tools群のバージョンアップと、サービスアカウントの追加、Storageへアップするサンプルの追加。リファクタリングと、StorageのURLを外だしの設定ファイルへ。データのある行に罫線を追加。
- 0.0.4 Excelをアップロードするサンプルを追加。
- 0.0.3 Storageに置いてあるExcelファイルを取得し、Firestoreからとってきたデータを埋め込んで、ダウンロードするサンプルを追加。functions/output.xlsx をBucketにアップロードしておいてください。
- 0.0.2 Firestoreから取得したデータを整形するサンプルを追加。
- 0.0.1 初版。Firebase Cloud Functionsを使ったexcelデータをFirestoreへ投入するサンプル
Footnotes
-
Functionsからの処理なので、Security Rules の設定は影響がない、はず。もちろん本運用時は適切な設定で。 ↩