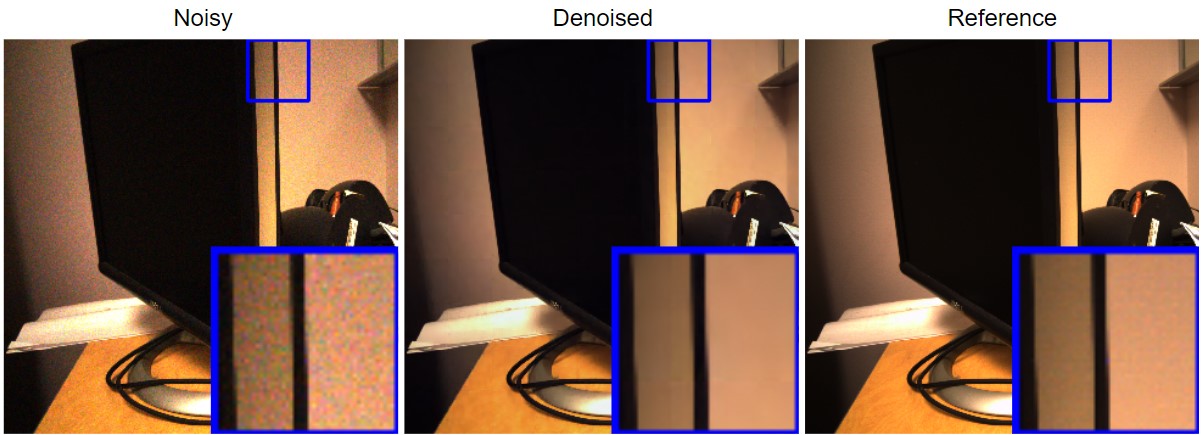
A pytorch implementation of Deep Graph Laplacian Regularization for image denoising. Original work: Zeng et al.
-
Clone this repository
git clone https://github.com/huyvd7/pytorch-deepglr -
Packages requirements: if you already had the same Pytorch version (pytorch==1.2.0, torchvision==0.4.0), remove 2 first lines in
requirements.txt.torch==1.2.0 torchvision==0.4.0 scipy==1.3.1 matplotlib==3.1.2 numpy==1.17.2 scikit_image==0.16.2 opencv-python
-
Install required packages listed in requirements.txt (with Python 3.7)
pip install -r requirements.txt
-
If you have issues when installing PyTorch. Please follow their official installation guide PyTorch. Please looking for this version
pytorch==1.2.0 and torchvision==0.4.0.
We provide implementations for both DeepGLR and GLR since DeepGLR is a stacking version of GLRs. GLR is a smaller network and can be test more quickly, but it has poorer performance than DeepGLR.
python validate_DGLR.py dataset/test/ -m model/deepglr.pretrained -w 324 -o ./
The above command resizes the input images located at dataset/test/ to square images with size 324 x 324, then performs evaluation for the given trained DeepGLR model/deepglr.pretrained and saves outputs to ./ (current directory).
python validate_GLR.py dataset/test/ -m model/glr.pretrained -w 324 -o ./
The above command resizes the input images located at dataset/test/ to square images with size 324 x 324, then performs evaluation for the given trained GLR model/glr.pretrained and saves outputs to ./ (current directory).
The provided sample dataset in this repository is a resized version of RENOIR dataset (720x720 instead of 3000x3000). The original dataset is located at Adrian Barbu's site.
Since this is a resized dataset, the evaluation results of DeepGLR are different from what were reported (MUCH HIGHER!!!). For the DeepGLR of this sample dataset, the evaluation scores are:
| Metric | Train | Test |
|---|---|---|
| SSIM | 0.900 | 0.887 |
| PSNR | 35.69 | 33.28 |
To reproduce the same results as written in the report, please replace the sample dataset in this repository with the original one. For your convinient, you can get the original from this Google Drive mirror. This mirror will be deleted at the end of Dec 2019.
python train_DGLR.py dataset/train/ -n MODEL_NAME -d ./ -w 324 -e 200 -b 100 -l 2e-4
The above command will train a new DeepGLR with these hyperparameters:
Dataset: dataset/train/
Output model name: MODEL_NAME (-n)
Output directory: ./ (-d)
Resize the given dataset to: 324x324 (-w)
Epoch: 200 (-e)
Batch size: 100 (-b)
Learning rate: 2e-4 (-l)
Note: training a DeepGLR from scratch would require a lot of hyperparameter tuning depends on the dataset and also randomization. It is easier to train 4 separate single GLR first, then stack them manually (this is a future work, feel free to make a pull request!).
If you want to continue training an existing DeepGLR instead of training from scratch, you can add -m PATH_TO_EXISTED_MODEL:
python train_DGLR.py dataset/train/ -m model/deepglr.pretrained -n MODEL_NAME -d ./ -w 324 -e 200 -b 100 -l 2e-4
python train_GLR.py dataset/train/ -n MODEL_NAME -d ./ -w 324 -e 200 -b 100 -l 2e-4
Same parameters as DeepGLR.
python denoise.py dataset/test/noisy/2_n.bmp -m model/deepglr.pretrained -w 324 -o OUTPUT_IMAGE.PNG
The above command will resize the dataset/test/noisy/2_n.bmp to 324x324, then denoise it using a trained DeepGLR model/deepglr.pretrained and save the result at OUTPUT_IMAGE.PNG.
Most of these works are done on Google Colaboratory. Thanks Google for the free GPUs.

