Merkle Trees are a fundamental concept in blockchain technology. They're a special kind of binary tree that is used to encode large chunks of information. The cool thing about Merkle Trees is that they kind of 'build up' from the bottom-up and allow you to verify if some value is present in the tree or not without having to loop over every element of the tree. This can be quite useful, as we will see. 🧐
A Merkle tree is a type of hash tree in which each leaf node is labeled with the cryptographic hash of a data block, and each non-leaf node is labeled with the cryptographic hash of its child nodes' labels. The majority of hash tree implementations are binary (each node has two child nodes), but they can also have many more child nodes.
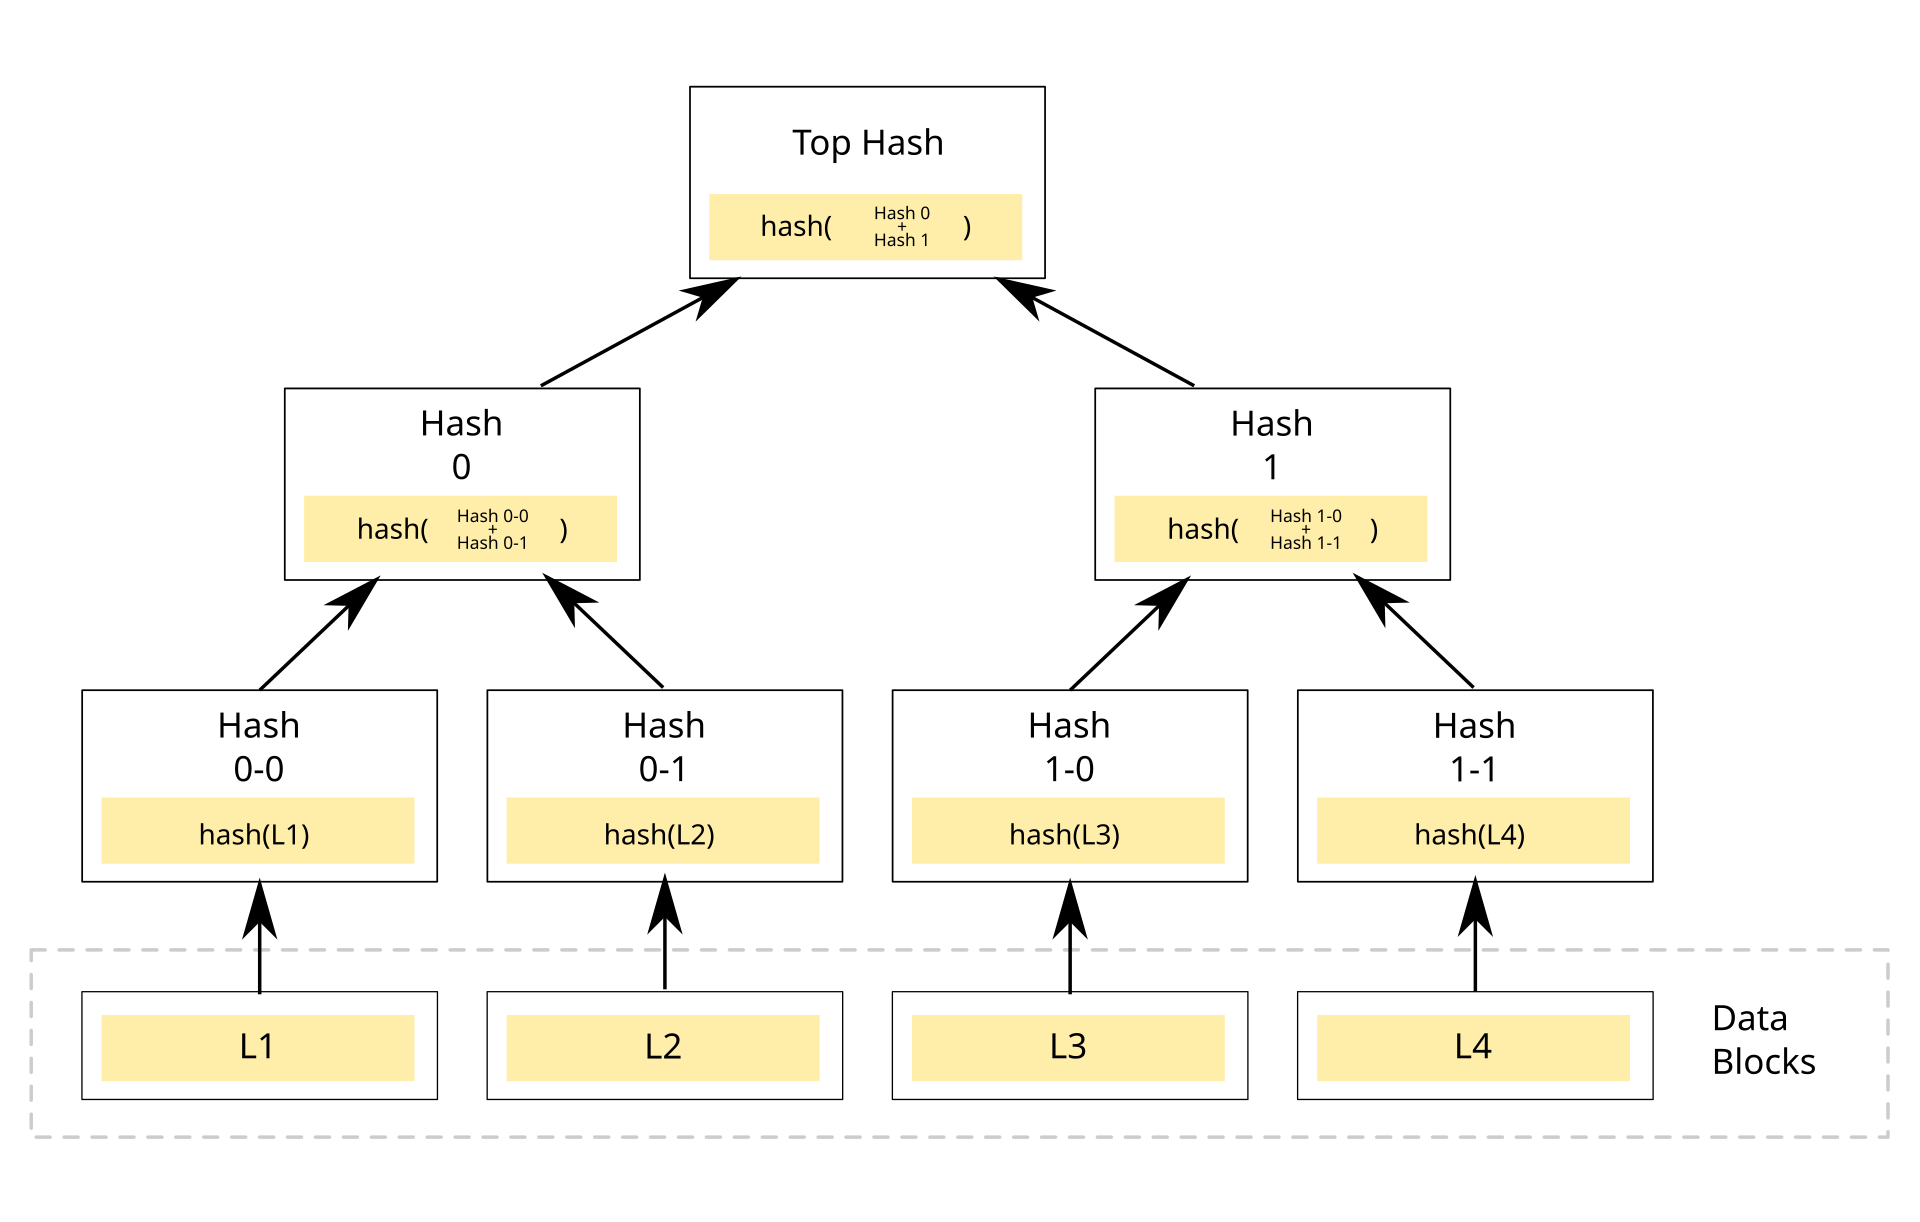
A typical Merkle Tree looks something like this:
(Reference from using-merkle-trees-for-nft-whitelists)
Let me explain what is going on. All the leaf nodes of the tree, i.e. nodes that don't have any further children, include hashes of data that you want to encode. Note that the values you want to encode in the tree are always just part of the leaf nodes. Since it is a binary tree, each non-leaf node has two children. As you move up from the leaf nodes, the parents will have the hash of the combined hashes of the leaf nodes, and so on.
As you keep doing this, eventually you will end up at the single top-level node, known as the Merkle Tree Root, this will come to play a very important role.
Let's say we have 4 transactions: "Transaction A", B, C, and D. All of them are executed in the same block. Each of these transactions is going to get hashed. Let's call those hashes "Hash A", B, C, and D respectively.
The following would be the resulting Merkle Tree of these transactions:

When these transactions get rolled up into a block, the block header would contain the Merkle Root, Hash ABCD. All miners have a copy of all transactions so far, and therefore all the transaction hashes. Any miner can rebuild the Merkle tree on-demand, which means that every miner can independently arrive at the same Merkle root for the same set of transactions.
This allows any miner to verify a fraudulent transaction. Let's say someone tries to introduce a false transaction instead of Transaction D. Let's call this Transaction E. Because this transaction is different from Transaction D, the hash is going to be different as well. The hash of Transaction E is Hash E. The Hash of C and E together is Hash CE, which is different from Hash CD. When Hash AB and CE are hashed together, you get Hash ABCE. Since hash ABCE is different from Hash ABCD, we can conclude that Transaction E is fraudulent.

A miner can recompute the Merkle Root in their own block and try to publish that version to the blockchain, but since every other miner has a different Merkle Root, the fraudulent miner is easily rejected.
We have covered Hashing Functions before when talking about IPFS, but just to recap: to hash Transaction A into Hash A, a one-way cryptographic hash function is used. Once hashed, Hash A cannot be turned into Transaction A; the hash is not reversible.
Each blockchain uses different hash functions, but they all have the same properties in common.
The same input always has the same output when passed into a hashing function.
Calculating the hash of an input value is fast.
Given a resulting hash, it is near impossible to determine the input. i.e. hash functions are one-way functions. For example: given y, it is difficult to find an x such that h(x) = y
Two different inputs never generate the same output.
Merkle Trees allow for quick verification of data integrity.
The disk space used up is very little compared to the entire set of transactions. The Merkle Root is included in the block header for this reason.
If you have two sets of transactions that are identical, verifying that they are the same with a Merkle Tree is faster than verifying the transactions individually one at a time. One can verify that a block has not been modified by only knowing the Merkle Root.
Merkle Trees aren't just used in blockchain applications. Some popular applications that use Merkle Trees are:
- IPFS
- Git
- Distributed databases such as AWS DynamoDB and Apache Cassandra use Merkle trees to control discrepancies
So, how do we actually verify that some data is part of a Merkle Tree?
You don't want the verifier to loop over every leaf node of the Merkle Tree, as it can be quite large, so how can we do this in a more efficient way?
Let's say the Verifier only has the Merkle Root r, that is, the top-level parent node of the tree. You, as a Prover, want to prove to the Verifier that some value K exists in the Merkle Tree.
To do this, you can generate a Merkle Proof. Let's try to understand what a Merkle Proof is with an example Merkle Tree.

The main idea is as follows: if you can give the Verifier the value of K, along with all the relevant nodes from the tree that get hashed up together to build up the r hash, the Verifier can compare the computed root value against r that they already have. If they are the same hash, it must mean that K was in fact present in the Merkle Tree, as you could not have generated the same Merkle Root hash with different input data.
In the diagram above, let's think about what info must be given to the Verifier that will positively prove to the Verifier that K is part of the Merkle Tree.
- Value of
Kitself (so Verifier can computeH(K)on its own) H(L), so the verifier can computeH(KL)H(IJ)so the verifier can computeH(IJKL)H(MNOP)so the verifier can computeH(IJKLMNOP)H(ABCDEFGH)so the verifier can computeH(ABCDEFGHIJKLMNOP)
Again, it is important to remember that only one given combination of nodes can generate this unique root r because the Merkle tree is a collision-resistant hash function which means it is a hash function that given two inputs is almost impossible to produce the same output.
For our given example, we only need to provide the following nodes to be able to prove that H[K] actually exists in our nodes:

At this point, if the computed value of H(ABCDEFGHIJKLMNOP) matches the previously known value r that the Verifier had, it must be true that K existed in the Merkle Tree, or else the hashes wouldn't be the same.
This is significantly more efficient than looping over the entire Merkle Tree, as for a tree with n number of elements, you only have to provide roughly log(n) elements as part of the proof (one for each 'level' of the tree). This means if you had a LOT of data, Merkle Trees are wayyyyy more efficient than storing arrays or mappings.
When ENS launched their token contract, they were airdropping the $ENS token to over 100,000 wallet addresses. They were able to deploy their contract, at a time of extremely high gas fees, for a MUCH lower price than what it would've been had they stored the wallet addresses in an array (where even storing a few hundred addresses could easily exceed gas limits of a block) - https://etherscan.io/tx/0xdfc76788b13ab1c033c7cd55fdb7a431b2bc8abe6b19ac9f7d22f4105bb43bff
Since the Verifier does not need to store the entire Merkle Tree to verify if something is a part of it, Merkle Trees actually come in quite handy for certain things.
In Sophomore, we created a Whitelist dApp that stored user addresses in a mapping. While that approach works, storing data in smart contract storage is by far the most expensive thing you can do in terms of gas. So what if you had to store 1000 addresses? What about 10,000, or 100,000? 🤯
At that point, utilizing smart contract storage directly is just infeasible and can easily cost millions of dollars just to whitelist people. On the other hand, you could build up a Merkle Tree and just store the Merkle Root value in the contract - a measly bytes32 value. In this scenario, the contract is now the Verifier, and users who wish to use their whitelist spot for minting NFTs, let's say, become the Provers proving that they are indeed part of the whitelist. Let's see how this would work.
- Please learn the basics of Mocha and Chai if you are not aware of them, to understand what they are follow this tutorial
Note All of these commands should work smoothly . If you are on windows and face Errors Like
Cannot read properties of null (reading 'pickAlgorithm')Try Clearing the NPM cache usingnpm cache clear --force
Let's see how all this works practically for our whitelist example.
-
To set up a Hardhat project, Open up a terminal and execute these commands
npm init --yes
npm install --save-dev hardhat
-
If you are on a Windows machine, please do this extra step and install these libraries as well :)
npm install --save-dev @nomicfoundation/hardhat-toolbox @nomiclabs/hardhat-waffle ethereum-waffle chai @nomiclabs/hardhat-ethers ethers
-
In the same directory where you installed Hardhat run:
npx hardhat
- Select
Create a basic sample project - Press enter for the already specified
Hardhat Project root - Press enter for the question on if you want to add a
.gitignore - Press enter for
Do you want to install this sample project's dependencies with npm (@nomiclabs/hardhat-waffle ethereum-waffle chai @nomiclabs/hardhat-ethers ethers)?
- Select
Now your hardhat folder is set-up.
We also need to install some extra dependencies to execute everything. So again in your terminal pointing to root directory execute the following command:
npm install @openzeppelin/contracts keccak256 merkletreejsNow start by creating a file inside your contracts folder named Whitelist.sol and add the following lines of code to it
// SPDX-License-Identifier: MIT
pragma solidity ^0.8.4;

import "@openzeppelin/contracts/utils/cryptography/MerkleProof.sol";

contract Whitelist {

    bytes32 public merkleRoot;

    constructor(bytes32 _merkleRoot) {
        merkleRoot = _merkleRoot;
    }

    function checkInWhitelist(bytes32[] calldata proof, uint64 maxAllowanceToMint) view public returns (bool) {
        bytes32 leaf = keccak256(abi.encode(msg.sender, maxAllowanceToMint));
        bool verified = MerkleProof.verify(proof, merkleRoot, leaf);
        return verified;
    }

}
What's exactly happening here? So as we mentioned we are not storing the address of each user in the contract, instead, we are only storing the root of the merkle tree which gets initialized in the constructor.
We also have another function checkInWhitelist which takes in a proof and maxAllowanceToMint.
maxAllowanceToMint is a variable that keeps track of the number of NFT's a given address can mint.
The value we are actually storing in the Merkle Tree, for this use case, is storing the address of the user along with how many NFTs they are allowed to mint. You can store whatever data you want in Merkle Trees, but this works for our example. The hash of the leaf node on which this address exists can be computed by first encoding the address of the sender and the maxAllowanceToMint into a bytes string which further gets passed down to the keccak256 hash function which requires the hash string to generate the hash.
Now we use the OpenZeppelin's MerkleProof library to verify that the proof sent by the user is indeed valid. Note how Openzeppelin performs the verification on a high level is similar to the verification of the Merkle proof we talked about earlier in the tutorial.
Next, let's write a test that can help determine if the code in our contract actually works.
Inside your test folder create a new file merkle-root.js and add the following lines of code to it
const { expect } = require("chai");
const { ethers } = require("hardhat");
const keccak256 = require("keccak256");
const { MerkleTree } = require("merkletreejs");

function encodeLeaf(address, spots) {
  // Same as `abi.encodePacked` in Solidity
  return ethers.utils.defaultAbiCoder.encode(
    ["address", "uint64"],
    [address, spots]
  );
}

describe("Check if merkle root is working", function () {
  it("Should be able to verify if a given address is in whitelist or not", async function () {

    // Get a bunch of test addresses
    const [owner, addr1, addr2, addr3, addr4, addr5] =
      await ethers.getSigners();

    // Create an array of elements you wish to encode in the Merkle Tree
    const list = [
      encodeLeaf(owner.address, 2),
      encodeLeaf(addr1.address, 2),
      encodeLeaf(addr2.address, 2),
      encodeLeaf(addr3.address, 2),
      encodeLeaf(addr4.address, 2),
      encodeLeaf(addr5.address, 2),
    ];

    // Create the Merkle Tree using the hashing algorithm `keccak256`
    // Make sure to sort the tree so that it can be produced deterministically regardless
    // of the order of the input list
    const merkleTree = new MerkleTree(list, keccak256, {
      hashLeaves: true,
      sortPairs: true,
    });
    // Compute the Merkle Root
    const root = merkleTree.getHexRoot();

    // Deploy the Whitelist contract
    const whitelist = await ethers.getContractFactory("Whitelist");
    const Whitelist = await whitelist.deploy(root);
    await Whitelist.deployed();

    // Compute the Merkle Proof of the owner address (0'th item in list)
    // off-chain. The leaf node is the hash of that value.
    const leaf = keccak256(list[0]);
    const proof = merkleTree.getHexProof(leaf);

    // Provide the Merkle Proof to the contract, and ensure that it can verify
    // that this leaf node was indeed part of the Merkle Tree
    let verified = await Whitelist.checkInWhitelist(proof, 2);
    expect(verified).to.equal(true);

    // Provide an invalid Merkle Proof to the contract, and ensure that
    // it can verify that this leaf node was NOT part of the Merkle Tree
    verified = await Whitelist.checkInWhitelist([], 2);
    expect(verified).to.equal(false);
  });
});
Here we first get some signers using hardhat's extended ethers package for testing.
Then we create a list of nodes which are all converted into byte strings using the ethers.utils.defaultAbiCoder.encode
Using the MerkleTree class from merkletreejs we input our list, specify our hashing function which is going to be keccak256, and set the sorting of nodes to true
After we create the Merkle Tree, we get its root by calling the getHexRoot function. We use this root to deploy our Whitelist contract.
After our contract is verified, we can call our checkInWhitelist by providing the proof. So now here we will check that (owner.address, 2) exists in our dataset. To generate the proof, we hash the encoded value of (owner.address, 2) and generate a proof using
getHexProof function from merkletreejs library.
This proof is then sent in checkInWhitelist as an argument that further returns a value of true to signify that (owner.address, 2) exists.
To run the test, execute the following command from the root of the directory:
npx hardhat testIf all your tests pass, you have successfully learned what a Merkle tree is and how it can be used for whitelisting 🥳 🥳 🥳
Hope you had fun!!
Cheers 🥂
This module was built in collaboration with Hypotenuse Labs