@inproceedings{
Li2020Additive,
title={Additive Powers-of-Two Quantization: An Efficient Non-uniform Discretization for Neural Networks},
author={Yuhang Li and Xin Dong and Wei Wang},
booktitle={International Conference on Learning Representations},
year={2020},
url={https://openreview.net/forum?id=BkgXT24tDS}
}
This repo contains the code and data of the following paper accepeted by ICLR 2020
Additive Power-of-Two Quantization: An Efficient Non-uniform Discretization For Neural Networks
- May 16 2020: New quantization function, checkpoints for ImageNet, and slides for brief introduction.
- May 17 2020: Add implementation for calibrated gradients in 2-bit weight quantization and grad scale.
- Dec 18 2020: Add MobilenetV2 implmentation.
- Feb 2021: Our new paper BRECQ has been accepted at ICLR 2021, a new state-of-the-art in post-training quantization and can quantize ResNet-18 in 20 mins! (Paper, Code)
Pytorch 1.1.0 with CUDA
- The models are trained using internal framework and we only release the checkpoints as well as the logs, please prepare the ImageNet validation and training dataset, we use official example code here to load data.
- The CIFAR10 dataset can be download automatically (update soon).
models.quant_layer.py contains the configuration for quantization. In particular, you can specify them in the class QuantConv2d:
class QuantConv2d(nn.Conv2d):
    """Generates quantized convolutional layers.

    args:
        bit(int): bitwidth for the quantization,
        power(bool): (A)PoT or Uniform quantization
        additive(float): Use additive or vanilla PoT quantization

    procedure:
        1. determine if the bitwidth is illegal
        2. if using PoT quantization, then build projection set. (For 2-bit weights quantization, PoT = Uniform)
        3. generate the clipping thresholds

    forward:
        1. if bit = 32(full precision), call normal convolution
        2. if not, first normalize the weights and then quantize the weights and activations
        3. if bit = 2, apply calibrated gradients uniform quantization to weights
    """

    def __init__(self, in_channels, out_channels, kernel_size, stride=1, padding=0, dilation=1, groups=1, bias=False, bit=5, power=True, additive=True, grad_scale=None):
        super(QuantConv2d, self).__init__(in_channels, out_channels, kernel_size, stride, padding, dilation, groups, bias)
        self.layer_type = 'QuantConv2d'
        self.bit = bit
        self.power = power
        self.grad_scale = grad_scale
        if power:
            if self.bit > 2:
                self.proj_set_weight = build_power_value(B=self.bit-1, additive=additive)
            self.proj_set_act = build_power_value(B=self.bit, additive=additive)
        self.act_alpha = torch.nn.Parameter(torch.tensor(6.0))
        self.weight_alpha = torch.nn.Parameter(torch.tensor(3.0))
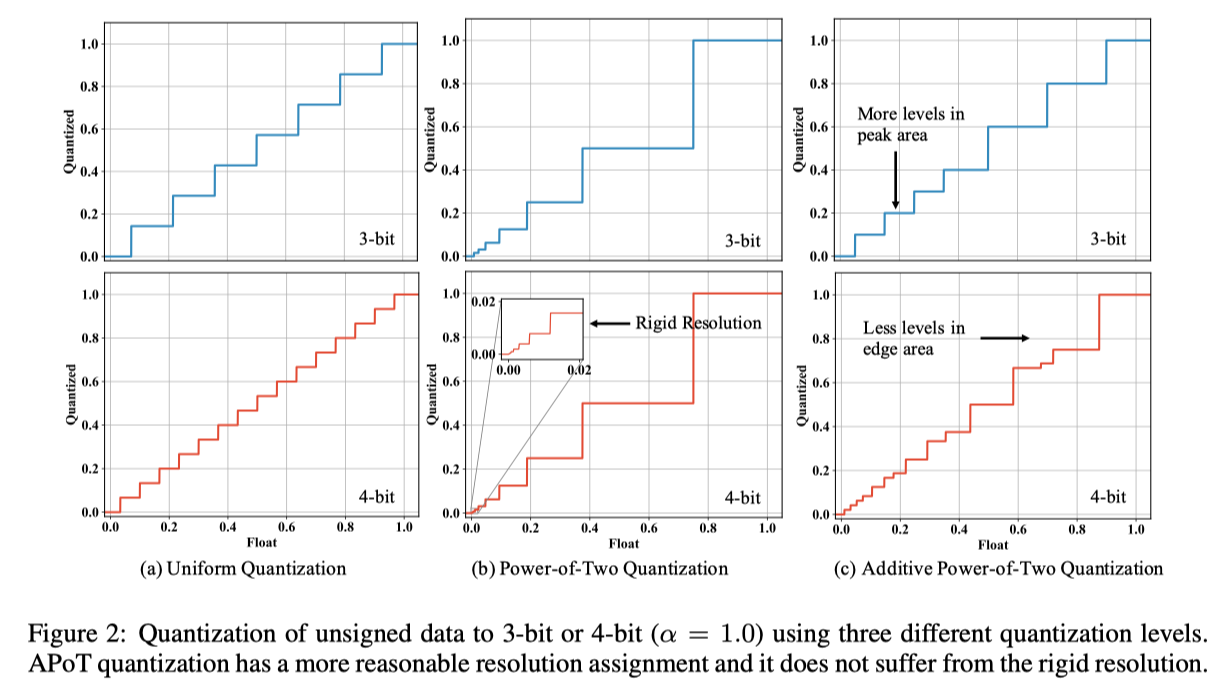
Here, self.bit controls the bitwidth; power=True means we use PoT or APoT (use additive to specify). build_power_value construct the levels set Q^a(1, b) with parameter bit and additive. If power=False, the conv layer will adopt uniform quantization.
To train a 5-bit model, just run main.py:
python main.py -a resnet18 --bit 5Progressive initialization requires checkpoint of higher bitwidth. For example
python main.py -a resnet18 --bit 4 --pretrained checkpoint/res18_5best.pth.tarWe provide a function show_params() to print the clipping parameter in both weights and activations
Checkpoints are released in Google Drive.
| Model | Precision | Hyper-Params | Accuracy | Checkpoints |
|---|---|---|---|---|
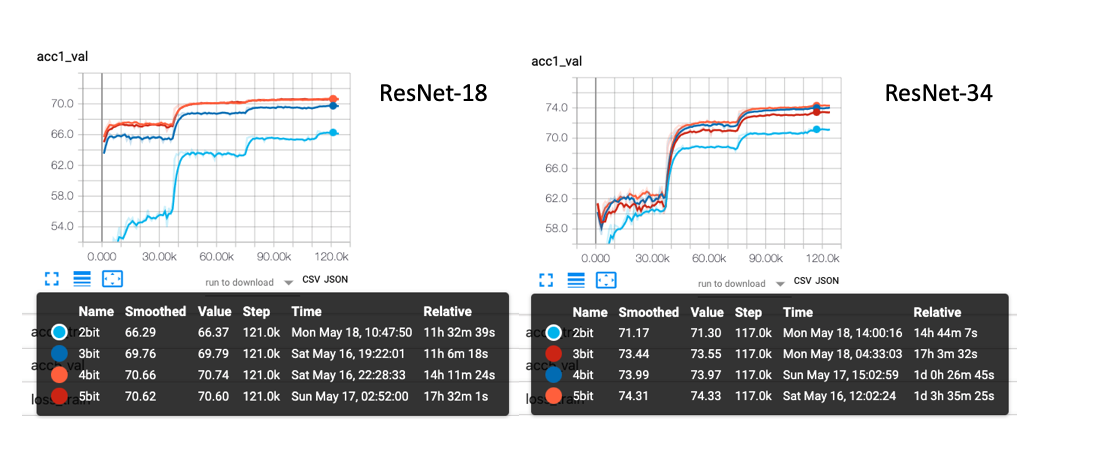
| ResNet-18 | 5-bit | batch1k_lr0.01_wd0.0001_100epoch | 70.75 | res18_5bit |
| ResNet-18 | 4-bit | batch1k_lr0.01_wd0.0001_100epoch | 70.74 | res18_4bit |
| ResNet-18 | 3-bit | batch1k_lr0.01_wd0.0001_100epoch | 69.79 | res18_3bit |
| ResNet-18 | 2-bit | batch1k_lr0.04_wd0.00002_100epoch_cg | 66.46 | res18_2bit |
| ResNet-34 | 5-bit | batch1k_lr0.1_wd0.0001_100epoch | 74.26 | res34_5bit |
| ResNet-34 | 4-bit | batch1k_lr0.1_wd0.0001_100epoch | 74.12 | res34_4bit |
| ResNet-34 | 3-bit | batch1k_lr0.1_wd0.0001_100epoch | 73.55 | res34_3bit |
| ResNet-34 | 2-bit | batch1k_lr0.1_wd0.00002_100epoch_cg | 71.30 | res34_2bit |
| ResNet-50 | 4-bit | batch512_lr0.05_wd0.0001_100epoch | 76.80 | Updating |
| ResNet-50 | 3-bit | batch512_lr0.05_wd0.0001_100epoch | 75.92 | Updating |
| ResNet-50 | 2-bit | batch512_lr0.05_wd0.00025_100epoch_cg | - | Updating |
Use power=False to switch to the uniform quantization, results:
| Model | Precision | Hyper-Params | Accuracy | Compared with APoT |
|---|---|---|---|---|
| ResNet-18 | 4-bit | batch1k_lr0.01_wd0.0001_100epoch | 70.54 | -0.2 |
| ResNet-18 | 3-bit | batch1k_lr0.01_wd0.0001_100epoch | 69.57 | -0.22 |
| ResNet-18 | 2-bit | batch1k_lr0.01_wd0.00002_100epoch | - | Updating |
cd $PATH-TO-THIS-PROJECT/ImageNet/events
tensorboard --logdir 'res18' --port 6006To be updated
(CIFAR10 codes will be updated soon.)
The training code is inspired by pytorch-cifar-code from junyuseu.
The dataset can be downloaded automatically using torchvision. We provide the shell script to progressively train full precision, 4, 3, and 2 bit models. For example, train_res20.sh :
#!/usr/bin/env bash
python main.py --arch res20 --bit 32 -id 0,1 --wd 5e-4
python main.py --arch res20 --bit 4 -id 0,1 --wd 1e-4  --lr 4e-2 \
        --init result/res20_32bit/model_best.pth.tar
python main.py --arch res20 --bit 3 -id 0,1 --wd 1e-4  --lr 4e-2 \
        --init result/res20_4bit/model_best.pth.tar
python main.py --arch res20 --bit 2 -id 0,1 --wd 3e-5  --lr 4e-2 \
        --init result/res20_3bit/model_best.pth.tar
The checkpoint models for CIFAR10 are released:
| Model | Precision | Accuracy | Checkpoints |
|---|---|---|---|
| Res20 | Full Precision | 92.96 | Res20_32bit |
| Res20 | 4-bit | 92.45 | Res20_4bit |
| Res20 | 3-bit | 92.49 | Res20_3bit |
| Res20 | 2-bit | 90.96 | Res20_2bit |
| Res56 | Full Precision | 94.46 | Res56_32bit |
| Res56 | 4-bit | 93.93 | Res56_4bit |
| Res56 | 3-bit | 93.77 | Res56_3bit |
| Res56 | 2-bit | 93.05 | Res56_2bit |
To evluate the models, you can run
python main.py -e --init result/res20_3bit/model_best.pth.tar -e -id 0 --bit 3And you will get the output of accuracy and the value of clipping threshold in weights & acts:
Test: [0/100]   Time 0.221 (0.221)      Loss 0.2144 (0.2144)    Prec 96.000% (96.000%)
 * Prec 92.510%
clipping threshold weight alpha: 1.569000, activation alpha: 1.438000
clipping threshold weight alpha: 1.278000, activation alpha: 0.966000
clipping threshold weight alpha: 1.607000, activation alpha: 1.293000
clipping threshold weight alpha: 1.426000, activation alpha: 1.055000
clipping threshold weight alpha: 1.364000, activation alpha: 1.720000
clipping threshold weight alpha: 1.511000, activation alpha: 1.434000
clipping threshold weight alpha: 1.600000, activation alpha: 2.204000
clipping threshold weight alpha: 1.552000, activation alpha: 1.530000
clipping threshold weight alpha: 0.934000, activation alpha: 1.939000
clipping threshold weight alpha: 1.427000, activation alpha: 2.232000
clipping threshold weight alpha: 1.463000, activation alpha: 1.371000
clipping threshold weight alpha: 1.440000, activation alpha: 2.432000
clipping threshold weight alpha: 1.560000, activation alpha: 1.475000
clipping threshold weight alpha: 1.605000, activation alpha: 2.462000
clipping threshold weight alpha: 1.436000, activation alpha: 1.619000
clipping threshold weight alpha: 1.292000, activation alpha: 2.147000
clipping threshold weight alpha: 1.423000, activation alpha: 2.329000
clipping threshold weight alpha: 1.428000, activation alpha: 1.551000
clipping threshold weight alpha: 1.322000, activation alpha: 2.574000
clipping threshold weight alpha: 1.687000, activation alpha: 1.314000


