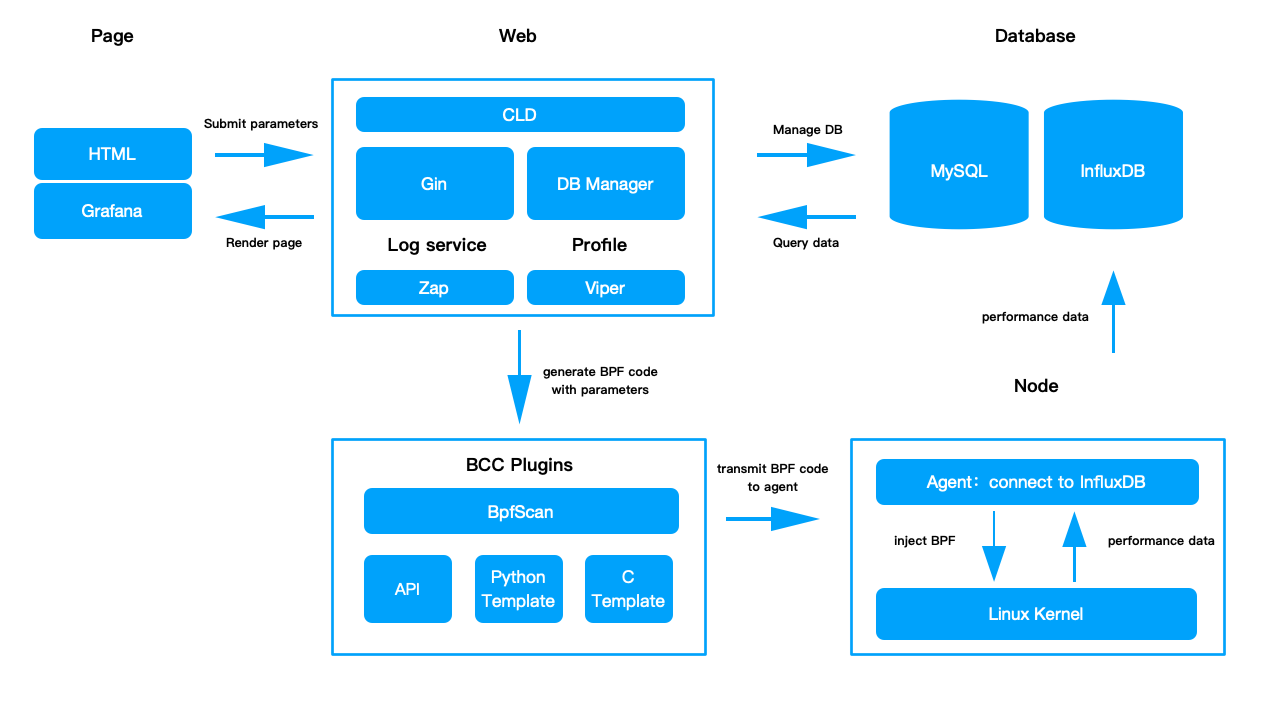
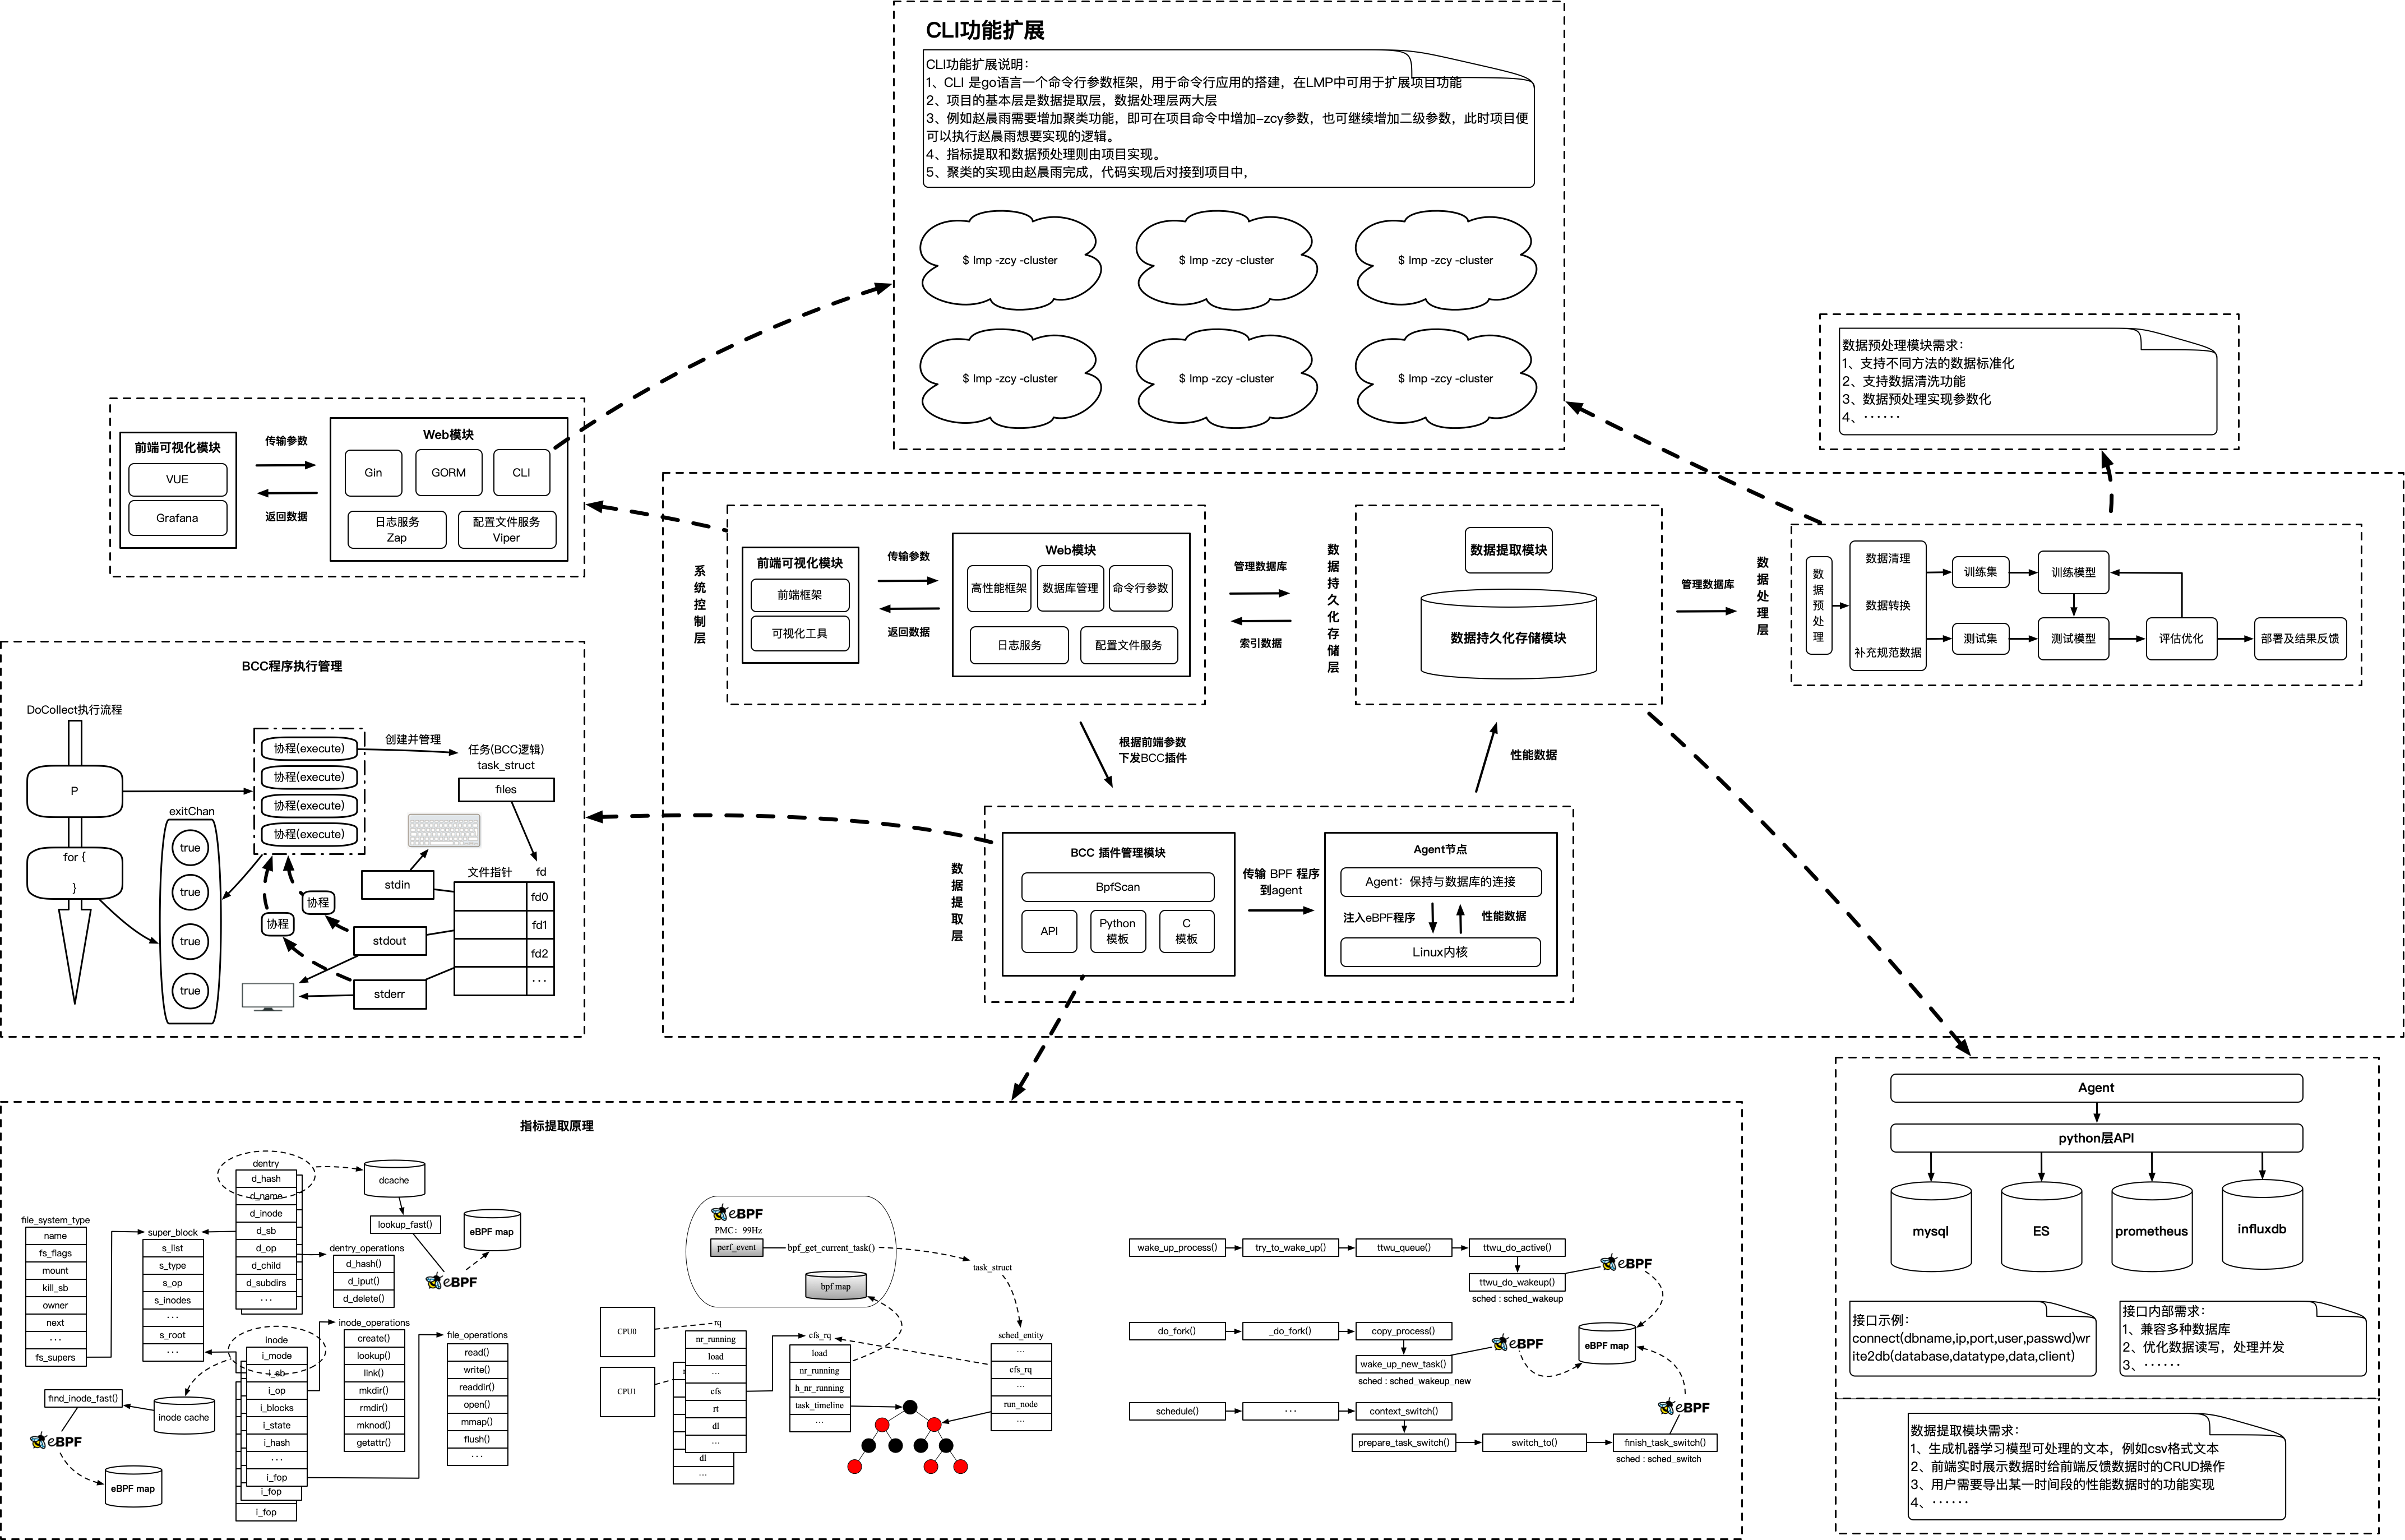
LMP是一个基于BCC(BPF Compiler Collection)的Linux系统性能数据实时展示的web工具,它使用BPF(Berkeley Packet Filters),也叫eBPF,目前LMP在ubuntu18.04上测试通过,内核版本4.15.0。
├── config  # 配置
├── docs    # 文档
├── pkg     # golang 服务代码
├── plugins # python ebpf 代码
├── static  # 网页代码
├── test    # 测试数据
└── vendor  # golang vendor
- golang:go1.12及以上;
- docker:influxdb、grafana;
- bcc环境
- mysql:5.7.29测试通过
# For grafana
sudo docker pull grafana/grafana
# For Influxdb
sudo docker pull influxdb
 git clone https://github.com/linuxkerneltravel/lmp
 cd lmp
 sudo make db
 > 输入您的 mysql root用户密码
 make
# 项目的所有配置均位于config.yaml中,grafana的默认端口为3000端口,influxdb的默认端口为8086,修改配置信息的方式如下:
 vim lmp/config/config.yaml

#run grafana
 sudo docker run -d \
   -p 3000:3000 \
   --name=grafana \
   grafana/grafana

#run influxdb,按照如下命令启动influxdb之后,会自动带有database lmp,influxdb的用户名和密码位于config.yaml中
 sudo docker run -d \
    -p 8083:8083 \
    -p 8086:8086 \
    --name influxdb \
    -v ${YOUR_PROJECT_PATH}/lmp/test/influxdb_config/default.conf:/etc/influxdb/influxdb.conf \
    -v ${YOUR_PROJECT_PATH}/lmp/test/influxdb_config/data:/var/lib/influxdb/data \
    -v ${YOUR_PROJECT_PATH}/lmp/test/influxdb_config/meta:/var/lib/influxdb/meta \
    -v ${YOUR_PROJECT_PATH}/lmp/test/influxdb_config/wal:/var/lib/influxdb/wal influxdb1.8

#run lmp
 cd lmp/
 make
 sudo ./lmp -h
在shell执行sudo ./lmp,即启动观测功能
在单机节点上部署完成lmp并启动之后,通过浏览器访问8080端口即可。如果是本地查看,则访问localhost:8080,如果远程访问,则访问remoteip:8080即可。
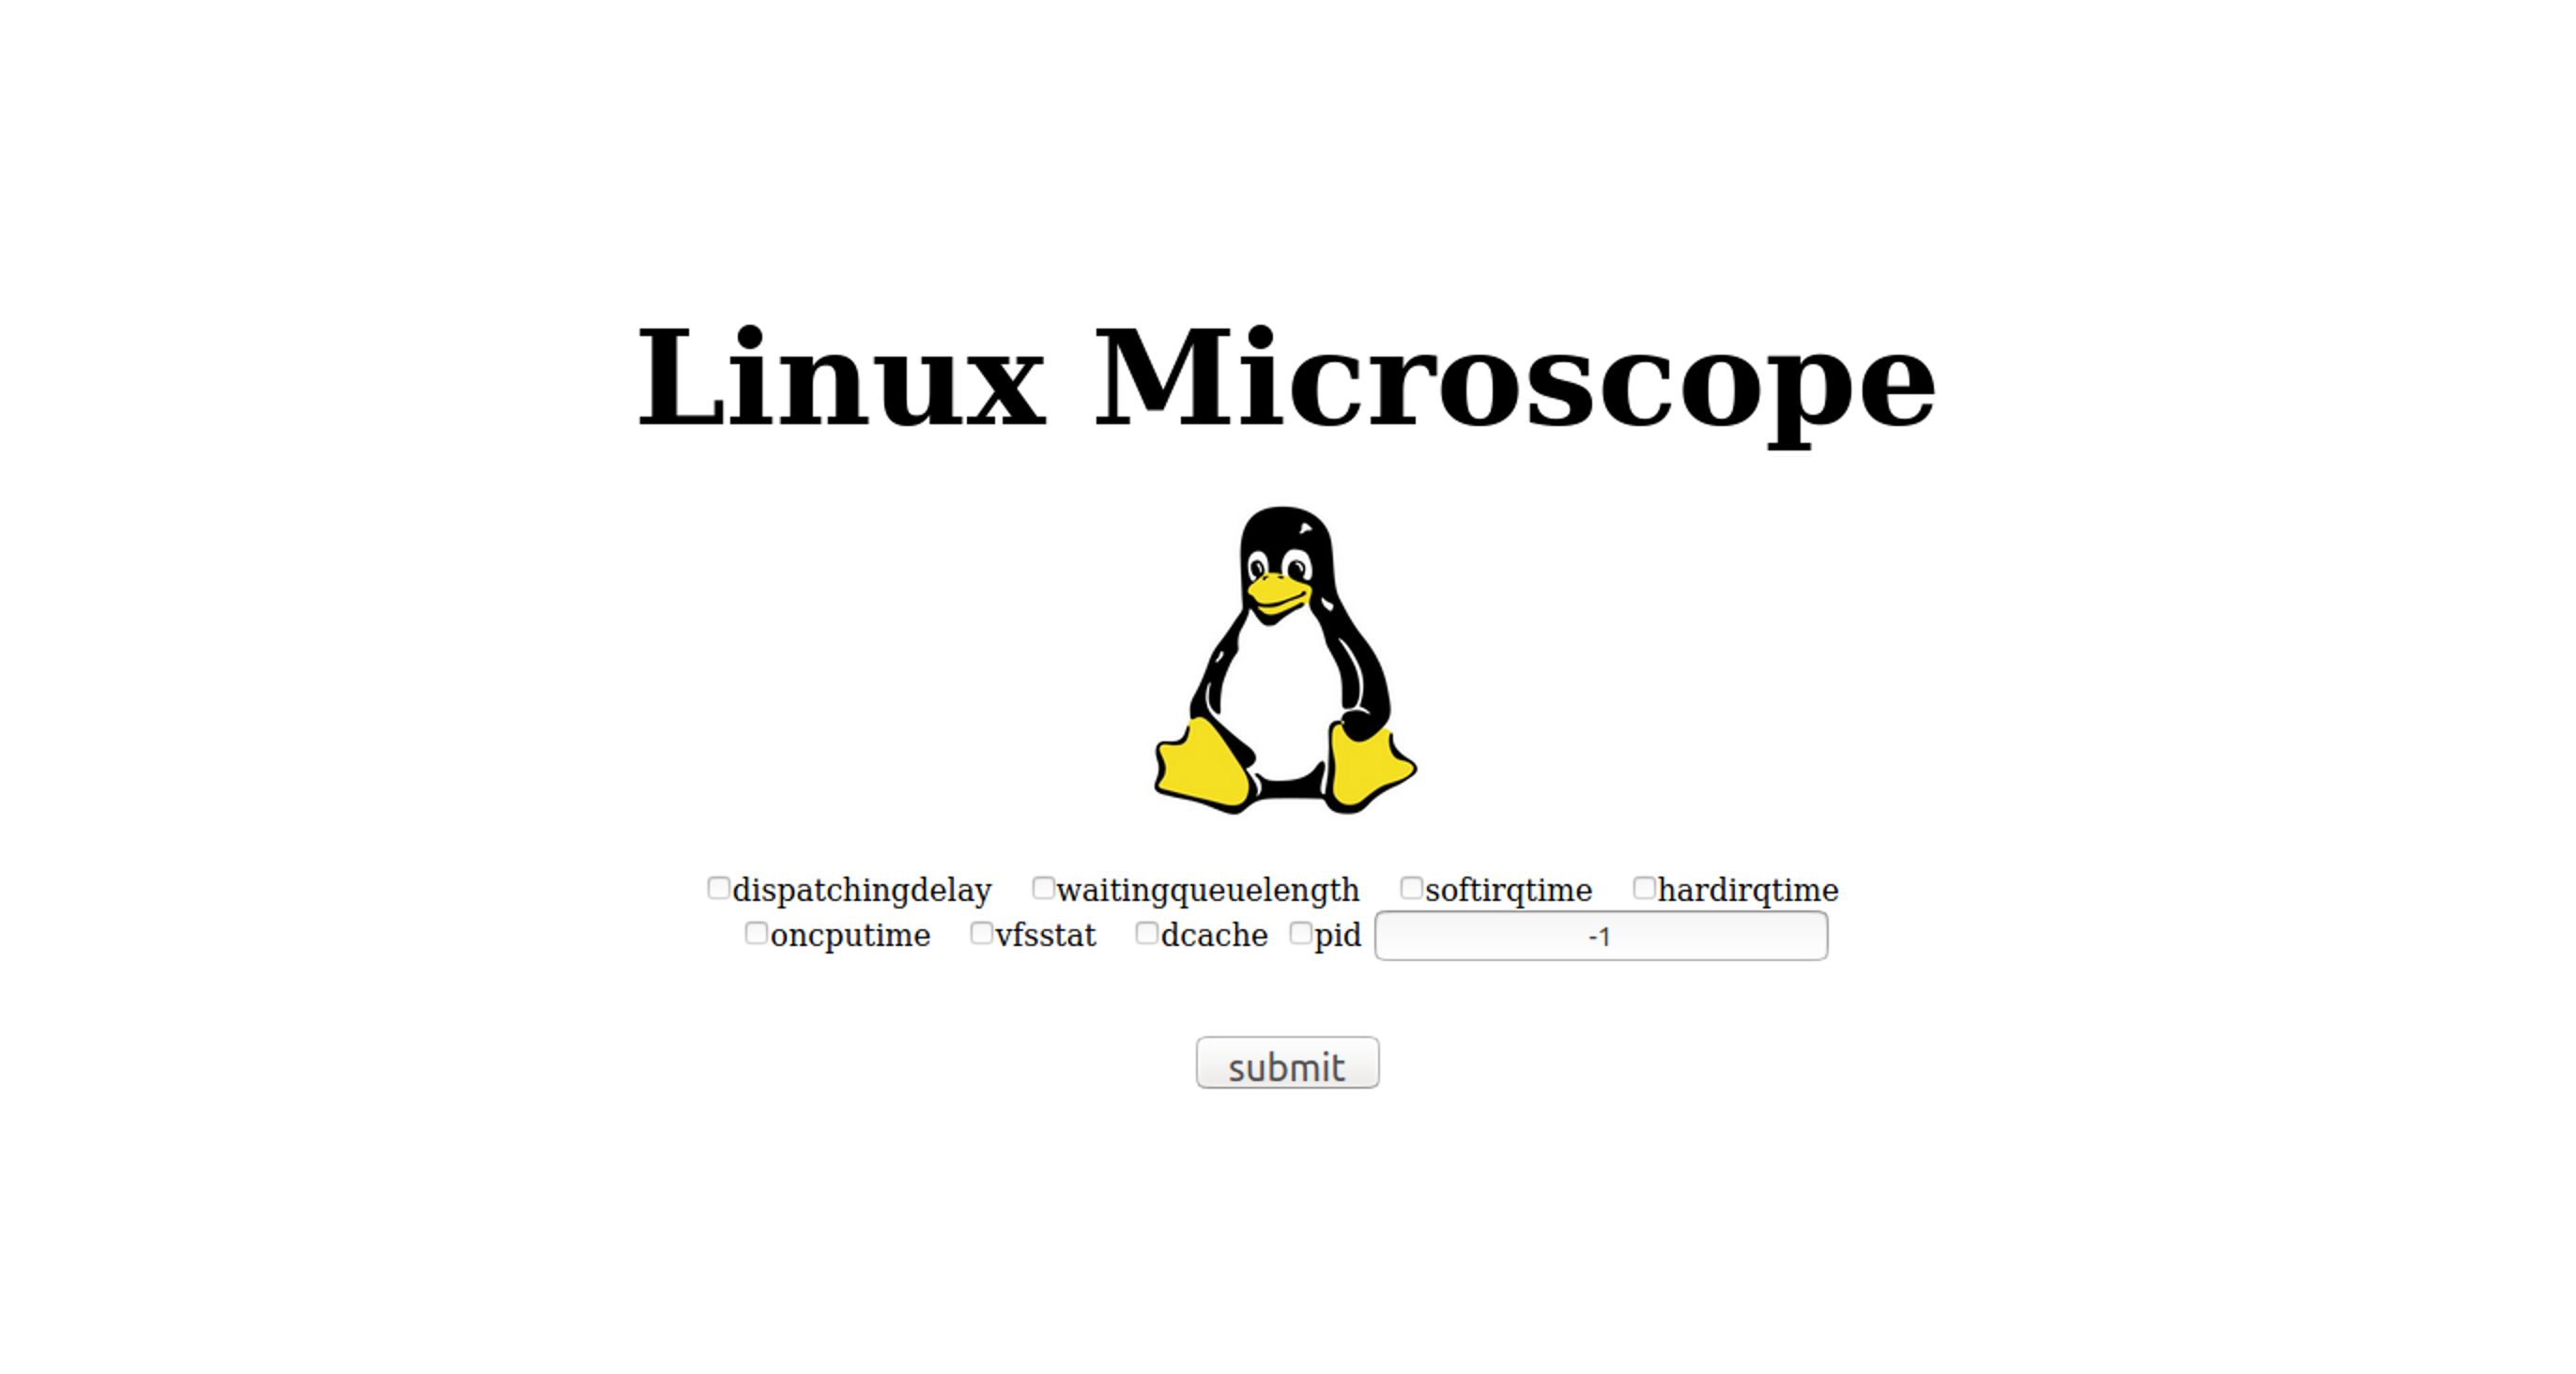
8080端口返回页面如下,该页面仅用于观测指标下发,输入栏输入的是观测时间,单位是分钟。可一次下发多个指标,但是注意实际环境使用bcc的开销问题,建议单个指标下发对比开销之后,再组合多个指标观测。
另外开启grafana页面,通过浏览器访问3000端口即可。如果是本地查看,则访问localhost:3000,如果远程访问,则访问remoteip:3000即可。
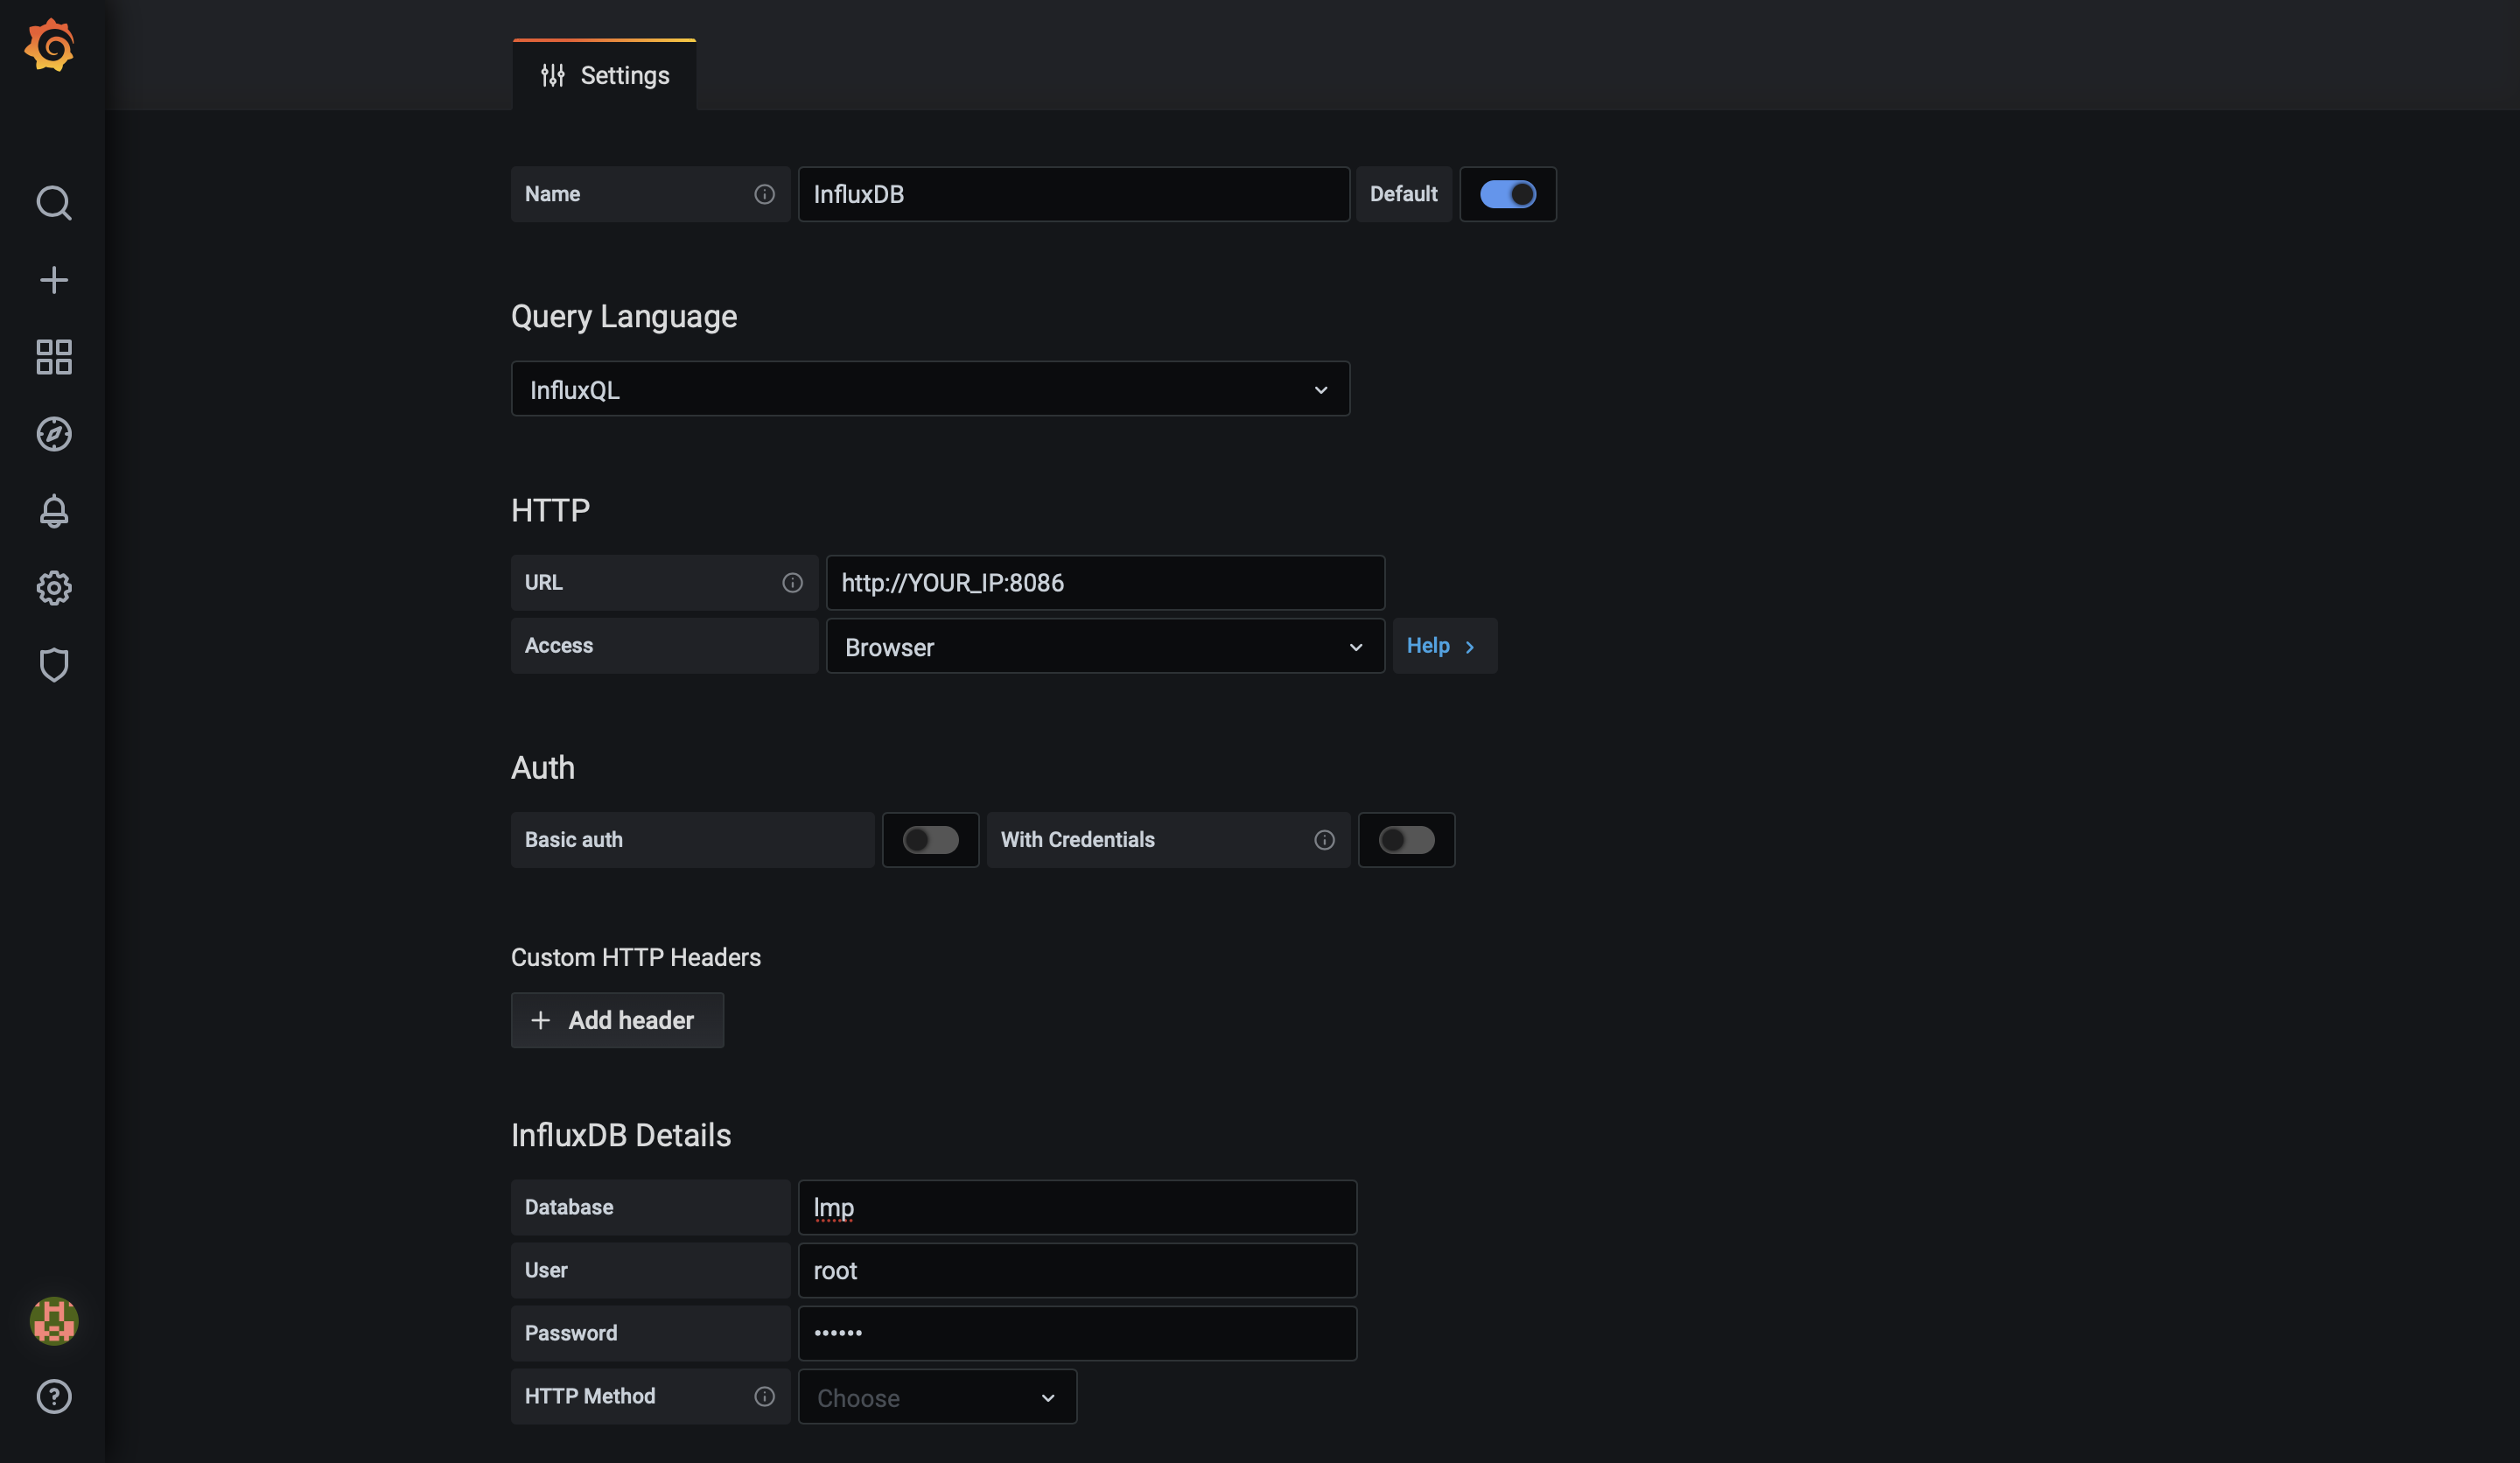
grafana用于指标数据观测,进入grafana之后,首先需要登录进入grafana,初始用户名和密码均为admin,之后需要配置grafana连接influxdb:
按照自己的ip地址配置完成以后,点击save&test按钮,测试influxdb是否连接成功,出现如下提示说明连接成功:
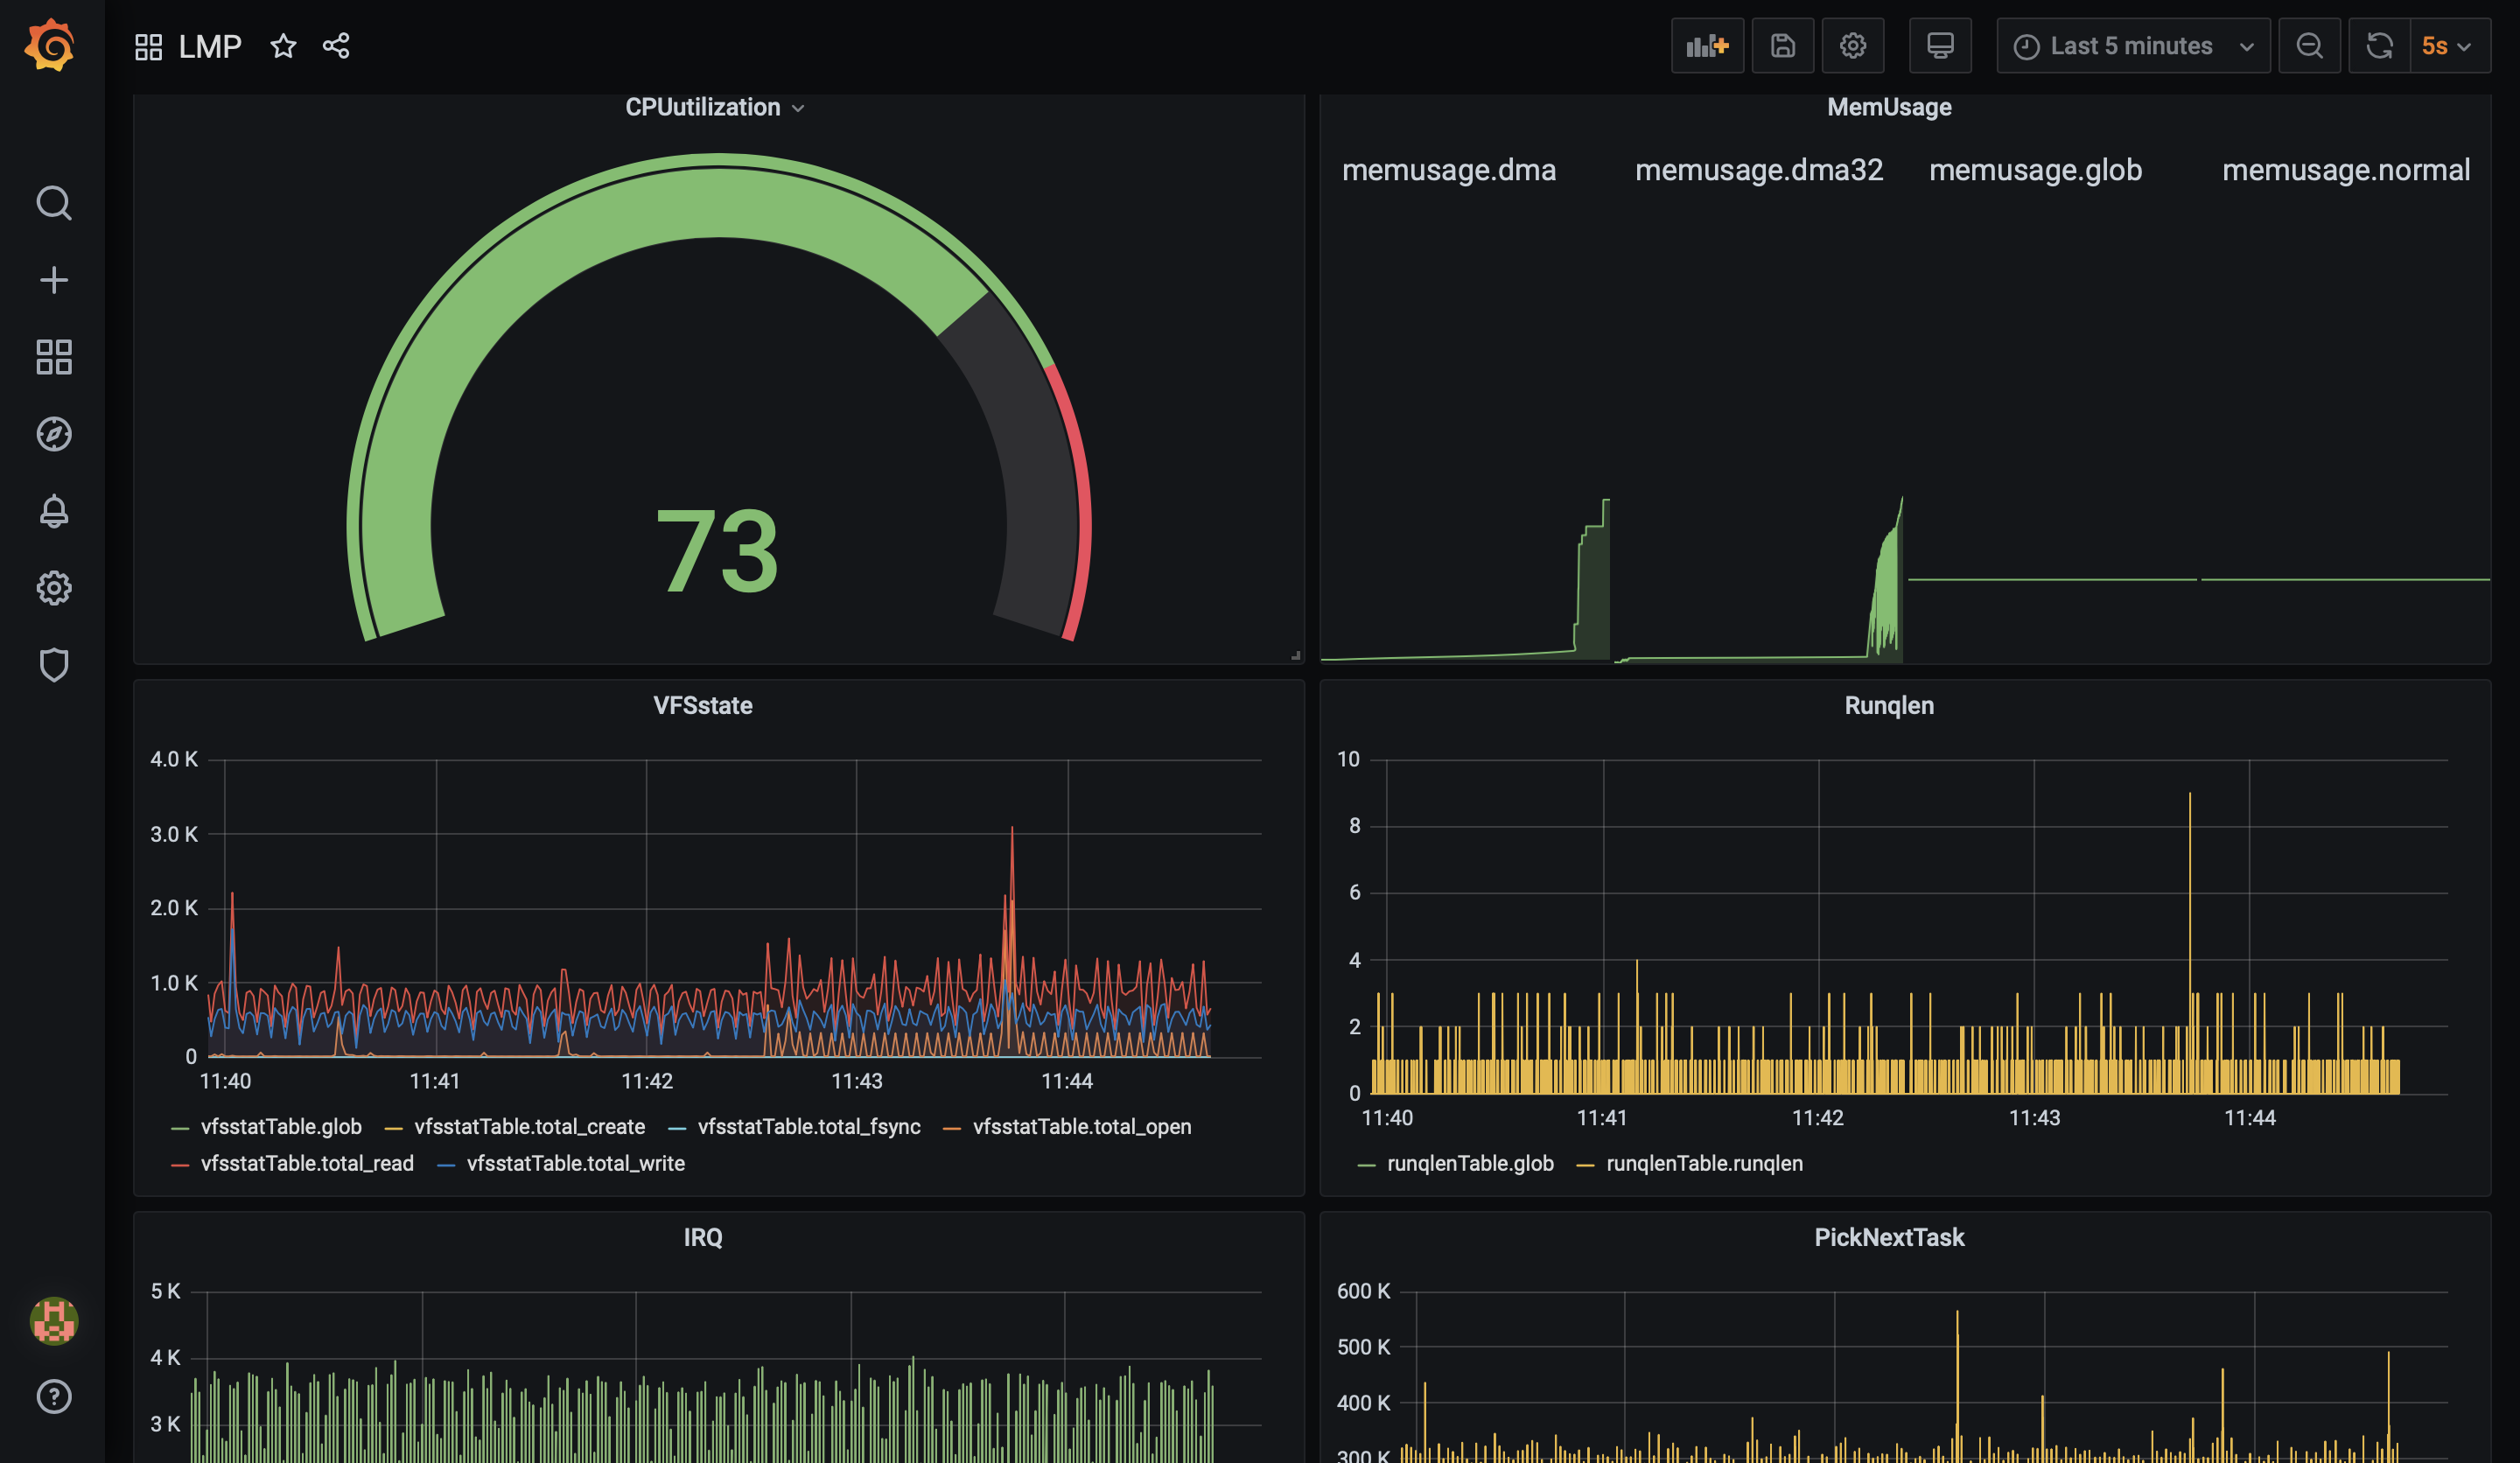
接下来导入/lmp/test/grafana-JSON下的lmp.json文件,即可自动创建grafana的dashboard:
在Dashboards中Manage中,点击Import,上传lmp.json文件即可观测:
统计时间到时后,lmp会自动关闭后台bcc插件,之后继续在8080端口页面下发指标即可。
LMP通过命令行参数引入机器学习模型,你可以自己实现模型后对接到项目中,我们的想法是利用观测功能提取到数据后,利用这些数据来训练模型,目前仅可引入机器学习模型,使用示例如下:
⇒  ./lmp -h
NAME:
   LMP - LMP is a web tool for real-time display of Linux system performance data based on BCC (BPF Compiler Collection).
To get more info of how to use lmp:
  # lmp help


USAGE:
   lmp [global options] command [command options] [arguments...]

VERSION:
   v0.0.1

COMMANDS:
   cluster  Density peak clustering
   help, h  Shows a list of commands or help for one command

GLOBAL OPTIONS:
   --help, -h     show help (default: false)
   --version, -v  print the version (default: false)
命令介绍中介绍了cluster命令,在命令行执行:
⇒  ./lmp cluster -h
NAME:
   lmp cluster - Density peak clustering

USAGE:
   lmp cluster [command options] [APP_NAME]

DESCRIPTION:
   Density peak clustering, Can be used for anomaly detection.
       example: ./lmp cluster --data /YOUR_PATH
       example: ./lmp cluster -d /YOUR_PATH

OPTIONS:
   --data value, -d value  specified the the dataset to run
   --help, -h              show help (default: false)
即可看到使用方法,关于如何增加一个模型见→增加一个模型
LMP目前支持BCC类型的插件程序,增加的方法见→增加一个插件
推荐使用 postman 下发web请求,具体调试方法见→调试项目
LMP is a web tool for real-time display of Linux system performance data based on BCC (BPF Compiler Collection), which uses BPF (Berkeley Packet Filter), also known as eBPF. Currently, LMP is tested on ubuntu18.04 and the kernel version is 4.15.0.
Expand to view
.
.
├── LICENSE
├── README.md
├── config  # 配置
├── docs    # 文档
├── pkg     # golang 服务代码
├── plugins # python ebpf 代码
├── static  # 网页代码
├── test    # 测试数据
└── vendor  # golang vendor
- golang
- docker
- bcc
# For prometheus
sudo docker pull prom/prometheus
# For grafana
sudo docker pull grafana/grafana
# For Influxdb
sudo docker pull influxdb
 git clone https://github.com/linuxkerneltravel/lmp
 cd lmp
 make
 sudo make install
# Modify configuration file
 vim lmp/config/config.yaml

#run grafana
 sudo docker run -d \
   -p 3000:3000 \
   --name=grafana \
   -v /opt/grafana-storage:/var/lib/grafana \
   grafana/grafana

#run influxdb
 sudo docker run -d \
    -p 8083:8083 \
    -p 8086:8086 \
    --name influxdb \
    -v ${YOUR_PROJECT_PATH}/lmp/test/influxdb_config/default.conf:/etc/influxdb/influxdb.conf \
    -v ${YOUR_PROJECT_PATH}/lmp/test/influxdb_config/data:/var/lib/influxdb/data \
    -v ${YOUR_PROJECT_PATH}/lmp/test/influxdb_config/meta:/var/lib/influxdb/meta \
    -v ${YOUR_PROJECT_PATH}/lmp/test/influxdb_config/wal:/var/lib/influxdb/wal influxdb

#run lmp
 cd lmp/
 make
 sudo ./lmp
http://localhost:8080/ After logging in to grafana, view it.
make clean
- [Gin] - https://gin-gonic.com/
- [bcc] - https://github.com/iovisor/bcc

