This solution is an end-2-end microservice sample. The micro-service enables creation of Shared Access Token for storage account. This capability allows other calling services to upload or view content of specific containers without exchaning secrets or managing connection strings. The use SaS token is a best practice for securing access to storage account.
The sample will create the required Azure resources, configure them and output a URL. The solution focus on a single tenant approach, where all services are under the same tenant.
This sample will cover the following topics:
- What are the user stories for this solution?
- What was the design approach?
- Architecture and main components overview
- Step-by-step instructions to deploy the solution
- Consuming the APIs provided by the solution
- Next steps & Limitations
These are the high level user stories for the solution: As a service provider, I need my customers to uploaded content in a secured, easy to maintain micro-service exposed as an API, so that I can process the content uploaded and perform an action on it.
As a service provider, I would like to enable download of specific files for authorized devices or humans, so that they could download the content directly from storage.
As a service provider, I would like to offer my customers ability to see what files they have already uploaded, so that they can download it when needed with time restricted SaS.
The following guidelines were considered for the solution approach:
- Time, role and IP based authorization
- Microservice
- For authentication/authorization the client credentials flow was selected.
Note, the IP restriction is provided as an ability, it does provide minimal layer of security, limiting the reuse of the same SaS by multiple users, for machine2machine communication, it would be better to authenticate the requests and have the time restriction shorter, for example having it as 30 seconds or less.
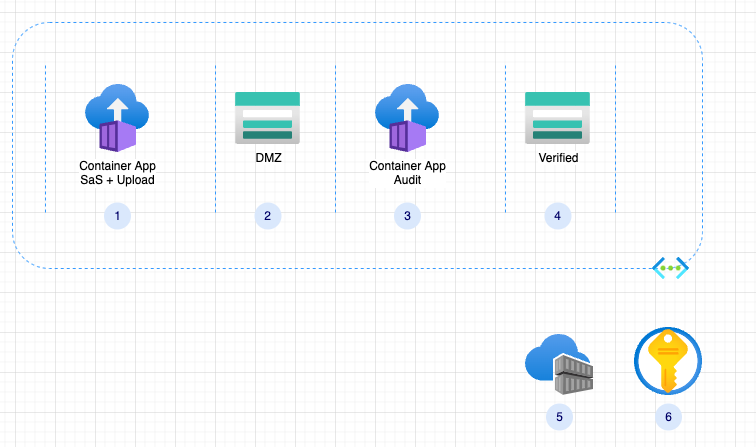
Here is the draft architecture created:

-
Container App - create SaS tokens and containers, it also provide SaS for given file with in a given container.
-
Storage Account - DMZ, all content is considered unsafe
-
Container App - verify content and move it to verified storage
-
Verified storage, content is assumed to be verified and has minimal or no threat to the organization
-
Container Registry - holds the container app images
-
Azure KeyVault - holds connection strings and other secured configuration
Addtional resource is the app registration used to govern access, this resource is not created by the bicep code, rather used by it. You will need to create and configure it via the azure portal.
Prerequisites: You will need to have the following provisioned prior to running the scripts:
-
An exisitng resource group. Since Bicep does not create the resource group, so make sure to create one before you start. Using the following steps you can spin up an entire environment. You will need the name of the resource group to execute the bicep code.
-
App registration - this is the app registration that will be used to authenticate the requests to the micro-service. You will need to create it via the azure portal. Bicep does not support the creation of app registrations. Create an app registration, here is a guide on how to do it. The guide walk you through how to create the app, add scopes. Read the guide carefull, and skip the parts indicated. The information you would require from these two app registration would be used in later steps.
-
ClientId - The Service-A ID - mapped to 'azureadappreg'.
-
Domain - mapped to 'azureaddomain'.
-
Once you have these (resource group + app registration) you can follow these steps.
-
Clone the repo
-
Navigate to the
deploy/bicepdirectory -
Modify the param.json file to reflect your individual settings, use the information from the prerequisites step.
-
Confirm you have are logged in, you can run
az login -
Run
az deployment group create --resource-group <your rg name> --template-file main.bicep --parameters @param.json
Once you have the environment deployed, check the fqdn of the newly created container app, for both options listed here, you will need to add the /swagger suffix to get to the exposed apis.
-
As part of the deployment output, you can search for 'fqdn' it will have the deployed container app url.
-
Another option is to copy it from the portal, you can find it in the overview blade of the container app.
This 'vanilla' version can be your starting point, as part of this sample, you can also leverage the github actions provided. There are few steps required to be performed on your github repo to enable it to work with your subscription & resource group. There are few online guides that would walk you through this task, here is an example.
The initial provisioning is taking an image from this repo (with the latest tag). Part of the sample also include two github actions, that builds and deploy the newly created image to the container app enviorment. There are few manual steps that are required to be done on your cloned repository allowing it to make changes to your Azure resources. There are several guides on how to do it, here is one
Service-A: An app registration which was created in the prerequsite step. It will be the one governing access to the api.
Service-B: A second app registration acting as the consumer of the api is required. For this app registration you would need to create a secret. You will need to create an '.env' file. The default location should be in the same folder of the test.rest rest test file. (the format of the '.env' file is outlined below)
-
ClientId - The Service-B is mapped to 'b_app_id' key.
-
TenantId - mapped to 'tenant'.
As part of this repo, I've included the test.rest to help test the APIs and also to obtain access token.
You will need to create an .env file with these entries, both are provided with in the response of the Token API.
sas_base_url=<SasTokenBaseUri>
sas_sig=<SasTokenSig>
tenant=<your tenant>
b_app_id=<the calling app client id>
b_app_sec=<the calling app secret>
fs_service_scp=<scope created as part of the app registration process>
-
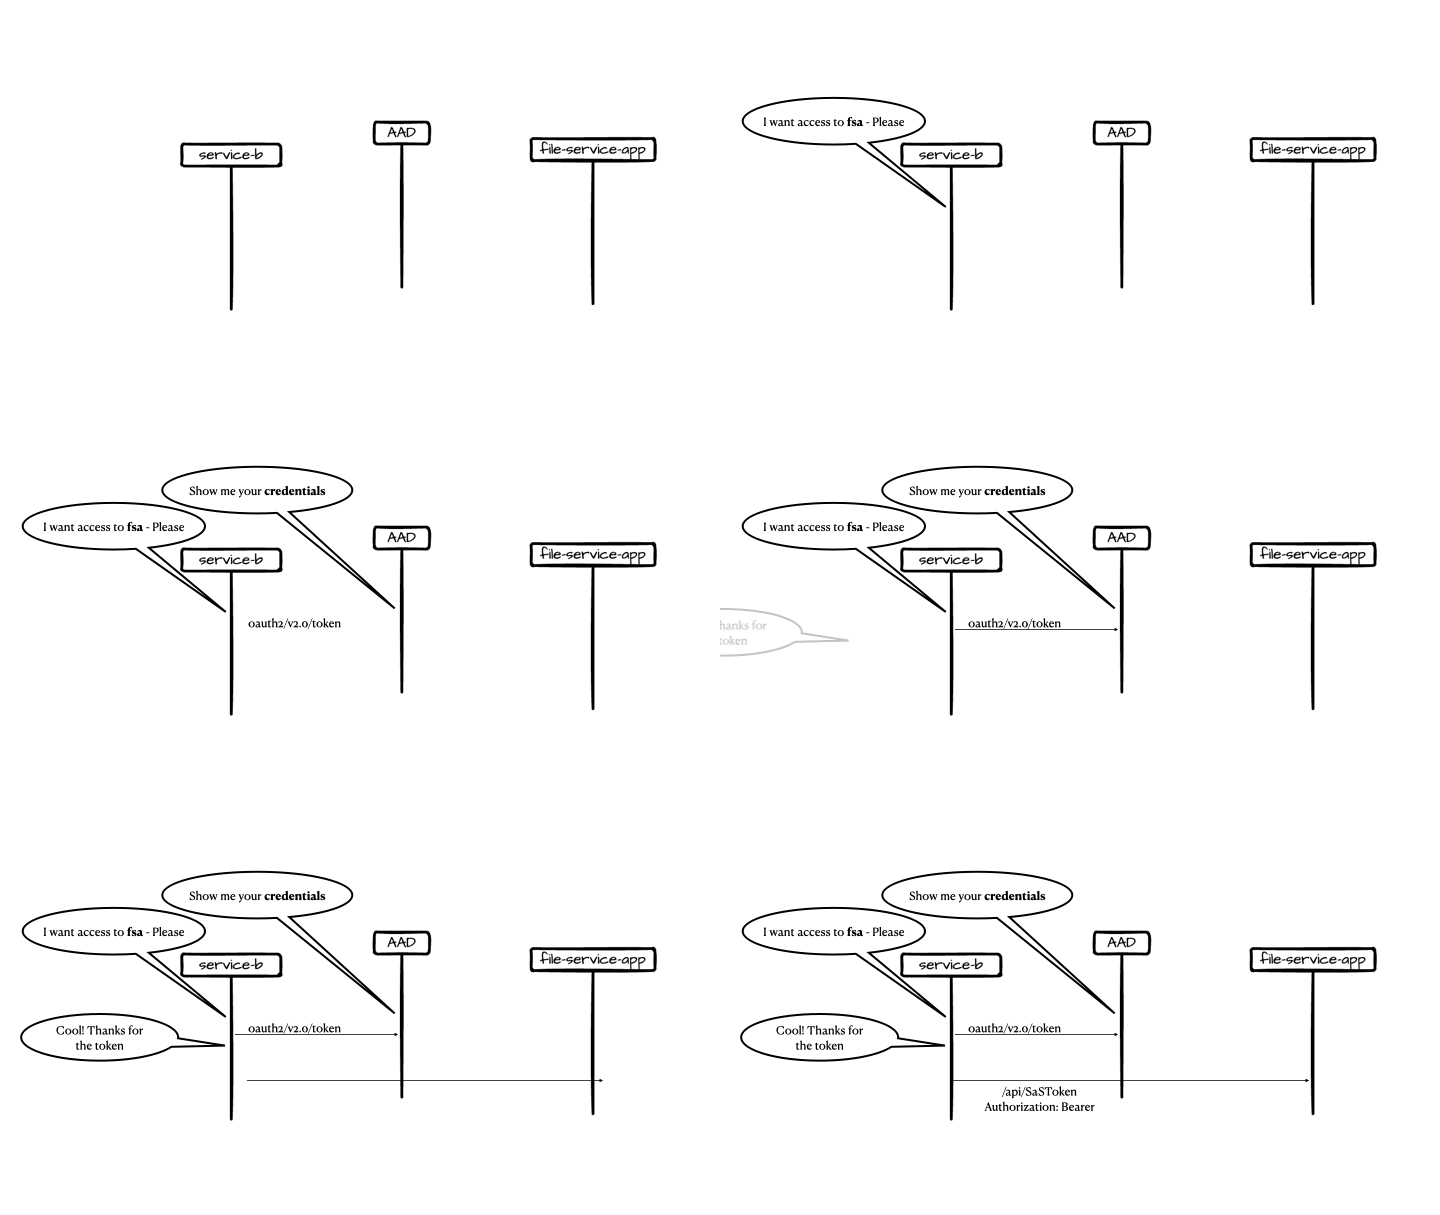
Caller1 makes a call to the authentication service (in this example AAD) for an access token. This flow is called client credentials flow.
-
Caller can continue to call the microservice with the token aquired.
The repo includes test.rest with sample POST call to obtain a token.
Here is a animated view of the flow:
-
Caller1 make a call to obtain a SaS token for a container2
-
ContainerApp, extracts the caller IP, creates the token, and return it to the caller
-
Caller uses the token to upload new file to the container in the DMZ storage
-
Second container app, validates the file uploaded is valid/clean and moves it to a verified storage account
1 - A caller is an authorized application, user or any other identity, the project has few sample clients that are able to leverage the provided APIs, it is an implementation decision which client to use.
2 - There are two options, either the caller provided an existing container name, or he can create a new one.
The project provides a few end-points, if the client did not create yet a designated container, he can call the api/SaSToken this will create a container with GUID as the name, and return a SaS token for that container. It is expected that the client will reuse this container in any consecutive calls. It will be implemented a validation for this.
Provides SaS token, based on the time restriction defined in configuration. A default implementation that also allows for IP restriction based on the caller IP is provided with the project.
Create a container and respond with the SaS token with permissions to create new blobs.
Gets a SaS token for given container with permissions to create new blobs.
Gets a read SaS token for the provided container and file path.
As part of the response, the full URI is provided together with the captured IP, the container name and also the breakdown of the URI which might be needed for few clients.
Here is a sample response:
{
    "ContainerName":"xxx969a1-e800-424a-b9c1-ab6f94e49xxx",
    "RemoteIp":"XX.XXX.XX.XXX",
    "RequestStatus":"Success",
    "SaSUri":"https://xxxxxxx.blob.core.windows.net/f7b969a1-e800-424a-b9c1-ab6f94e49b6d?sv=2021-08-06&se=2022-09-05T14%3A17%3A51Z&sip=xx.xxx.xx.xxx&sr=c&sp=racwdxyltmei&sig=XXXXXXX",
    "SasTokenBaseUri":"https://xxxxxxx.blob.core.windows.net/f7b969a1-e800-424a-b9c1-ab6f94e49b6d","SasTokenSig":"sv=2021-08-06&se=2022-09-05T08%3A24%3A10Z&sip=xx.xxx.xx.xxx&sr=c&sp=racwdxyltmei&sig=XXXXXXX"
}Return the list of files within a given container.
- Secured, the code must hosted in vnet enabled compute.
- Your storage must not be publicly exposed.
- All uploads are considered unsafe unless verified.
- Customer uploads must land on DMZ storage, with minimal, automatic clean up.
- Use .net6 as programing language
- Use Container Apps as the compute service
.NET knowledge will come handy if you wish to add capabilities, note the 'appsetting.json' file can be used for local debuging, make sure you would have there the 'AzureAd' section populated with your details.
Some of the areas that can be added:
-
Provision VNet, ensure all compute resources are within this network.
-
Enhance authorization, check for roles as an example.
-
Add addtional container app, which will audit the uploaded files and scan them for viruses.
With the first version, only the bear minimal capabilities were provided for customers who needs to support the following user stories. The suggested architecture, also calls for an audit or scanning capabilities that would ensure the uploaded files are safe before moving them to the secured area, as all files uploaded should be treated as un-safe.
-
The service validating file content is not implemented.
-
Authentication and Authorization flow are initial provisioned with minimal validation, addtional role assignment or any other means for authrization can be added by you.
-
Network security is out-of-scope.
