Installation | Usage | Discord | Troubleshooting
I built this in response to the severe tech scalping situation that's happening right now. Almost every tech product that's coming out right now is being instantly brought out by scalping groups and then resold at at insane prices. $699 GPUs are being listed for $1700 on eBay, and these scalpers are buying 40 carts while normal consumers can't get a single one. Preorders for the PS5 are being resold for nearly $1000. My take on this is that if I release a bot that anyone can use, for free, then the number of items that scalpers can buy goes down and normal consumers can buy items for MSRP. If everyone is botting, then no one is botting.
For Raspberry Pi installation and setup, go here.
This project uses Pipenv to manage dependencies. Hop in my Discord if you have ideas, need help or just want to tell me about how you got your new 3080. TerryFrench has also created a youtube video detailing how to get this project running on Windows 10 as well. Huge thanks to him.
pip install pipenv
pipenv shell
pipenv install
Run it
python app.py

Usage: app.py [OPTIONS] COMMAND [ARGS]...

Options:
  --help  Show this message and exit.

Commands:
  amazon
  nvidia
| Website | Auto Checkout | Open Cart Link | Test flag |
|---|---|---|---|
| nvidia.com | ✔ |
✔ |
✔ |
| amazon.com | ✔ |
||
| bestbuy.com | ✔ |
||
| evga.com | ✔ |
✔ |
Ok now we have a basic GUI. GUIs aren't my strong suit, but pretty much the top box is the settings for amazon and the bottom box is the settings for Nvidia.
- Open a chrome browser
- Log into Amazon
- Go to a product page
- Refresh the page until the 'Buy Now' option exists
- If the price is under the "Price Limit", it will buy the item.
Amazon flags
--no-image : prevents images from loading on amazon webdriver
Example usage:
python app.py amazon
Amazon Email []: hari@email.com
Amazon Password []: mypassword
Amazon Item URL []: https://www.amazon.com/dp/B08HHDP9DW
Maximum Price to Pay [1000]: 1000
...
INFO: "2020-09-19 00:07:02,199 - Logged in as hari@email.com
INFO: "2020-09-19 00:07:05,200 - Loading page: https://www.amazon.com/dp/B08HHDP9DW
INFO: "2020-09-19 00:07:06,452 - Loaded page for ASUS TUF Gaming NVIDIA GeForce RTX 3080 Graphics Card (PCIe 4.0, 10GB GDDR6X, HDMI 2.1, DisplayPort 1.4a, Dual Ball Fan Bearings, Military-Grade Certification, GPU Tweak II)
INFO: "2020-09-19 00:07:06,474 - Initial availability message is: Currently unavailable. We don't know when or if this item will be back in stock.
INFO: "2020-09-19 00:07:06,494 - Refreshing page.
INFO: "2020-09-19 00:07:07,695 - Current availability message is: Currently unavailable. We don't know when or if this item will be back in stock.
You can also save your amazon config to your environment variables. This will set them as the defaults in the CLI to save time entering them each time.
MacOS and Linux Bash Shells
export  amazon_email=user@email.com
export  amazon_password=supersecurepassword
export  amazon_item_url=https://www.amazon.com/dp/B08HHDP9DW?
export  amazon_price_limit=1000
Linux csh/tcsh
setenv  amazon_email user@email.com
setenv  amazon_password supersecurepassword
setenv  amazon_item_url https://www.amazon.com/dp/B08HHDP9DW?
setenv  amazon_price_limit 1000
Windows
set amazon_email=user@email.com
set amazon_password=supersecurepassword
set amazon_item_url=https://www.amazon.com/dp/B08HHDP9DW?
set amazon_price_limit=1000
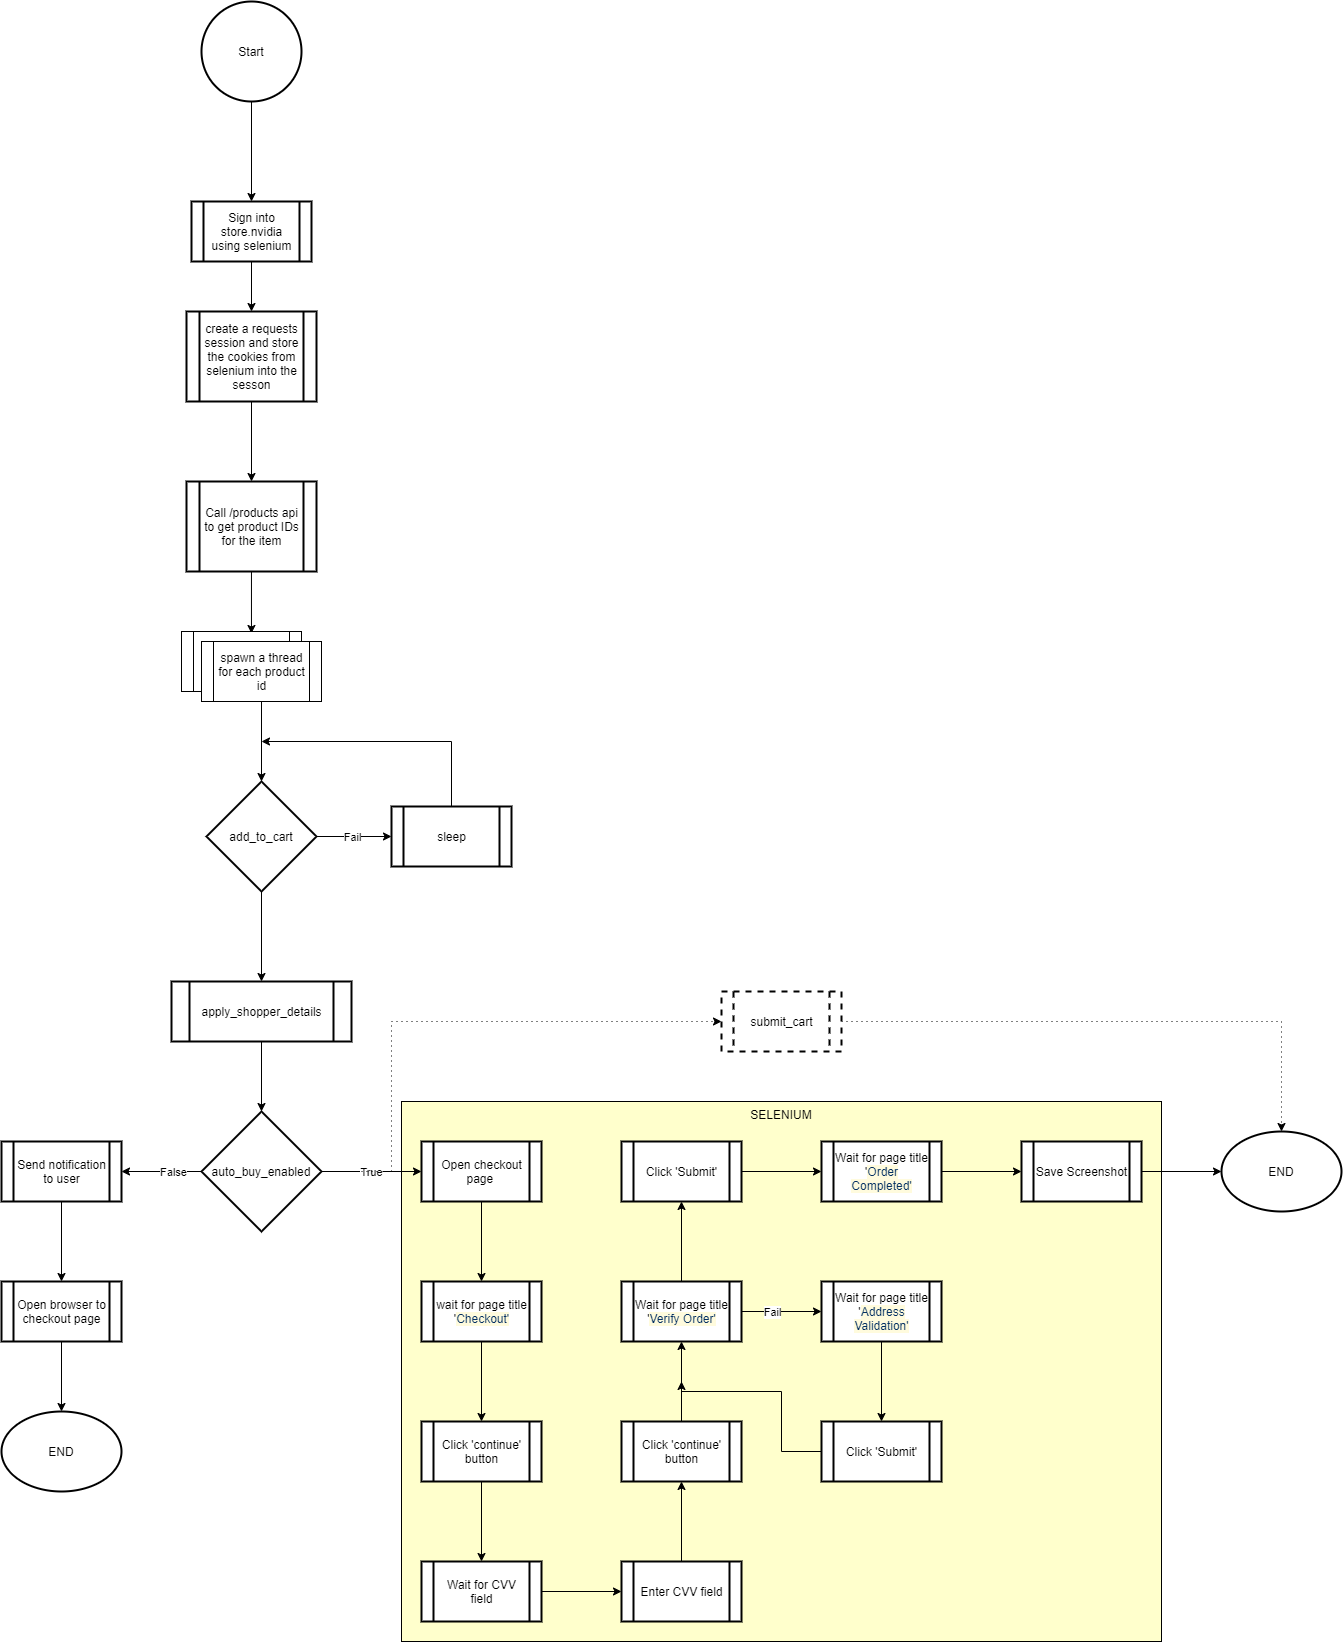
- Call Digitalriver API to get product number for the GPU selected (2060S, 3080, 3090)
- Call Digitalriver API to check if the GPU is in stock until it is in stock
- Will open a window in your default browser with the GPU in your cart when it is stock.
Nvidia flags
--test : runs a test of the checkout process, without actually making the purchase
Example usage:
python app.py nvidia
What GPU are you after?: 3080
What locale shall we use? [en_us]:
...
19092020 12:05:46 AM : Calling https://api.digitalriver.com/v1/shoppers/me/products/5438481700/inventory-status? : DEBUG -stores.nvidia
19092020 12:05:46 AM : Returned 200 : DEBUG -stores.nvidia
19092020 12:05:46 AM : Stock status is PRODUCT_INVENTORY_OUT_OF_STOCK : INFO -stores.nvidia
First be sure to have a Nvidia store account with all of your infos (billing address etc ...) already filled in).
Then make a copy of autobuy_config.template_json and name it autobuy_config.json. Be sure to remove all the single-line comments, which are denoted with #.
If this file exists and the credentials are valid, the bot will make a purchase for you.
{
  "NVIDIA_LOGIN": "fuckthesc@lpers.com",        # Your NVIDIA Store login
  "NVIDIA_PASSWORD": "12345",                   # Your NVIDIA Store password
  "FULL_AUTOBUY":false,                         # FALSE : Fill your infos but dont click on the last button / TRUE : Buy the card
  "CVV":"101",             # CCV code
  "BYPASS_ADDRESS_SUGGESTION":false             # Selects the address you entered not the one suggested
}
This is fairly basic right now. Just login to the best buy website in your default browser and then run the command as follows:
python app.py bestbuy --sku [SKU]
Example:
python app.py bestbuy --sku 6429440
Make a copy of evga_config.template_json to evga_config.json:
{
  "username": "hari@",
  "password": "password!",
  "card_pn": "10G-P5-3895-KR",
  "card_series": "3080",
  "credit_card" : {
            "name": "Hari ",
            "number": "234234",
            "cvv": "123",
            "expiration_month": "12",
            "expiration_year": "2023"
        }
}
Test run command (Uses old gpu list and then stops before finishing the order)
python app.py evga --test
Autobuy command:
python app.py evga --model [indentifier]
These are the series: "3090" or "3080" (any should work, untested)
P/N numbers can be found in URLs or on product pages such as newegg. They look like this:
10G-P5-3895-KR
10G-P5-3881-KR
10G-P5-3885-KR

if it doesn't load the correct page title (since the 3090 isn't listed yet), it will refresh every second until the correct page is loaded.
This uses a notifications handler that will support multiple notification channels.
To enable Twilio notifications, first go to https://www.twilio.com/ and create a free account and get a Twilio number.
Then make a copy of twilio_config.template_json and name it twilio_config.json. If this file exists and the credentials are
valid, the notification handler will send you an sms when it carts or purchases an item.
{
  "account_sid": "ACCOUNT_SID",
  "auth_token": "AUTH_TOKEN",
  "from": "YOUR TWILIO NUMBER",
  "to": "THE NUMBER YOU WANT TO SEND SMS TO"
}
To enable Discord notifications, first get your wehbook url. Use the directions here to get the webhook url.
Make a copy of the discord_config.template_json file and name it discord_config.json and place the webhook url here.
{
  "webhook_url": "Discord webhook url here"
}
To enable Telegram notifications, you have to create a new bot and get your chat id. Use the directions here (Creating your bot and Getting your Chat id sections).
Make a copy of the telegram_config.template_json file and name it telegram_config.json and place your BOT_TOKEN and BOT_CHAT_ID values here.
{
    "BOT_TOKEN" : "1234567890:abcdefghijklmnopqrstuvwxyz",
    "BOT_CHAT_ID" : "111222333"
}
It is possible to notify multiple users at once. Just add a list as the BOT_CHAT_ID value:
{
    "BOT_TOKEN" : "1234567890:abcdefghijklmnopqrstuvwxyz",
    "BOT_CHAT_ID" : ["111222333", "444555666"]
}
To enable shock notifications to your Pavlok Shockwatch,
store the url from the pavlok app in the pavlok_config.json file, you can copy the template from pavlok_config.template_json.
WARNING: This feature does not currently support adjusting the intensity, it will always be max (255).
{
  "base_url": "url goes here"
}
I suggest joining the #Support channel in Discord for personal assistance if these common fixes don't help.
Error: selenium.common.exceptions.WebDriverException: Message: unknown error: cannot find Chrome binary
The issue is that chrome is not installed in the expected location. See Selenium Wiki and the section on overriding the Chrome binary location .
The easy fix for this is to add an option where selenium is used (amazon.py)
chrome_options.binary_location="C:\Users\%USERNAME%\AppData\Local\Google\Chrome\Application\chrome.exe"
Error: selenium.common.exceptions.SessionNotCreatedException: Message: session not created: This version of ChromeDriver only supports Chrome version 85
You are not running the proper version of Chrome this requires. As of this update, the current version is Chrome 85. Check your version by going to chrome://version/ in your browser. We are going to be targeting the current stable build of chrome. If you are behind, please update, if you are on a beta or canary branch, you'll have to build your own version of chromedriver-py.
- Prereqs and Setup
sudo apt update
sudo apt upgrade
sudo apt install chromium-chromedriver
git clone https://github.com/Hari-Nagarajan/nvidia-bot
cd nvidia-bot/
pip3 install pipenv
export PATH=$PATH:/home/<YOURUSERNAME>/.local/bin
pipenv shell
pipenv install
-
Leave this Terminal window open.
-
Open the following file in a text editor:
/home/<YOURUSERNAME>/.local/share/virtualenvs/nvidia-bot-<RANDOMCHARS>/lib/python3.7/site-packages/selenium/webdriver/common/service.py
-
Edit line 38 from
self.path = executabletoself.path = "chromedriver", then save and close the file. -
Back in Terminal...
python app.py
- Follow Usage to configure the bot as needed.

