PySEP is a waveform and metadata download tool. The package also contains
RecSec, a record section plotting tool. As part of the
SCOPED toolkit, PySEP has been
containerized
using Docker.
PySEP uses ObsPy tools to request seismic data and metadata, process,
standardize and format waveform data, and write out SAC files with the underlying
motivation of preparing data for moment tensor inversions, although the
written files can be used for other purposes.
The main processing steps taken by PySEP are:
- Create or gather event metadata (QuakeML) with user-defined event parameters
- Gather station metdata (StationXML) in a bounding box surrounding an event,
- Curtail station list due to distance or azimuth constraints
- Gather three-component waveform data for chosen station catalog
- Quality check waveforms: remove gaps, null out missing components, address clipped amplitudes
- Preprocess waveforms: detrend, remove response, amplitude scaling, standardizing time series.
- Rotate streams to desired components: ZNE, RTZ, UVW (triaxial orthogonal)
- Append SAC headers with event and station metadata, and TauP arrivals
- Write per-component SAC files, and StationXML, QuakeML and MSEED files
- Write CAP (Cut-and-Paste) weight files for moment tensor inversions
- Write config YAML files which can be used to re-run data gathering/processing
- Plot a record section and source-receiver map
PySEP also has the capacity to:
- Interface with a Lawrence Livermore National Laboratory database of nuclear explosion and earthquake waveforms (see note)
- Allow access to embargoed waveform data and PASSCAL HDF5 (PH5) datasets
- Access pre-defined configuration files for data used in previous studies
- Input custom TauP models for arrival time estimation
We recommend installing PySEP into a Conda environment. Dependencies are
installed via Conda where possible, with Pip used to install PySEP itself.
This will set two command line tools pysep and recsec
conda create -n pysep python=3.10
conda activate pysep
git clone https://github.com/uafgeotools/pysep.git
cd pysep
conda install --file requirements.txt
pip install -e .PySEP comes with unit testing which should be run before and after making any changes to see if your changes have altered the expected code behavior.
cd pysep/tests
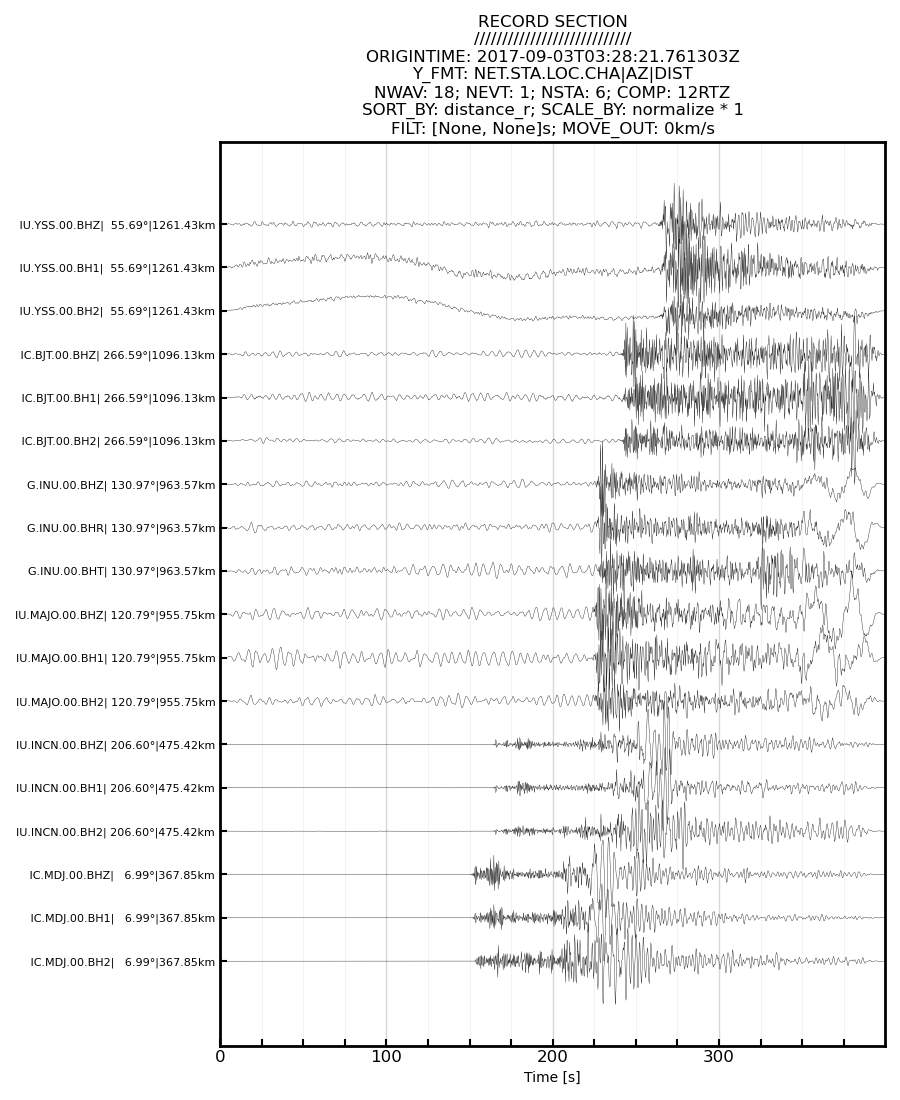
pytestAn example record section produced by the recsec tool inside PySEP
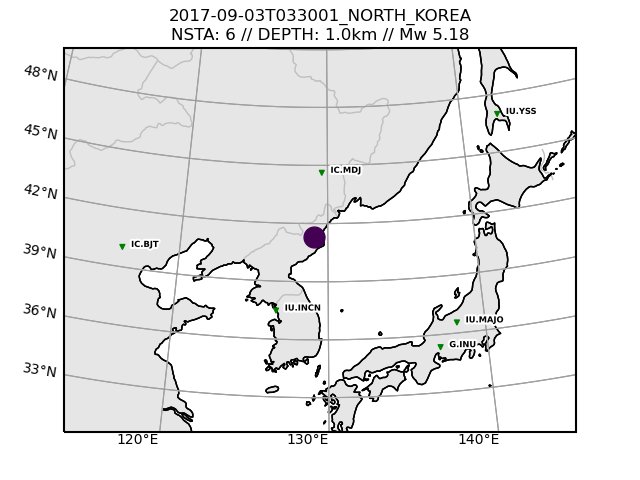
An example station map generated from collected metadata during a PySEP run
Normal users should use PySEP as a command line tool.
To bring up the command line tool help message:
pysep -h To list out available pre-defined configuration files
pysep -l  # or pysep --list

-p/--preset -e/--event
-p MTUQ2022_workshop -e 2009-04-07T201255_ANCHORAGE.yaml
-p MTUQ2022_workshop -e 2014-08-25T161903_ICELAND.yaml
-p MTUQ2022_workshop -e 2017-09-03T033001_NORTH_KOREA.yaml
-p MTUQ2022_workshop -e 2020-04-04T015318_SOUTHERN_CALIFORNIA.yaml
To run one of the pre-defined configuration files
pysep -p MTUQ2022_workshop -e 2017-09-03T033001_NORTH_KOREA.yaml To create a template configuration file that you must fill out with your own parameters
pysep -W # or pysep --writeTo run this newly created configuration file
pysep -c pysep_config.yamlTo use the same configuration file with multiple events, you can use an event file passed to PySEP through the command line.
When using this option, the event parameters inside the config file will be ignored, but all the other parameters will be used to gather data and metadata.
Event input files should be text files where each row describes one event with the following parameters as columns:
ORIGIN_TIME LONGITUDE LATITUDE DEPTH[KM] MAGNITUDE
For an example event input file called 'event_input.txt', call structure is:
pysep -c pysep_config.yaml -E event_input.txtThe new version of PySEP uses a file naming schema that is incompatible with previous versions, which may lead to problems in established workflows.
To honor the legacy naming schema of PySEP, simply use the --legacy_naming
argument in the command line. This will change how the event tag is formatted,
how the output directory is structured, and how the output SAC files are named.
pysep -c pysep_config.yaml --legacy_namingThe event tag used to name the output directory and written SAC files can be set
manually by the user using the --event_tag argument. If not given, the tag
will default to a string consisting of event origin time and Flinn-Engdahl
region (or just origin time if --legacy_naming is used). Other output files
such as the config file and ObsPy objects can be set as in the following:
pysep -c pysep_config.yaml \
    --overwrite_event_tag event_abc \
    --config_fid event_abc.yaml \
    --stations_fid event_abc_stations.txt \
    --inv_fid event_abc_inv.xml \
    --event_fid event_abc_event.xml \
    --stream_fid event_abc_st.ms
Please note: the output SAC file names are hardcoded and cannot be changed by the user. If this is a required feature, please open up a GitHub issue, and the developers will address this need.
PySEP also comes with a pretty sophisticated record section tool, which plots seismic data acquired by PySEP. When you have successfully collected your data, it will reside in the /SAC folder of the PySEP output directory.
To see available record section plotting commands
recsec -h # RECordSECtionTo plot the waveform data in a record section with default parameters
recsec --pysep_path ./SACTo plot a record section with a 7km/s move out, high-pass filtered at 1s s
recsec --pysep_path ./SAC --move_out 7 --min_period_s 1To sort your record section by azimuth and not distance (default sorting)
recsec --pysep_path ./SAC --sort_by azimuthHave a look at the -h/--help message and the docstring at the top of recsec.py
for more options.
Much of the aesthetic look of RecSec figures is hardcoded, however there are some keyword arguments that you can provide as flags which may help. The following parameters correspond to Matplotlib plot adjustments.
- ytick_fontsize: Fontsize of the Y-axis tick labels
- xtick_fontsize: Fontsize of the X-axis tick labels
- tick_linewidth: Linewidth of axes tick marks
- tick_length: Length of axes tick marks
- label_fontsize: Fontsize of X and Y axis labels
- axis_linewidth: Linewidth of border around figure
- title_fontsize: Fontsize of the title
- xtick_minor: Frequency of minor ticks on the X axis
- xtick_major: Frequency of major ticks on the X axis
To set one of these parameters, just set as a flag, e.g.,
recsec --pysep_path ./SAC --xtick_minor 100 --xtick_major 500RecSec can plot SPECFEM-generated synthetic seismograms in ASCII format. Here the domain should be defined by geographic coordinates (latitude/longitude). If your domain is defined in Cartesian, see below.
Record sections can be plotted standalone, or alongside observed seismograms to look at data-synthetic misfit.
To access metadata, RecSec requires the CMTSOLUTION and STATIONS file that were used by SPECFEM to generate the synthetics. Based on a standard SPECFEM3D_Cartesian working directory, plotting synthetics only would have the following call structure:
recsec --syn_path OUTPUT_FILES/ --cmtsolution DATA/CMTSOLUTION --stations DATA/STATIONSTo compare observed and synthetic data, you would have name the --pysep_path and tell RecSec to preprocess both data streams identically
recsec --pysep_path ./SAC --syn_path OUTPUT_FILES/ --cmtsolution DATA/CMTSOLUTION --stations DATA/STATIONS --preprocess bothPreprocessing flags such as filtering and move out will be applied to both observed and synthetic data.
Under the hood, RecSec uses some of ObsPy's geodetic functions to calculate distances and azimuths. Because of this, RecSec will fail if coordinates are defined in a Cartesian coordinate system (XYZ), which may often be the case when working in SPECFEM2D or in a local domain of SPECFEM3D_Cartesian.
To circumvent this, RecSec has a flag --cartesian, which will swap out the
read functions to work with a Cartesian coordinate system. The call is very
similar to the above:
For SPECFEM3D_Cartesian this would look like
recsec --syn_path OUTPUT_FILES --cmtsolution DATA/CMTSOLUTION --stations DATA/STATIONS --cartesianFor SPECFEM2D, the source file may not be a CMTSOLUTION. Additionally, the default seismogram components may not be defined in ZNE
recsec --syn_path OUTPUT_FILES --cmtsolution DATA/SOURCE --stations DATA/STATIONS --components Y --cartesianIt is often useful to compare two sets of synthetic seismograms, where one set represents 'data', while the other represents synthetics. For example, during a tomographic inversion, a Target model may be used to generate data.
RecSec can plot two sets of synthetics in a similar vein as plotting
data and synthetics together. The User only needs to add the --synsyn flag
and provide paths to both --pysep_path and --syn_path.
NOTE: RecSec makes the assumption that both sets of synthetics share the same metadata provided in the
--cmtsolutionand--stationsflags.
Let's say you've stored your 'data' in a directory called 'observed/' and your synthetics in a directory called 'synthetic/'
recsec --pysep_path observed/ --syn_path synthetic/ --cmtsolution DATA/CMTSOLUTION --stations DATA/STATIONS --synsynMore advanced users can use PySEP as a scripting tool rather than a command line tool.
All of the gathered data/metadata are saved as attributes of the Pysep class with typical ObsPy naming schema
>>> from pysep import Pysep
>>> sep = Pysep(config_file='pysep_config.yaml')
>>> sep.run()
>>> print(sep.st[0].stats.sac)
>>> sep.inv
>>> sep.event
Although not the preferred method of interacting with PySEP, you can forgo the config file and pass parameters directly to the instantiation of the PySEP class, making PySEP a bit more flexible.
>>> from pysep import Pysep
>>> sep = Pysep(origin_time="2000-01-01T00:00:00", event_latitude=64.8596,
                event_longitude=-147.8498, event_depth_km=15., ....
                )
Check out the Pysep.run() function for other API options for using PySEP.
The RECord SECtion tool can also be scripted. It simply requires an ObsPy Stream object as input. Tunable parameters can be fed in as input variables.
>>> from obspy import read
>>> from pysep.recsec import plotw_rs
>>> st = read()
>>> plotw_rs(st=st, sort_by="distance")To append SAC headers to your own seismic data, you can directly use the
PySEP utility functions append_sac_headers and
format_sac_header_w_taup_traveltimes
>>> from pysep.utils.cap_sac import append_sac_headers, format_sac_header_w_taup_traveltimes
>>> from obspy import read, read_events, read_inventory
>>> st = read()
>>> inv = read_inventory()
>>> event = read_events()[0]
>>> st = append_sac_headers(st=st, inv=inv, event=event)
>>> st = format_sac_header_w_taup_traveltimes(st=st, model="ak135")PySEP contains a utility function read_synthetics to read in
SPECFEM-generated synthetics with appropriately crafted SAC headers.
Given a standard SPECFEM3D working directory, reading in SPECFEM synthetics
and saving them as SAC files might look something like:
>>> from pysep.utils.io import read_synthetics
>>> st = read_synthetics(fid="OUTPUT_FILES/NZ.BFZ.BXE.semd",
                         cmtsolution="DATA/CMTSOLUTION",
                         stations="DATA/STATIONS")
>>> for tr in st:
>>> st.write(f"{tr.get_id()}.sac", format="SAC")Data are often stored in custom databases that we cannot predict the structure of. To point PySEP at your local databases, the simplest method would be to find a way to read your data and metadata into ObsPy objects, which you can then feed into the PySEP machinery.
>>> from pysep import Pysep
>>> from obspy import read, read_events, read_inventory
>>> st = read()
>>> inv = read_inventory()
>>> event = read_events()[0]
>>> sep = Pysep(st=st, inv=inv, event=event, config_file="config.yaml")Chinook is University of Alaska Fairbanks' (UAF) high performance computer. We can run PySEP on Chinook using Docker containers through Singularity/Apptainer.
PySEP has been containerized directly, and any changes pushed to the repo will trigger the container to rebuild, keeping everything up-to-date. The following code snippet downloads the correct SCOPED container. and runs the PySEP help message on Chinook.
module load singularity
singularity pull ghcr.io/seisscoped/pysep:centos7
singularity exec -c pysep_centos7.sif pysep -h
To run a data download we will need to mount the local filesystem into the
container using the --bind command. Using the Anchorage example event:
singularity exec -c --bind $(pwd):/home1 pysep_centos7.sif \
    bash -c "cd /home1/; pysep -p mtuq_workshop_2022 -e 2009-04-07T201255_ANCHORAGE.yaml"
In the above example, the -c/--contain flag preserves the internal container
filesystem, the -B/--bind flag binds the current working directory on Chinook
(i.e., pwd)to a directory called /home1 within the container, and then the
bash -c command changes to this /home1 directory and runs PySEP. Files are
subsequently saved to the local filesystem in our current working directory.
RecSec, the record section plotting tool, can be run from the command line
using a similar format. With the Anchorange example files we just generated:
cd 2009-04-07T201255_SOUTHERN_ALASKA/
singularity exec -c --bind $(pwd):/home1 ../pysep_centos7.sif \
bash -c "cd /home1; recsec --pysep_path SAC/ --min_period 10 --save record_section_tmin10.png"PySEP interfaces with the databases of:
-
W. Walter et al. (2006) An assembled western United States dataset for regional seismic analysis ISSO 9660 CD, LLNL release UCRL-MI-222502
Download link: https://ds.iris.edu/mda/18-001


