Yuang Peng, Yuxin Cui, Haomiao Tang, Zekun Qi, Runpei Dong, Jing Bai, Chunrui Han, Zheng Ge, Xiangyu Zhang and Shu-tao Xia
Project Page | Arxiv | Benchmark | HuggingFace

DreamBench++ builds a fair benchmark for personalized image generation.
- We collected 150 diverse images and 1350 prompts containing simple, stylized, and imaginative content.
- We use multimodal large language models (e.g., GPT4o) to construct automated evaluation metrics aligned with human preferences.
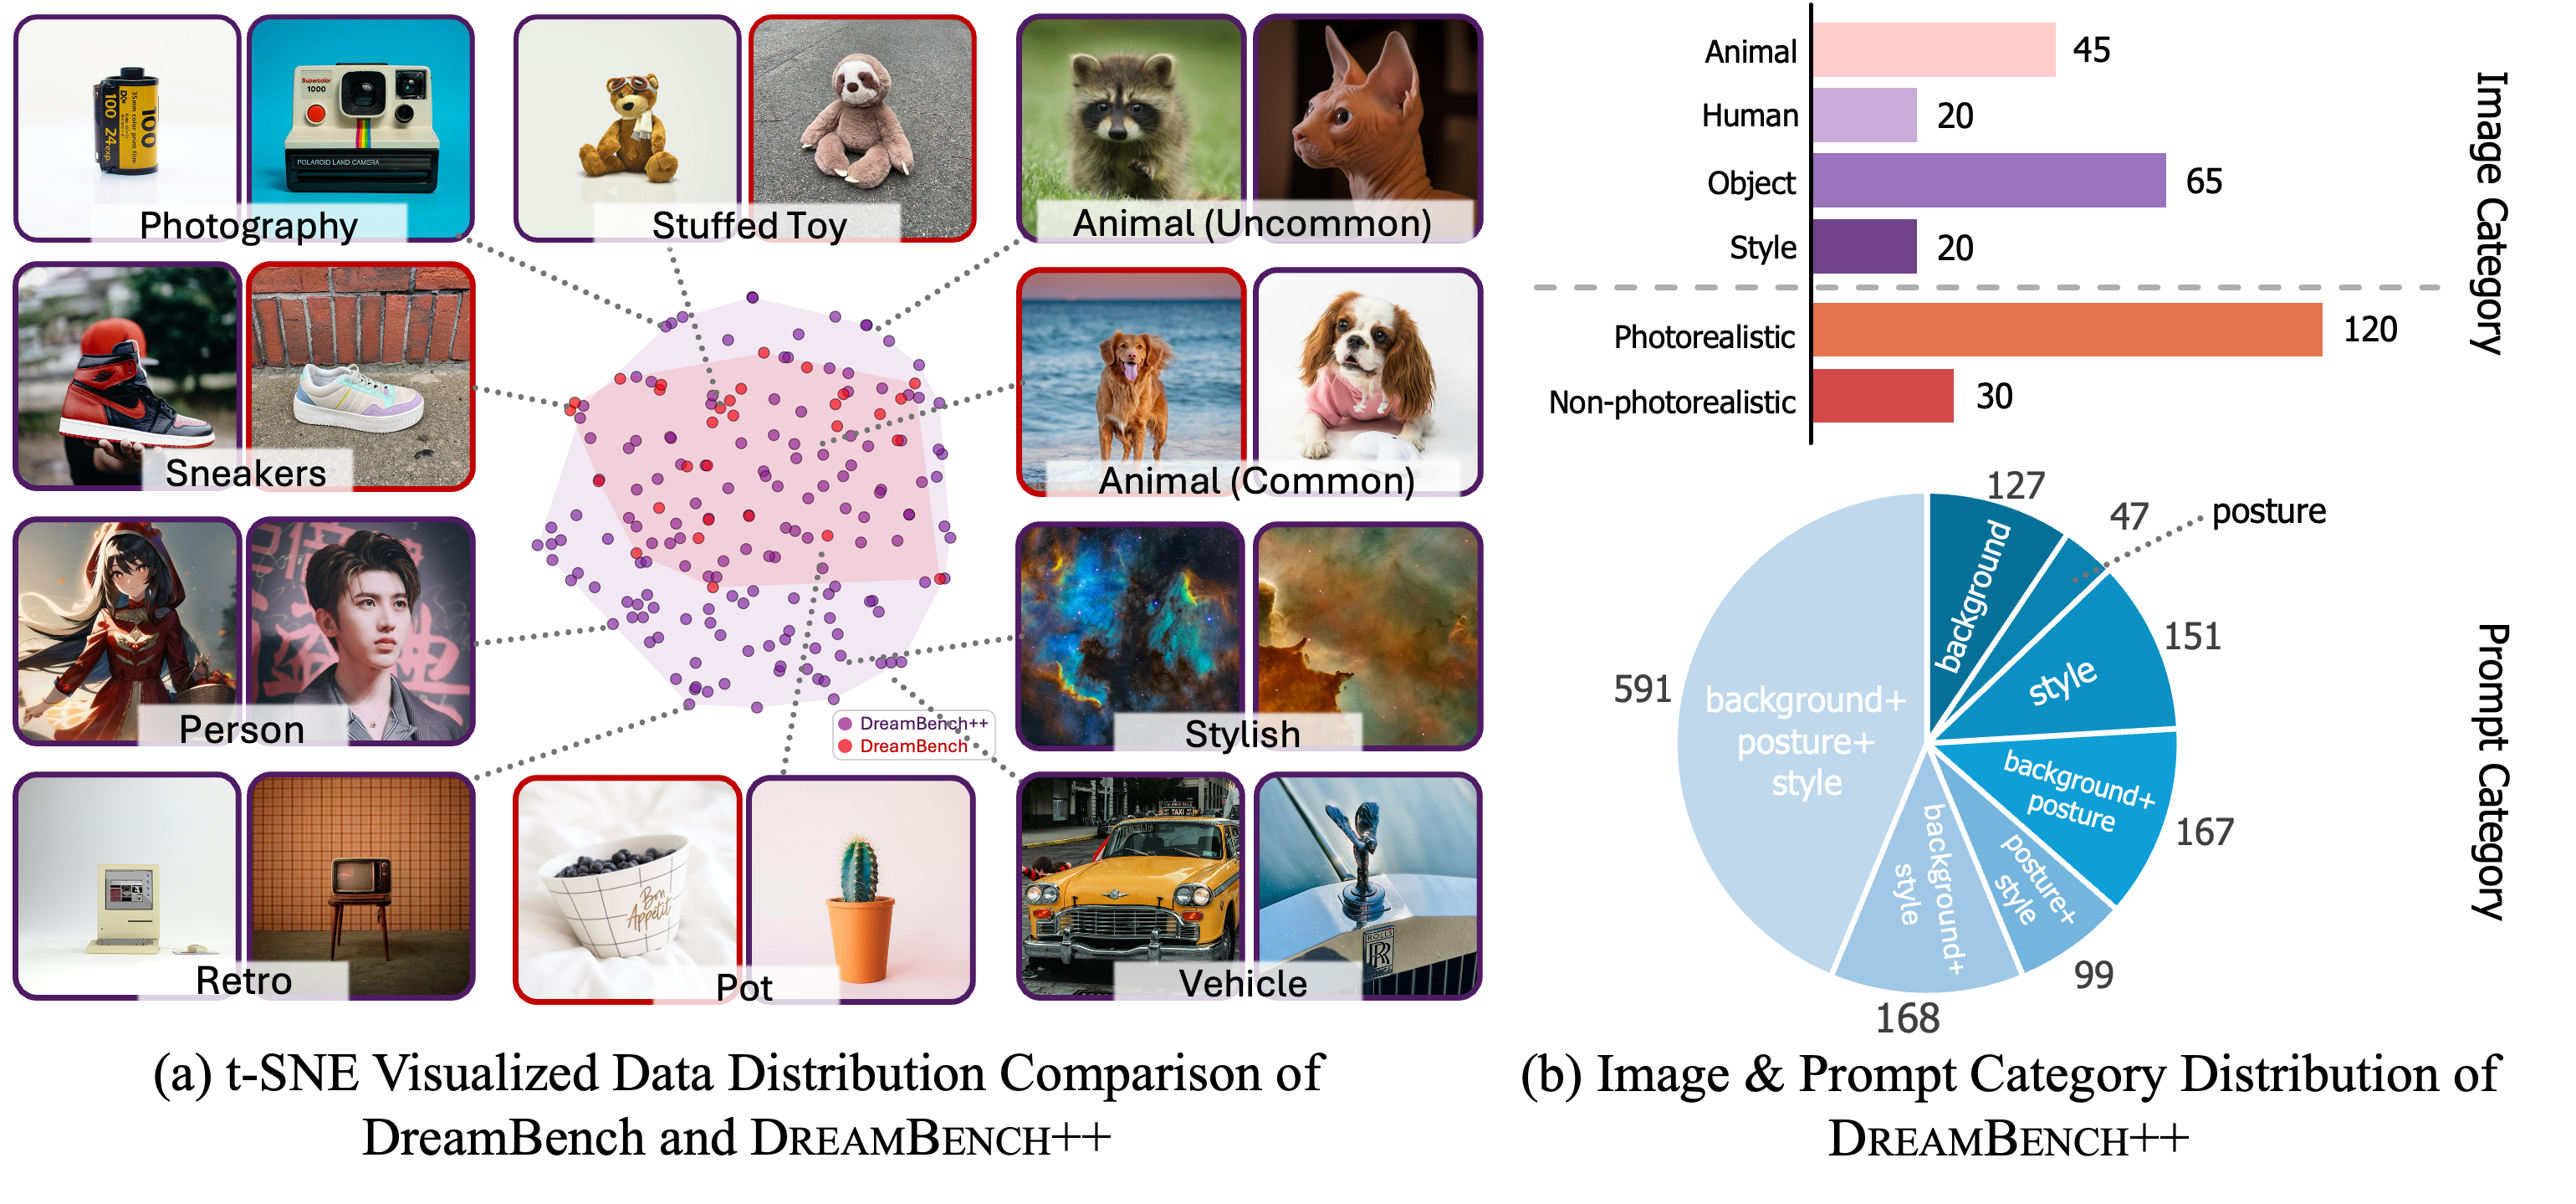
The image above shows the visualization of data distribution. (a) Images comparison between DreamBench and DreamBench++ using t-SNE. (b) Image and prompt distribution of DreamBench++.
DreamBench++ contains three categories: live subject (animals and humans), object, and style, with a total of 150 images. Among them, 120 images are photorealistic and 30 are non-photorealistic. Each image has 9 corresponding prompts, each with varying levels of difficulty, including 4 prompts for photorealistic styles, 3 for non-photorealistic styles, and 2 for complicated and imaginative content.
Most of these pictures come from the author's own collection, unsplash, rawpixel, and Google Image Search. Each image’s copyright status has been verified for academic suitability.
You can download the dataset from Google Drive or HuggingFace. After downloading the dataset, you can preview the dataset in the following ways:
pip install streamlit
cd data
streamlit run preview.pyInstall necessary packages:
git clone https://github.com/yuangpeng/dreambench_plus.git
cd dreambench_plus
pip install -e .(Optional) If you want to evaluate DreamBooth or Textual Inversion, you first need to train on the DreamBench++ sample.
python dreambench_plus/generate_models.py \
--method dreambooth_sd \
--start 0 --end 150
Then you can run the following command to generate images If you evaluate DreamBooth or Textual Inversion, you need to specify --db_or_ti_output_dir to the output directory of the models trained above.
torchrun dreambench_plus/generate_images.py \
--method blip_diffusion \
--use_default_params True
You can also use other hyperparameters for inference. All parameter lists can be queried through torchrun dreambench_plus/generate_images.py --help.
We support multi-GPU parallel inference. For example, you can use the following command to use a single-node with 8 gpus for accelerated inference. For more usage, please refer to the torchrun documentation.
torchrun --nproc-per-node=8 dreambench_plus/generate_images.py \
--method blip_diffusion \
--use_default_params True
Output images will be organized in the following structure:
samples
└── blip_diffusion_gs7_5_step100_seed42_torch_float16
    ├── src_image
    │   ├──live_subject_animal_00_kitten
    │   │   ├── 0_0.jpg
    │   │   ├── 0_1.jpg
    │   │   ├── ...
    │   ├── ...
    ├── text
    │   ├── live_subject_animal_00_kitten
    │   │   ├── 0_0.txt
    │   │   ├── 0_1.txt
    │   │   ├── ...
    │   ├── ...
    ├── tgt_image
    │   ├── live_subject_animal_00_kitten
    │   │   ├── 0_0.jpg
    │   │   ├── 0_1.jpg
    │   │   ├── ...
    │   ├── ...
├── negative_prompt.txtYou can evaluate the generated images using DINO and CLIP. You can run the following command to evaluate the generated images. The --dir parameter specifies the directory of the generated images. The --nproc-per-node parameter specifies the number of GPUs used for evaluation.
torchrun --nproc-per-node=8 dreambench_plus/eval_clip_and_dino.py --dir samples/blip_diffusion_gs7_5_step100_seed42_torch_float16First, you need to write the directory of the method and the corresponding generated image into METHODS in dreambench_plus/constants.py, and fill in your openai api key
Then you can run the following command to evaluate the generated images using GPT. For evaluations of concept preservation, you need to specify --category to utilize a different prompt for evaluation. For prompt following evaluations, there is no such parameter.
python --method "DreamBooth LoRA SDXL" \
--out_dir data_gpt_rating/concept_preservation_full/dreambooth_lora_sdxl \
--category subject \
--ablation_settings full
After running the above command, you can obtain the GPT score results in the out_dir directory. Then you can get the final score by running the following command:
python dreambench_plus/benchmarking.pyTo reproduce the results in the paper, please download the human rating data and GPT rating data from Google Drive and unzip them.
You can run the following command to obtain the experimental results (GPT Score and Krippendorff Analysis) in the paper:
python dreambench_plus/benchmarking.py
python dreambench_plus/krippendorff_analysis.pyIf you find DreamBench++ useful for your research and applications, please cite using this BibTeX:
@article{peng2024dreambench,
    author={Yuang Peng and Yuxin Cui and Haomiao Tang and Zekun Qi and Runpei Dong and Jing Bai and Chunrui Han and Zheng Ge and Xiangyu Zhang and Shu-Tao Xia},
    title={DreamBench++: A Human-Aligned Benchmark for Personalized Image Generation},
    journal={CoRR},
    volume={abs/2406.16855},
    year={2024},
    url={https://dreambenchplus.github.io/},
}