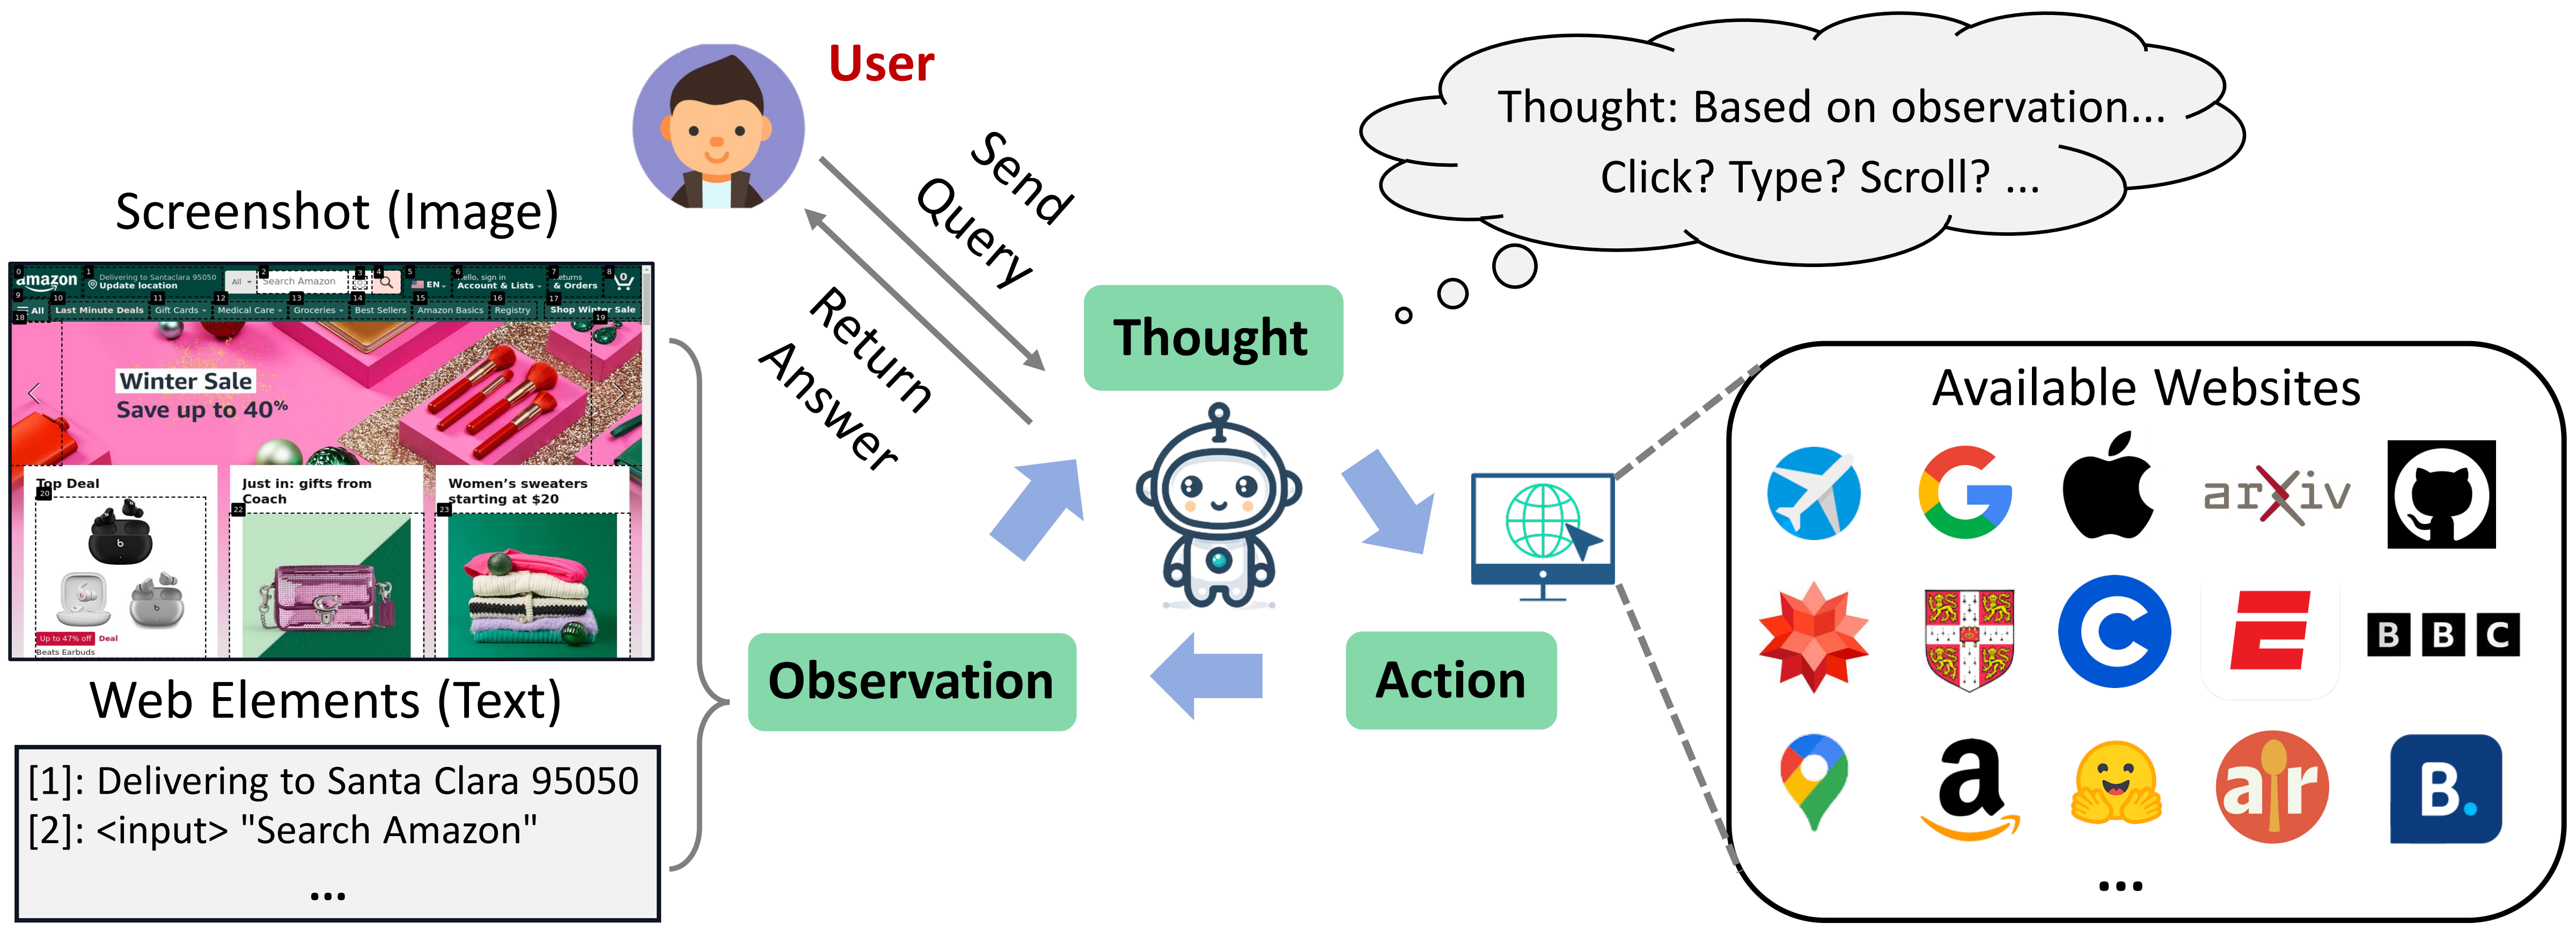
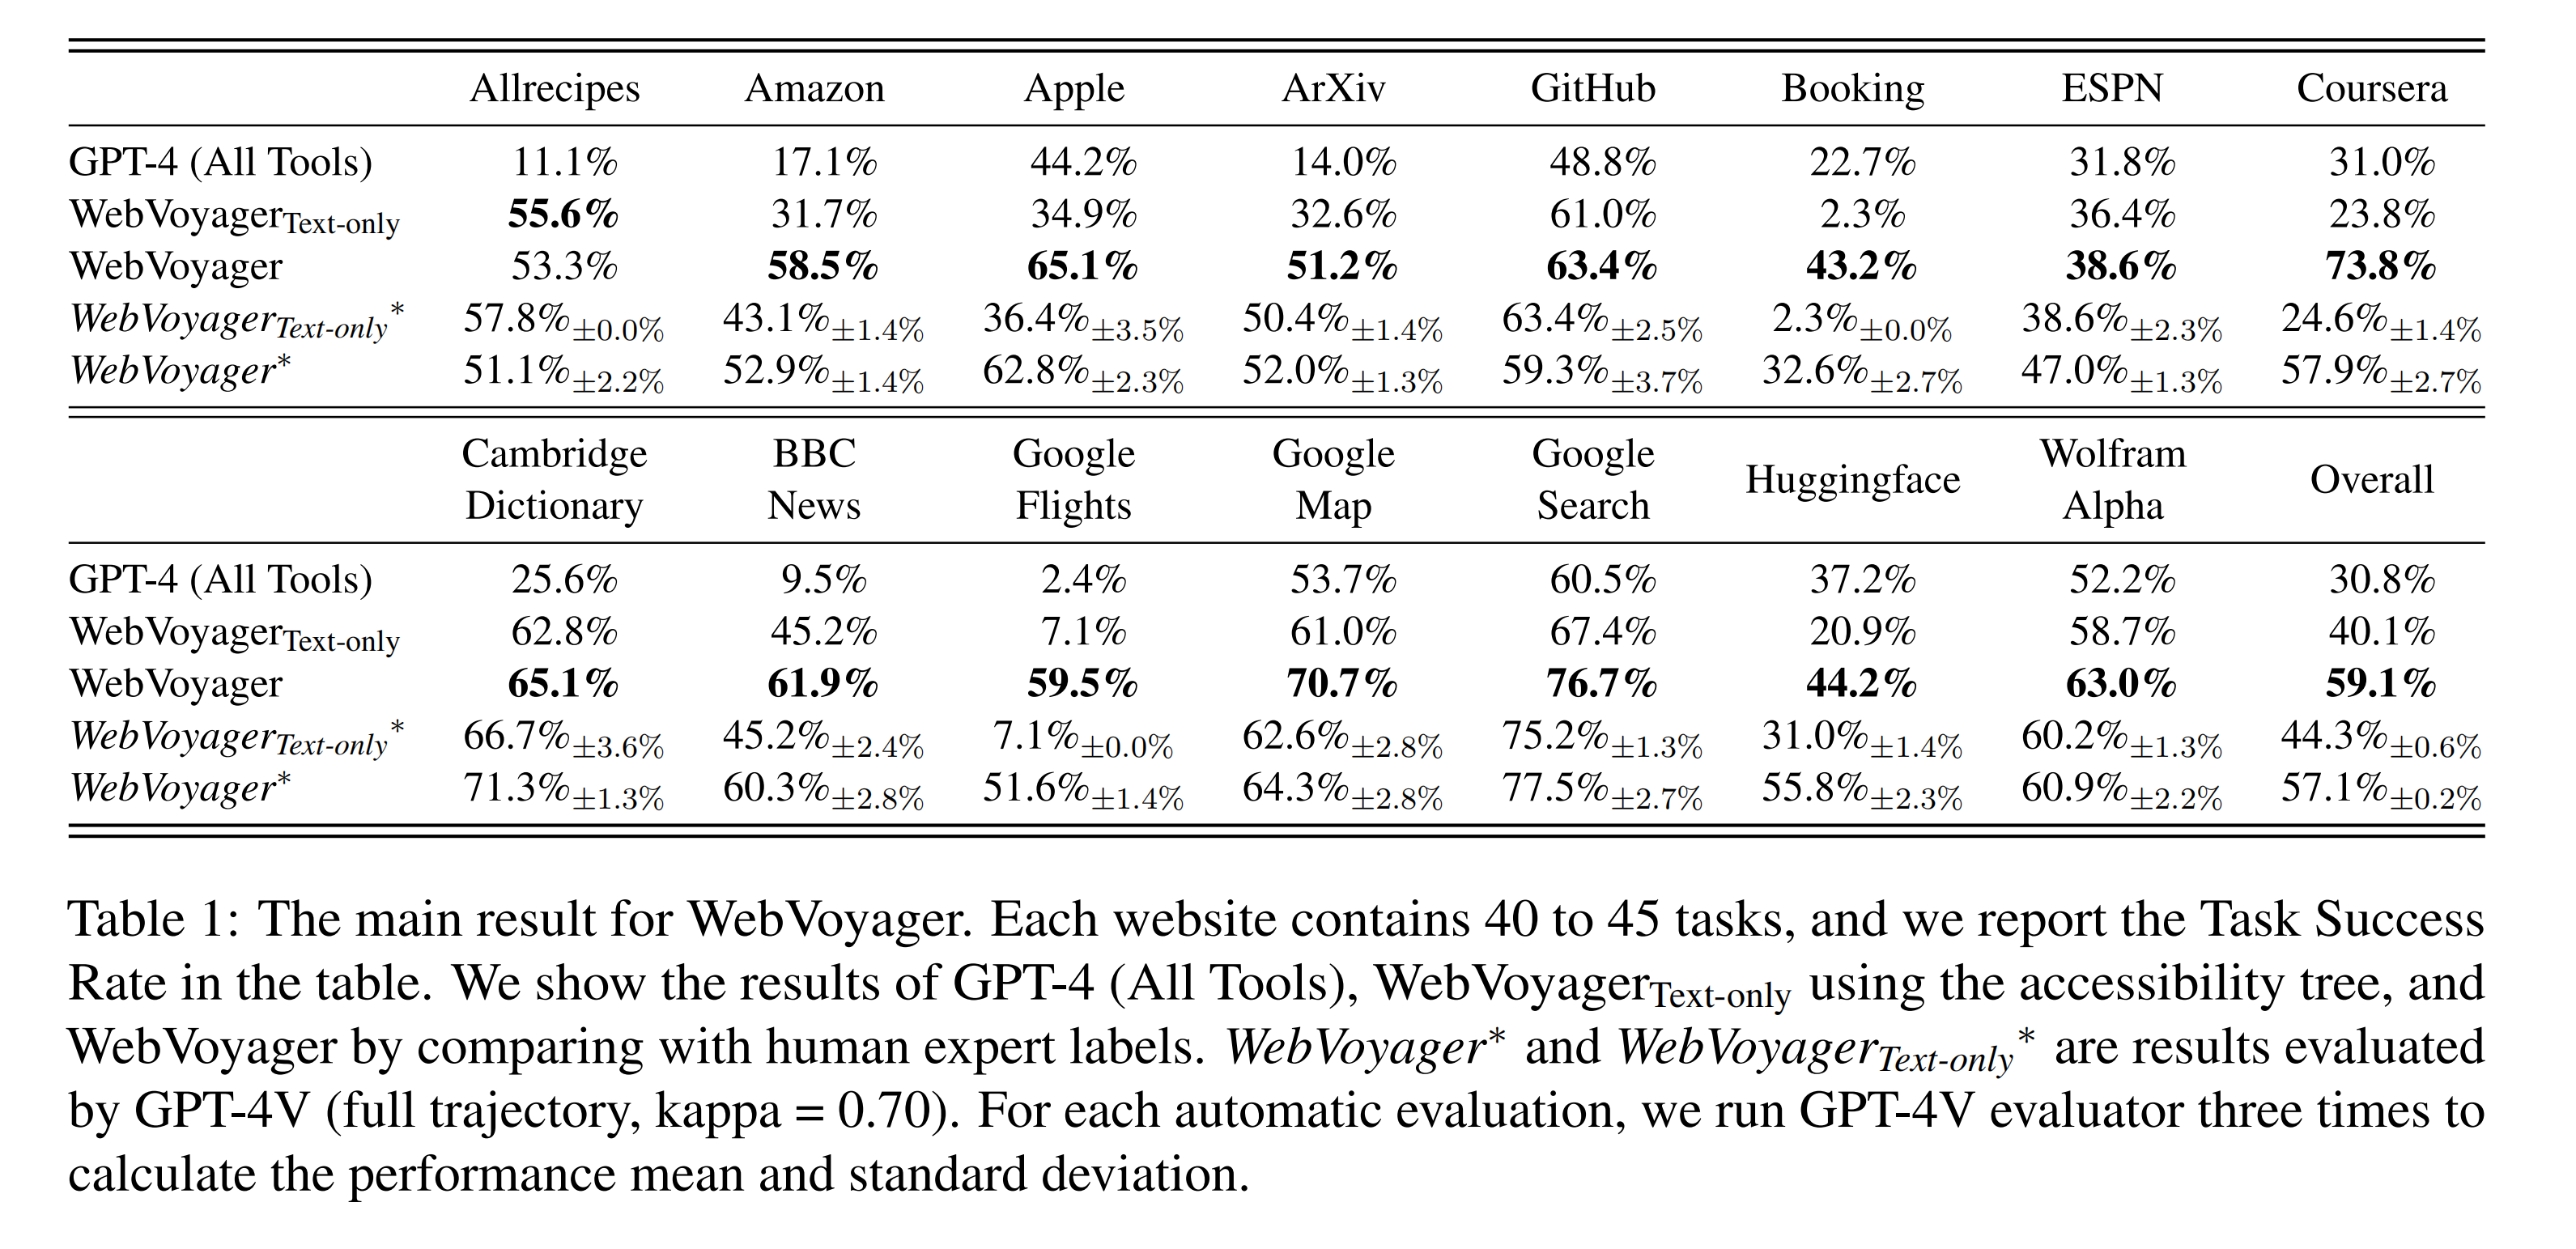
This repo contains the data and implementation of our paper WebVoyager. WebVoyager is an innovative Large Multimodal Model (LMM) powered web agent that can complete user instructions end-to-end by interacting with real-world websites.
- Multimodal Web Agent. We implement WebVoyager that integrates textual and visual information to address web tasks end-to-end and introduce a generalist planning approach for navigation.
- Online Environment. We build an online web browsing environment using Selenium.
- Diverse Web Tasks We offer a variety of tasks centered on widely used websites and introduce a method for expanding these tasks.
- Evaluation Tool We propose an automated evaluation protocol using GPT-4V.
We use Selenium to build the online web browsing environment.
- Make sure you have installed Chrome. (Using the latest version of Selenium, there is no need to install ChromeDriver.)
- If you choose to run your code on a Linux server, we recommend installing chromium. (eg, for CentOS:
yum install chromium-browser) - Create a conda environment for WebVoyager and install the dependencies.
conda create -n webvoyager python=3.10
conda activate webvoyager
pip install -r requirements.txt
To test WebVoyager, we utilize a semi-automated approach to generate and filter 643 task queries, covering 15 websites, with each website containing 40+ queries. The dataset can be found in data/WebVoyager_data.jsonl.
- For each data entry, we provide a task description along with its corresponding website.
- Some tasks are time-sensitive and are primarily distributed in Booking and Google Flights. Currently, we need to manually update the time before running.
- We have labelled each task with a brief reference answer, which is placed in
data/reference_answer.json.
Additionally, we extract 90 web browsing tasks (Level 1 and Level 2) from the GAIA dataset (validation). View the tasks in data/GAIA_web.jsonl
- In GAIA validation set, the authors provide Annotator Metadata and specify the tools ("web browser" or "search engine"). We extract tasks based on this information.
- GAIA does not provide a corresponding website for each task, so we set the starting website for each task to be Google Search.
The existing data can form a relatively rich task pool, and we recommend using GPT-4 (https://chat.openai.com) to expand the data. Below is a sample prompt, you can modify or redesign the prompt to meet your demands.
Here are some example tasks and the websites that need to be interacted with to solve these tasks.
"""
<TASK: xxx; WEB: xxx;>
<other in-context examples>
"""

Please carefully analyze the above TASKs and then generate new TASKs for {website}. Please use diverse descriptions and do not repeat the task descriptions in examples.

Pay attention:
1. Do not include the requirement to view videos in the task.
2. In the generated task, if you need to declare a specific date in the future (such as booking, flights ...), you can choose the date in the range of <date 1> to <date 2>.
3. The generated task should have a clear goal and should not require complicated web page operations.
4. When looking for real-time information in the past (such as ArXiv, BBC News ...), don't ask for too much information for a certain period of time in the past, as this requires a lot of web scrolling and page flipping. But you may request information for certain points in time, e.g. latest.
5. To improve randomness and diversity, please try not to repeat entities that were asked about in examples.

Think carefully about the functions of given websites, and please note that the generated TASK can be solved by the corresponding website. The format of the answer must be: TASK: {Generated-task}|||WEB: {Website-name, https-address}
After setting up the environment, you can start running WebVoyager.
- Copy the examples you want to test into
data/tasks_test.jsonl. For Booking and Google Flights tasks, please manually update the date in the task if it is outdated. - Modify the api_key in
run.sh
You can run WebVoyager with the following command:
bash run.shThe details of run.sh:
#!/bin/bash
nohup python -u run.py \
    --test_file ./data/tasks_test.jsonl \
    --api_key YOUR_OPENAI_API_KEY \
    --headless \
    --max_iter 15 \
    --max_attached_imgs 3 \
    --temperature 1 \
    --fix_box_color \
    --seed 42 > test_tasks.log &
For WebVoyager (Text only), an example script can be:
#!/bin/bash
nohup python -u run.py \
    --test_file ./data/tasks_test.jsonl \
    --api_key YOUR_OPENAI_API_KEY \
    --headless \
    --max_iter 15 \
    --max_attached_imgs 1 \
    --temperature 1 \
    --text_only \
    --api_model gpt-4-1106-preview \
--seed 42 > test_tasks_text_only.log &General:
--test_file: The task file to be evaluated. Please refer to the format of the data file in thedata.--max_iter: The maximum number of online interactions for each task. Exceeding max_iter without completing the task means failure.--api_key: Your OpenAI API key.--output_dir: We should save the trajectory of the web browsing.--download_dir: Sometimes Agent downloads PDF files for analysis.
Model:
--api_model: The agent that receives observations and makes decisions. In our experiments, we usegpt-4-vision-preview. For text-only setting, models without vision input can be used, such asgpt-4-1106-preview.seed: This feature is in Beta according to the OpenAI Document.--temperature: To control the diversity of the model, note that setting it to 0 here does not guarantee consistent results over multiple runs.--max_attached_imgs: We perform context clipping to remove outdated web page information and only keep the most recent k screenshots.--text_only: Text only setting, observation will be accessibility tree.
Web navigation:
--headless: The headless model does not explicitly open the browser, which makes it easier to deploy on Linux servers and more resource-efficient. Notice: headless will affect the size of the saved screenshot, because in non-headless mode, there will be an address bar.--save_accessibility_tree: Whether you need to save the Accessibility Tree for the current page. We mainly refer to WebArena to build the Accessibility Tree.--force_device_scale: Set device scale factor to 1. If we need accessibility tree, we should use this parameter.--window_width: Width, default is 1024.--window_height: Height, default is 768. (1024 * 768 image is equal to 765 tokens according to OpenAI pricing.)--fix_box_color: We utilize GPT-4-ACT, a Javascript tool to extracts the interactive elements based on web element types and then overlays bounding boxes. This option fixes the color of the boxes to black. Otherwise it is random.
Prompt optimisation is a complex project which directly affects the performance of the Agent. You can find the system prompt we designed in prompts.py.
The prompt we provide has been tweaked many times, but it is not perfect, and if you are interested, you can do your own optimisation without compromising its generality (i.e. not giving specific instructions for specific sites in the prompt). If you just need the Agent for some specific websites, then giving specific instructions is fine.
If you want to add Action to the prompt, or change the Action format, it is relatively easy to change the code. You can design your own extract_information function to parse the model's output and modify run.py to add or modify the way of action execution.
The results will be saved in the output dir you set, in this experiment we use results and we put some of the results in results/examples. The results folder for each task contains interact messages and several screenshots.
We can look at the screenshots, supplemented by the agent's thought and action in interact_messages, to determine whether the path meets the requirements of the task.
We provide the task, the responses from WebVoyager, and the last k screenshots to the GPT-4V and ask it to judge whether the agent has successfully completed the task.
We provide our evaluation tool in evaluation.
You can perform auto evaluation by executing evaluation/run_eval.sh.
#!/bin/bash
nohup python -u auto_eval.py \
    --api_key YOUR_OPENAI_API_KEY \
    --process_dir ../results/examples \
    --max_attached_imgs 15 > evaluation.log &
Please update the api_key and process_dir in the above script and then run the following command.
cd evaluation
bash run_eval.shIf you find our work helpful, please consider citing our paper:
@article{he2024webvoyager,
  title={WebVoyager: Building an End-to-End Web Agent with Large Multimodal Models},
  author={He, Hongliang and Yao, Wenlin and Ma, Kaixin and Yu, Wenhao and Dai, Yong and Zhang, Hongming and Lan, Zhenzhong and Yu, Dong},
  journal={arXiv preprint arXiv:2401.13919},
  year={2024}
}
This is not an officially supported Tencent product. The content generated by the model is influenced by factors such as the non deterministic output of the OpenAI API, changes in prompts, and style changes or pop-ups on website pages, and the project does not guarantee its accuracy. The project does not assume any legal responsibility for any content output from the model, any web pages viewed, or any data obtained, and does not assume any responsibility for any losses that may arise from the use of the relevant resources and output results.


