This is a document to help me learn React Native, including setup, tooling etc. Started: 12/1/20
npx react-native init ProjectNameHere
- Start Metro
Metro: "takes in an entry file and various options, and returns a single JavaScript file that includes all your code and its dependencies."
(Can use Yarn as well)
npx react-native start
Keep Metro running in a separate terminal.
- Start the application
npx react-native run-android
- Modifying the app
- Edit anything in App.js
- Reload: Press R twice, or select Reload from Developer Menu (Command M)
This section follows the official documentation of React Native to learn the basics.
View: Basic building block of UI e.g Image, Text - all make up the application overall.
- Instead of writing separate views in Java/Kotlin for Android and Swift in iOS, we use JavaScript using React components. Corresponding iOS / Android views are made during runtime.
- React Native components work as they would on a normal Android / iOS device, therefore they're called Native Components
- Core Components: Essential Native Components that are ready to use and provided by React Native.
Links:
Core Components: Documentation link
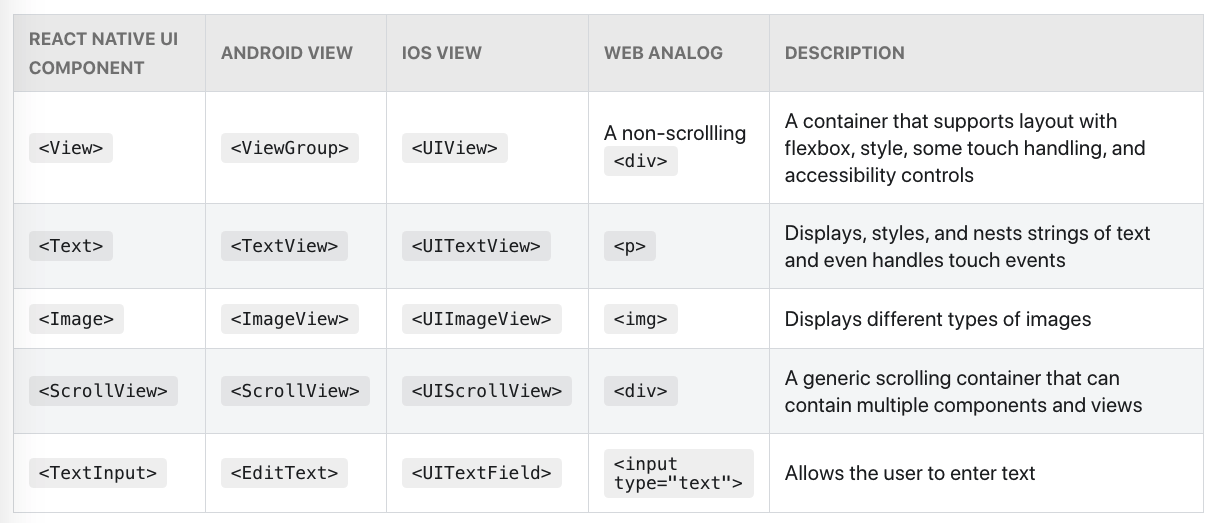
Below is an example of Core Components which are used frequently.
React Native components have the same API structure as React components - this is shown as an image below.
React Native runs on React, so basic knowledge of React is helpful when working with RN.
- Components
- JSX
- Props
- State: "Use props to configure a component when it renders. Use state to keep track of any component data that you expect to change over time."
- TextInput: Core Component for entering text
- onChangeText: Prop that takes a function to call whenever text changes
- onSubmitEditing: Function to call when text is submitted
Example of using Text Input:
import React, { useState } from 'react';
import { Text, TextInput, View } from 'react-native';

const PizzaTranslator = () => {
  const [text, setText] = useState('');
  return (
    <View style={{padding: 10}}>
      <TextInput
        style={{height: 40}}
        placeholder="Type here to translate!"
        onChangeText={text => setText(text)}
        defaultValue={text}
      />
      <Text style={{padding: 10, fontSize: 42}}>
        {text.split(' ').map((word) => word && '🍕').join(' ')}
      </Text>
    </View>
  );
}

export default PizzaTranslator;- RN has componets to handle lots of gesture
- Button: Basic button component which renders relative to the OS you are on
- Touchables: Component to customise the gestures recognised by the button.
- Docs mention Pressable as newer
13/1/21: Got up to Using a ScrollView
- ScrollView: A scrolling container that can contain multiple components and views.
- pagingEnabled: A prop which, when configured, allows for paging through different uses through swiping.
- Using ScrollViews: Best for a small number of things of a limited size - all elements and views in ScrollView are rendered, even if not on the screen. (FlatList should be used if you have a long list to display)
Example ScrollView
import React from 'react';
import { Image, ScrollView, Text } from 'react-native';

const logo = {
  uri: 'https://reactnative.dev/img/tiny_logo.png',
  width: 64,
  height: 64
};

export default App = () => (
  <ScrollView>
    <Text style={{ fontSize: 96 }}>Scroll me plz</Text>
    <Image source={logo} />
    { /* More elements here...*/ }
    <Text style={{ fontSize: 80 }}>React Native</Text>
  </ScrollView>
);There's two main components used for outputting lists: FlatList or SectionList.
FlatList: A scrolling list of changing, but similarly structured data. This is good for long lists of data, and only renders elements that are currently on the screen.
Props: data (items to be displayed), renderItem
Example
renderItem: This is the function containing the output we want for each item in data
<FlatList
  data={[
    {key: 'Devin'},
    {key: 'Dan'},
    {key: 'Dominic'},
    {key: 'Jackson'},
    {key: 'James'},
    {key: 'Joel'},
    {key: 'John'},
    {key: 'Jillian'},
    {key: 'Jimmy'},
    {key: 'Julie'},
  ]}
  renderItem={({item}) => <Text style={styles.item}>{item.key}</Text>}
/>No notes taken but reference here: Troubleshooting in React Native
No notes taken, but this part of the docs goes over writing code specific to Android or iOS if needed: Platform Specific Code in React Native
To Do: Learn how Expo handles things for the developer compared to R.N development without Expo
