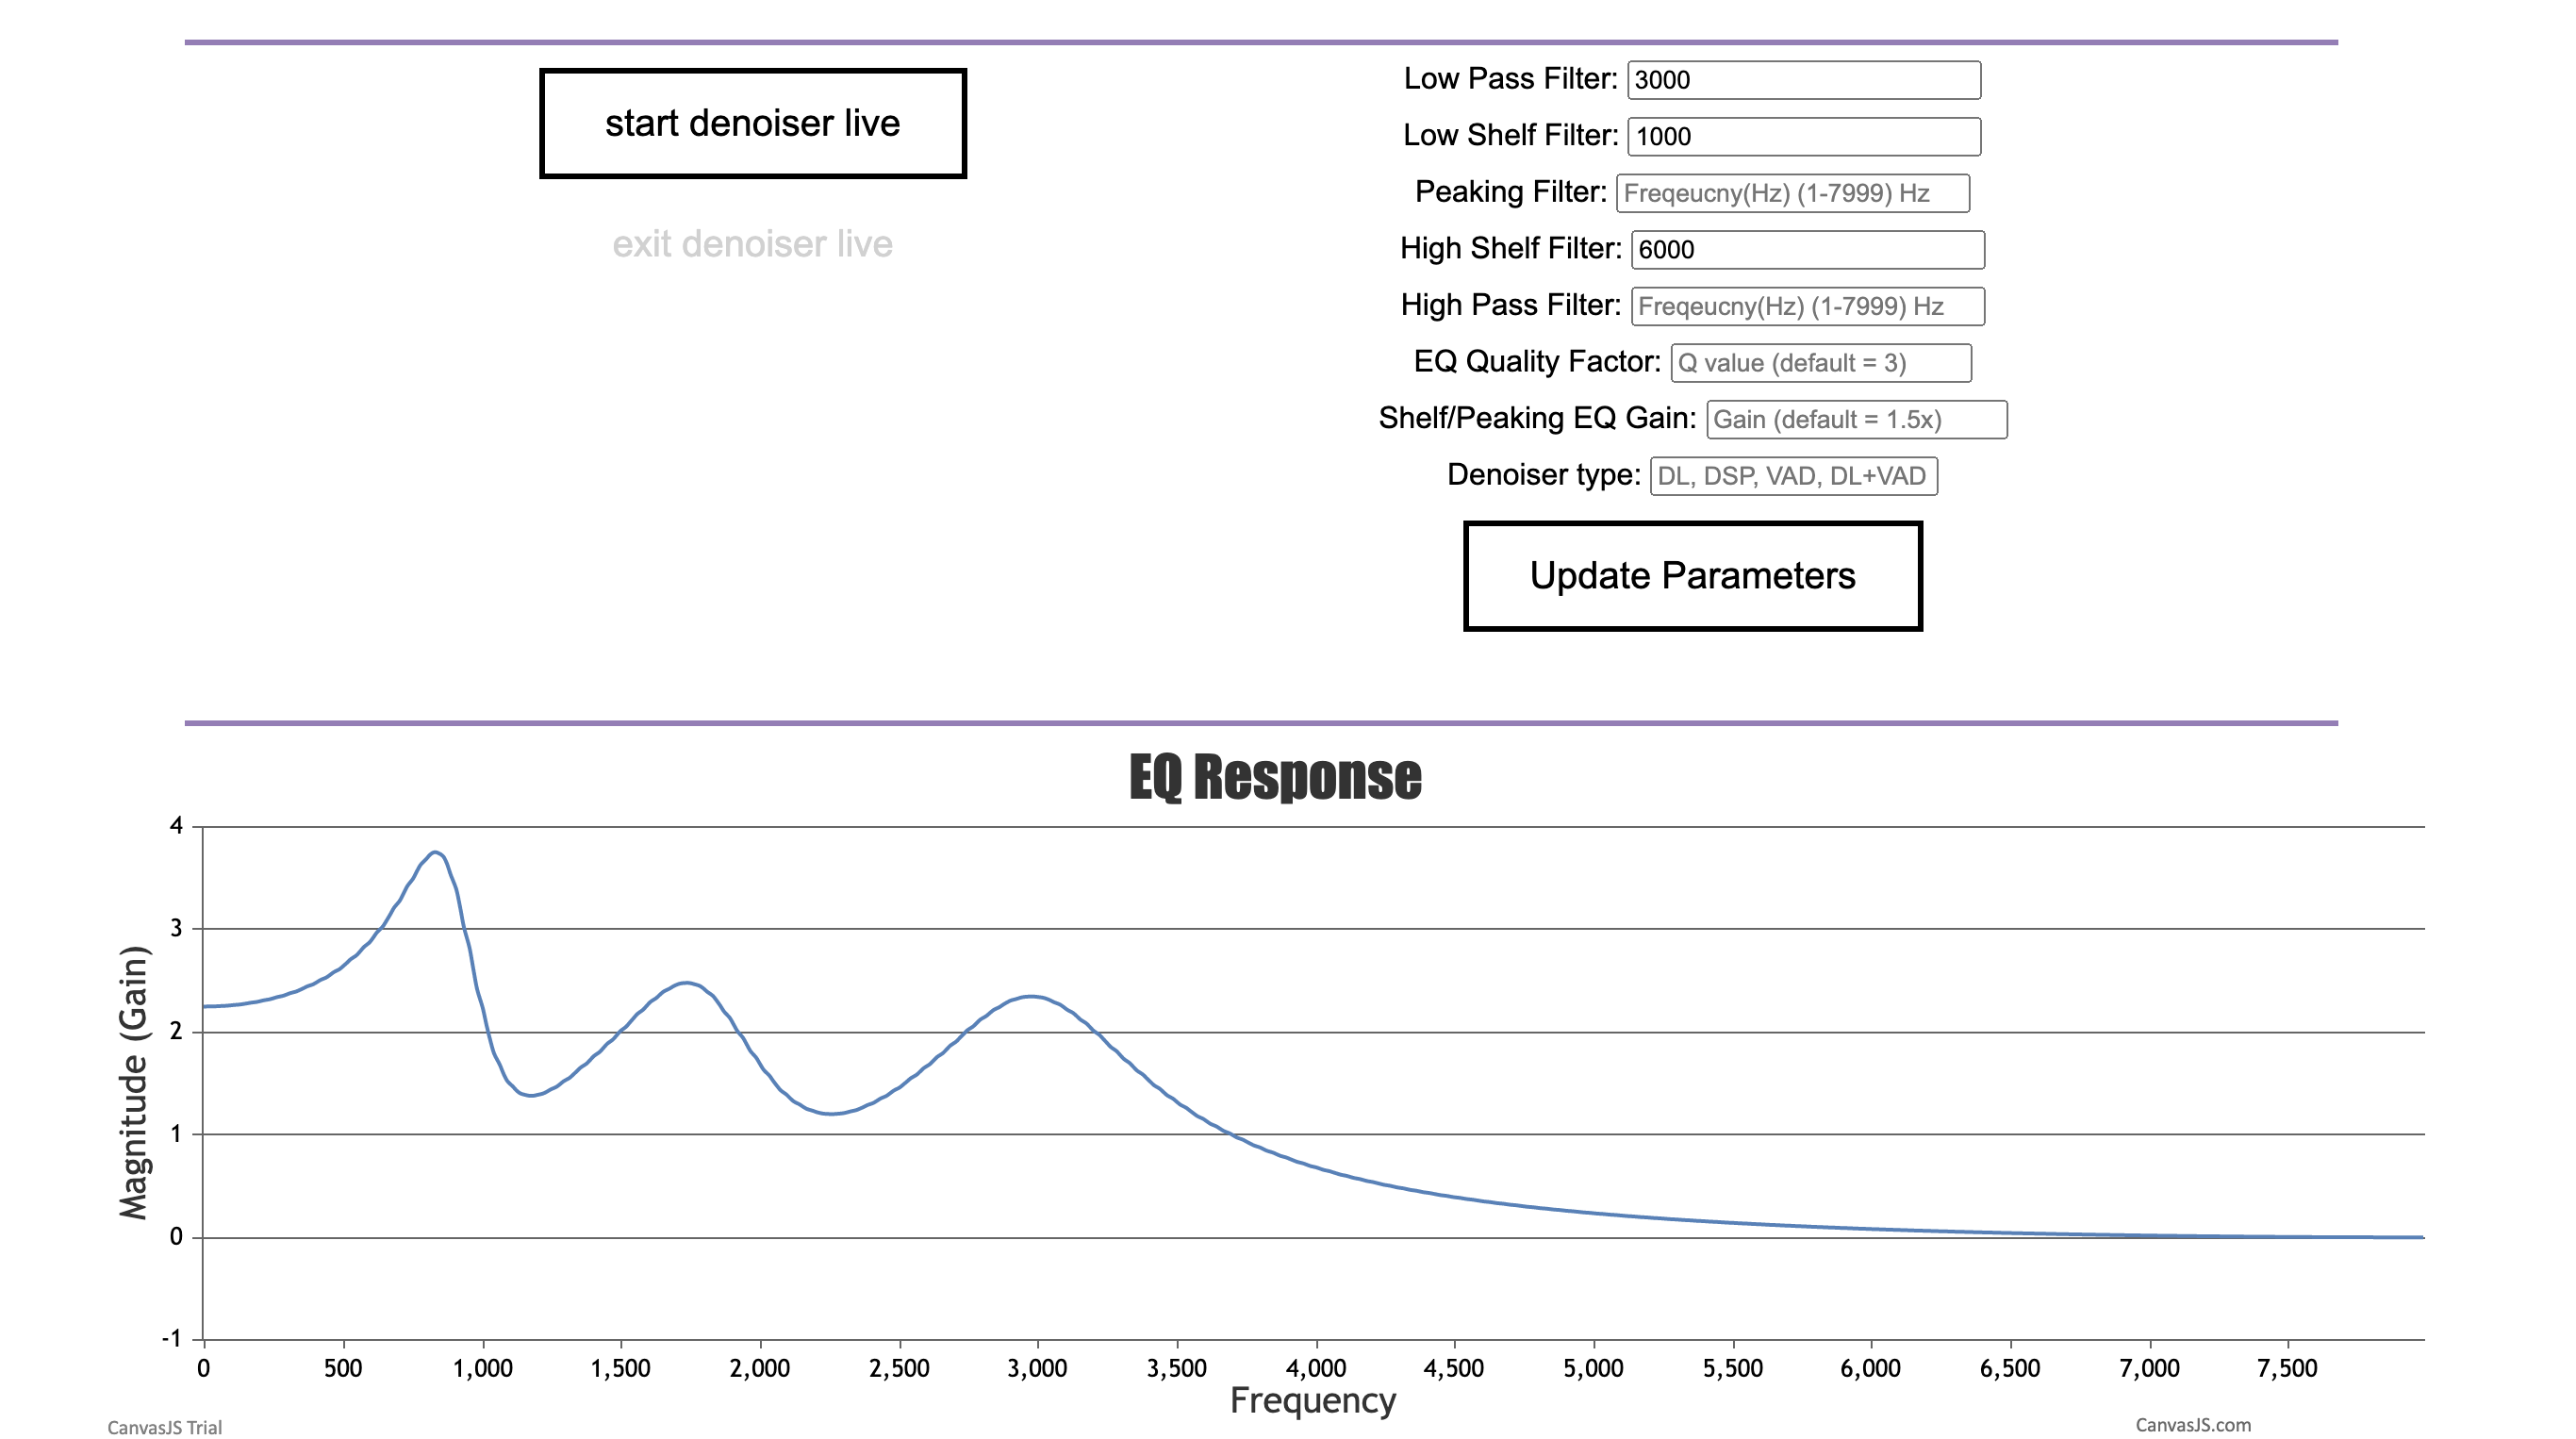
A software that receive audio & video input and enhance them in real time. Possible application: meeting (using feedback loop in apps like Zoom) and speech/lecture recording/streaming. The software will denoise the received audio, adjust EQ and enhance the audio performance based on video infomation. In addition, it can do digital zoom or control a pan-tilt camera based on video information.
This is a capstone project of EE434 at USC.
Team: Michael Pozzi, Matt Baseheart, Yuzhou He
Files:
Processor folder: contains the main software

etc folder: indivitual modules, test program, and previous versions

EE434_Report.pdf: our project report. You can find details of our implementations inside
How it works:
[Note: 16k Hz for speech detection + single channel for speed. Can be adjusted in program to fit requirement.]

[Note: the server and client can be run on different or same device, but UDP from Jetson to PC is not supported]

[Note: all the processes below run on different threads in parallel]

0. Client receives EQ parameters and audio chain components from user input, and update to server

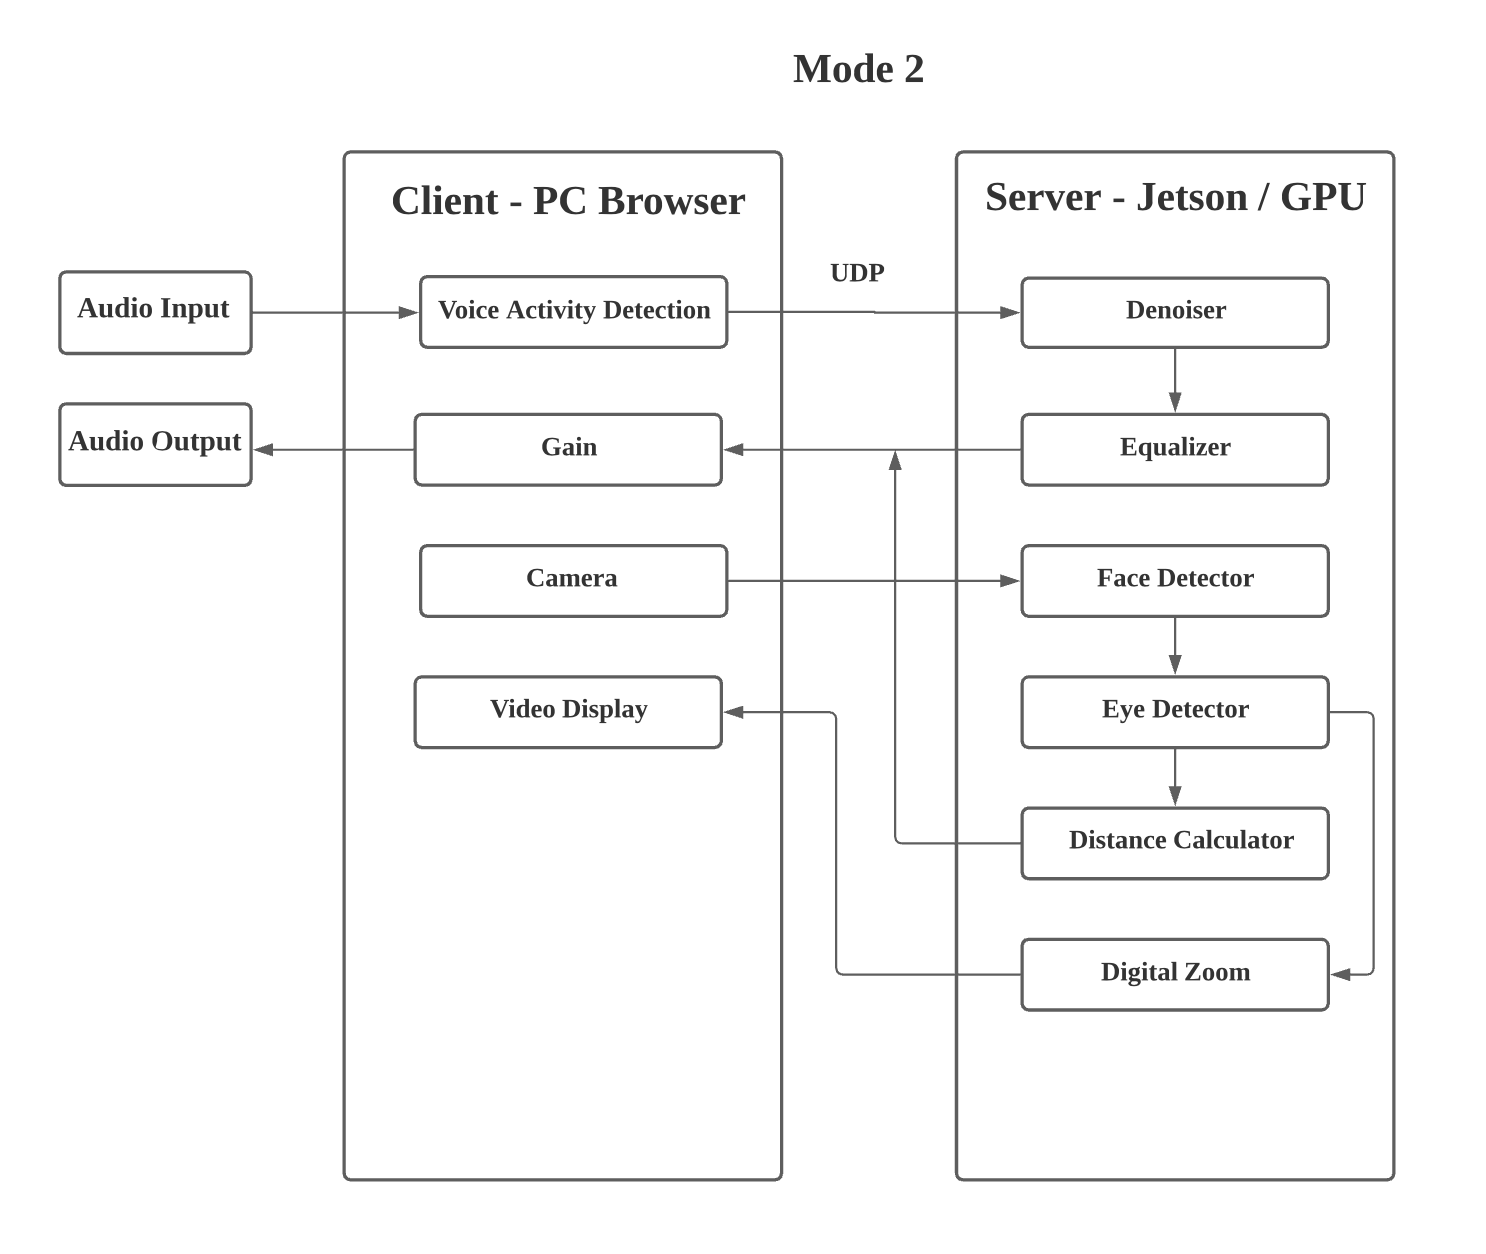
1. Client program receive audio input from microphone

2. Raw input is passed to Voice Activity Detection module (optional, only recommended when using Demucs/DCCRN)

    If VAD is on and speech detected: Client send the audio data to Server through UDP

3. Server receives the raw audio, and passes it to denoiser (either DSP, Demucs, or DCCRN)

4. Server send the denoised audio back to the Client through UDP

5. Client passes the denoised audio to EQ

6. Client receives distance information from video processor

7. Client adjust the volume based on distance

8. Client output the audio to the output device
Note: [Three denoisers are included, one based on Demucs network ("Demucs"), one based on DCCRN network ("DCCRN"), one based on OMLSA + IMCRA algorithm ("DSP")] The Demucs network is trained on the entire valentini dataset + DNS dataset with hidden channel size = 48, plus some office/room noises downloaded from youtube and Audioset. The Demucs/DCCRN Network runs slow on CPU, so DSP denoiser is prefered. Demucs/DCCRN can run in real time on 4 i-5 cpu cores, add VAD module can help reduce the computation when no speech is detected.]
Video Module (works separately from flask app):

    1. Detect and mark face

    2. Detect Eyes and measure eye separations (support glasses)

    3. Estimate distance using eye separation and focal length

    4. Send distance information to Audio Client

    5. Send position information to Pan-Tilt Camera / digital zoom
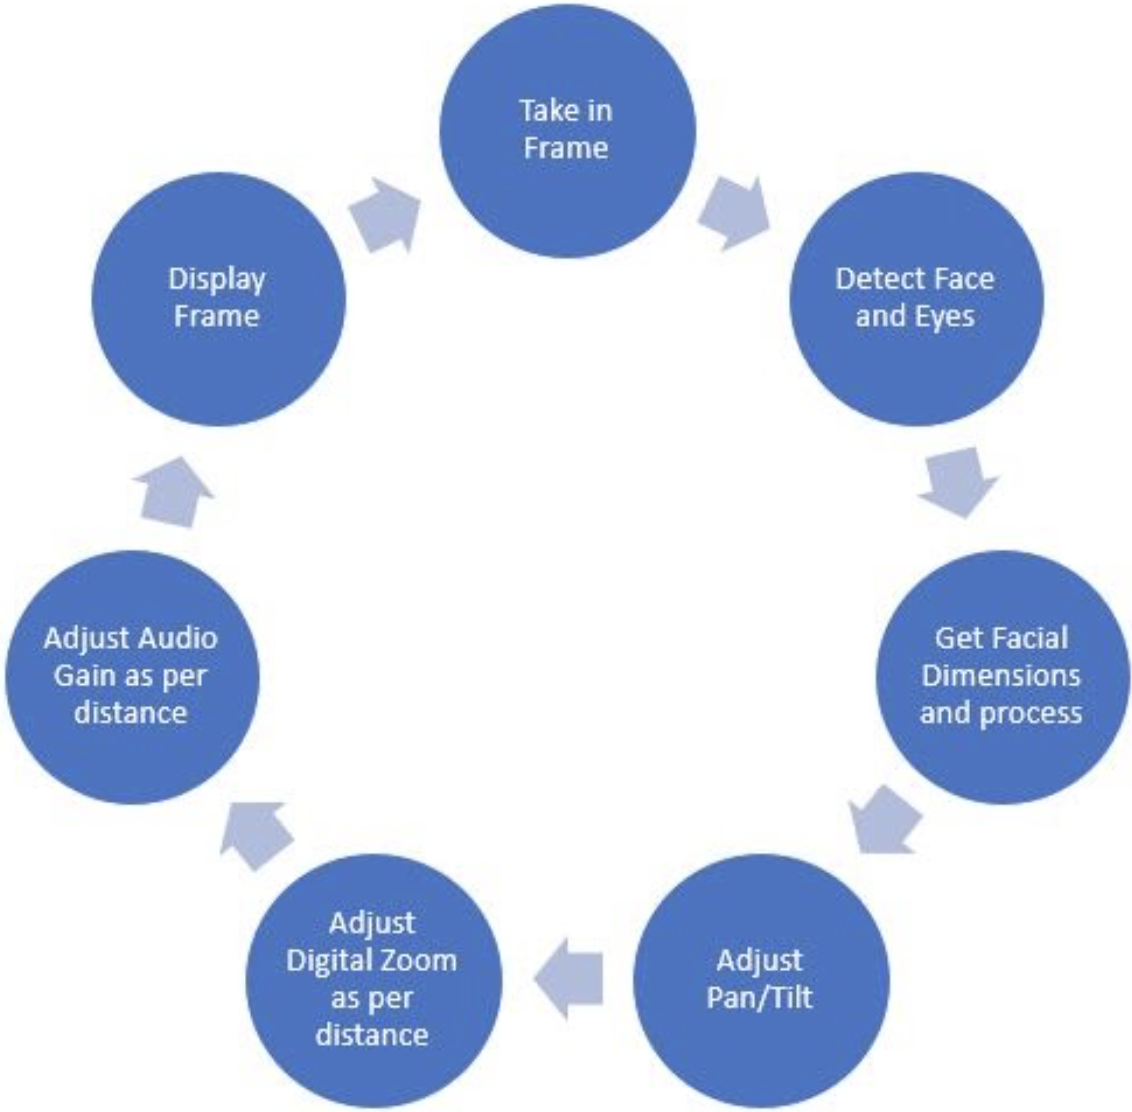
Block diagrams of the pipelines:
To run the flask server (linux/mac):
Download "denoiser.th" from drive.
Move "denoiser.th" to 434-project/Processor/Audio_Server/denoiser/denoiser.th
1. pip3 install -r requirements.txt   (recommend use conda python3.7)

[This only installs basic libraries. Need to install extra libraries if you are using servokit, asteriod or dlib]

2. run server first to allow UDP binding:

    cd 434-project/Processor/Audio_Server

    python3 main.py

3. run client: needs to have sounddevice configured inside app.py (the default only works on Mac + soundflower):

    cd 434-project/Processor/Audio_Client

    flask run

4. connect the video processor to the audio chain:

    cd 434-project/Processor/Video

    python3 dlib_distance_detector.py
(Note: we include a dlib face_landmark model for eye detection with glasses, and a python-opencv model for eye detection without glasses. Both works well with no glasses case. However, the dlib package is harder to install, and the model is larger because it includes the entire face map)
5. open flask site in chrome "http://127.0.0.1:5000/")
[Note: The default IP configuration allows you to run both client and server on the same device. (127.0.0.1) You need to reconfigure the ip and port if you are running them on separate devices.]
Note:
If you want to test out individual modules:
Voice Activity Detection:

    cd 434-project/etc/individual\ modules/Voice_Activity_Detection/env

    flask run

Real Time OMLSA Algorithm:

    cd 434-project/etc/individual\ modules/real_time_omlsa

    python3 main.py

Non-real time OMLSA Algorithm with file input (can plot the result):

    cd 434-project/etc/individual\ modules/fast_omlsa

    python3 main.py

Demucs Denoiser (support file upload):

    cd 434-project/etc/v1/env\ \(v1.1\)

    flask run
Video pipeline:
The pipeline goes as follows:
1. Get frame

2. Convert to gray

3. Get faces from detector

4. Find coordinates of face from rect

5. Get face width average

6. Adjust frame check value

7. Put rectange over face

8. Change servos

9. Find facial features from predictor

10. Put dots on features

11. Get left and right eye centers from features

12. Get Distance

13. Get eye width average

14. Average eye dsitance

15. Check if face size has changed significantly

16. If changed significantly, adjust gain

17. Implement digital zoom

18. Display image
Common Errors and Warnings:
If OSX limits the maximum UDP-package to be 9216, input the following command in terminal to remove the restriction:
sudo sysctl -w net.inet.udp.maxdgram=65535
If dlib fails to install, try to install from source (the following code works for OSX):
git clone https://github.com/davisking/dlib.git

cd dlib

mkdir build; cd build; cmake ..; cmake --build .

cd ..

python3 setup.py install

(if assert error happens, delete the lines with the assert(false) statement in the error files)
If there is an error that says "the selected port is already binded" or anything similar:
Go to main.py in Audio_Server and app.py in Audio_Client, change all the port from 9999-9996 to any other port in 9000-9999 range.

This error is because the UDP receiver is closed before sender.

You should always open UDP receiver first, and close UDP sender first.

(which means run Server main.py file before Client flask run, and close Client window before server when quit the program.)
Feel free to raise an issue and ask questions!


