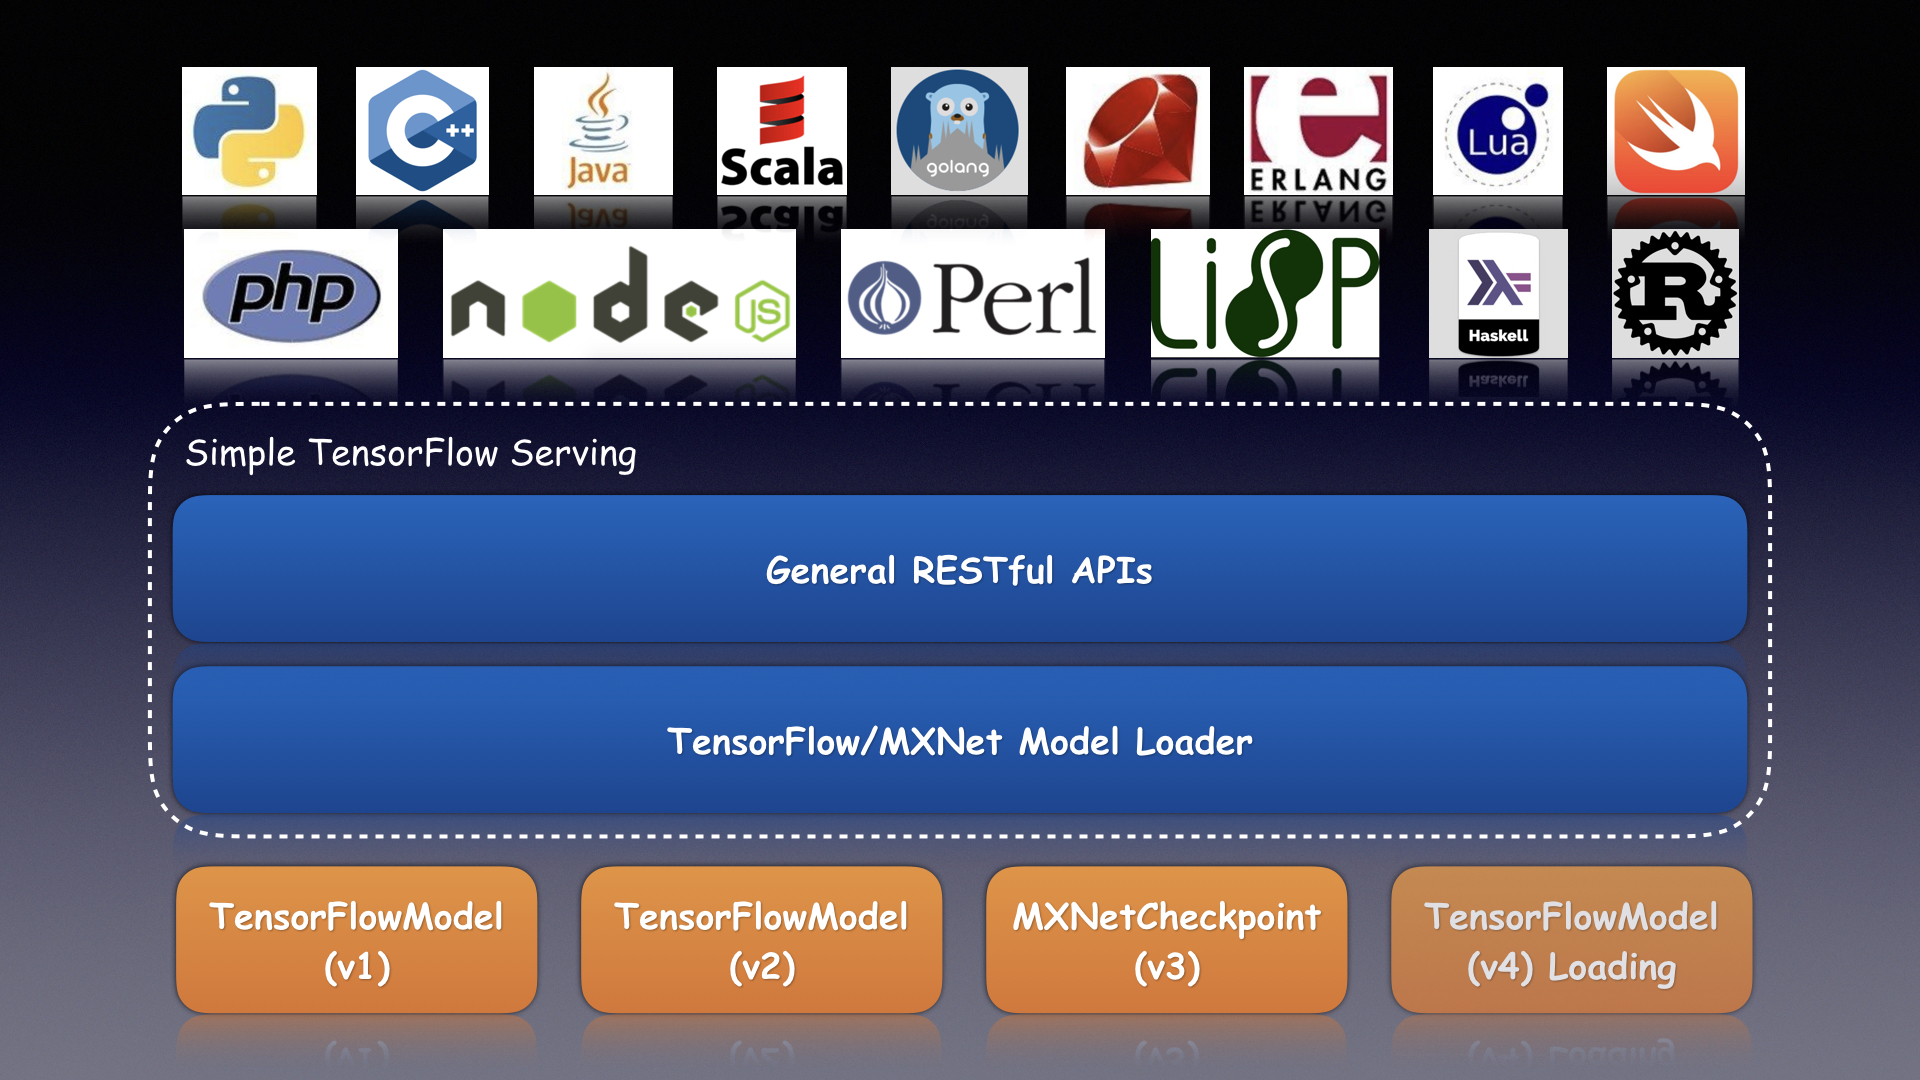
Simple TensorFlow Serving is the generic and easy-to-use serving service for machine learning models.
It is the bridge for TensorFlow models and bring machine learning to any programming language, such as Bash, Python, C++, Java, Scala, Go, Ruby, JavaScript, PHP, Erlang, Lua, Rust, Swift, Perl, Lisp, Haskell, Clojure, R.
- Support distributed TensorFlow models
- Support the general RESTful/HTTP APIs
- Support inference with accelerated GPU
- Support
curland other command-line tools - Support clients in any programming language
- Support code-gen client by models without coding
- Support inference with raw file for image models
- Support statistical metrics for verbose requests
- Support serving multiple models at the same time
- Support dynamic online and offline for model versions
- Support loading new custom op for TensorFlow models
- Support secure authentication with configurable basic auth
- Support multiple models of TensorFlow/MXNet/PyTorch/Caffe2/CNTK/ONNX
Install the server with pip.
pip install simple_tensorflow_serving
Or install with bazel.
bazel build simple_tensorflow_serving:server
Or install from source code.
python ./setup.py install
Or use docker image.
docker run -d -p 8500:8500 tobegit3hub/simple_tensorflow_serving
Start the server with the TensorFlow SavedModel.
simple_tensorflow_serving --model_base_path="./models/tensorflow_template_application_model"
Check out the dashboard in http://127.0.0.1:8500 in web browser.
Generate Python client and access the model with the test dataset.
simple_tensorflow_serving --model_base_path="./models/tensorflow_template_application_model" --gen_client="python"
python ./client.py
It supports serve multiple models and multiple versions of these models. You can run the server with this configuration.
{
  "model_config_list": [
    {
      "name": "tensorflow_template_application_model",
      "base_path": "./models/tensorflow_template_application_model/",
      "platform": "tensorflow"
    }, {
      "name": "deep_image_model",
      "base_path": "./models/deep_image_model/",
      "platform": "tensorflow"
    }, {
       "name": "mxnet_mlp_model",
       "base_path": "./models/mxnet_mlp/mx_mlp",
       "platform": "mxnet"
    }
  ]
}
simple_tensorflow_serving --model_config_file="./examples/model_config_file.json"
Adding or removing model versions will be detected automatically and re-load latest files in memory. You can easily choose the specified model and version for inference.
endpoint = "http://127.0.0.1:8500"
input_data = {
  "model_name": "default",
  "model_version": 1,
  "data": {
      "keys": [[11.0], [2.0]],
      "features": [[1, 1, 1, 1, 1, 1, 1, 1, 1],
                   [1, 1, 1, 1, 1, 1, 1, 1, 1]]
  }
}
result = requests.post(endpoint, json=input_data)
You can generate clients in different languages(Bash, Python, Golang, JavaScript etc.) for your model without writing any code.
simple_tensorflow_serving --model_base_path="./models/tensorflow_template_application_model/" --gen_client bash
simple_tensorflow_serving --model_base_path="./models/tensorflow_template_application_model/" --gen_client python
The generated code should look like these which can be test immediately.
#!/bin/bash

curl -H "Content-Type: application/json" -X POST -d '{"data": {"keys": [[1.0], [1.0]], "features": [[1.0, 1.0, 1.0, 1.0, 1.0, 1.0, 1.0, 1.0, 1.0], [1.0, 1.0, 1.0, 1.0, 1.0, 1.0, 1.0, 1.0, 1.0]]} }' http://127.0.0.1:8500
#!/usr/bin/env python

import requests

def main():
  endpoint = "http://127.0.0.1:8500"

  input_data = {"keys": [[1.0], [1.0]], "features": [[1.0, 1.0, 1.0, 1.0, 1.0, 1.0, 1.0, 1.0, 1.0], [1.0, 1.0, 1.0, 1.0, 1.0, 1.0, 1.0, 1.0, 1.0]]}
  result = requests.post(endpoint, json=input_data)
  print(result.text)

if __name__ == "__main__":
main()For image models, we can request with the raw image files instead of constructing array data.
Now start serving the image model like deep_image_model.
simple_tensorflow_serving --model_base_path="./models/deep_image_model/"
Then request with the raw image file which has the same shape of your model.
curl -X POST -F 'image=@./images/mew.jpg' -F "model_version=1" 127.0.0.1:8500
If your models rely on new TensorFlow custom op, you can run the server while loading the so files.
simple_tensorflow_serving --model_base_path="./model/" --custom_op_paths="./foo_op/"
Please check out the complete example in ./examples/custom_op/.
For enterprises, we can enable basic auth for all the APIs and any anonymous request is denied.
Now start the server with the configured username and password.
./server.py --model_base_path="./models/tensorflow_template_application_model/" --enable_auth=True --auth_username="admin" --auth_password="admin"
If you are using the Web dashboard, just type your certification. If you are using clients, give the username and password within the request.
curl -u admin:admin -H "Content-Type: application/json" -X POST -d '{"data": {"keys": [[11.0], [2.0]], "features": [[1, 1, 1, 1, 1, 1, 1, 1, 1], [1, 1, 1, 1, 1, 1, 1, 1, 1]]}}' http://127.0.0.1:8500
endpoint = "http://127.0.0.1:8500"
input_data = {
  "data": {
      "keys": [[11.0], [2.0]],
      "features": [[1, 1, 1, 1, 1, 1, 1, 1, 1], [1, 1, 1, 1, 1, 1, 1, 1, 1]]
  }
}
auth = requests.auth.HTTPBasicAuth("admin", "admin")
result = requests.post(endpoint, json=input_data, auth=auth)In addiction, it supports loading and serving the general MXNet models in standard checkpoint format. You can load the models with commands or configuration as well.
simple_tensorflow_serving --model_base_path="./models/mxnet_mlp/mx_mlp" --model_platform="mxnet"
The clients are similar and you can implement in your favourite programming language.
endpoint = "http://127.0.0.1:8500"
input_data = {
  "model_name": "default",
  "model_version": 1,
  "data": {
      "data": [[12.0, 2.0]]
  }
}
result = requests.post(endpoint, json=input_data)
print(result.text)Now it supports loading and serving the general ONNX models.
simple_tensorflow_serving --model_base_path="./models/onnx_mnist_model/onnx_model.proto" --model_platform="onnx"
The clients are similar and you can implement in your favourite programming language.
endpoint = "http://127.0.0.1:8500"
input_data = {
  "model_name": "default",
  "model_version": 1,
  "data": {
      "data": [[[[...]]]]
  }
}
result = requests.post(endpoint, json=input_data)
print(result.text)Here is the example client in Bash.
curl -H "Content-Type: application/json" -X POST -d '{"data": {"keys": [[1.0], [2.0]], "features": [[10, 10, 10, 8, 6, 1, 8, 9, 1], [6, 2, 1, 1, 1, 1, 7, 1, 1]]}}' http://127.0.0.1:8500
Here is the example client in Python.
endpoint = "http://127.0.0.1:8500"
payload = {"data": {"keys": [[11.0], [2.0]], "features": [[1, 1, 1, 1, 1, 1, 1, 1, 1], [1, 1, 1, 1, 1, 1, 1, 1, 1]]}}

result = requests.post(endpoint, json=payload)
Here is the example client in C++.
Here is the example client in Java.
Here is the example client in Scala.
Here is the example client in Go.
endpoint := "http://127.0.0.1:8500"
dataByte := []byte(`{"data": {"keys": [[11.0], [2.0]], "features": [[1, 1, 1, 1, 1, 1, 1, 1, 1], [1, 1, 1, 1, 1, 1, 1, 1, 1]]}}`)
var dataInterface map[string]interface{}
json.Unmarshal(dataByte, &dataInterface)
dataJson, _ := json.Marshal(dataInterface)

resp, err := http.Post(endpoint, "application/json", bytes.NewBuffer(dataJson))
Here is the example client in Ruby.
endpoint = "http://127.0.0.1:8500"
uri = URI.parse(endpoint)
header = {"Content-Type" => "application/json"}
input_data = {"data" => {"keys"=> [[11.0], [2.0]], "features"=> [[1, 1, 1, 1, 1, 1, 1, 1, 1], [1, 1, 1, 1, 1, 1, 1, 1, 1]]}}
http = Net::HTTP.new(uri.host, uri.port)
request = Net::HTTP::Post.new(uri.request_uri, header)
request.body = input_data.to_json

response = http.request(request)
Here is the example client in JavaScript.
var options = {
    uri: "http://127.0.0.1:8500",
    method: "POST",
    json: {"data": {"keys": [[11.0], [2.0]], "features": [[1, 1, 1, 1, 1, 1, 1, 1, 1], [1, 1, 1, 1, 1, 1, 1, 1, 1]]}}
};

request(options, function (error, response, body) {});
Here is the example client in PHP.
$endpoint = "127.0.0.1:8500";
$inputData = array(
    "keys" => [[11.0], [2.0]],
    "features" => [[1, 1, 1, 1, 1, 1, 1, 1, 1], [1, 1, 1, 1, 1, 1, 1, 1, 1]],
);
$jsonData = array(
    "data" => $inputData,
);
$ch = curl_init($endpoint);
curl_setopt_array($ch, array(
    CURLOPT_POST => TRUE,
    CURLOPT_RETURNTRANSFER => TRUE,
    CURLOPT_HTTPHEADER => array(
        "Content-Type: application/json"
    ),
    CURLOPT_POSTFIELDS => json_encode($jsonData)
));

$response = curl_exec($ch);
Here is the example client in Erlang.
ssl:start(),
application:start(inets),
httpc:request(post,
  {"http://127.0.0.1:8500", [],
  "application/json",
  "{\"data\": {\"keys\": [[11.0], [2.0]], \"features\": [[1, 1, 1, 1, 1, 1, 1, 1, 1], [1, 1, 1, 1, 1, 1, 1, 1, 1]]}}"
  }, [], []).
Here is the example client in Lua.
local endpoint = "http://127.0.0.1:8500"
keys_array = {}
keys_array[1] = {1.0}
keys_array[2] = {2.0}
features_array = {}
features_array[1] = {1, 1, 1, 1, 1, 1, 1, 1, 1}
features_array[2] = {1, 1, 1, 1, 1, 1, 1, 1, 1}
local input_data = {
    ["keys"] = keys_array,
    ["features"] = features_array,
}
local json_data = {
    ["data"] = input_data
}
request_body = json:encode (json_data)
local response_body = {}

local res, code, response_headers = http.request{
    url = endpoint,
    method = "POST",
    headers =
      {
          ["Content-Type"] = "application/json";
          ["Content-Length"] = #request_body;
      },
      source = ltn12.source.string(request_body),
      sink = ltn12.sink.table(response_body),
}
Here is the example client in Rust.
Here is the example client in Swift.
Here is the example client in Perl.
my $endpoint = "http://127.0.0.1:8500";
my $json = '{"data": {"keys": [[11.0], [2.0]], "features": [[1, 1, 1, 1, 1, 1, 1, 1, 1], [1, 1, 1, 1, 1, 1, 1, 1, 1]]}}';
my $req = HTTP::Request->new( 'POST', $endpoint );
$req->header( 'Content-Type' => 'application/json' );
$req->content( $json );
$ua = LWP::UserAgent->new;

$response = $ua->request($req);
Here is the example client in Lisp.
Here is the example client in Haskell.
Here is the example client in Clojure.
Here is the example client in R.
endpoint <- "http://127.0.0.1:8500"
body <- list(data = list(a = 1), keys = 1)
json_data <- list(
  data = list(
    keys = list(list(1.0), list(2.0)), features = list(list(1, 1, 1, 1, 1, 1, 1, 1, 1), list(1, 1, 1, 1, 1, 1, 1, 1, 1))
  )
)

r <- POST(endpoint, body = json_data, encode = "json")
stop_for_status(r)
content(r, "parsed", "text/html")
Here is the example with Postman.
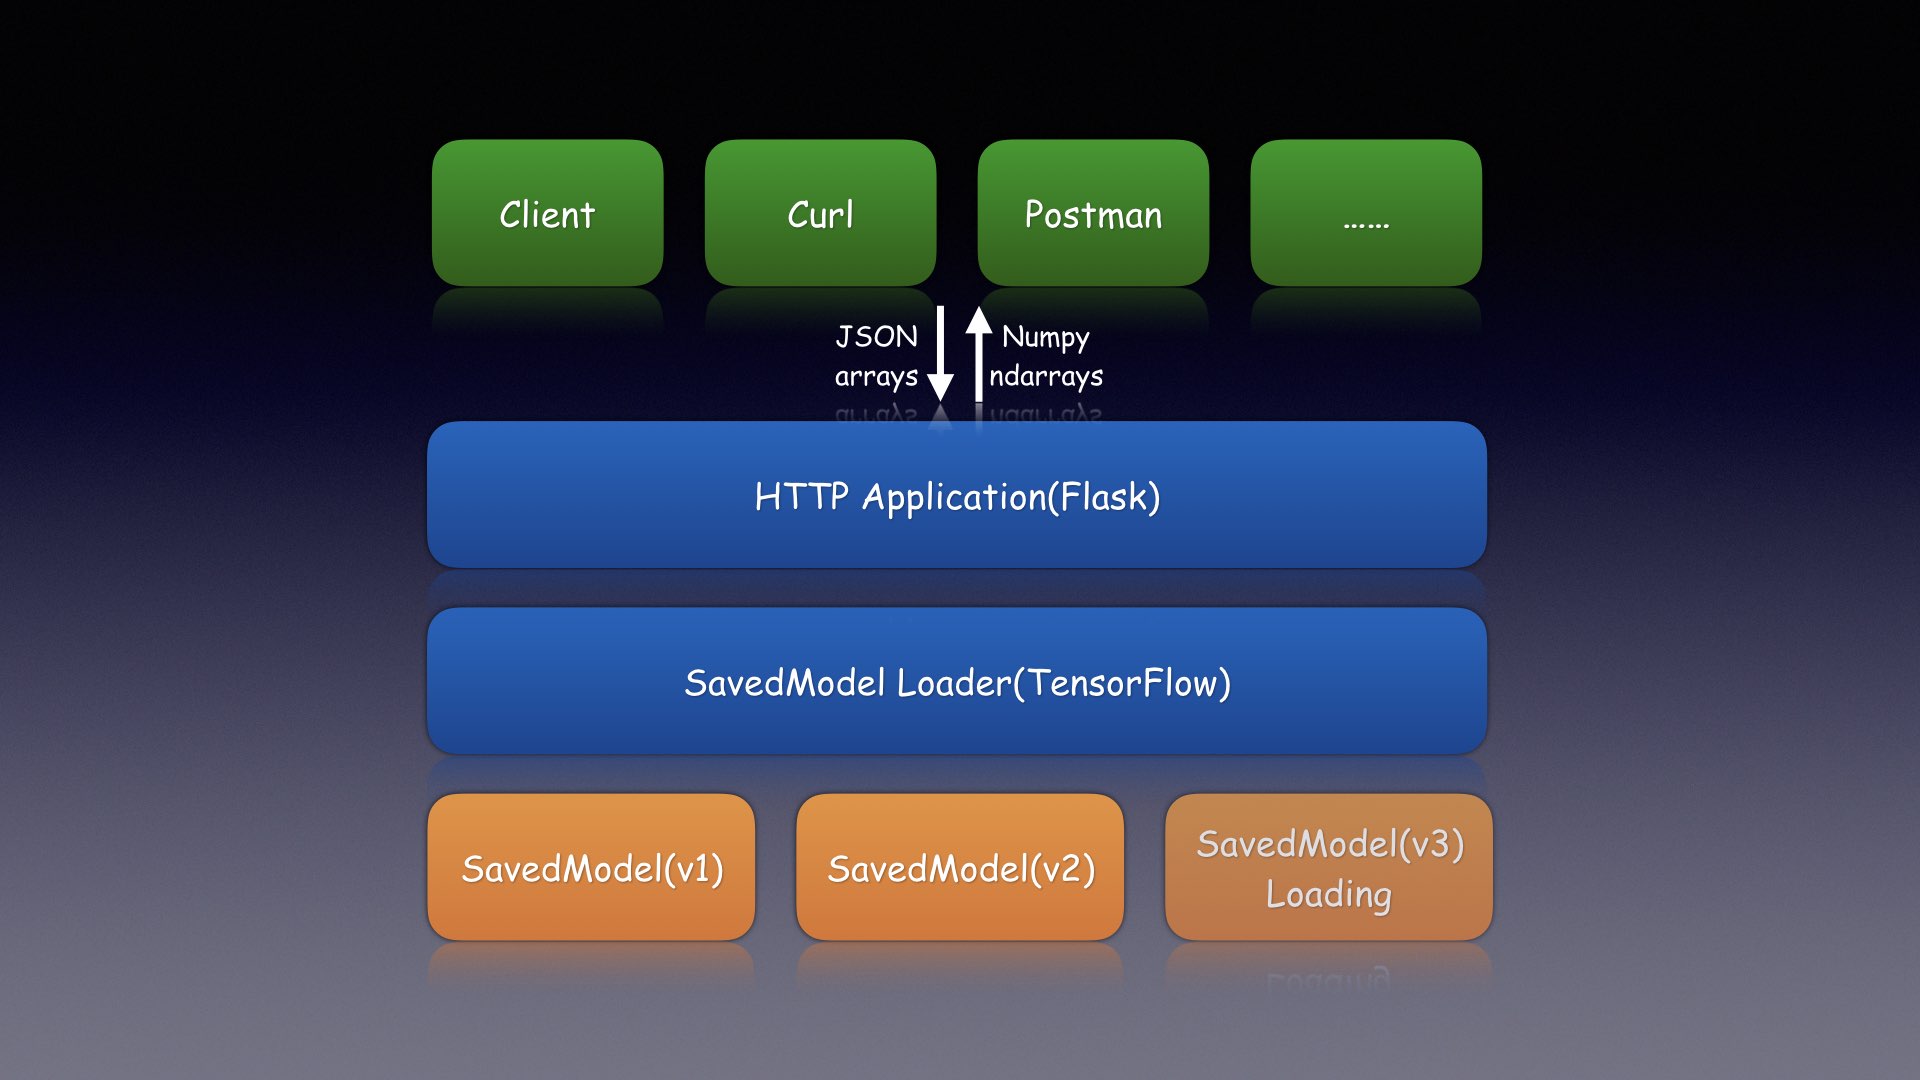
simple_tensorflow_servingstarts the HTTP server withflaskapplication.- Load the TensorFlow models with
tf.saved_model.loaderPython API. - Construct the feed_dict data from the JSON body of the request.
// Method: POST, Content-Type: application/json { "model_version": 1, // Optional "data": { "keys": [[1.0], [2.0]], "features": [[10, 10, 10, 8, 6, 1, 8, 9, 1], [6, 2, 1, 1, 1, 1, 7, 1, 1]] } } - Use the TensorFlow Python API to
sess.run()with feed_dict data. - For multiple versions supported, it starts independent thread to load models.
- For generated clients, it reads user's model and render code with Jinja templates.
Check out the C++ implementation of TensorFlow Serving in tensorflow/serving.
Feel free to open an issue or send pull request for this project. It is warmly welcome to add more clients in your languages to access TensorFlow models.


