In this code we show how to create efficient and scalable RESTful APIs for mobile and cloud applications securely from your business critical applications residing on the mainframe.
IBM z/OS Connect Enterprise Edition provides access to z/OS subsystems, such as CICS®, IMS™, WebSphere® MQ, DB2®, and Batch, that use RESTful APIs with JSON formatted messages. The framework provides concurrent access, through a common interface, to multiple z/OS subsystems.
z/OS Connect EE can help to deliver benefits for an enterprise in two ways.
- It provides an intuitive workstation-based tool, the z/OS Connect EE API Editor, that enables a developer, with or without z/OS skills, to create RESTful APIs from traditional z/OS based assets. The core business assets that run on z/OS can easily be adapted to the latest mobile and cloud communication techniques and message protocol formats.
- Mobile and cloud application developers, inside or outside the enterprise, can incorporate z/OS data and transactions into their applications without the need to understand z/OS subsystems. The z/OS resources appear as any other RESTful API.

In this journey we will show how to use z/OS Connect EE to create, deploy, and test RESTful APIs that expose z/OS subsystems
Scenario One: Expose a CICS COBOL program as a RESTful API
Scenario Two: Expose an IMS application as a RESTful API
z/OS Connect Enterprise Edition
CICS
IMS
Swagger
To request a trial, go to z Systems trial homepage. On this page, navigate to the z/OS Connect Enterprise Edition panel on the right. In the panel, click "register now" button and follow the steps. If everything goes through, you shoud see a screen titled "Congratulations, your environment is on its way".
Wait for an email notification from "zTrial".
The waiting normally lasts several hours to one business day.
The trial is available through a Windows-based remote desktop environment.
In order to access the trial environment, you must be able to connect to a remote system over a network connection.
- Windows users should use the built-in Remote Desktop Connection application.
- Mac users should use the Remote Desktop app, available from the App Store.
- Linux users have several choices of remote desktop application, which might vary between distribution.
IBM® z/OS Connect Enterprise Edition (z/OS Connect EE) makes exposing a CICS® program through a RESTful API quick and easy.

This scenario guides you through the steps in roughly 30 minutes. By the end of the session, you'll know how to:
- Create and deploy an API from within IBM Developer for z Systems™.
- Associate and map an API to a service representation of a CICS program, no code required.
- Test an API by using the built-in Swagger UI.
No previous knowledge of CICS, z/OS Connect EE, or API design is needed, but some awareness of API terminology might help.
Please wait a moment while your development environment loads (this takes about 20 seconds).
- Creating the API Project
Create an API project that will contain your API and service mapping. - Creating the API
Create a basic API that uses RESTful principles. - Associating a service with the API
Associate your API to a Service Archive file. - Mapping the request
Map your API parameters to fields in the associated service. - Mapping the response
Remove irrelevant values from the response so that your API returns relevant fields only. - Deploying the API
Package and deploy your API from within the API Editor. - Testing the API
Test your API by using the built-in Swagger UI.
Create an API project that will contain your API and service mapping.
Before you create your API, you must create a new API project. A z/OS® Connect EE API Project contains files that represent the API, and the mappings from the API to the services.
-
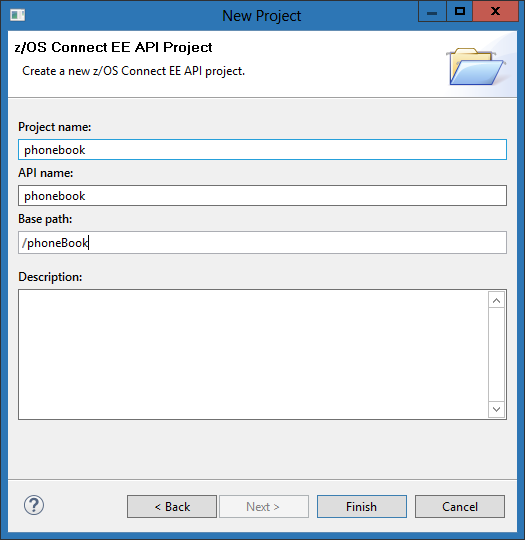
On the development environment menu bar, click File > New > Project... to open the New Project wizard.
-
Expand the z/OS Connect Enterprise Edition folder, select z/OS Connect EE API Project, and click Next.
-
Complete the fields as follows:
- type catalog in the Project name and API name fields.
- type /catalogManager in the Base path field.

-
Click Finish to create the project in the Project Explorer.
The z/OS Connect EE API Editor tab opens.
Create a basic API that uses RESTful principles.
-
In the Path field, replace
/newPath1with the value /items/{itemID}.The parameter `{itemID}` is a placeholder that represents the value that is provided by an API consumer when they make a request.For example, the item
24-pack of black ball penshas an ID of10, so you would specify /items/10 in your API request. -
Remove the POST, PUT, and DELETE methods for this path by clicking the X icon associated with each method.
This leaves the GET method. The GET method is typically used for retrieving data, which is the purpose of your API.

- Click File > Save from the menu to save your progress.
Associate your API to a Service Archive file.
In z/OS Connect EE, a service archive file (.sar file) provides information about the underlying service, including its expected request and response JSON schemas.
Note: z/OS Connect EE provides tooling to generate .sar files for its compatible subsystems (including CICS®, IMS™, DB2®, and IBM® MQ).
To learn more about the sar file, here is additional document.
In this scenario, the .sar file is already generated, so you can focus on creating, deploying, and testing your API.
-
Click Service....
The Select a z/OS Connect EE Service dialog box opens. -
Click File System.
-
Browse to
C:/Service Archive Files. -
Select the
inquireSingle.sarfile and click Open. -
In the dialog box that opens, click OK to confirm the import.
-
Click OK.
The inquireSingle service is now associated with the get method of your API.

- Click File > Save from the menu to save your progress.
In this scenario, the connection between z/OS Connect EE and CICS is configured for you (using the WOLA service provider).
The final step is to configure the mappings between your new API and the inquireSingle service, which represents the CICS COBOL program logic.
Map your API parameters to fields in the associated service.
-
Next to the GET method, click Mapping... then click Open Request Mapping.
The request tab opens. -
Right-click
ca_request_id, then click Add Assign transform.A static value is assigned to the field in the request schema. -
In the Properties view, at the bottom of the window, click General and set Value to 01INQS.

Leave the Omit from interface option checked to exclude this value from the API documentation.
-
Expand the field
ca_inquire_singleso that the sub-fieldca_single_itemis visible. -
Select the fields
ca_return_code,ca_response_message, andca_single_item.Press Ctrl and click to select multiple fields. -
Right-click one of the selected fields, then click Add Remove transform.
The fields are now removed from the API documentation. -
Connect the path parameter itemID to the field
ca_item_ref_reqby clicking and dragging one to the other.A Move action is created that assigns the path parameter
itemIDin the HTTP request to the fieldca_item_ref_reqin the service's JSON content.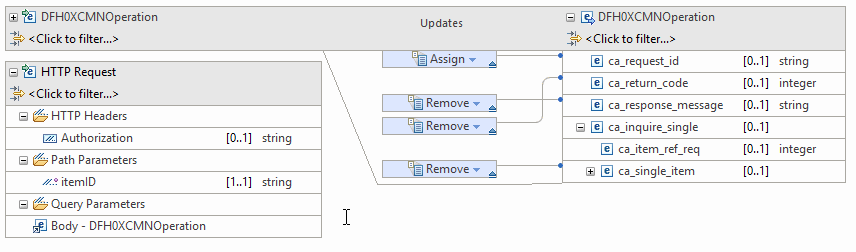 Note: This mapping defines the flow of a value, which is passed in by an API consumer, to the service associated with the API. The service then passes the value to the CICS application. At each stage, the data is transformed into formats and structures that each participant can understand.
 -
Click File > Save from the menu to save your progress.
-
Close the request tab.

Remove irrelevant values from the response so that your API returns relevant fields only.
You can safely remove these fields to make the API response and the API documentation clearer.
-
Click Mapping... for the GET method, then click Open Response Mapping.
-
Expand the field
ca_inquire_singleso that the sub-fieldca_item_ref_reqis visible. -
On the right side of the window, select the
ca_request_idandca_item_ref_reqfields.Press Ctrl and click to select multiple fields. -
Right-click one of the selected fields, and select Add Remove transform.
This excludes these fields from the body of the response.

- Click File > Save from the menu to save your progress.
- Close the response tab.
Package and deploy your API from within the API Editor.
-
In the Project Explorer view, select your API project (catalog) and right-click to select z/OS Connect EE > Deploy API to z/OS Connect EE Server.
-
Optional: If the z/OS Connect EE server is disconnected, connect to the server by clicking on the red icon at the top of the Deploy API dialog.

-
Click OK to deploy your API.
-
When deployment completes, click OK on the Result dialog box.

Test your API by using the built-in Swagger UI.
You can use the built-in Swagger UI to test out an API from within the developer environment. Let's try that now by opening up the Swagger UI for your new API, and request information about an item in the catalog.
-
In the z/OS Connect EE Servers view, expand the API folder, right-click your API, and click Open in Swagger UI.
The Swagger UI for your API opens. -
In the tab that opens, click default, and then /items/{itemID}
Take a look at the Example Value JSON. You'll notice that the fields that you removed as part of the mapping are not present.
The CICS application that you have exposed by creating this API contains an inventory of office stationary. A 24-pack of black ball pens has an itemID of 10.
You can use your new API to check the price and stock levels of this item.
-
Type the value 10 in the relevant text box, then click Try it out.
Scroll down to see the response. By inspecting the Response Body, you can see that this item costs $2.90 and 129 items are in stock.{ "DFH0XCMNOperationResponse": { "ca_return_code": 0, "ca_response_message": "RETURNED ITEM: REF =0010", "ca_inquire_single": { "ca_single_item": { "in_sngl_stock": 129, "ca_sngl_description": "Ball Pens Black 24pk", "ca_sngl_item_ref": 10, "on_sngl_order": 0, "ca_sngl_cost": "002.90", "ca_sngl_department": 10 } } } }
Congratulations! You've successfully exposed a CICS® application as a RESTful API by using z/OS Connect EE!
IBM® z/OS Connect Enterprise Edition (z/OS Connect EE) makes exposing an IMS™ application through a RESTful API quick and easy.

This scenario guides you through the steps in roughly 30 minutes. By the end of the session, you'll know how to:
- Create and deploy an API from within IBM Developer for z Systems™.
- Associate and map an API to a service representation of a IMS application, no code required.
- Test an API by using the built-in Swagger UI.
No previous knowledge of IMS, z/OS Connect EE, or API design is needed, but some awareness of API terminology might help.
Please wait a moment while your development environment loads (this takes a minute or so).
- Creating the API Project
Create an API project that will contain your API and service mapping. - Creating the API
Create a basic API that uses RESTful principles. - Associating a service with the API
Associate your API to a Service Archive file. - Mapping the request
Map your API parameters to fields in the associated service. - Mapping the response
Remove irrelevant values from the response so that your API returns relevant fields only. - Deploying the API
Package and deploy your API from within the API Editor. - Testing the API
Test your API by using the built-in Swagger UI.
Create an API project that will contain your API and service mapping.
Before you create your API, you must create a new API project. A z/OS® Connect EE API Project contains files that represent the API, and the mappings from the API to the services.
-
On the development environment menu bar, click File > New > Project... to open the New Project wizard.
-
Expand the z/OS Connect Enterprise Edition folder, select z/OS Connect EE API Project, and click Next.
-
Complete the fields as follows:
- enter phonebook in the Project name field and API name field.
- enter /phonebook in the Base path field.
-
Click Finish to create the project in the Project Explorer.
The z/OS Connect EE API Editor dialog opens.

Create a basic API that uses RESTful principles.
You'll create an API that a consumer can use to add contact information to the phone book program. The API will connect through a service to the program in IMS™.
-
In the Path field, replace /newPath1 with the value /contacts.
The contact record values are sent in the HTTP message body of our POST request. In this case, no parameters are stored in the URL. -
Remove the GET, PUT and DELETE methods for this path by clicking on the X icon associated with each method.
This leaves the POST method. The POST method is typically used for submitting data, which is the purpose of your API.

- Click File > Save from the menu to save your progress.
Associate your API to a Service Archive file.
In z/OS Connect EE, a service archive file (.sar file) provides information about the underlying service, including its expected request and response JSON schemas.
Note: z/OS Connect EE provides tooling to generate .sar files for its compatible subsystems (including CICS®, IMS™, DB2®, and IBM® MQ).
In this scenario, the .sar file is already generated, so you can focus on creating, deploying, and testing your API.
-
Click Service....
The Select a z/OS Connect EE Service dialog box opens. -
Click File System.
-
Browse to
C:/Service Archive Files. -
Select the
contacts.sarfile and click Open. -
In the dialog box that opens, click OK to confirm the import.
-
Click OK.
The contacts service is now associated with the get method of your API.

- Click File > Save from the menu to save your progress.
In this scenario, the connection between z/OS Connect EE and IMS is configured for you (using the IMS service provider).
The final step is to configure the mappings between your new API and the contacts service, which represents the IMS program logic.
Map your API parameters to fields in the associated service.
-
Next to the POST method, click Mapping... then click Open Request Mapping.
The request tab opens. -
Expand the
IVTNO_INPUT_MSGsection on the left side of the tab.

This shows fields that are exposed through the API and made available to the REST clients. By default, it is a one-to-one mapping to the fields that are exposed by the service unless you change the mapping.
- Right-click the
IN_COMMANDfield on right side of the tab, in the service definition, then click Add Assign transform. - In the Properties view, at the bottom of the window, click General and set Value to ADD.

Leave the Omit from interface option checked to exclude this value from the API documentation.
Note: This mapping defines the flow of a value, which is passed in by an API consumer, to the service associated with the API. The service then passes the value to the IMS program. At each stage, the data is transformed into formats and structures that each participant can understand.
- Click File > Save from the menu to save your progress.
- Close the request tab.
Remove irrelevant values from the response so that your API returns relevant fields only.
The API you're creating is designed to pass back information about a requested item in the phone book program. However, the contacts service contain several fields that aren’t relevant to that request.
You can safely remove these fields to make the API response and the API documentation clearer.
- Click Mapping... for the POST method, then click Open Response Mapping.
- Right-click
OUT_COMMANDon the right side of the tab, and select Add Remove transform.
This excludes this field from the body of the response.

- Click File > Save from the menu to save your progress.
- Close the response tab.
You completed your API front end, your service association, and respective API-to-service mappings, so go ahead and make this API available.
Package and deploy your API from within the API Editor.
Deploying your API is a quick, simple process that you can complete without leaving the developer environment.
-
In the Project Explorer view, select your API project (phonebook) and right-click to select z/OS Connect EEDeploy API to z/OS Connect EE Server.
-
Optional: If the z/OS Connect EE server is disconnected, connect to the server by clicking on the red icon at the top of the Deploy API dialog.

You are now connected to the z/OS Connect EE server.
-
Click OK to deploy your API.
-
When the deployment completes, click OK in the Result dialog box.

Your API is now successfully deployed!
Test your API by using the built-in Swagger UI.
You can use the built-in Swagger UI to test out an API from within the developer environment. Let's try that now by opening up the Swagger UI for your new API, and adding a contact to the phone book.
-
In the z/OS Connect EE Servers view, expand the API folder, right-click your API, and click Open in Swagger UI.
The Swagger UI for your API opens. -
In the tab that opens, click default, and then /contacts
Take a look at the Example Value JSON. You'll notice that the fields that you removed as part of the mapping are not present.
The IMS program that you have exposed by creating this API contains contact information.
You can use your new API to add a new contact.
-
Click the Example Value box to copy the request message format into your phone book POST request.
Specify some values for the last name, first name, zip code, and extension. -
Click Try it out!.
Information about the request URL, request headers, response body, response code, and response headers are provided. The response body contains the output message. The
OUT_MESSAGEwould contain one of the following messages:- ENTRY WAS ADDED
- ADDITION OF ENTRY HAS FAILED (this message indicates that the IN_LAST_NAME value you specified already exists)
Congratulations! You've successfully exposed an IMS™ application as a RESTful API by using z/OS Connect EE!