
Written & Developed by Zach CHAN (SN : 190340436)
- Table of Contents
- Introduction
- List of Requirements
- R1: Basic Functionalities
- R2: Implementation of a custom deck control Component with custom graphics which allows the user to control deck playback in some way that is more advanced than stop/ start.
- R3: Implementation of a music library component which allows the user to manage their music library
- R4: Implementation of a complete custom GUI
OtoDecks is a DJ application for DJs to mix their music using multiple tracks. Besides basic functionalities like loading audio files into audio players, playing multiple tracks, mixing the tracks by varying each of their volumes, and speeding up or slowing down the tracks, the application has an advanced deck control and a useful music library component.
The music library component allows users to manage a library of music within the application. Users can search the music library and load music from it into the decks. It also persists between application loads, by storing the state of the music library in a data file. Users are also able to import and export any extra data files, so they can store and load different playlists.
Video Title: OtoDecks - A Simple yet powerful DJing Application
Youtube link: https://youtu.be/u2S1ybyRJpM
- Goto Release folder
- Run Otodecks.exe
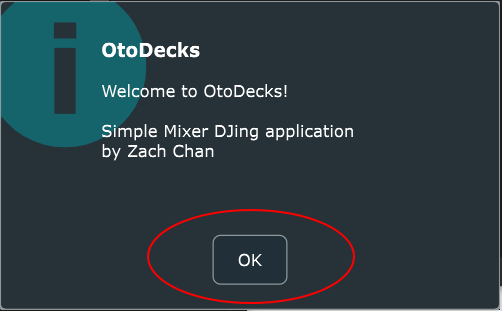
- Welcome alert box shows up. Click "OK" to continue.
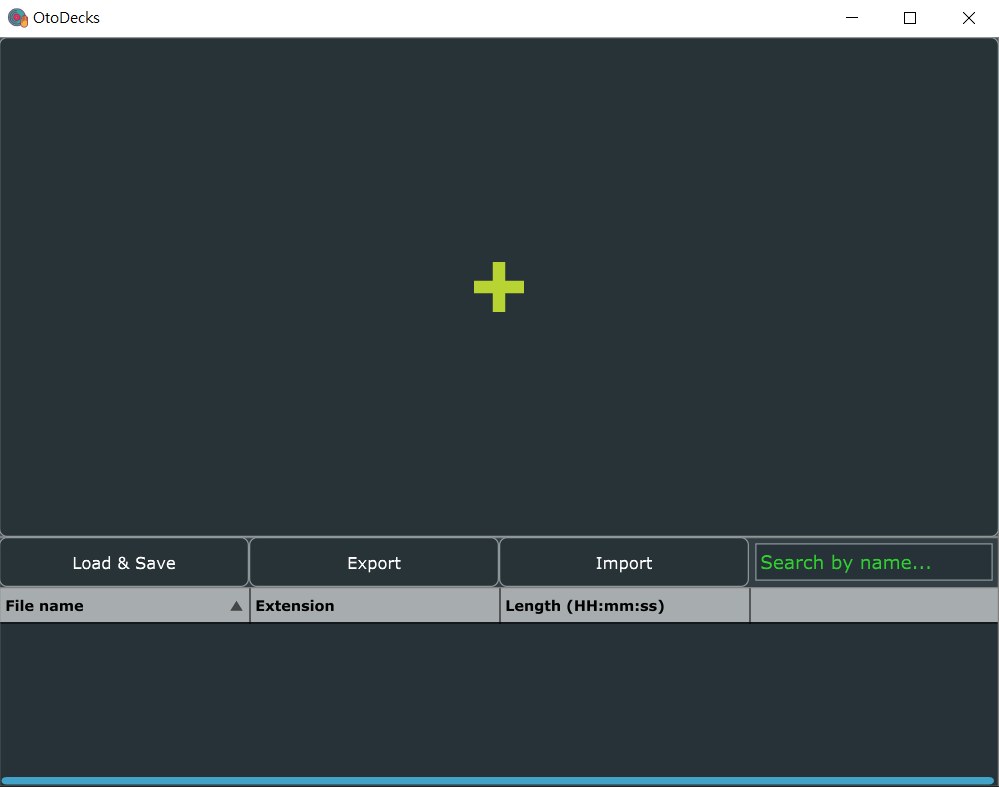
- Main app window shows up.


MainComponent
├── TracksManager (upper half)
│   ├── Track (array)
│   │   ├── DeckGUI
│   │   │   ├── WaveFormDisplay
│   │   │   └── OtherLookAndFeel
│   │   └── DJAudioPlayer
│   └── AddDeckGUI
└── MusicLibrary (lower half)
    └── PlaylistComponent
R1A: Can load audio files into audio players
I have moved this functionality to become part of PlaylistCompent.
When the user clicks Load & Save button, it opens up a file dialog to ask for audio files. Then it will be loaded, stored as a playlist item and displayed on the playlist table.
Loading them into audio players will be triggered by clicking the corresponding play button.
After clicking the play button, an AlertWindow will pop up and ask the user which available track to load the playlist item into. (Hint: If no tracks available, you have to add the tracks by clicking the + button in AddDeckGUI.)
Steps to load audio files are shown on the below screenshot:

The click event of the play button is handled by PlaylistComponent::buttonClicked function inside PlaylistComponent.cpp. Its duty is to validate and pass the loading job to the selected track.
After serveral validation, the event handler will call track->deckGUI.loadURL(filePath) to call the selected track's loadURL function in its deckGUI. The implementation is inside DeckGUI::loadURL in DeckGUI.cpp:
bool DeckGUI::loadURL(URL& fileURL)
{
    bool sucessLoading = player->loadURL(fileURL);
    if (sucessLoading) {
        reset();
        waveformDisplay.loadURL(fileURL);
        player->readerSource->setLooping(loopButton.getToggleStateValue() == 1); // set looping on AudioFormatReaderSource
        return true;
    }
    return false;
}
As you can see, this function loads the fileURL to the player by calling player->loadURL(fileURL) function, which is implemented in DJAudioPlayer::loadURL. Once it is successful, the waveform display will also load the waveform graphics using the audio file URL by calling waveformDisplay.loadURL(fileURL). Looping will then be set based on the state of the Loop checkbox below the waveform display.
To go even deeper, DJAudioPlayer::loadURL will also read the file using AudioFormatManager and set the audio source using AudioFormatReaderSource. I believe this part has already been covered in the lectures.
R1B: Can play two or more tracks
TracksManager handles this part. It stores an array of tracks with maximum of 5 tracks (can be changed using TRACKS_LIMIT const). Users can add tracks by clicking the + button from the AddDeckGUI.

The addTrackButton is a button in AddDeckGUI class, but its listener is registered in TracksManager, using the following statement:
addDeck.addTrackButton.addListener(this);And its click event handler is implemented in TracksManager::buttonClicked using TracksManager::addTrack in TracksManager.cpp:
void TracksManager::buttonClicked(Button* button)
{
    if (button == &(addDeck.addTrackButton)) {
        addTrack();
    }
    ...
}
void TracksManager::addTrack()
{
    for (auto& track : tracks) {
        if (!track->deckGUI.isVisible()) {
            track->deckGUI.setVisible(true);
            break;
        }
    }
    resized();
}
Once we have 2 or more different tracks, we can click play in the Music Library to choose on which track the user would like to load the audio. This part is already covered in R1A. Since the tracks are independent, they have two different DJAudioPlayer, which means two independent AudioTransportSource. So to allow the tracks to be mixed, TracksManager also includes a MixerAudioSource which allows 2 or more tracks to be played simultaneously, using the following implementation in TracksManager::prepareToPlay function and other overridding functions:
void TracksManager::prepareToPlay(int samplesPerBlockExpected, double sampleRate)
{
    mixerSource.prepareToPlay(
        samplesPerBlockExpected,
        sampleRate
    );

    for (auto& track : tracks) {
        track->prepareToPlay(
            samplesPerBlockExpected,
            sampleRate
        );
        mixerSource.addInputSource(&track->player, false);
    }
}
void TracksManager::getNextAudioBlock(const AudioSourceChannelInfo& bufferToFill)
{
    mixerSource.getNextAudioBlock(bufferToFill);
}
void TracksManager::releaseResources()
{
    for (auto& track : tracks) {
        track->releaseResources();
    }

    mixerSource.releaseResources();
}
mixerSource.addInputSource allows to append AudioSource to the mixing list, allowing the audio mixing. This makes the application able to play two or more tracks.
R1C: Can mix the tracks by varying each of their volumes
On each track, the GUI has a circular slider to control its volume.

The value under the slider shows the current volume of the track. Users can either slide the slider or input the value in the field to change the volume. Maximum volume is 1 while silence is volume = 0.
Volume slider is a juce:Slider component declared in Track's DeckGUI.
Volume slider is a juce:Slider component declared in Track's DeckGUI. When the slider value is changed, DeckGUI::sliderValueChanged function responds to the change as the slider registers DeckGUI as its event listener using the following statement in DeckGUI's constructor:
volSlider.addListener(this);When the slider changes, the slide event handler set the gain of its DJAudioPlayer to the volume slider's value using the following statement:
void DeckGUI::sliderValueChanged(Slider* slider) {
    if (slider == &volSlider) {
        player->setGain(slider->getValue());
    }
    ...
}
In this way, users can control the volume of each track using each of the volume sliders.
R1D: Can speed up and slow down the tracks
On each track, the GUI has a circular slider to control its audio speed.

The value under the slider shows the current speed multipler of the track. Users can either slide the slider or input in the field to change the speed. Maximum speed is set to be 10 times faster than normal, while normal speed is 1 and a stop is at speed = 0.
Speed slider is a juce:Slider component declared in Track's DeckGUI. When the slider value is changed, DeckGUI::sliderValueChanged function responds to the change as the slider has register DeckGUI as its event listener using the following statement in DeckGUI's constructor:
speedSlider.addListener(this);When the slider changes, the slide event handler set the speed of its DJAudioPlayer to the speed slider's value using the following statement:
void DeckGUI::sliderValueChanged(Slider* slider) {
    ...
    if (slider == &speedSlider) {
        player->setSpeed(slider->getValue());
    }
    ...
}
In this way, users can control the speed of each track using each of the speed sliders.
R2: Implementation of a custom deck control Component with custom graphics which allows the user to control deck playback in some way that is more advanced than stop/ start.
R2A: Component has custom graphics implemented in a paint function
My custom graphics are implemented on a few buttons: Play button, Pause button, Stop button, Close Track Button on the Track GUI, Add Track Button on AddDeckGUI. Those icons on the buttons are all drawn using their own paint functions. The following screenshot shows the buttons I am talking about:

For example, let's look at how I draw the Play button in the constructor of DeckGUI:
{
    /** Use Path to create a triangle **/
    Path p;
    // 3 Points (x, y) offsets from center of the button
    p.addTriangle({ -5, -8 }, { -5, 8 }, { 5, 0 });
    playPath.setPath(p);
    playPath.setFill(Colour(37, 211, 102)); // set the path fill to green
}
playButton.setImages(&playPath, nullptr, nullptr); // set the button's image as the path
playButton.setTooltip(playButton.getButtonText());R2B: Component enables the user to control the playback of a deck somehow
I added a loop checkbox component at the bottom of the Track GUI. More advanced than stop/start, when the user ticks the loop checkbox, once the audio playback has reached the end, it goes back to the beginning, creating an endless looping until the user unchecks the box. Screenshot below shows the position of the checkbox:

In the implementation, the loop checkbox is a juce::ToggleButton, so its event handler is DeckGUI::buttonClicked. The following snippet shows when the loop button is toogle what will be performed:
void DeckGUI::buttonClicked(Button* button) {
    ...
    if (button == &loopButton) {
        if (player->readerSource != nullptr) {
            // set looping on AudioFormatReaderSource
            player->readerSource->setLooping(loopButton.getToggleStateValue() == 1);
        }
    }
}
By setting the looping state of the juce::AudioFormatReaderSource using the loop button toggle state, the player is able to know when the user wants to endless loop the audio playback.
R3A: Component allows the user to add files to their library
Users can add audio files by clicking Load & Save button in the Music Library. The button is a TextButton called loadSaveButton declared in MusicLibrary Component Class, which is also where its click event listener registered at. So at MusicLibrary::buttonClicked in MusicLibrary.cpp, we are able to see what the button does after clicking the Load & Save button:
void MusicLibrary::buttonClicked(Button* button)
{
    if (button == &loadSaveButton)
    {
        DBG("MusicLibrary::buttonClicked Load & Save Button was clicked.");

        // Load
        bool loaded = false;
        FileChooser chooser{ "Select file(s)..." };
        do {
            if (chooser.browseForMultipleFilesToOpen()) // will return true if user choose >= 1 files
            {
                for (auto& chooserRes : chooser.getResults())
                {
                    File* file = new File(chooserRes);
                    if (playlistComponent.pushFileToPlaylist(file)) {
                        // success
                        playlistComponent.refresh(); // refresh the list
                        loaded = true;
                    }
                }
            }
            else break; // break the do loop if cancel
        } while (!loaded);

        if (loaded) {
            saveToTempFile();
        }
    }
    ...
}
It then opens up a file dialog to ask for audio files. The above snippet reveals that the user can add multiple files to the file dialog since it browseForMultipleFilesToOpen(). The loaded boolean is only true when playlistComponent successfully push at least one of the files the user submitted in the dialog. And PlaylistComponent::pushFileToPlaylist will only return true if the file is valid with recognised audio format, if the file exists, and if the file is not already on the platlist.
bool validFile = false;
for (auto& knownFormat : knownFormats) {
    if (knownFormat->canHandleFile(*file)) {
        validFile = true;
        break;
    }
}
bool existFile = file->exists();
bool onListFile = isFileOnList(file);
if (validFile && existFile && !onListFile) {
    ...
    return true;
}
saveToTempFile will then call PlaylistComponent::writeToFile which will append the .data file with the full file path, using std::ofstream fileWriter.
As you can see, the valid audio files will be loaded, stored as a playlist item and displayed on the playlist table. Besides loading, the file path will be automatically appended into OtoDecks.data file, which is in the same directory with OtoDecks.exe. The file is useful to achive requirement R3E.
After successful loading to music library and saving to data file, an alert box will pop up to indicate that the user successfully added files to their library. Screenshot:

R3B: Component parses and displays meta data such as filename and song length
When the user add audio files into the library, the table inside it will parse the file and add a new row displaying its filename, file extension, audio length and a play button, as shown below:

While the program is adding audio file to the music library, PlaylistComponent::pushFileToPlaylist (mentioned in R3A) pushes valid audio file to PlaylistComponent::trackFiles std::vector array. Then it will call PlaylistComponent::tableComponent's updateContent() function.
if (validFile && existFile && !onListFile) {
    trackFiles.push_back(file);
    tableComponent.updateContent();
    ...
}
PlaylistComponent::updateContent() will trigger PlaylistComponent::paintCell() function. I have implemented to override this virtual function. This is where the component parses and displays meta data such as filename and song length.
if (rowNumber < getNumRows()) {
    if (columnId == 1) { // file name Column
        g.drawText(filesVector[rowNumber]->getFileNameWithoutExtension(),
            2, 0, width - 4, height,
            Justification::centredLeft, true);
    }
    if (columnId == 2) { // extension Column
        std::string extension = filesVector[rowNumber]->getFileExtension().toUpperCase().toStdString();
        extension.erase(std::remove(extension.begin(), extension.end(), '.'), extension.end());
        g.drawText(extension,
            2, 0, width - 4, height,
            Justification::centredLeft, true);
    }
    if (columnId == 3) { // audio file length Column
        double durationInSec = getAudioFileDuration(filesVector[rowNumber], &(tracksManager->formatManager));
        time_t seconds(durationInSec); // you have to convert your input_seconds into time_t
        tm* p = gmtime(&seconds); // convert to broken down time
        char durationInISO[80];
        strftime(durationInISO, 80, "%H:%M:%S", p); // convert seconds to ISO8601
        g.drawText(durationInISO,
            2, 0, width - 4, height,
            Justification::centredLeft, true);
    }
}
Below is the implementation to get the audio file duration in seconds:
double PlaylistComponent::getAudioFileDuration(File* file, AudioFormatManager* fm)
{
    auto* reader = fm->createReaderFor(&(FileInputStream(*file)));
    return reader->lengthInSamples / reader->sampleRate;
}R3C: Component allows the user to search for files
In MusicLibrary, there is a textbox with placerholder "Search by name...". Users are able to input in the field to serach for files in the table. The table will be filtered by name with the search text. Below screenshot shows the search bar in action:

This search box is a juce::TextEditor named searchTextbox inside MusicLibrary Component, and it is passed into its PlaylistComponent using pointers in the constructor. The text change event handler is MusicLibrary::textEditorTextChanged function.
void MusicLibrary::textEditorTextChanged(TextEditor& textEditor)
{
    if (&textEditor == &searchTextbox) {
        // Get search bar's text
        String searchText = textEditor.getText();

        DBG("MusicLibrary::textEditorTextChanged, Value: " + searchText);
        playlistComponent.searchResults.clear(); // clear previous searchResults

        if (searchText.isNotEmpty()) {
            for (auto& trackFile : playlistComponent.trackFiles)
            {
                if (trackFile->getFileName().trim().toLowerCase().contains(searchText.trim().toLowerCase())) { // found a match
                    playlistComponent.searchResults.push_back(trackFile);
                }
            }
        }

        playlistComponent.refresh(false);
    }
}
As you can see in the code, PlaylistComponent's searchResults std:vector is responsible to store the search file results that matches search text. To show the search results, playlistComponent refreshes its table. Thus it calls PlaylistComponent::paintCell function. Inside this function, it will determine whether to show all files or the search results using the following statements:
std::vector<File*> filesVector = trackFiles;
if (searchTextbox->getText().isNotEmpty()) { // if there's a search
    filesVector = searchResults;
}
It determines by using the fact that whether search textbox is empty or not. Then the part to draw the table contents is exactly the same as the part we have shown in R3B.
R3D: Component allows the user to load files from the library into a deck
I have mentioned similar process in R1A about loading files into audio players.
With audio files list item in the MusicLibrary, we can click play button of that song item. After clicking the button, an AlertWindow will pop up and ask the user which available track to load the playlist item into. (Hint: If no tracks available, you have to add the tracks by clicking the + button in AddDeckGUI.)
Steps to load audio files are shown on the below screenshot:
The click event of the play button is handled by PlaylistComponent::buttonClicked function inside PlaylistComponent.cpp. Its duty is to validate and pass the loading job to the selected track.
After serveral validation, the event handler will call track->deckGUI.loadURL(filePath) to call the selected track's loadURL function in its deckGUI. The implementation is inside DeckGUI::loadURL in DeckGUI.cpp:
bool DeckGUI::loadURL(URL& fileURL)
{
    bool sucessLoading = player->loadURL(fileURL);
    if (sucessLoading) {
        reset();
        waveformDisplay.loadURL(fileURL);
        player->readerSource->setLooping(loopButton.getToggleStateValue() == 1); // set looping on AudioFormatReaderSource
        return true;
    }
    return false;
}
As you can see, this function loads the fileURL to the player by calling player->loadURL(fileURL) function, which is implemented in DJAudioPlayer::loadURL. Once it is successful, the waveform display will also load the waveform graphics using the audio file URL by calling waveformDisplay.loadURL(fileURL).
Therefore, in this way, PlaylistComponent allows the user to load files from the library into a deck.
R3E: The music library persists so that it is restored when the user exits then restarts the application
As mentioned in R3A, when MusicLibrary::buttonClicked handles click event of the Load & Save button, MusicLibrary::saveToTempFile() will be called. This function is responsible to append the full file path of the added audio file to the Otodecks.data file, using std::ofstream fileWriter. Please be noted that the default data file is located in the same directory as the app .exe locates. The following shows the coding for MusicLibrary::saveToTempFile():
void MusicLibrary::saveToTempFile()
{
     playlistComponent.saveToTempFile();
}
It passes the job to PlaylistComponent, let's see the coding for that part:
void PlaylistComponent::saveToTempFile(bool notificationOn)
{
    // Save
    File* fileToSaveTo = new File(TEMP_FILENAME + TEMP_FILEEXT);
    if (writeToFile(fileToSaveTo)) {
        if (notificationOn) {
            AlertWindow::showMessageBox(AlertWindow::InfoIcon, ProjectInfo::projectName,
                "Load success and saved Playlist to " + TEMP_FILENAME + TEMP_FILEEXT);
        }
    }
    else {
        if (notificationOn) {
            AlertWindow::showMessageBox(AlertWindow::WarningIcon, ProjectInfo::projectName,
                "Error while saving Playlist to " + TEMP_FILENAME + TEMP_FILEEXT);
        }
    }
    delete fileToSaveTo; // release memory
}
The function uses a pointer to File to store the File. The url is constructed with 2 constants: TEMP_FILENAME and TEMP_FILEEXT. And the constants definitions can be found at the top of the cpp file:
const String PlaylistComponent::TEMP_FILENAME = String(ProjectInfo::projectName);
const String PlaylistComponent::TEMP_FILEEXT = ".data";
In this way, the application will store the file url automatically to Otodecks.data.
When the user exits and restart the application, the application will read its Otodecks.data in the same directory and try to restore all the files listed in the data file. However, if the audio file is already moved or deleted from the system such that the application cannot locate them using the url stored, the application will skip adding the file and pop up an alert box informing the user the audio file does not exists anymore.
The following coding shows details in action:
When the app starts, MusicLibrary's constructor is called, which calls its loadFromTempFile();:
MusicLibrary::MusicLibrary(TracksManager* tm)
    : tracksManager{ tm }
{
    // init load temp file to the playlist
    loadFromTempFile();
    ...
}
void MusicLibrary::loadFromTempFile()
{
    playlistComponent.loadFromTempFile();
}
So the function passes the job to PlaylistComponent to load audio files into the library using its vector array trackFiles:
void PlaylistComponent::loadFromTempFile()
{
    // Read
    File* fileToRead = new File(TEMP_FILENAME + TEMP_FILEEXT);
    if (readFromFile(fileToRead)) {
        if (fileToRead->exists()) {
            AlertWindow::showMessageBox(AlertWindow::InfoIcon, ProjectInfo::projectName,
                "Restored Playlist from " + TEMP_FILENAME + TEMP_FILEEXT);
            saveToTempFile(false); // save to remove non-existing paths in the temp file
        }
    }
    else {
        AlertWindow::showMessageBox(AlertWindow::InfoIcon, ProjectInfo::projectName,
            "Error while reading Playlist from " + TEMP_FILENAME + TEMP_FILEEXT);
    }
    delete fileToRead; // release memory
}
As you can see above, the function reads from the same data file as saveToTempFile() saves, and check if the file exists or not. Then saveToTempFile() is called only on successful loading to remove any non-existing paths in the data file.
Therefore, the music library persists so that it is restored when the user exits then restarts the application.
R4A: GUI layout is significantly different from the basic DeckGUI shown in class, with extra controls
Below shows the basic DeckGUI shown in class:

And below shows my application GUI:

Under this comparison, the GUI layout is significantly different from the basic DeckGUI shown in class, in the following special features:
- Added Pause and Close Track Button to each DeckGUI.
- Buttons on the same line instead of different lines.
- Buttons are colored ImageButtons drawn using Paths, instead of simple TextButtons.
- Colored Circular Sliders with labels on the same line, instead of horizontal sliders on different lines.
- Extra checkbox control to set looping to the song.
- Add/Close Track feature so that users can control how many tracks they want to use or show.
- Moved the Load Button to the Music Library to load files into library first before loading into the track, instead of inside DeckGUI to directly load files to the track, giving the user more flexibility using the Music Library.
R4B: GUI layout includes the custom Component from R2
Say for example, the following coding shows how I implemented the GUI of custom Close Track Button:
class DeckGUI : ... {
    ...
    DrawableButton closeButton{ "CLOSE", DrawableButton::ImageOnButtonBackground };
    ...
}
DeckGUI::DeckGUI(...) {
    ...
    {
        Path p;
        p.addLineSegment(Line<float>(-4, -4, 4, 4), 2);
        p.addLineSegment(Line<float>(4, -4, -4, 4), 2);
        closePath.setPath(p);
        closePath.setFill(Colours::white); // red
    }
    closeButton.setImages(&closePath, nullptr, nullptr);
    closeButton.setTooltip(closeButton.getButtonText());
    closeButton.setColour(TextButton::ColourIds::buttonColourId, Colours::red); // red
    ...
}

void DeckGUI::resized() {
    double rowH = getHeight() / 8;
    double controlsW = getWidth() / 4;
    ...
    closeButton.setBounds(3 * controlsW, 0, controlsW, rowH);
    ...
}
As for the checkbox, it's a simple juce::ToogleButton:
class DeckGUI : ... {
    ...
    ToggleButton loopButton{ "LOOP" };
    ...
}
void DeckGUI::resized() {
    double rowH = getHeight() / 8;
    ...
    loopButton.setBounds(0, rowH * 7, getWidth(), rowH);
    ...
}R4C: GUI layout includes the music library component from R3
Music Library GUI is implemented using the following coding:
class MusicLibrary : ... {
    TextButton loadSaveButton{ "Load & Save" };
    TextButton exportButton{ "Export" };
    TextButton importButton{ "Import" };
    TextEditor searchTextbox;
    ...
    PlaylistComponent playlistComponent{ tracksManager, &searchTextbox };
}
MusicLibrary::MusicLibrary(...)
{
    ...
    searchTextbox.setText("");
    searchTextbox.setTextToShowWhenEmpty("Search by name...", Colours::limegreen);
    ...
}
void MusicLibrary::resized()
{
    double buttonsHeight = getHeight() / 5;
    double buttonsWidth = getWidth() / 4;

    double textboxPadding = buttonsHeight / 8;
    double textboxHeight = buttonsHeight - 2 * textboxPadding;
    double textboxWidth = buttonsWidth - 2 * textboxPadding;

    loadSaveButton.setBounds(0, 0, buttonsWidth, buttonsHeight);
    exportButton.setBounds(buttonsWidth, 0, buttonsWidth, buttonsHeight);
    importButton.setBounds(2 * buttonsWidth, 0, buttonsWidth, buttonsHeight);
    searchTextbox.setBounds(3 * buttonsWidth + textboxPadding, textboxPadding, textboxWidth, textboxHeight);
    searchTextbox.applyFontToAllText(Font(textboxHeight * 0.6f));

    playlistComponent.setBounds(0, buttonsHeight, getWidth(), 4 * buttonsHeight);
}
class PlaylistComponent : ... {
    ...
    TableListBox tableComponent;
    ...
}
PlaylistComponent::PlaylistComponent(...)
{
    // Table Headers
    tableComponent.getHeader().addColumn("File name", 1, 400);
    tableComponent.getHeader().addColumn("Extension", 2, 400);
    tableComponent.getHeader().addColumn("Length (HH:mm:ss)", 3, 400);
    tableComponent.getHeader().addColumn("", 4, 400);

    // give it a border
    tableComponent.setColour(ListBox::outlineColourId, Colours::grey);
    tableComponent.setOutlineThickness(1);

    tableComponent.getHeader().setSortColumnId(1, true); // sort forwards by the Name column
    tableComponent.setMultipleSelectionEnabled(true);

    tableComponent.setModel(this);

    addAndMakeVisible(tableComponent);
}
void PlaylistComponent::resized()
{
    tableComponent.setBounds(0, 0, getWidth(), getHeight());

    for (int i = 1; i <= columnsNum; ++i) {
        tableComponent.getHeader().setColumnWidth(i, getWidth() / columnsNum);
    }
}