#WRT54GL ####July 2015 - I've been playing with a new WRT54GL router for about a month and wanted to go back and make a list of the configuration lessons learned I've tracked down. My primary references are this book, and the OpenWrt website. My examples are applicable with Mac OS X on the development machine.
##A few comments up front
- The book is based on an older set of firmware (White Russian 0.8) that used a few deprecated techniques. So much of the book is good for getting a general sense of how the router works, but not directly applicable to copy example source code. Specifically, the book uses
nvramto configure global variables which has been depracated in OpenWrt foruci. See this page for a description of newucitool. - The book jumps around from topic to topic a lot in the first 150 pages, and covers multiple firmware options, not just OpenWrt. So I've tried to organize my notes below along a more linear progression through getting a router up and running then exploring the full functionality of open source router firmware.
##Access to the router
- Logging in - The first thing I had to do was configure my computer to log into the Linksys router. The default IP on the router is 192.168.1.1. so I had to give my computer a manual IP on the same subnet. I chose 192.168.1.54. In the systems preferences panel I selected to use "DHCP with manual IP". With that completed just plug into any LAN port on the router and load the router address in a browser to get to the web interface. The browser will prompt for username and password. Both are set to the default value,
admin. - Wireless while connected directly - Next I wanted to be able to browse the web while I'm working on this so I enabled my wifi card on my host Mac-Mini to link into the home wireless network. The problem came up that whenever I was connected to both the WRT via ethernet and the wifi network I couldn't get web traffic to route to the wifi. So again, open up network preferences and in the bottom left hit the little gear. In there you can "Set Service Order.." By dragging the wifi interface higher in the list it pushed traffic toward that interface first.
- Upgrading to third party firmware - Straight out of the box the easiest way to upgrade to third party firmware is to use the Linksys web interface to move from the OEM firmware to my choice of open source firmware, OpenWRT.
- a. From this page on the OpenWrt website, it looks like a stable version to use with this hardware is 8.09.2. So browse to the downloads page and click on it, or get is directly from your Mac host like this,
wget http://downloads.openwrt.org/kamikaze/8.09.2/brcm-2.4/openwrt-wrt54g-squashfs.bin. - b. Also download the
md5sumsfile. Then follow the the instructions on page 56 to verify the integrity of the downloaded file. Simpler still use thecheck_md5.shscript in this repository to run the check. - c. Once the upgrade firmware is verified follow the upgrade instructions on page 57 at the Linksys Administration tab of the web interface.
- a. From this page on the OpenWrt website, it looks like a stable version to use with this hardware is 8.09.2. So browse to the downloads page and click on it, or get is directly from your Mac host like this,
- Change the root password - As described on page 72 you can change the root password via the web interface or the command line. Of course, I prefer the command line. From the Mac host
telnet 192.168.1.1. Then run thepasswdcommand. After updating the passwordexitout of the telnet session, and attempt to telnet back in. It SHOULD deny this connection. So ssh is the only remote login available now. - Set up PKI based ssh - Password based login is weak protection even with SSH because it is vulnerable to brute force attack. Set up PKI protection for the ssh root login as described on page 127, which I followed with the following modifications to get it working.
- a. In order to use
scpto move my public key over to the router I had to use use this commandscp ~/.ssh/id_dsa.pub root@192.168.1.1:/tmp/because I have not set up the hosts file yet to call it by name. - b. Similarly, once the keys were in place I had to ssh like this
ssh root@192.168.1.1for the same reason that my hosts file on the Mac is not set up. - c. The work thus far is a convenience because you can log in without being asked to provide your password; HOWEVER, password authentication is still turned on. So before exposing this router to the Internet, password authentication should be TURNED OFF. To do this follow the instructions here, but modifying the
/etc/config/dropbearfile to sayoption PasswordAuth 'off'. - d. After modifying the dropbear configuration restart the service using the config scripts in
/etc/init.d/like this/etc/init.d/dropbear restart. Then try to ssh in from a fictitious user like this,ssh bob@192.168.1.1. You SHOULD get the reply backPermission denied (publickey), and your command tossh root@192.168.1.1should log in immediately without any password request. - e. Don't forget that you can use
ucithe (universal configuration interface) to see the status of anything in/etc/init.dby typinguci show <foo>.
- a. In order to use
- Set up an ssh config file - Following the advice on page 113, an ssh config file makes it easier to ssh into various computers. Create the file
touch ~/.ssh/config. Then edit thehostsalong the lines of the example hosts file in this repo. When complete the commandssh wrtwill log into the correct IP with the right user. - Reverting back to original firmware - For this one the obvious stuff like using the OpenWrt web interface works. But let's assume things have gone pretty horribly wrong (and they will at some point). So assuming you have managed to lock yourself out of the router and options for the web interface or TFTP won't work, here is the way I had to re-install the original firmware once I got a direct connection to the hardware console as described in the next section.
- a. Download the Linksys firmware here
- b. Convert from a
<foo>.binfile to a<foo>.trxfile using theddcommand like thisdd if=<foo>.bin of=<foo>.trx bs=32 skip=1. This code strips off the 32 byte header. - c. Use
scpto move the new .trx file into the/tmp/directory of the router. Then use sysupgrade as described here, but note that the example on the wiki is still using.binfiles. These have been deprecated for sysupgrade so you must convert the source to a .trx file.
- Uploading firmware via TFTP - Trivial File Transfer Protocol (TFTP) is the default way of uploading firmware to the router. This describes my process for getting TFTP working. Although the book and web site were helpful there were a few tricks that I had to figure out on my own.
- The router must be
pingable. This should seem obvious but in the midst of troubleshooting it is easy to forget step one -ping 192.168.1.1 - I highly recommend adding the serial cable shown below while getting used to the WRT54 for first time because you can actually watch to boot sequence and see when it delays to listen for TFTP.
- TFTP can upload
<foo>.binfiles as opposed to.trxfiles necessary forsysupgrade, so the transformation from paragraph 6 is unnecessary. - Before uploading any software check the md5 checksum. Easiest method on Mac is to use my script
check_md5.sh <firmware>.bin md5sums. - Pending a satisfactory verification, and if your router IP is still 192.168.1.1 the easiest thing to do in order to upload software via TFTP is to use my
wrt_tftp.shscript. Just run the script on the Mac host,wrt_tftp.sh <firmware>.binthenrebootthe router from the console. The timeout set on the tftp script should allow the two devices to link up.
- The router must be
##Brick on Day 1
- THE TRUTH...I screwed up my router the first day I played around with it. I got off the reservation and started messing around with the way the router was configured to my home network...at which point I managed to shut down the wireless and DHCP server and erased it's self-assigned IP. So I could not communicate with the router anymore. THUS...I BRICKED IT ON THE FIRST DAY!
- So without the ability to communicate with my new router via any available interface I went to bed pissed off and woke up early to ponder the problem over a fresh cup of coffee. My solution was to find a way to connect to the serial console provided on the PCB inside the router so I could directly control the linux processor.
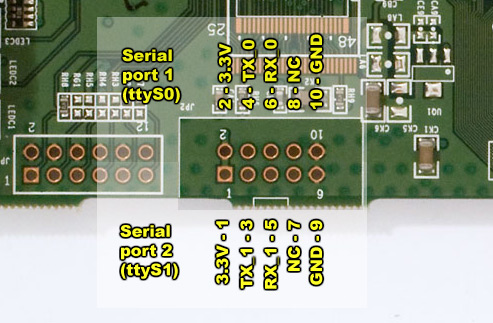
- There is a good discussion in chapter 7 of the book on building a serial cable to get access to the console via JP2 on the PCB. The book version requires a level shifting IC to convert the signal level on the board to RS-232 power levels. Then it connects this to an RS-232 serial connector. I certainly don't have an RS-232 port on my Mac-Mini or my Macbook Air, so I need to use USB.
- Using the book to understand the pin-out of JP2 on the PCB, I used an Adafruit FTDI Friend to convert the serial signal to USB as follows:
- Voltage mod - The WRT54GL operates with 3.3V on the PCB, not 5V which is the default VCC Out on the FTDI Friend. So you will need to cut the 5V trace and solder across the 3.3V jumper.
- Connector bill of materials - Next we need to build the cable to plug into the FTDI Friend. I get most of my hobby level stuff from Sparkfun:
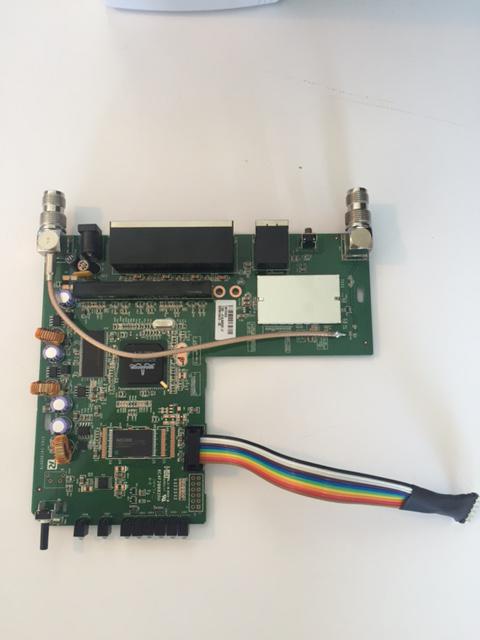
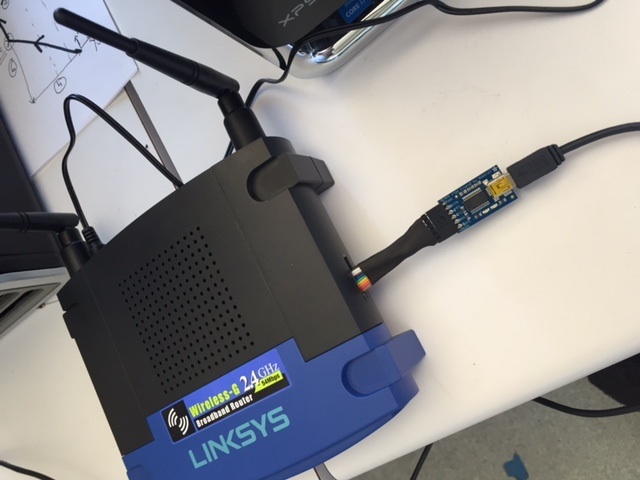
- Assemble the cable - Solder the male connector to the PCB. Then crimp the female ribbon wire onto the female connector. Then break off a piece of the male headers that is 6 pins wide. Cut off about 8 inches of ribbon cable then very carefully figure out which pins on the connector line up with the pin-out on the FTDI Friend. Remember that TX0->FTDI-RX and RX0->FTDI-TX. Then directly connect VCC and GND on the PCB to their corresponding pins on the FTDI friend. The remaining six wires in the connector can be cut short and left disconnected from the male header strip. Once everything is soldered use some heat shrink to protect and strengthen the connection to the headers stip. Some photos of my cable are included below this set of instructions.
- The FTDI Friend will also require a micro-USB cable to plug into the mac.
- Once everything is soldered up, connected and reassembled, power the router up with the cable plugged in. The FTDI will make the serial terminal from the router appear in the
/dev/directory as something liketty.usbserial-XXXXX. Use thescreenutility to monitor the terminal. From the book we know that the baud rate for the WRT54GL console is 115200 so this command will give access to the console,screen <tty.usbserial-XXXX> 115200. Of course you will have to put the right file handle in. I've written a script,/bin/wrt_console.shthat will search the/dev/folder and open the console automagically. - Finally, once you can log into the console go through the steps above to re-install OpenWrt or the OEM firmware.


##Getting experimental
- Start fresh - The whole point of buying a router to play with and learning about OpenWrt is so you can get experimental. However, you will at some point screw things up as you learn. So between each function I'd recommend reloading the default firmware image to avoid unknown interaction between different modules.
- Setting a new IP - The default IP for OpenWrt is 192.168.1.1, but I want to attach it to my home network behind an internet facing router on the internal IP 10.0.0.1. So I want to change the IP of the WRT to fit in this subnet. I want to set up two subnets. The first subnet 10.0.0.0 will consist of devices directly connected to the XFINITY modem/router that comes from my ISP. The second subnet 10.0.0.128 will serve devices connected to the WRT router. The first host address in this second subnet is 10.0.0.129. So we want that IP for the WRT.
- Using the UCI framework the config file for the network is at
/etc/config/network. See the explanation of this file here. - Note from the page that rebooting the router is not necessary to see changes. Just reload the network settings with
/etc/init.d/network reload. - Change the config file to assign a static IP on the LAN interface of 10.0.0.129, with a netmask of 255.255.255.128. This is also known as a /25 mask. Then reload the network settings. See the results by running
uci show network.
- Using the UCI framework the config file for the network is at
- Configuring DHCP - we are running DHCP on the lan interface to serve IP addresses to clients that connect to the router, but this is a home network and we don't want to connect more than 20 devices. So we want to modify how dnsmasq is configured to limit the number of devices.
- Take a look at the documentation page for the
dhcpconfig file here. - Host addresses on this subnet run from binary .10000001 (129) to .11111110 (254). So the range of addresses in this subnet is 10.0.0.129 - 10.0.0.254, recalling that the all 0's and the all 1's hosts are not allowed. But we don't want to ever give out 126 addresses so we will limit dnsmasq to give only 20 leases. Modify the
/etc/config/dhcpfile for the 'lan' interface tooption 'start' '0'andoption 'limit' '20'. Then reload the dnsmasq program by the command/etc/init.d/dnsmasq reload. - Don't forget to modify your home routers DHCP setting to use the same network mask and to adjust the DHCP range to avoid overlap with the WRT.
- Then run the Ethernet cables to set up the topology I've described and make sure that it works.
- Take a look at the documentation page for the