Using oracle database is just painful. This is a template repo to spin up oracle database container.
first git clone this repository
navigate to dockerfiles/<version> . Download the binary of your desired oracle database version and put it there . The binaries can be downloaded from the Oracle Technology Network, make sure you use the linux link: Linux x86-64. The needed file is named linuxx64_<version>_database.zip. Do not unzip.
Now go to dockerfiles and run the buildContainerImage.sh script
[oracle@localhost dockerfiles]$ ./buildContainerImage.sh -h

Usage: buildContainerImage.sh -v [version] -t [image_name:tag] [-e | -s | -x] [-i] [-o] [container build option]
Builds a container image for Oracle Database.

Parameters:
   -v: version to build
       Choose one of: 11.2.0.2  12.1.0.2  12.2.0.1  18.3.0  18.4.0  19.3.0
   -t: image_name:tag for the generated docker image
   -e: creates image based on 'Enterprise Edition'
   -s: creates image based on 'Standard Edition 2'
   -x: creates image based on 'Express Edition'
   -i: ignores the MD5 checksums
   -o: passes on container build option

* select one edition only: -e, -s, or -x

LICENSE UPL 1.0

Copyright (c) 2014,2021 Oracle and/or its affiliates.
Here is an example usage using 19.3.0
./buildDockerImage.sh -v 19.3.0 -sSit back and relax while the freakin big database is being installed.
The resulting images will be an image with the Oracle binaries installed. On first startup of the container a new database will be created, the following lines highlight when the database is ready to be used:
#########################
DATABASE IS READY TO USE!
#########################
You may extend the image with your own Dockerfile and create the users and tablespaces that you may need.
After the image is successfully created, if you run docker images command, you will find the image
REPOSITORY                         TAG          IMAGE ID       CREATED              SIZE
oracle/database 19.3.0-se2 9c70f41e1126 2 days ago 6.53GBTo run your Oracle Database image use the docker run command as follows:
docker run --name <container name> \
-p <host port>:1521 -p <host port>:5500 \
-e ORACLE_SID=<your SID> \
-e ORACLE_PDB=<your PDB name> \
-e ORACLE_PWD=<your database passwords> \
-e INIT_SGA_SIZE=<your database SGA memory in MB> \
-e INIT_PGA_SIZE=<your database PGA memory in MB> \
-e ORACLE_EDITION=<your database edition> \
-e ORACLE_CHARACTERSET=<your character set> \
-e ENABLE_ARCHIVELOG=true \
-v [<host mount point>:]/opt/oracle/oradata \
oracle/database:19.3.0-ee

Parameters:
   --name:        The name of the container (default: auto generated).
   -p:            The port mapping of the host port to the container port.
                  Two ports are exposed: 1521 (Oracle Listener), 5500 (OEM Express).
   -e ORACLE_SID: The Oracle Database SID that should be used (default: ORCLCDB).
   -e ORACLE_PDB: The Oracle Database PDB name that should be used (default: ORCLPDB1).
   -e ORACLE_PWD: The Oracle Database SYS, SYSTEM and PDB_ADMIN password (default: auto generated).
   -e INIT_SGA_SIZE:
                  The total memory in MB that should be used for all SGA components (optional).
                  Supported 19.3 onwards.
   -e INIT_PGA_SIZE:
                  The target aggregate PGA memory in MB that should be used for all server processes attached to the instance (optional).
                  Supported 19.3 onwards.
   -e ORACLE_EDITION:
                  The Oracle Database Edition (enterprise/standard).
                  Supported 19.3 onwards.
   -e ORACLE_CHARACTERSET:
                  The character set to use when creating the database (default: AL32UTF8).
   -e ENABLE_ARCHIVELOG:
                  To enable archive log mode when creating the database (default: false).
                  Supported 19.3 onwards.
   -v /opt/oracle/oradata
                  The data volume to use for the database.
                  Has to be writable by the Unix "oracle" (uid: 54321) user inside the container!
                  If omitted the database will not be persisted over container recreation.
   -v /opt/oracle/scripts/startup | /docker-entrypoint-initdb.d/startup
                  Optional: A volume with custom scripts to be run after database startup.
   -v /opt/oracle/scripts/setup | /docker-entrypoint-initdb.d/setup
                  Optional: A volume with custom scripts to be run after database setup.
Here is an example usage
docker run --name new_oracle19c \
 -p 1521:1521 -p 5500:5500 \
 --shm-size=1g \
 -e ORACLE_SID=ORCL \
 -e ORACLE_PDB=ORCLPDB1 \
 -e ORACLE_PWD=oracle \
 -v /d/Work/oracle_docker_test/sql:/docker-entrypoint-initdb.d/startup \
 -v /d/Work/oracle_docker_test/sql:/docker-entrypoint-initdb.d/setup \
 -d oracle/database:19.3.0-se2
Sit back and relax while the freakin big database is being installed. (2)
- if you already have another oracle database locally installed or running in a container that uses the port
1521, change the-pto1522:1521 - don't use
ORACLE_SID=orcl.ORACLE_SIDis case sensitive
run the terminal
docker exec -it container_id bashthen
sqlplus system as sysdbawhen prompted for password, give the password when you ran the container
password : oracleNow, you can access the oracle database
Let's create a new user
create user DUMMY identified by DUMMY;
GRANT ALL PRIVILEGES TO DUMMY;CREATE TABLESPACE DUMMY_TABSPACE
DATAFILE 'dummy_tabspace.dat'
SIZE 10M AUTOEXTEND ON;
CREATE TEMPORARY TABLESPACE DUMMY_TABSPACE_TEMP
TEMPFILE 'dummy_tabspace_temp.dat'
SIZE 5M AUTOEXTEND ON;
CREATE USER DUMMY
IDENTIFIED BY DUMMY
DEFAULT TABLESPACE DUMMY_TABSPACE
TEMPORARY TABLESPACE DUMMY_TABSPACE_TEMP;
GRANT CONNECT,RESOURCE,DBA TO DUMMY;
GRANT CREATE SESSION TO DUMMY;
GRANT CREATE TABLE TO DUMMY;
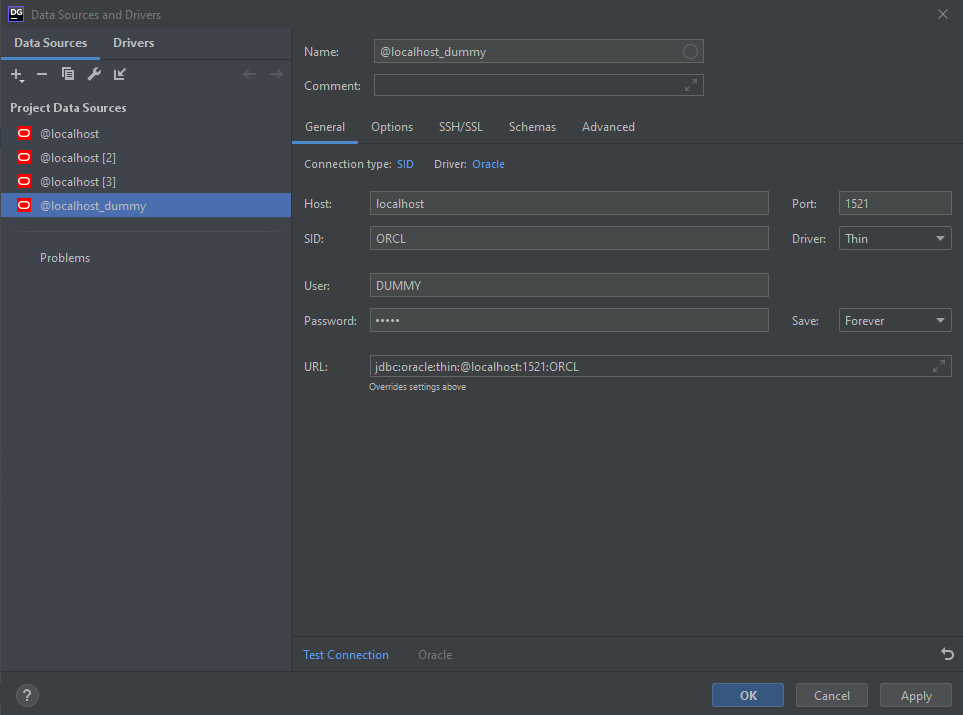
GRANT UNLIMITED TABLESPACE TO DUMMY;File > new > Data Source > Oracle
Now click test connection and if all goes well you will see a green prompt saying the connection was successful : ) Click apply and you will find your newly created user with schema
If you have used -p 1522:1521 , then just use 1522 instead 1521 in the port section
