
-
Create GitHub Account
-
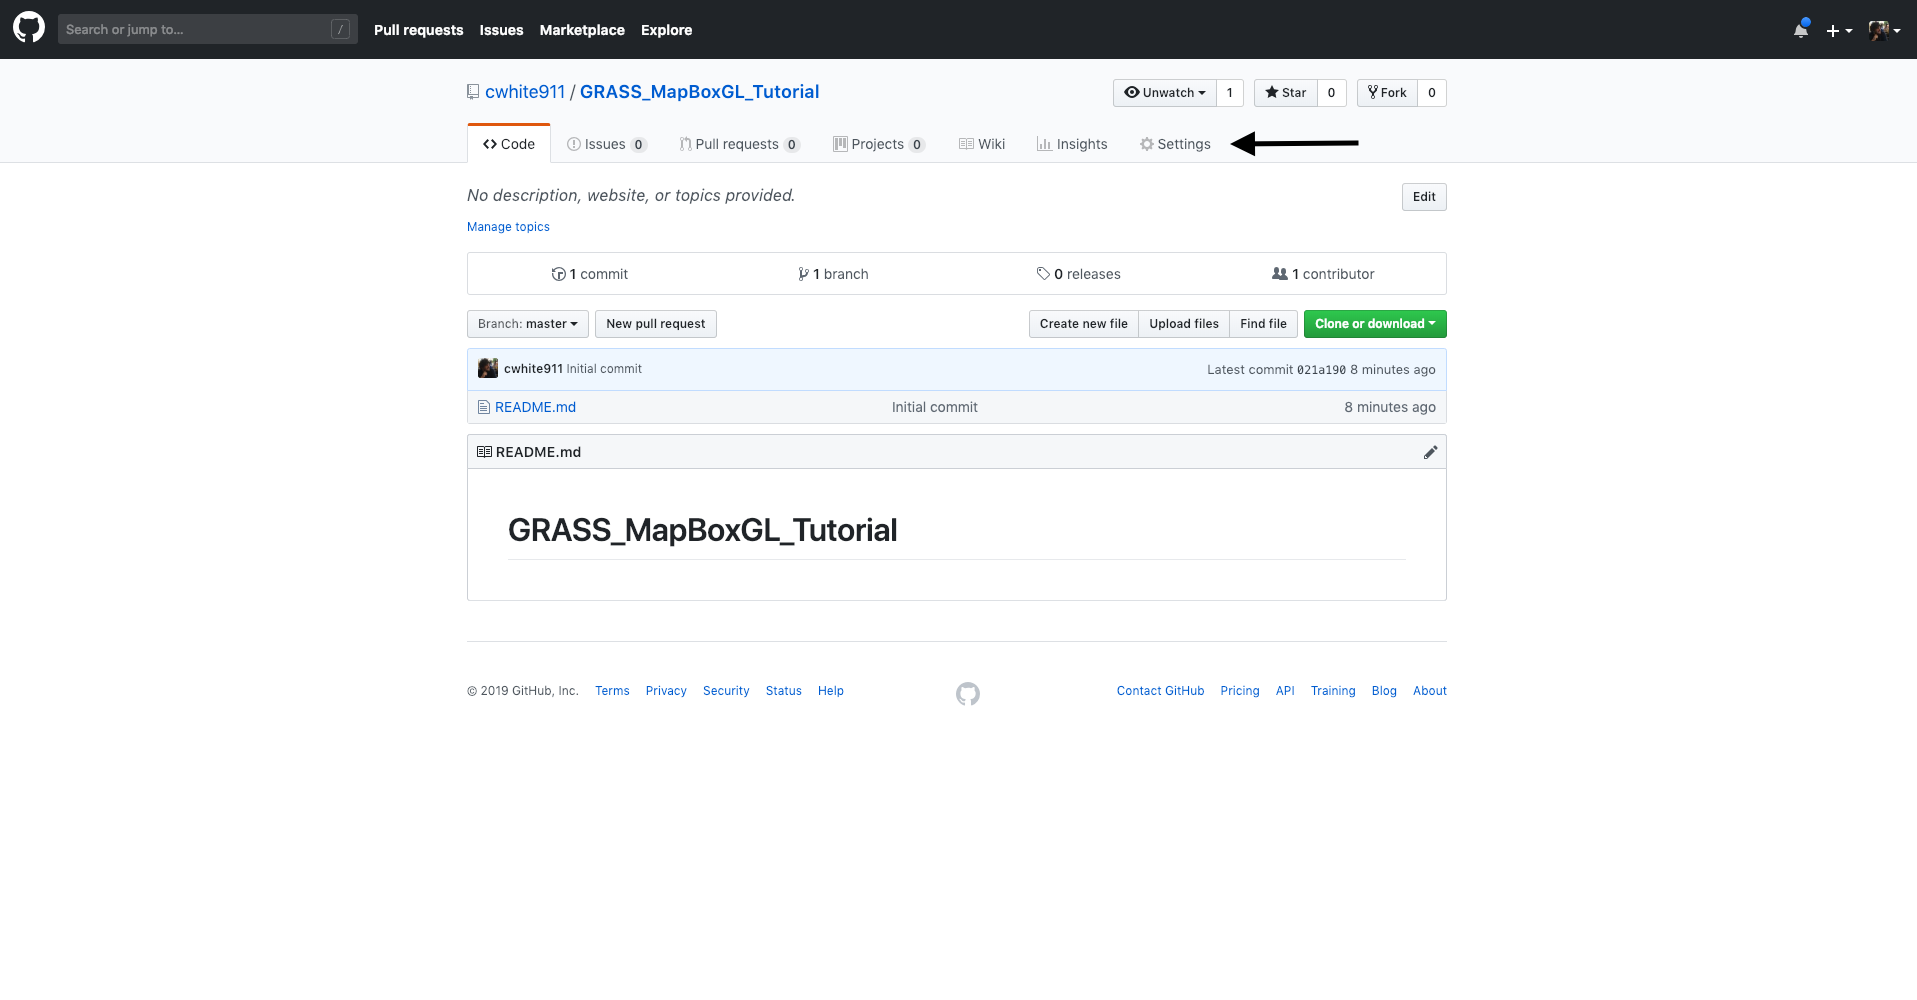
Fork and clone this project or create your own GitHub Repository
-
From your new repository click settings
-
From the settings page scroll down until you see GitHub Pages from the dropdown select master branch


- Now all of your code will be hosted by GitHub at
https://YourGitHubUserName.github.io/GRASS_MapBoxGL_Tutorial/
Install GRASS GIS if you don't have it
- Run your favorite simulation
- Use r.out.leaflet to generate bbox and pngs
- clone grass-web-publishing into the main project directory
git clone https://github.com/ncsu-geoforall-lab/grass-web-publishing.git
Full code at https://github.com/ncsu-geoforall-lab/grass-web-publishing thanks Vaclav!
- Inside the new grass-web-publishing directory you will find r.out.leaflet.py located inside the r.out.leaflet directory
- Find your running GRASS Session terminal and type python then drag the r.out.leaflet.py file into the terminal
Note: Dragging files into the terminal will add the absolute path to the file
- Add the rasters you would like to export to the raster parameter as a comma seperated list, and set the output directory, so that the new images will be in this projects images folder.
It should look something like this, but you will need to update the paths.
python r.out.leaflet.py raster="inundation_0.0,inundation_0.5,inundation_1.0,inundation_1.5,inundation_2.0,inundation_2.5,inundation_3.0,inundation_3.5,inundation_4.0,inundation_4.5,inundation_5.0" output="./images"
You will now see a few new files in the images directory
- data_file.csv
- data_file.js
- New pngs
Inside of data_file.js you will see the name of each of your new png files and the bounding boxes. We will load this file into our html document to get access to this information later.
- Create an empty file in your project called index.html and copy the following code into the document.
<!DOCTYPE html>
<html>
<head>
    <meta charset='utf-8' />
    <title>GRASS Animate Simulation</title>
    <meta name='viewport' content='initial-scale=1,maximum-scale=1,user-scalable=no' />
    <script src='https://api.tiles.mapbox.com/mapbox-gl-js/v0.53.0/mapbox-gl.js'></script>
    <link href='https://api.tiles.mapbox.com/mapbox-gl-js/v0.53.0/mapbox-gl.css' rel='stylesheet' />
    <style>
        body { margin:0; padding:0; }
        #map { position:absolute; top:0; bottom:0; width:100%; }
    </style>
</head>
<body>

<div id='map'></div>
<script src="./images/data_file.js"></script>
<script>
//Sets up the map
mapboxgl.accessToken = '<YOUR MAPBOX TOKEN>';
var map = new mapboxgl.Map({
    container: 'map',
    zoom: 12,
    center: [-78.6319,35.7099],
    pitch: 45,
    style: 'mapbox://styles/mapbox/satellite-v9'
});

</script>

</body>
</html>-
Create account at MapBox
-
Once you are logged into MapBox retrieve your public token from https://account.mapbox.com/
-
Replace from the index.html file you just created with your public token.
-
Add navigation controls to the map
//Sets up the map
mapboxgl.accessToken = '<YOUR MAPBOX TOKEN>';
var map = new mapboxgl.Map({
    container: 'map',
    zoom: 12,
    center: [-78.6319,35.7099],
    pitch: 45,
    style: 'mapbox://styles/mapbox/satellite-v9'
});

//Add Navigation Controls
map.addControl(new mapboxgl.NavigationControl());- Next you will add a static raster layer to the map
//Convert Bounds to match mapbox gl source specs
function grassBbox(bounds) {
    return [
        [bounds[1][1], bounds[1][0]],
        [bounds[0][1], bounds[1][0]],
        [bounds[0][1], bounds[0][0]],
        [bounds[1][1], bounds[0][0]]
    ];
}

//We need to wait for the map to load before we add the raster layer
map.on('load', function() {

    //Create a new map source with the bounding box and url to your raster data.
    map.addSource("grass", {
        type: "image",
        //Gets the first image listed in images/data_file.js
        url: "./images/" + layerInfos[0].file,
        //Gets the bounds of the first image listed in images/data_file.js
        coordinates: grassBbox(layerInfos[0].bounds)
    });

    //Now add a new layer to the map from the source you created
    map.addLayer({
        id: "grass-layer",
        "type": "raster",
        "source": "grass",
        "paint": {
            "raster-fade-duration": 0
        }
    });

});- Now we will create an animation from the images
//The total numbers of images found in data_file.js
var frameCount = layerInfos.length;
//Default used to start animation with first image
var currentImage = 0;

//Gets the current image
function getPath() {
    return "images/" + layerInfos[currentImage].file;
}

//Convert Bounds to match mapbox gl source specs
function grassBbox(bounds) {
    return [
        [bounds[1][1], bounds[1][0]],
        [bounds[0][1], bounds[1][0]],
        [bounds[0][1], bounds[0][0]],
        [bounds[1][1], bounds[0][0]]
    ];
}

//We need to wait for the map to load before we add the raster layer
map.on('load', function() {

    //Create a new map source with the bounding box and url to your raster data.
    map.addSource("grass", {
        type: "image",
        //Replace static file with function
        url: getPath(),
        //Gets the bounds of the first image listed in images/data_file.js
        coordinates: grassBbox(layerInfos[0].bounds)
    });

    //Now add a new layer to the map from the source you created
    map.addLayer({
        id: "grass-layer",
        "type": "raster",
        "source": "grass",
        "paint": {
            "raster-fade-duration": 0
        }
    });

    //Will update image every 200ms
    setInterval(function() {
        currentImage = (currentImage + 1) % frameCount;
        map.getSource("grass").updateImage({ url: getPath() });
    }, 200);

});
Now when you load your index.html into the browser you should see the animation.
- Optional: Add 3d buildings
//Optional Add 3d Buildings so that they are visible above flooding
if (! map.getSource('composite')) {map.addSource('composite', { type: 'vector', url: 'mapbox://mapbox.mapbox-streets-v7'});}

var layers = map.getStyle().layers;

var labelLayerId;
for (var i = 0; i < layers.length; i++) {
    if (layers[i].type === 'symbol' && layers[i].layout['text-field']) {
    labelLayerId = layers[i].id;
    break;
    }
}


//Add 3d Buildings layer
map.addLayer({
    'id': '3d-buildings',
    'source': 'composite',
    'source-layer': 'building',
    'filter': ['==', 'extrude', 'true'],
    'type': 'fill-extrusion',
    'minzoom': 14,
    'paint': {
        'fill-extrusion-color': '#aaa',
        // use an 'interpolate' expression to add a smooth transition effect to the
        // buildings as the user zooms in
        'fill-extrusion-height': [
            "interpolate", ["linear"], ["zoom"],
            14, 0,
            14.05, ["get", "height"]
        ],
        'fill-extrusion-base': [
            "interpolate", ["linear"], ["zoom"],
            14, 0,
            14.05, ["get", "min_height"]
        ],
        'fill-extrusion-opacity': 0.8
        }
    }, labelLayerId);
This is what your index.html file should now look like with the mapbox token replaced
<!DOCTYPE html>
<html>
<head>
    <meta charset='utf-8' />
    <title>GRASS Animate Simulation</title>
    <meta name='viewport' content='initial-scale=1,maximum-scale=1,user-scalable=no' />
    <script src='https://api.tiles.mapbox.com/mapbox-gl-js/v0.53.0/mapbox-gl.js'></script>
    <link href='https://api.tiles.mapbox.com/mapbox-gl-js/v0.53.0/mapbox-gl.css' rel='stylesheet' />
    <style>
        body { margin:0; padding:0; }
        #map { position:absolute; top:0; bottom:0; width:100%; }
    </style>
</head>
<body>

<div id='map'></div>
<!-- Loads data from data_file.js -->
<script src="./images/data_file.js"></script>

<script>
//Sets up the map
mapboxgl.accessToken = '<YOUR MAPBOX TOKEN>';
var map = new mapboxgl.Map({
    container: 'map',
    zoom: 12,
    center: [-78.6319,35.7099],
    pitch: 45,
    style: 'mapbox://styles/mapbox/satellite-v9'
});

//Add Navigation Controls
map.addControl(new mapboxgl.NavigationControl());

//The total numbers of images found in data_file.js
var frameCount = layerInfos.length;
//Default used to start animation with first image
var currentImage = 0;

//Gets the current image
function getPath() {
   return "images/" + layerInfos[currentImage].file;
}

//Convert Bounds to match mapbox gl source specs
function grassBbox(bounds) {
    return [
        [bounds[1][1], bounds[1][0]],
        [bounds[0][1], bounds[1][0]],
        [bounds[0][1], bounds[0][0]],
        [bounds[1][1], bounds[0][0]]
    ];
}

//We need to wait for the map to load before we add the raster layer
map.on('load', function() {

    //Create a new map source with the bounding box and url to your raster data.
    map.addSource("grass", {
        type: "image",
        //Replace static file with function
        url: getPath(),
        //Gets the bounds of the first image listed in images/data_file.js
        coordinates: grassBbox(layerInfos[0].bounds)
    });

    //Now add a new layer to the map from the source you created
    map.addLayer({
        id: "grass-layer",
        "type": "raster",
        "source": "grass",
        "paint": {
            "raster-fade-duration": 0
        }
    });

    //Will update image every 200ms
    setInterval(function() {
        currentImage = (currentImage + 1) % frameCount;
        map.getSource("grass").updateImage({ url: getPath() });
    }, 200);


    //Optional Add 3d Buildings so that they are visible above flooding
    if (! map.getSource('composite')) {map.addSource('composite', { type: 'vector', url: 'mapbox://mapbox.mapbox-streets-v7'});}

    var layers = map.getStyle().layers;

    var labelLayerId;
    for (var i = 0; i < layers.length; i++) {
        if (layers[i].type === 'symbol' && layers[i].layout['text-field']) {
        labelLayerId = layers[i].id;
        break;
        }
    }


    //Add 3d Buildings layer
    map.addLayer({
        'id': '3d-buildings',
        'source': 'composite',
        'source-layer': 'building',
        'filter': ['==', 'extrude', 'true'],
        'type': 'fill-extrusion',
        'minzoom': 14,
        'paint': {
            'fill-extrusion-color': '#aaa',
            // use an 'interpolate' expression to add a smooth transition effect to the
            // buildings as the user zooms in
            'fill-extrusion-height': [
                "interpolate", ["linear"], ["zoom"],
                14, 0,
                14.05, ["get", "height"]
            ],
            'fill-extrusion-base': [
                "interpolate", ["linear"], ["zoom"],
                14, 0,
                14.05, ["get", "min_height"]
            ],
            'fill-extrusion-opacity': 0.8
            }
        }, labelLayerId);

});

</script>

</body>
</html>Now lets push your code to github and see what you have done
git add .
git commit -m "Init Fancy Map"
git push origin master
Now your map should be live at
https://YourGitHubUserName.github.io/GRASS_MapBoxGL_Tutorial/