MVVM UI Framework for Godot Engine
- Install plugins in the godot asset store
You can also download the plugin package and manually import it
- Open project settings and enable plugins(check box)
Create a new index.gmui file in the pages folder under the root directory, and then write it to :
Run the project and you will see the blank page you have written. That's right, you don't need to write any code, a GMUI project will run! The starting point of GMUI is to be as simple as possible, without the need to write any extra code.
If prompted for the main scene, please select 'addons/gmui/dist/scenes/pages/index. tscn' or the scene file in the corresponding directory
In order to come up with a usable version as soon as possible, GMUI has reused Godot's built-in nodes as components. In the future, we will provide more beautiful default components, and we welcome friends from the community to contribute to the component library. Next, we will demonstrate through a registration and login interface without actual functionality :
<Row align="center">
    <Column align="center">
        <Row>
            <Text text="Username"></Text>
            <LineEdit placeholder_text="Pls enter username"></LineEdit>
        </Row>
        <Row>
            <Text text="Password"></Text>
            <LineEdit placeholder_text="Pls enter password"></LineEdit>
        </Row>
        <Row>
            <Button text="login"></Button>
            <Button text="reset"></Button>
         </Row>
    </Column>
</Row>
Running the project can see :
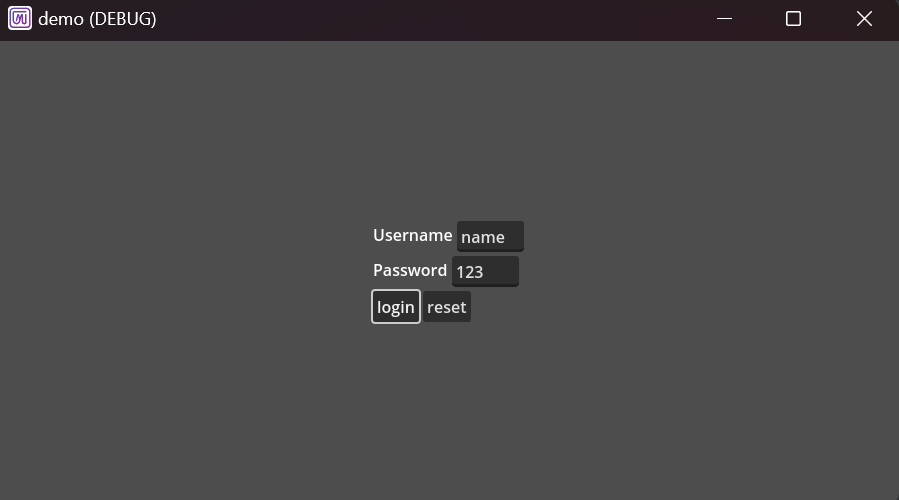
Bidirectional data binding is also a piece of cake! To write logical code, add a 'Script' tag at the bottom of the. gmui file. In the case below, clicking the login button will print the user's input.
<Row align="center">
    <Column align="center">
        <Row>
            <Text text="Username"></Text>
            <LineEdit placeholder_text="Pls enter username" g-model="username"></LineEdit>
        </Row>
        <Row>
            <Text text="Password"></Text>
            <LineEdit placeholder_text="Pls enter password" g-model="password"></LineEdit>
        </Row>
        <Row>
            <Button text="Login" ref="loginBtn"></Button>
            <Button text="Reset" ref="resetBtn"></Button>
         </Row>
    </Column>
</Row>

<Script>
    @onready var data = vm.define_reactive({'username': 'name', 'password': '123'})
    func _mounted():
        vm.refs['loginBtn'].rnode.pressed.connect(
            func():
            print('username:', data.rget('username'))
            print('password:', data.rget('password'))
        )
        vm.refs['resetBtn'].rnode.pressed.connect(
        func():
            data.rset('username', '')
            data.rset('password', '')
        )
    func _updated():
        print('username:', data.rget('username'))
        print('password:', data.rget('password'))
</Script>
You can also use bidirectional binding for components :
<LineEdit g-model="text"></LineEdit>

<Script>
</Script><Control>
<Widget path="res://components/component.gmui" g-model="text"></Widget>
<Text g-bind:text="text"></Text>
</Control>
<Script>
@onready var data = vm.define_reactive({'text': 'my text'})
</Script>If you don't like this style, you can also put all UI code into a 'Template' tag, as shown in the following example:
<Template>
    // Your UI Code
    // Your UI Code
    // ......
</Template>

<Script>

</Script>If ref is declared on a regular node, a virtual node will be obtained. You can obtain the virtual node through mv.refs['name'] :
<Control>
    <Label text="my text" ref="label"></Label>
</Control>

<Script>
    func _mounted():
        print(vm.refs['label'].rnode.text)
</Script>
If you declare ref in a component, you will obtain a VM instance of that component :
<Control>
    <Text text="component text" ref="text1"></Text>
</Control><Control>
<Widget path="res://components/username_input.gmui" ref="widget"></Widget>
</Control>
<Script>
func _mounted():
var widget = vm.refs['widget'].refs['text1']
</Script>When you want to execute a method within a node, please use the exec_func method with the method name and parameter array as parameters :
<Control>
    <Label text="my text" id="label"></Label>
</Control>

<Script>
    func _mounted():
        vm.ids['label'].exec_func('set_text', ['new text'])
</Script>
Note: Although virtual nodes have real nodes, it is best not to directly modify the state of real nodes through them. Please call exec_func or bind responsive data !
The jump to method can be used for page redirection, with the parameter being the path to the. gmui file in the page directory :
<Column align="center">
    <Row align="center">
        <Text text="my text"></Text>
    </Row>
    <Row align="center">
        <Button text="jump" ref="btn"></Button>
    </Row>
</Column>

<Script>
    func _mounted():
        vm.refs['btn'].rnode.pressed.connect(
            func():
        self.jump_to('res://pages/page.gmui')
    )
</Script>- Bidirectional data binding
- New UI component library
- More layout components
- C # language support
- Responsive UI programming