This is a utility to transform deep EXR files and output shallow EXR files. Supported operations include:
- Extracting layers based on object ID to allow compositing in 2D graphics packages with poor or no deep compositing support, like Photoshop and After Effects. The output layers can be composited together easily, and color filters can be applied with correct transparency and antialiasing, even when layers overlap in complex ways.
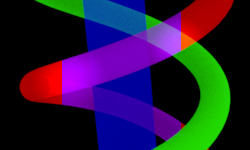
The red helix is a single layer even where it goes underneath the cylinder, and color and exposure changes have been made to it with ordinary Photoshop tools:
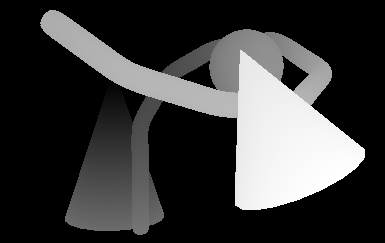
- Masks can be created (or used from deep EXR channels) and extracted. This allows creating a mask from depth information, normals or world position that can be used to mask 2D effects.
This mask is based on the distance of each pixel from the tip of the left cone:
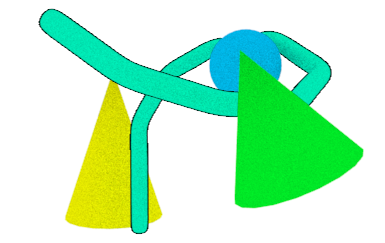
- Layers can be stroked (outlined). This effect is nearly identical to the Photoshop stroke effect, but can be applied to individual objects, and the stroke will be occluded by objects closer to the camera.
- Strokes can include self-intersections, using edge detection based on depth.
The output works with any image editing software that supports basic EXR files, without requiring deep compositing support. This idea is based on https://github.com/MercenariesEngineering/openexrid.
2017-05-29-1: Windows
- Add an ID channel to your EXR output and assign the ID 1000 to an object. Render a deep EXR file.
- Render a deep EXR file with object ID samples. This is tested with Arnold renders out of Maya. The EXR channel names should be "R", "G", "B", "A", "Z", "ZBack" and "id".
- Run the tool:
exrflatten --input=input.exr --save-layers --layer=1000=MyObject
This will extract objects with ID 1000 as "MyObject". Objects with other IDs will be in a default layer.
- In Photoshop, add all color output EXRs to a document. Lower numbered files must be lower in the compositing order. Important: The document must be 32-bit for Photoshop to blend the layers correctly.
The image should now look like the original render, and you can make color adjustments to individual object layers.
OpenEXR files can contain a lot of data which can be hard to access from 2D tools, such as depth, position and orientation information. The --create-mask operation can help convert complex EXR data to a simple monochrome or alpha mask, which can be easily imported into any tool.
A facing mask can convert world space normals to a mask. (Alternatively, you can render a facing channel at render time and use it directly.) The mask can be reoriented, to give a mask for parts of objects facing in a particular direction.
A depth mask generates a mask from the distance to an object. This can be used to mask a blurred copy of the image for a cheap depth of field effect, or to mask color correction to make objects further away darker or create a fog effect.
A distance mask creates a mask from the distance from a specified point to an object.
Strokes (outlines) can be applied to layers to create an ink line effect. Each layer is stroked separately, and strokes inherit the depth of their object. This allows objects to have an outline even if they're on top of another object, and for outlines to be occluded by objects closer to the camera.
Intersection lines can also be added, to add ink lines where an object intersects itself in the same layer. This is done with world space-based edge detection.
The --stroke command adds strokes:
--stroke=1 --radius=1 --intersections
- 1 is the object ID to stroke.
- --radius sets the thickness of the stroke.
- --intersections causes intersection lines tol be drawn.
See --stroke for a complete list of arguments.
Intersection lines have some limitations:
- This is actually a stroke effect, created by generating a mask and then applying a stroke to it. This can cause holes in the outline where two intersections meet.
- Edge detection by depth isn't perfect.
- Intersection lines and outline strokes are added separately, and don't always join up perfectly.
By default, a stroke is applied to the whole object. You can control which parts of the object have an outline with a stroke mask. This can be generated with --create-mask, or a channel in the input EXR file can be used. For example:
--stroke=1 --stroke-mask=StrokeMask
A mask can also be used to control intersection lines:
--stroke=1 --intersections --intersection-mask=IntersectionMask
Areas which are black in the mask won't generate a stroke. The same mask can be used for both strokes and intersections, or you can use a separate mask for each.
By default, strokes are added to the layer they're on. Strokes can also be output into a new layer, by specifying an output-id:
--stroke=1 --output-id=2
This will read object ID 1, and output the stroke as object ID 2. To output it into its own file, you also need to include this object ID as a layer:
--save-layers --layer=2=ObjectStroke
The stroke will then be output as a separate layer. This makes it easy to mask the stroke further during compositing.
Note that strokes are partially on top of the object and partially below, due to the way strokes are blended, which means that the stroke layer will have some of the object's color. This means that any color corrections applied to the object need to be applied to the stroke layer as well.
See sample/sample.psd shows how this can be used. This sample applies several color adjustments to objects in the scene. The adjustments affect the intended objects, even though the objects overlap each other in complex ways, with both helixes being both in front of and behind each other and the blue cylinder.
The source scene sample.ma can be rendered with Maya 2017 using Arnold, which
will output sample.exr. These files were generated by create-samples.sh.
To generate the flattened images, run:
The PSD is linked to these files, and will update automatically. (If Photoshop doesn't connect the linked images correctly, you may need to re-link them the first time.)
If more than one input render is specified, they'll be combined.
When 3D renderers render a scene, they don't include samples for objects that aren't visible to the camera. If you render a scene with two objects, and one is covering up the other so the camera can't see it, there won't be any data for it.
With deep EXR, you can render the scene twice: once with just the front object, and once with just the rear one. (In Maya, this is done by toggling Primary Visibility, which makes the object invisible but still cast shadows and reflections on other objects.) This gives two images, one with each object. If you then specify both images as inputs, the layers can now include both objects. If you hide or mask the front object, the one behind it becomes visible. (You need to set the layer order appropriately for this to happen. If the front object is in a lower compositing layer this won't be possible.)
You could do this by importing the two original EXR layers, but that becomes complicated if you have several layers, such as a scene layer containing things in the environment that might be both in front of and behind your characters. You have to separate foreground and background elements yourself to composite them correctly. That's one of the problems that deep compositing solves, and EXR layering provides that solution to simple compositing as well.
Some operations are dependent on scene scale. By default, the input is expected to be in 1cm
scale. If your scene has a different scale, this can be set with --scale=meters, --scale=feet,
or an arbitrary scale such as --scale=100 (also meters).
The output should be correct regardless of the order you specify for layers. If an object is behind another object, but is on a higher layer, the output will be adjusted to compensate. If you're just making color adjustments, this is automatic and can be ignored. However, if you want to mask objects, specifying a good layer order will give more useful results.
Suppose a box is in front of a wall, with the box as object 1 and the wall as object 2. If you specify
--layer="1=Box" --layer="2=Wall"
the Wall output layer will be on top of the Box layer. The silhouette of Box will be cut out of Wall in the result, to prevent the wall (which you're actually putting on top) from covering up the box. This is fine if you're just adjusting colors and will give correct results, but isn't optimal.
If you reverse the order with --layer="2=Wall" --layer "1=Box", the Box layer is now
on top. The output no longer has to do any tricks to make everything visible. This means
you can hide or mask the box layer, and you'll see the wall behind. This wasn't possible
with the other order.
In some cases, objects will mutually cover each other:
Here, the helixes are on top of each other, and no object is always on top of any other object. There's no layer ordering that can match this perfectly. This is the basic limitation of flat layers, and you need real deep compositing support to get full control here. The results will be correct and can be used for color adjustments, but you can't hide one layer without the cutouts in the other being visible.
Operations are executed in the order they're given, and manipulate the image in memory. Subsequent operations can see the results of earlier ones. This allows some interesting possibilities:
- Generate a mask from distance to a point, and then apply the mask to a stroke. This allows outlining an object near a particular point. Note that the mask won't be useful after applying a stroke, because the stroke will add samples without mask data. If you want to output a mask, add it after manipulating the image.
- --save-layers and --save-flattened save the image at the current time. This allows saving multiple copies of the file, each at a different point.
A series of operations can be specified on the commandline, which will be executed in order. The order is significant. For example, if you generate a mask, future commands can use that mask, but earlier commands can not, and the generated mask will include any changes made by earlier commands.
Global options come first on the commandline:
--input=file.exr Adds an input file. All input files will be read and combined before executing
any commands.
--output=path Specify the directory to hold input files. This path will be prefixed to
all output paths.
--id=channel Change the EXR channel used for object IDs. By default, the standard channel
ID is used.
--scale=[cm|meters|feet|#] Set the scene scale (default: cm). "meters" is an alias for 100,
and "feet" is an alias for 30.48.
--save-flattened saves a single flattened image, with all objects merged.
--save-flattened=output.exr
--save-layers splits the current image into a list of layers according to object ID, and saves the layers as a set of numbered EXR files. This operation can be followed by the following options:
- --layer=1=Name Add a layer to be saved. The first argument, 1, is the object ID to save. The second argument is the name of the layer, which is used as the filename substitution. Note that a default layer is added automatically if any objects have IDs not specified by a --layer option.
- --filename-pattern=<Name>.exr Set the pattern used to generate filenames. See filename patterns.
- --layer-mask=options Add a mask to the layer set. See masks.
- --combine=1,2 Combine one object ID into another before saving the layer set. This is useful if you have lots of object IDs and want to manipulate them separately, but you want layers to be saved with objects combined to reduce the number of layers. Objects with the second object ID, 2, will be combined into the first object ID, 1.
The --filename-pattern option to --save-layers sets how filename patterns are generated.
The default pattern is <inputname> <ordername> <layer>.exr, which gives filenames like render #1 main color.exr.
Substitutions:
- <name> The layer name set by the --layer option.
- <order> The order that this layer is to be composited.
- <ordername> If this is a mask, this is the same as <name>. Otherwise, this is #<order> <name>.
- <layer> The layer type: color for regular color layers, and the mask name set by -layer-mask for masked layers.
- <inputname> The input filename, with the extension removed.
- <frame> If the input filename has the format abcdef.1234.exr, this is the frame number, 1234.
A list of masks can be specified when saving layers. For each layer output, the mask will be applied and saved as a separate file.
--save-layers takes a single argument specifying how to save the layer, which is a semicolon-separated list of options:
- channel The channel containing the mask. This option is required. This can be a channel in the input EXR, or a mask channel created with --create-mask.
- name The name of the output mask. This will be available as the <layer> filename substitution.
- grey Output a greyscale mask.
- alpha Output an alpha mask. This mode is useful in combination with Photoshop clipping masks.
- rgb Composite the mask onto the layer color, and output the result.
- exrlayer Instead of writing the mask to a separate file, add it as a luminance channel in the corresponding color layer's EXR. The name argument specifies the EXR layer name, otherwise the channel will be used by default.
--create-mask generates a mask from other channels in the input image. The mask can then be used with other commands, like --save-layers and --stroke.
The argument to --create-mask is the mask mode:
- --create-mask=facing Generate a facing angle mask using normals and the camera position.
- --create-mask=depth Generate a mask from camera depth.
- --create-mask=distance Generate a mask based on distance from a given point.
This command takes the following options:
- --name=MaskName Set the name of the mask to create. This argument is required.
- --src=SourceLayer Specify the EXR layer to read. By default, a layer is chosen based on the type.
- --min=1 --max=10 Specify the minimum and maximum value for the mask. For depth, this is the depth range from the camera. For distance, this specifies the nearest and furthest distance for the mask. Values out of this range will be clamped to 0-1.
- --noclamp If set, values won't be clamped to the 0-1 range.
- --invert If set, invert black and white in the map.
- --normalize Automatically normalize the map, so the smallest value is black and the highest value is white.
- --angle=1,0,0 For type=facing, set the direction to measure the angle from. By default, this is 1,0,-1, which is towards the camera. This can be used to create a mask for surfaces facing in a particular direction.
- --pos=0,0,0 For type=distance, set the world space point to measure from.
Add a stroke to the image, with optional intersection lines. The argument to --stroke is an object ID: --stroke=1.
This command takes the following options:
- --radius=1 The radius of the stroke. Higher values make the outline thicker.
- --fade=1 The radius of the stroke fade-off. Higher values make the outline fade out over a larger area.
- --color=#000000 The color of the stroke.
- --intersections If present, include intersection lines. This requires a world space position channel named "P".
- --stroke-mask=MaskName The name of a mask for the stroke. This allows preventing the stroke from being drawn on some parts of the image.
- --intersection-mask=MaskName The name of a mask for intersection lines. This may be the same as stroke-mask.
- --intersection-min-distance=1 The minimum distance between two samples before intersection lines begin appearing. This is at a distance of 1000 units, and is adjusted for objects nearer or farther.
- --intersection-fade=1 The distance after intersection-min-distance for intersection lines to fully appear.
- --output-id=1 The object ID to write the stroke to. By default, the stroke is written to the same ID as it's read.
This doesn't currently perform "tidying" of images, which means it will probably give incorrect results if the EXR file contains volumes (samples with nonzero depth).
Strokes won't work well on blurred images, eg. with motion blur or depth of field.


