I.Lobato1,2, T. Friedrich1,2, S. Van Aert1,2
1EMAT, University of Antwerp, Department of Physics, Groenenborgerlaan 171, B-2020 Antwerp, Belgium
2NANOlab Center of Excellence, University of Antwerp, Department of Physics, Groenenborgerlaan 171, B-2020 Antwerp, Belgium
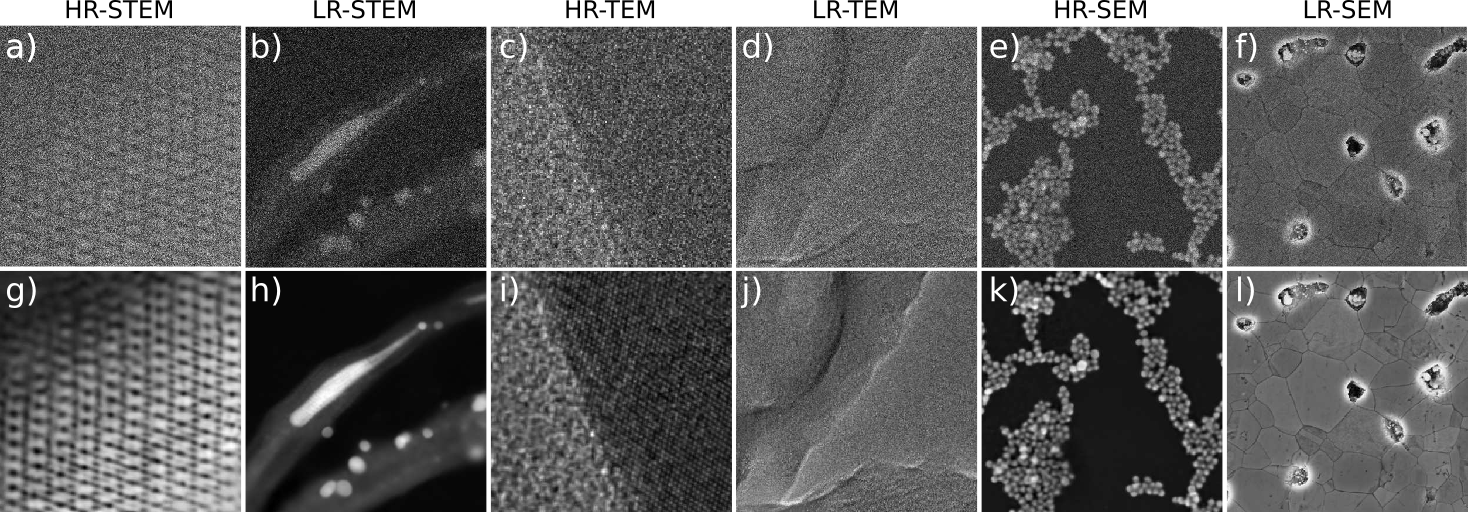
State-of-the-art electron microscopes such as scanning electron microscopes (SEM), scanning transmission electron microscopes (STEM) and transmission electron microscopes (TEM) have become increasingly sophisticated. However, the quality of experimental images is often hampered by stochastic and deterministic distortions arising from the instrument or its environment. These distortions can arise during any stage of the imaging process, including image acquisition, transmission, or visualization. In this paper, we will discuss the main sources of distortion in TEM and S(T)EM images, develop models to describe them and propose a method to correct these distortions using a convolutional neural network. We demonstrate the effectiveness of our approach on a variety of experimental images and show that it can significantly improve the signal-to-noise ratio resulting in an increase in the amount of quantitative structural information that can be extracted from the image. Overall, our findings provide a powerful framework for improving the quality of electron microscopy images and advancing the field of structural analysis and quantification in materials science and biology. The source code and trained models for our approach are made available in the accompanying repository.
To use r_em_nn, you need to install TensorFlow and its CUDA libraries if you want to use GPU acceleration. The specific version of TensorFlow required by r_em_nn depends on your operating system. It is recommended to install TensorFlow in a virtual environment to avoid conflicts with other packages.
miniconda is the recommended approach for installing TensorFlow with GPU support. It creates a separate environment to avoid changing any installed software in your system. This is also the easiest way to install the required software especially for the GPU setup.
Let us start by creating a new conda environment and activate it with the following command:
conda create -n py310_gpu python=3.10.*
conda activate py310_gpuIf you plan to run TensorFlow on a GPU, you'll need to install the NVIDIA GPU driver and then install CUDA and cuDNN using Conda. You can use the following command to install them::
conda install -c conda-forge cudatoolkit=11.2.* cudnn=8.1.*
To ensure that the system paths recognize CUDA when your environment is activated, you can run the following commands (Tensorflow step by step):
mkdir -p $CONDA_PREFIX/etc/conda/activate.d
echo 'export LD_LIBRARY_PATH=$LD_LIBRARY_PATH:$CONDA_PREFIX/lib/' > $CONDA_PREFIX/etc/conda/activate.d/env_vars.sh
These commands create a shell script in the activate.d directory, which sets the LD_LIBRARY_PATH environment variable when your environment is activated. This allows TensorFlow to locate the CUDA libraries that it needs to run on the GPU.
If you're using Windows, install TensorFlow version 2.10.*. TensorFlow 2.10 was the last TensorFlow release that supported GPU on native-Windows. Starting with TensorFlow 2.11, you will need to install TensorFlow in WSL2 or install tensorflow-cpu instead. Use the following command to install TensorFlow:
pip install tensorflow==2.10.*
If you're using Linux, install TensorFlow version 2.11.* using pip:
pip install tensorflow==2.11.*
Once you've installed TensorFlow, you can install r_em_nn using pip:
pip install r_em_nn
This command will install the latest version of r_em_nn and its required dependencies.
You can now use r_em_nn in your Python code. Here's an example:
import os
import matplotlib

# Check if running on remote SSH and use appropriate backend for matplotlib
remote_ssh = "SSH_CONNECTION" in os.environ
matplotlib.use('Agg' if remote_ssh else 'TkAgg')
import matplotlib.pyplot as plt

from r_em_nn_nn.model import load_r_em_nn_nn, load_test_data

def fcn_inference():
    # select network from [hrsem, lrsem, hrstem, lrstem, hrtem, lrtem]
    net_name = 'hrstem'

    # load its corresponding data
    x, y = load_test_data(net_name)

    # load its corresponding model
    r_em_nn_nn = load_r_em_nn_nn(net_name)
    r_em_nn_nn.summary()

    n_data = x.shape[0]
    batch_size = 16

    # run inference
    y_p = r_em_nn_nn.predict(x, batch_size)

    fig, axs = plt.subplots(1, 3, figsize=(12, 6))

    cb = [None, None, None]

    for ik in range(n_data):
        x_ik = x[ik, :, :, 0].squeeze()
        y_ik = y[ik, :, :, 0].squeeze()
        y_p_ik = y_p[ik, :, :, 0].squeeze()

        vmin = min(y_ik.min(), y_p_ik.min())
        vmax = max(y_ik.max(), y_p_ik.max())

        axs[0].imshow(x_ik, cmap='viridis')
        axs[0].set_xticks([])
        axs[0].set_yticks([])
        axs[0].grid(False)
        axs[0].set_title(f"Detected {net_name} image", fontsize=14)
        if cb[0] is not None:
            cb[0].remove()
        cb[0] = fig.colorbar(axs[0].images[0], ax=axs[0], orientation='vertical', shrink=0.6)

        axs[1].imshow(y_p_ik, vmin=vmin, vmax=vmax, cmap='viridis')
        axs[1].set_xticks([])
        axs[1].set_yticks([])
        axs[1].grid(False)
        axs[1].set_title(f"Restored {net_name} image", fontsize=14)
        if cb[1] is not None:
            cb[1].remove()
        cb[1] = fig.colorbar(axs[1].images[0], ax=axs[1], orientation='vertical', shrink=0.6)

        axs[2].imshow(y_ik, vmin=vmin, vmax=vmax, cmap='viridis')
        axs[2].set_xticks([])
        axs[2].set_yticks([])
        axs[2].grid(False)
        axs[2].set_title(f"Ground truth {net_name} image", fontsize=14)
        if cb[2] is not None:
            cb[2].remove()
        cb[2] = fig.colorbar(axs[2].images[0], ax=axs[2], orientation='vertical', shrink=0.6)

        if remote_ssh:
            plt.savefig(f"restored_{net_name}.png", format='png')
        else:
            fig.show()

        print(ik)

if __name__ == '__main__':
fcn_inference()All models of r_em_nn have been optimized to run on a standard desktop computer, and its performance can be significantly improved by utilizing GPU acceleration.
Please cite r_em_nn in your publications if it helps your research:
    @article{LCK_2023,
      Author = {I.Lobato and T. Friedrich and S. Van Aert},
      Journal = {Arxiv},
      Title = {Deep convolutional neural networks to restore single-shot electron microscopy images},
      Year = {2023},
      volume  = {xxx},
      pages   = {xxx-xxx}
    }